DIY Aeroponic High-Pressure Misting Manifold with 1000 PSI Solenoids: The True HPA Blueprint
Table of Contents
Legal Note: Regulations vary by location. Always consult local guidelines. This content is for educational purposes only. This build involves pressurized water storage, electrical wiring, and components operating well above typical hydroponic system pressures. Read the full safety section before building.
Most systems marketed as “aeroponic” aren’t, really. If your setup uses a standard submersible mag-drive pump pushing water through plastic sprinkler heads, that’s low-pressure aeroponics (LPA), a “spray-ponic” setup that works fine for lettuce and herbs but misses the real biological effect of true High-Pressure Aeroponics (HPA). True HPA suspends roots in a dark chamber and blasts them with an ultra-fine, highly pressurized fog, and when built correctly, the resulting root hair development is genuinely dramatic.
The core of true HPA is fluid dynamics. Roots absorb water and nutrients most efficiently at a fairly narrow droplet size, commonly cited around 50 microns in aeroponics practice. Shearing liquid nutrient solution into that fine a mist takes real pressure, typically in the 80 to 120 PSI range, and that pressure needs to snap on and off instantly, not ramp up and bleed down, or nozzles spit and drip large droplets that do more harm than good to root hairs.
Building this manifold means separating the pump’s pressurization cycle from the actual misting event using an accumulator tank and an industrial-grade solenoid. This guide covers the hardware, plumbing, electrical logic, and safety considerations to build one properly.
The Science of High-Pressure Aeroponics
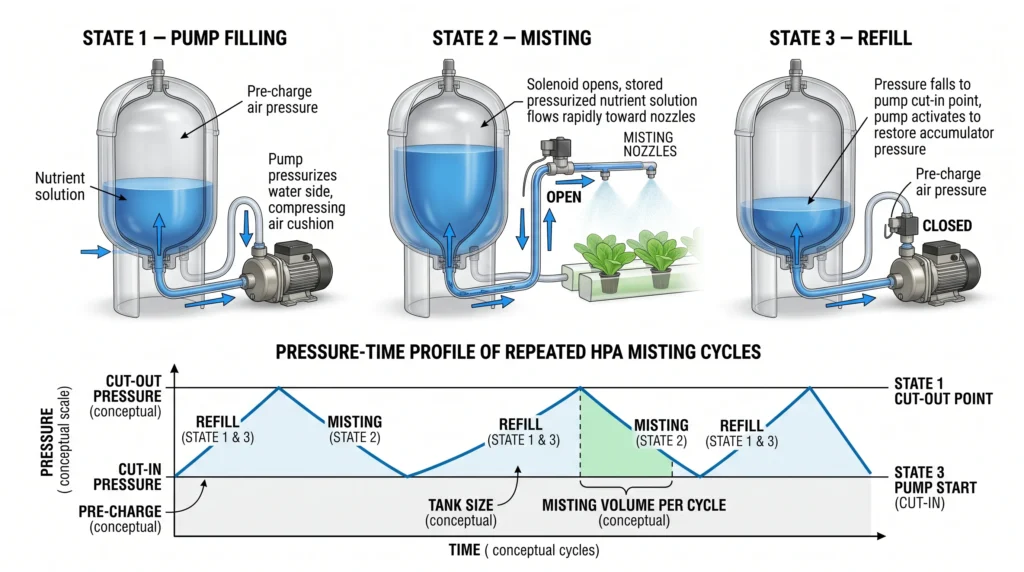
True HPA decouples the water pump from the misting nozzles. Storing pressurized solution in an accumulator tank and releasing it through an electronic solenoid gives the instant on/off crispness needed to hold a consistent fine droplet size without nozzle dripping.
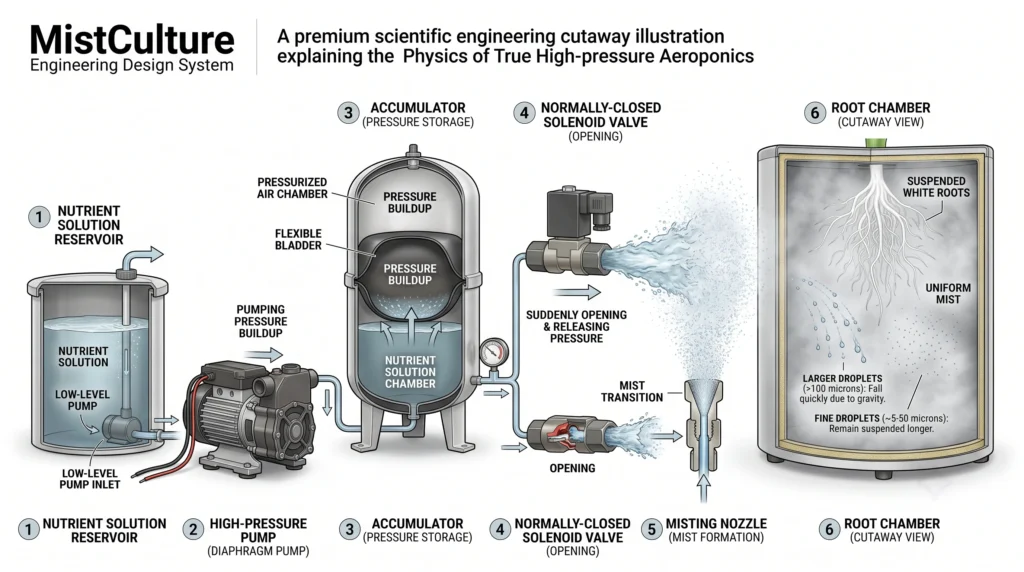
The goal is a nutrient-dense fog that floats in the root chamber rather than raining down onto it.
The droplet size question. Aeroponics practitioners commonly cite root hairs responding best to droplets in roughly the 30 to 80 micron range, with 50 microns frequently referenced as a practical sweet spot, though this is a widely repeated figure in grower and industry literature rather than something tied to one specific study I can point you to directly. Droplets larger than 100 microns fall out of the air quickly and coat roots in a heavy film, creating a localized low-oxygen zone that restricts uptake and invites rot, our root rot prevention guide covers that mechanism. Droplets smaller than roughly 30 microns, closer to what ultrasonic foggers produce, evaporate too fast and often fail to carry larger nutrient molecules like calcium to the root tissue at all.
Why the accumulator tank matters. Even a strong pump like the Aquatec 8800 takes a few seconds to build line pressure. Wire it directly to a cycle timer and you get a predictable failure pattern: pressure climbs slowly from zero, nozzles spit large droplets during the ramp, mist correctly only briefly at peak pressure, then spit again as the pump powers down. An accumulator tank (essentially a pressurized RO storage tank) solves this by letting the pump fill a bladder against a pre-charged air cushion until it hits target pressure, at which point a pressure switch cuts power. What’s left is a tank of solution held at pressure, ready to release instantly.
The solenoid’s role. With pressure stored, a solenoid valve acts as the gatekeeper between tank and nozzles. An electrical signal from the cycle timer pulls a plunger and opens the valve instantly, releasing full pressure into the manifold with no ramp-up. When the timer cuts power, the solenoid’s internal spring snaps it shut in milliseconds, no bleed-off, no dripping.
Hardware and Equipment Profile
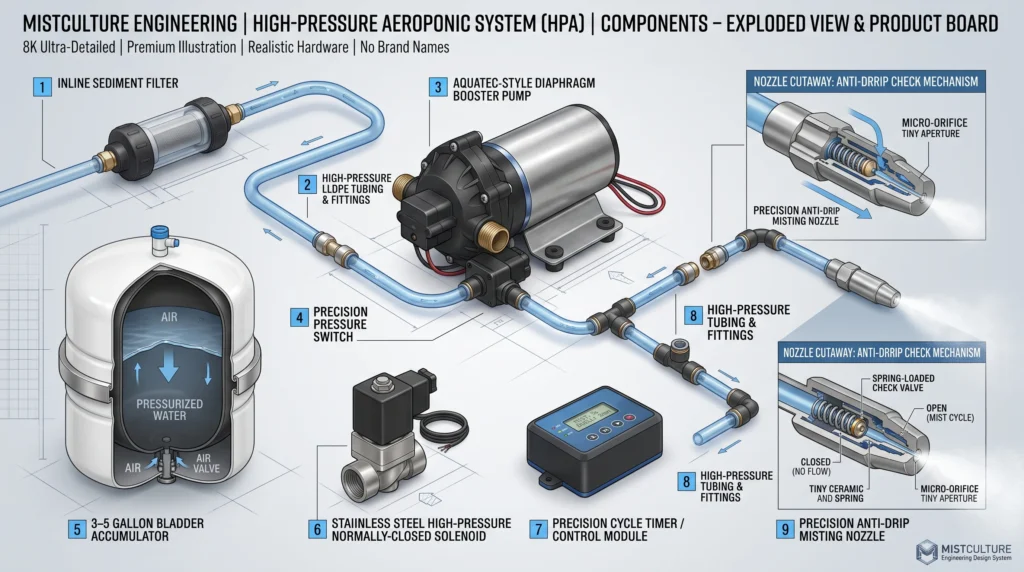

A heavy-duty diaphragm booster pump originally built for reverse osmosis filtration, genuinely capable of pushing well past 100 PSI and confirmed to run on a 24VAC transformer (not DC, worth knowing when sourcing a replacement transformer). It’s a widely trusted choice in the DIY HPA community specifically because it tolerates the abrasive nature of nutrient salts better than cheaper alternatives. See our pump sizing guide if scaling beyond a single manifold.
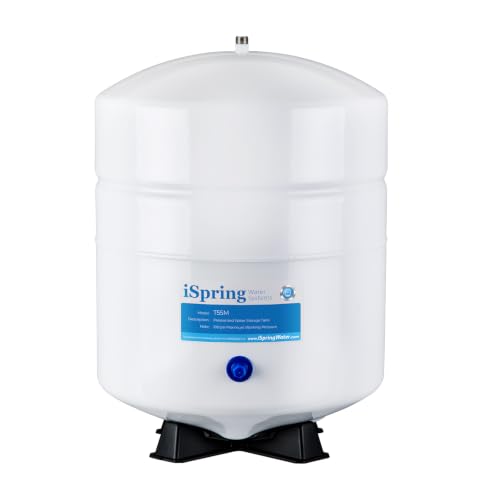
A metal tank with an internal butyl rubber bladder. Pre-charge the air side to roughly 30 PSI using a bicycle pump (with the tank fully empty of water when you check it), then let the water pump fill the water side to your target pressure. This stops the pump from short-cycling on every misting burst and holds a real reserve of pressurized solution for multiple cycles between pump runs.
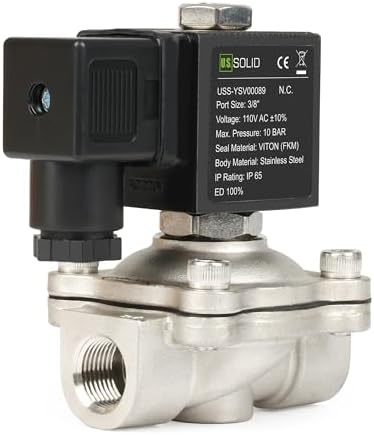
Look for a direct-acting or pilot-operated valve with a brass or stainless body and Viton or Teflon seal, rated well above your actual operating pressure. Cheap plastic irrigation solenoids are not built for this and can fail at 100 PSI. The high pressure rating here isn’t overkill, it’s what gives the internal spring enough force to snap shut crisply against real backing pressure.

Precision stainless steel or brass nozzles with a ruby or ceramic orifice and an internal anti-drip check valve (a small spring and ball bearing) that typically needs at least 40 PSI to open, keeping the manifold’s line pressure trapped between cycles rather than draining and causing a lag on the next burst.
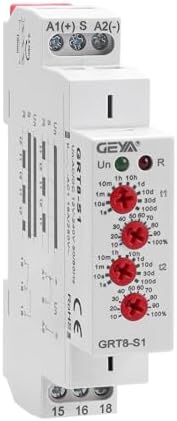
A standard 1-minute-increment digital timer won’t cut it here. You need something capable of on-cycles measured in single seconds and off-cycles measured in minutes, a specialized cyclic timer or programmable relay board.
Building the HPA Manifold
Plumbing security is non-negotiable here. Every cut on high-pressure tubing needs to be perfectly square, and every fitting from pump outlet to nozzle needs to be fully seated, this system runs at pressures that will find any weak point.
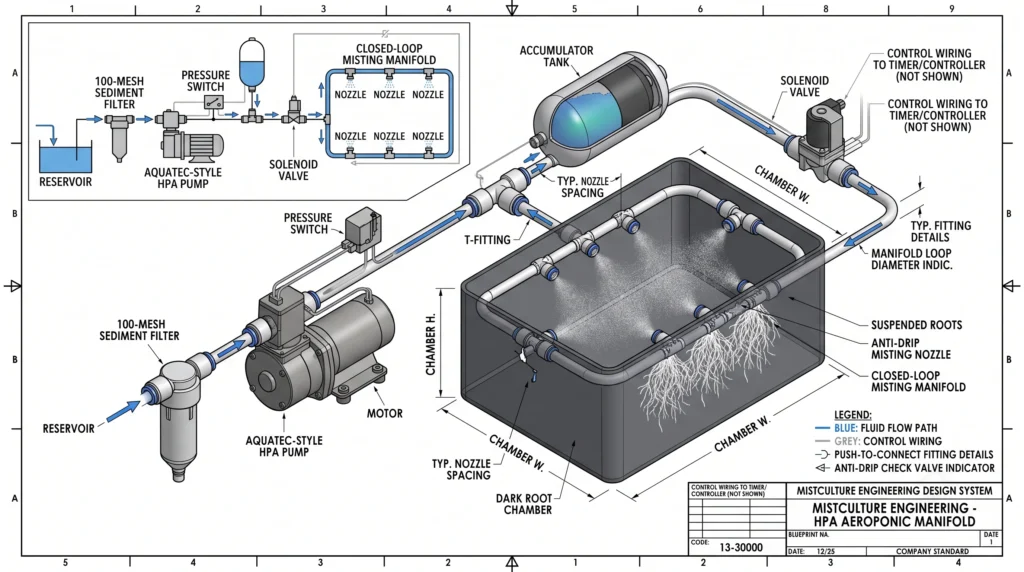
Step 1: Plumb reservoir to pump. Install a bulkhead fitting low on your reservoir, run tubing through an inline sediment filter (100 mesh minimum, HPA nozzle orifices are microscopic and clog instantly on any debris) to the Aquatec pump’s inlet.
Step 2: Install accumulator and pressure switch. Plumb a high-pressure switch immediately after the pump outlet, wired in series with the pump’s power. A common setup cuts power around 100 PSI and restores it once pressure drops to roughly 60 PSI. From the switch, a T-fitting splits the line, one side to the accumulator tank, the other continuing toward the root chamber.
Step 3: Wire and plumb the solenoid. Connect tubing from the accumulator’s T-fitting to the solenoid’s inlet, checking the directional arrow stamped on the body, it only holds pressure in one direction. Wire the solenoid to your cycle timer, using an appropriate relay or transformer for whatever voltage your specific solenoid needs, and mount it securely to the root chamber frame.
Step 4: Build the misting manifold. Inside the dark root chamber, use LLDPE tubing and push-to-connect T-fittings to route lines to evenly spaced nozzles, a standard 27-gallon tote with 6 plants commonly uses 2 to 4 nozzles depending on spray angle. Every tubing cut needs to be perfectly square (use a proper tube cutter, not scissors or a utility knife), pushed fully into fittings with a firm backward tug to confirm the internal teeth have set.
A tip worth following: loop the manifold back into a closed circuit rather than ending in a dead-end line. A looped manifold equalizes pressure across every nozzle instantly, so the nozzle nearest the solenoid fires with the same intensity as the one furthest away.
HPA Operating Parameters
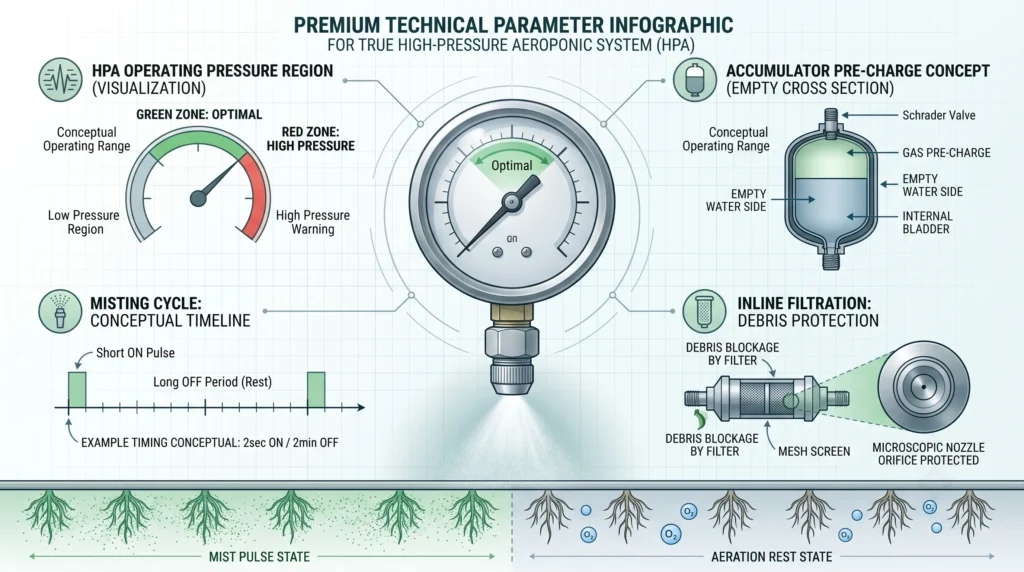
| Parameter | Recommended Range | Notes |
|---|---|---|
| Operating Pressure | 80-120 PSI | Below roughly 80 PSI, droplet size tends to increase past the target range |
| Accumulator Pre-Charge | 25-35 PSI | Check with a tire gauge while the tank is completely empty of water |
| Misting Cycle (ON) | 1.0-3.0 seconds | Adjust based on chamber volume and nozzle count |
| Rest Cycle (OFF) | 3.0-6.0 minutes | Roots should look fuzzy and white, never slick and wet |
| Nutrient Filtration | 100-200 mesh | Inline filtration is genuinely mandatory to avoid nozzle clogs |
| Nutrient Solution EC | Roughly half of typical DWC/NFT strength | HPA roots are unusually efficient at uptake; start conservative and adjust based on plant response rather than a fixed ratio |
For elemental profile guidance suited to high-pressure systems specifically, see our aeroponic nutrient guide.
Safety Considerations
This build carries real risks beyond a typical hydroponic project, worth taking seriously before you start.
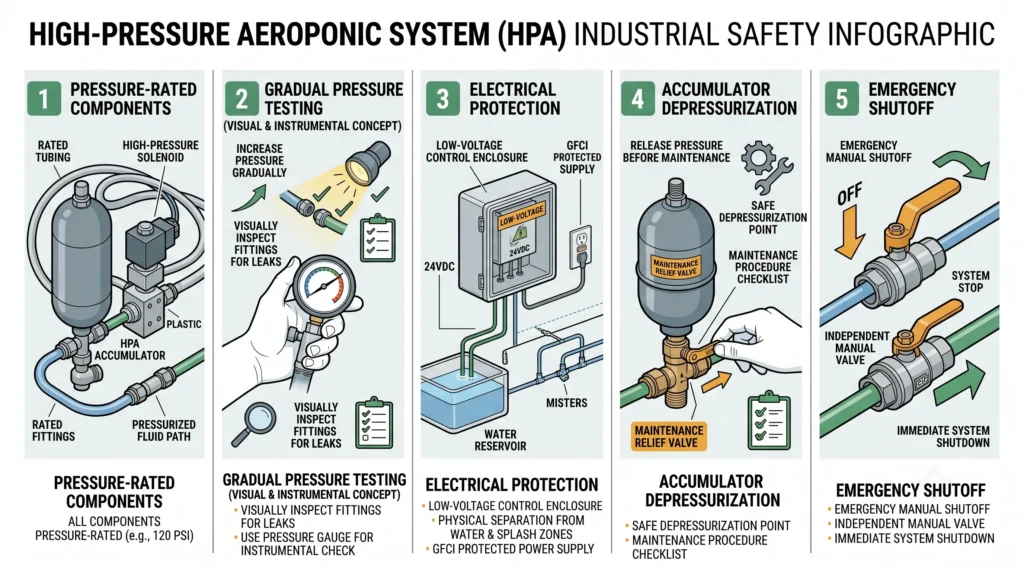
Pressurized components. Every fitting downstream of the pump is holding real pressure. Use only components rated meaningfully above your actual operating pressure (this is exactly why the solenoid is rated for 1000 PSI in a 100 PSI system, margin matters), and never substitute standard PVC and solvent cement anywhere in the pressurized line, the repeated water-hammer shock of a fast-closing solenoid will fatigue those joints over time and they can fail without much warning.
Testing before full pressure. When first assembling a new manifold, pressurize gradually and check every joint at a lower pressure before running it up to full operating pressure. Wear eye protection while doing this, a fitting failure under pressure can spray forcefully.
Electrical safety near water. Even though the Aquatec pump and most solenoids run on relatively low-voltage AC (commonly 24VAC), you’re combining electrical components with a wet environment. Keep transformers and any mains-voltage wiring well clear of splash zones, use a GFCI-protected outlet for anything plugged into household power, and never work on live wiring with wet hands.
Accumulator tank pressure release. Before disassembling or servicing any part of the system, relieve pressure from the accumulator tank first (open a nozzle or a bleed valve) rather than assuming it’s depressurized just because the pump is off, a charged tank holds pressure independent of whether the pump is running.
Solenoid failure mode. A solenoid is a mechanical device and can fail, either stuck open (continuous misting, which will overwater and rot your root zone) or stuck closed (no misting, which will dry roots out fast). Check on a new build frequently for the first few days, and consider a simple physical fail-safe (a timer-independent shutoff you can hit manually) for peace of mind.
Frequently Asked Questions
Do I really need a solenoid, or can I just use a cycle timer on the pump?
You need the solenoid for true HPA. Wiring a cycle timer directly to the pump means the pump spends several seconds ramping pressure up and bleeding it back down on every cycle, and during that ramp, nozzles spray heavy, large droplets that soak roots rather than misting them. The solenoid creates a hard separation, the pump builds pressure behind it continuously, and the solenoid itself opens and closes near-instantly.
Can I use an RV water pump instead of an Aquatec 8800?
Not really. RV pumps like Shurflo units are built for high volume at relatively low pressure (commonly 40-60 PSI), the opposite of what HPA needs, low volume at high pressure (100+ PSI). They generally won’t generate enough pressure to shear solution through 50-micron nozzle orifices properly.
Why do my misting nozzles keep clogging?
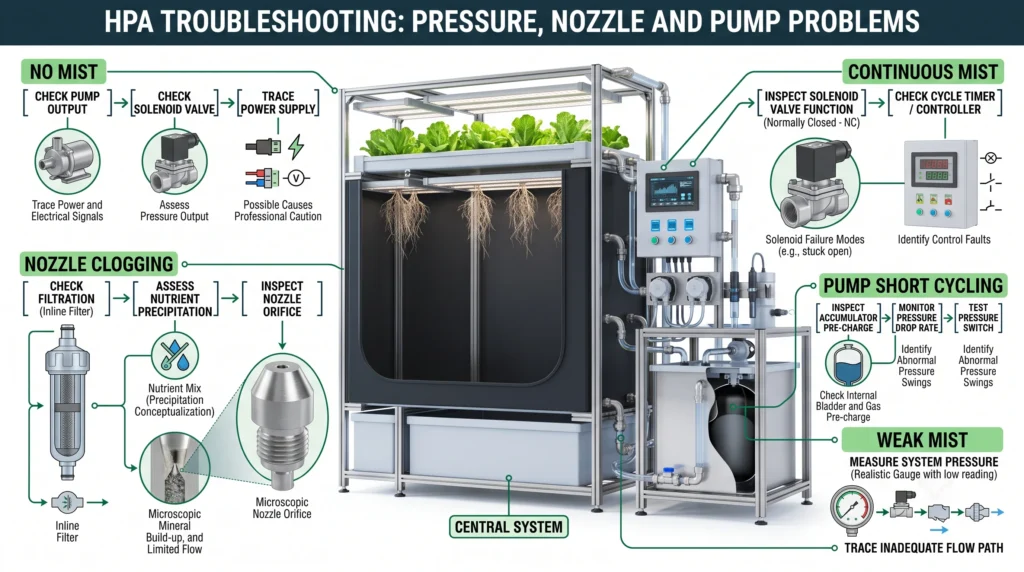
Usually one of two causes: physical debris in the reservoir (an inline 100-mesh filter before the pump handles this), or nutrient salt precipitation, if nutrients aren’t fully dissolved, calcium in particular can precipitate and calcify microscopic orifices over time. Using clean RO water and keeping nutrients properly dissolved, see our pH and EC mastery guide, reduces this risk significantly.
How do I prevent my pump from burning out?
The accumulator tank is what protects the pump here. Without it, every solenoid firing causes a sharp pressure drop that makes the pump slam on to compensate, rapid on/off cycling like that wears out internal switches and can overheat the motor fast. With a properly sized accumulator, the tank supplies pressure for many misting cycles before the pump needs to run again to refill it.
Should I use PVC pipe for the misting manifold?
No. Standard schedule 40 PVC and its solvent cement joints aren’t built to absorb the repeated water-hammer shock of a fast solenoid slamming open and shut under real pressure, joints fatigue over time and can fail. LLDPE tubing with push-to-connect fittings handles these dynamic pressure loads much better.
Accumulator Cycle Estimator
Estimate roughly how many misting bursts your accumulator tank can supply before the pump needs to kick back on and refill it.
Estimate how many misting bursts your accumulator tank delivers before the pump needs to refill it. Uses the standard bladder-tank drawdown formula (based on Boyle’s Law) that well and RO system manufacturers use for the same calculation.
This is a physics-based estimate (bladder tank drawdown via Boyle’s Law), not an exact guarantee, real nozzle flow, temperature, and tank efficiency all introduce some variance. Confirm your pre-charge with a tire gauge on an empty tank before relying on this.
The Final Verdict on DIY HPA
Building a true HPA manifold is a real engineering project, closer to plumbing and electrical work than typical hydroponic setup. Separating pressure generation (the pump and accumulator) from mist delivery (the solenoid and nozzles) is what gives you the precise, consistent droplet size that makes HPA genuinely different from a low-pressure spray system.
The payoff, a dense, fuzzy coat of micro-roots with unusually high oxygen and nutrient uptake, is real, but it comes with real responsibility: careful plumbing, correct component ratings, and genuine attention to the safety considerations above. Build it methodically, test it gradually, and monitor it closely for the first few days before trusting it unattended.