Arduino & Raspberry Pi Automated Hydroponic Dosing System Blueprint

Table of Contents
Mixing nutrients and balancing pH by hand is a rite of passage for every indoor grower, and also a fast way to burn out. Evenings spent bent over a reservoir with a pipette and a handheld meter get old quickly. Moving from casual hobbyist to a genuinely dedicated CEA setup usually means automating water chemistry at some point.
Building a custom system on a microcontroller gives you precision and customization commercial dosers don’t. Off-the-shelf units can run into the thousands of dollars and lock you into a proprietary ecosystem. Open-source hardware lets you build a dosing rig matched exactly to your reservoir volume, your specific nutrient line, and your crop’s actual demands. This guide covers the hardware architecture, sensor integration, and coding logic to build one yourself.
The Science of Automated Hydroponic Dosing
Automated dosing relies on continuous electrochemical monitoring to trigger precise, volumetric liquid additions. Microcontrollers read analog voltage signals from submerged probes, converting them into digital pH and EC values to control relay-driven peristaltic pumps.
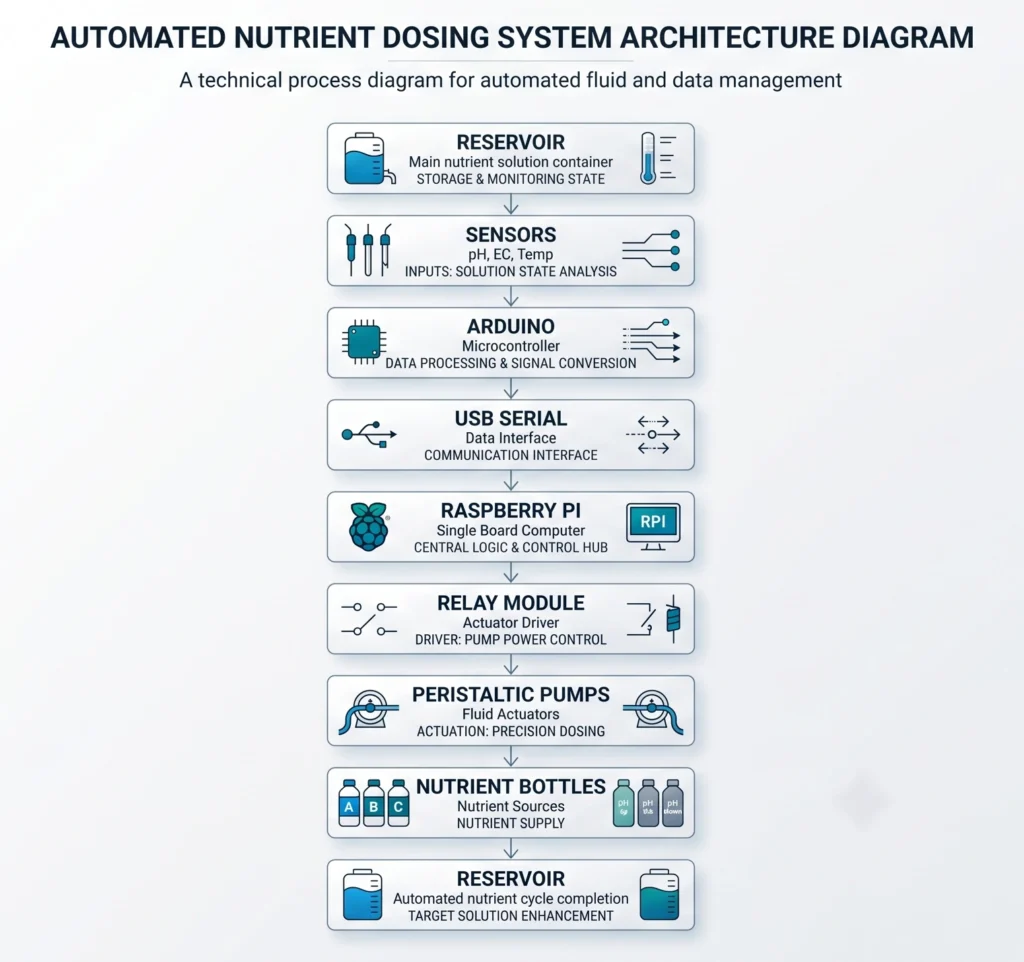
At its core, a DIY doser is a feedback loop: read the water’s current state, compare it to target parameters, make a small adjustment, wait and observe the result.
EC sensors measure how well your nutrient solution conducts electrical current, which correlates directly with dissolved mineral salt concentration. A pH probe measures hydrogen ion activity, generating a small millivolt signal that shifts as water becomes more acidic or alkaline. These signals are weak and genuinely noise-prone, so they pass through an analog-to-digital converter before your microcontroller can use them.
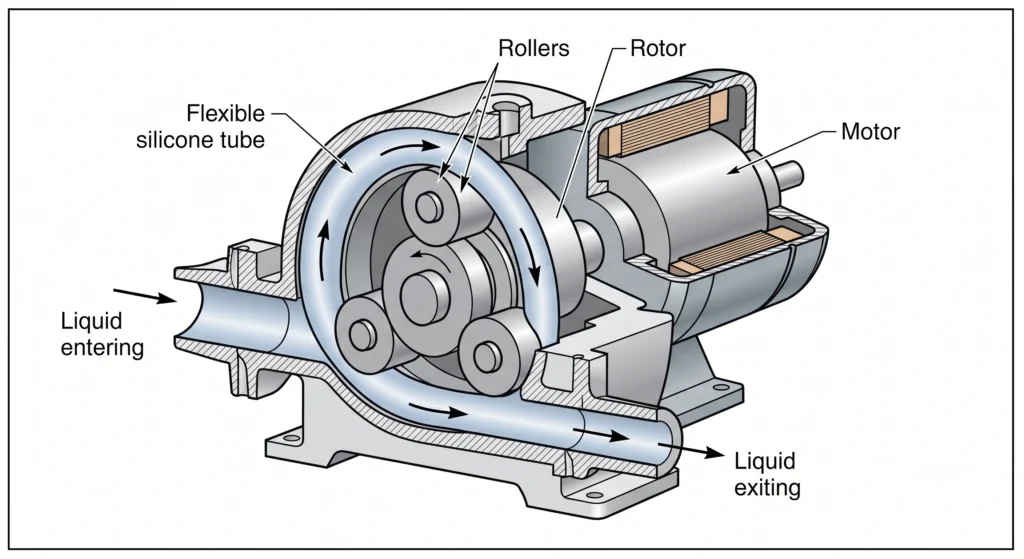
Once the microcontroller has that data, it needs to physically move liquid, which is where peristaltic pumps come in. Unlike a standard centrifugal pump, a peristaltic pump uses a rotating roller to pinch a flexible silicone tube, pushing a precise volume forward without the liquid ever touching the pump’s mechanical parts. That matters a lot here, since corrosive pH down (phosphoric acid) or concentrated nutrient salts would otherwise degrade the pump quickly. Timing exactly how long the pump runs lets the controller dose precise milliliter quantities.
For baseline target parameters before you start automating, see our pH and EC mastery guide.
Core Architecture: Arduino vs Raspberry Pi
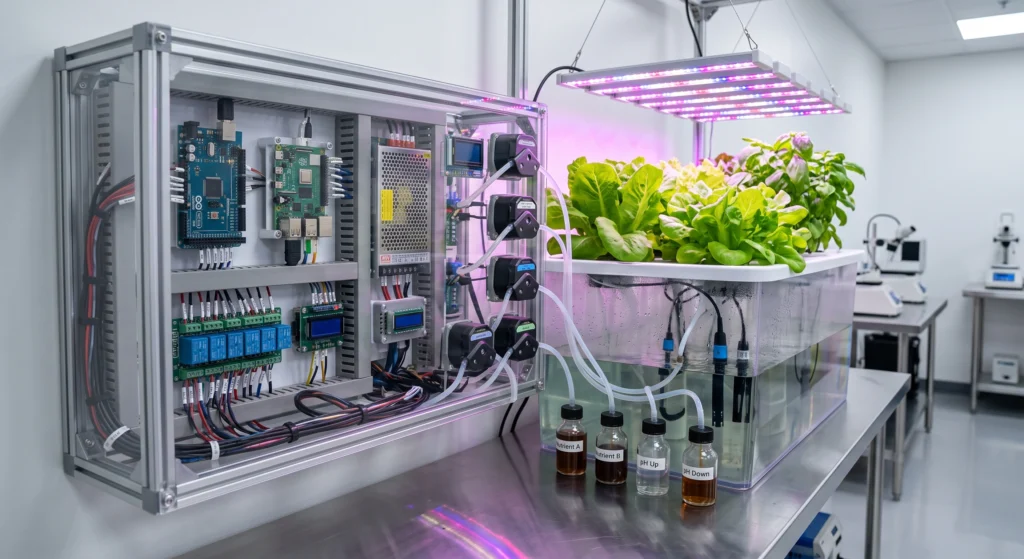
Pairing an Arduino with a Raspberry Pi plays to each platform’s strengths. The Arduino handles real-time sensor polling and relay control, while the Pi manages data logging, remote dashboards, and more complex scheduling.
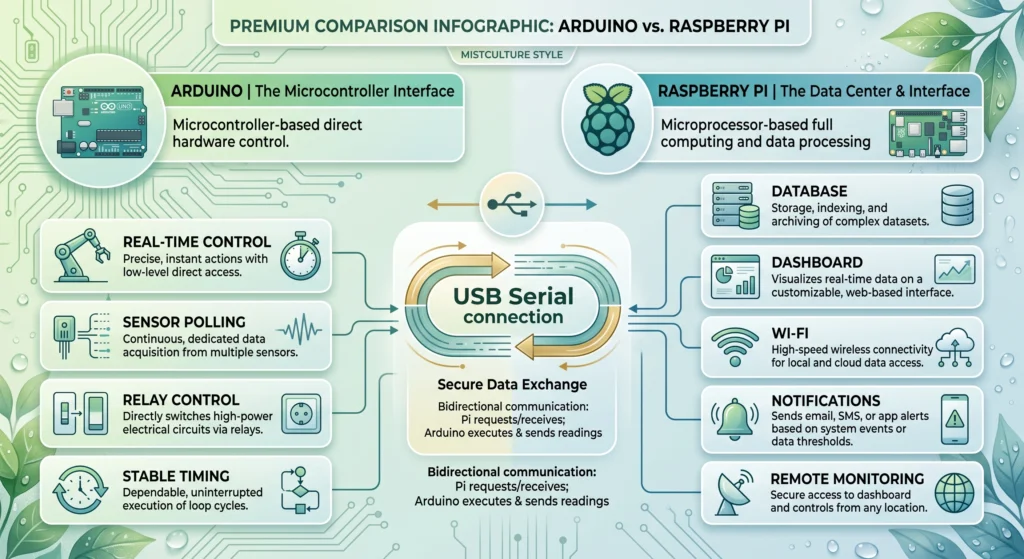
A common question is why not just use one or the other for the whole system. You can, but a hybrid setup is meaningfully more stable.
An Arduino is a microcontroller running one loop of code, with no operating system to crash or get distracted by background tasks. Tell it to hold a relay open for exactly 1.5 seconds to dose 2mL of nutrient, and it does exactly that with real-time precision.
A Raspberry Pi runs full Linux and is better suited to the heavier lifting: hosting a web dashboard, logging months of sensor data to a database, sending alerts if pH crashes, and handling Wi-Fi connectivity. Because it’s running a full OS, its timing can occasionally get interrupted by background processes, making it a bit less reliable for split-second hardware control specifically.
Connecting the two over USB serial or I2C gives you both strengths at once: the Arduino as the reliable workhorse reading water and running pumps, the Pi as the manager handling data and your remote dashboard.
Wiring Your Sensors and Actuators
Proper wiring means isolating low-voltage sensor circuits from high-voltage pump circuits. Optical isolation and separate power supplies prevent electrical noise from corrupting sensor readings and protect your microcontrollers from surges.
Getting the wiring right the first time saves weeks of chasing phantom bugs in your code.
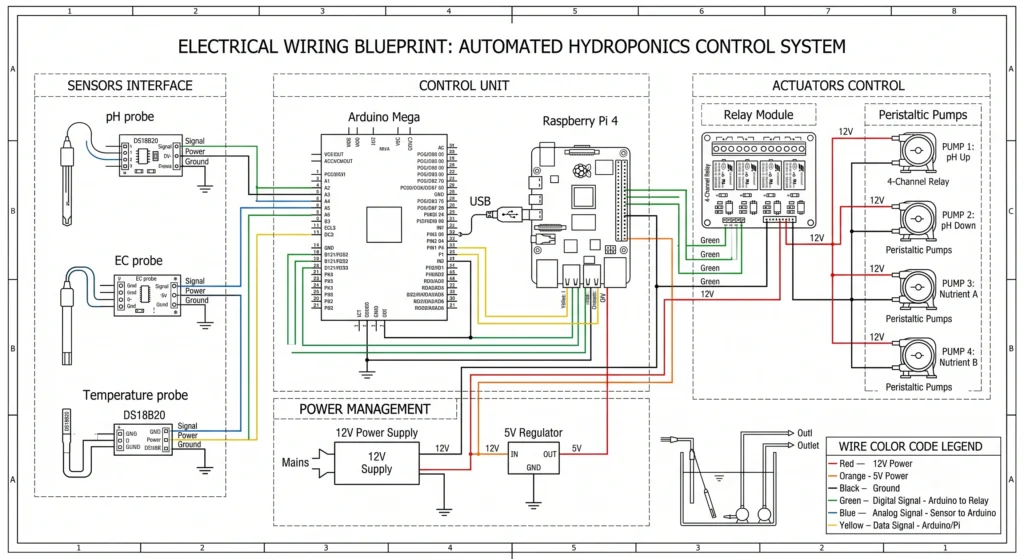
1. Establish a common ground and power strategy. Your microcontrollers run on 5V, but peristaltic pumps typically need 12V. Never try to power 12V motors directly from Arduino or Pi pins, use a dedicated 12V DC supply instead. Wire the 12V positive line to your relay module’s input, and critically, tie the 12V supply’s ground to your Arduino’s ground. A shared ground reference is what lets the Arduino’s 5V logic signals correctly trigger the 12V relays.
2. Use galvanically isolated sensors. Multiple probes (pH and EC) sharing the same body of water often interfere with each other through a ground loop, this is a genuinely common issue and shows up as pH readings swinging wildly the moment a water pump turns on. Wiring your sensors through an I2C isolator chip (Atlas Scientific’s EZO carrier boards are a well-known solution here) physically separates the electrical connection while still passing data through, keeping readings accurate regardless of what else is running in the reservoir.
3. Wire the relay module. A standard 4-channel relay module switches your dosing pumps. Connect the control pins (IN1-IN4) to Arduino digital pins, and connect the relay board’s 5V and GND to the Arduino to power its optocouplers. Cut the positive wire to each peristaltic pump, wire one end to the relay’s Common (COM) terminal and the other to Normally Open (NO). A HIGH signal from the Arduino closes the relay, completing the 12V circuit and activating the pump.
4. Connect Arduino to Raspberry Pi. A standard USB cable is the simplest link. The Pi recognizes the Arduino as a serial device (commonly /dev/ttyACM0), and your controller code listens on that port for sensor data while sending text commands (like “DOSE_A_500”) back to the Arduino.
If you’re pairing this with off-the-shelf climate gear, our review of hydroponic controllers under $200 covers handling exhaust fans and lighting alongside your DIY doser.
Controller Code and Dosing Logic
Effective dosing logic needs a deadband (hysteresis) and a mandatory mixing delay to avoid overdosing. The controller reads sensors, calculates distance from target, doses a small amount, and waits for the reservoir to fully mix before reading again.
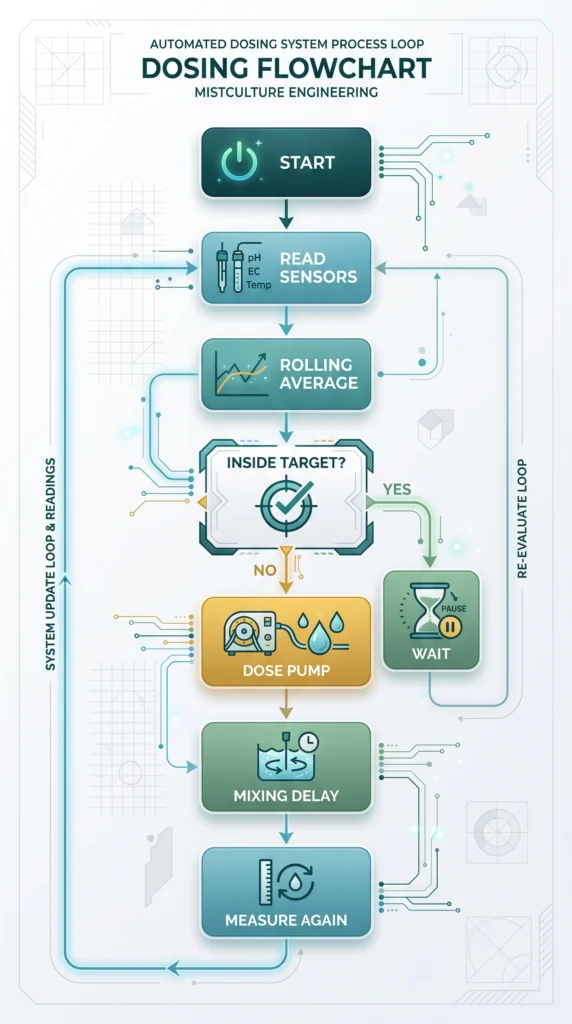
The most common mistake in a first DIY pH doser build is a naive “if/then” statement: “if pH is above 6.0, turn on the acid pump.” Because it takes real time for acid to physically mix into the water and reach the sensor, that pump keeps running well past the point where enough acid has actually been added, crashing the reservoir to pH 3.0 or lower by the time the probe catches up.
Real dosing code needs a delayed feedback loop:
Polling and averaging. Take a reading every second, store it, and calculate a rolling average over roughly 60 seconds. This keeps a single erratic reading from triggering an unnecessary dose.
Define a deadband. Never target one exact decimal. Aiming for pH 5.8 means setting a deadband, say 5.7 to 5.9, and only triggering the acid pump once the rolling average climbs above the top of that range, stopping once it trends back inside.
The dosing event and lockout timer. Once a threshold is breached, the code calculates a dose, activates the relay for that duration, then critically starts a lockout timer. Depending on your circulation pump, mixing might take 10 to 15 minutes. The code should ignore all pH thresholds during that window, then re-check the rolling average once it expires, dosing again only if still needed.
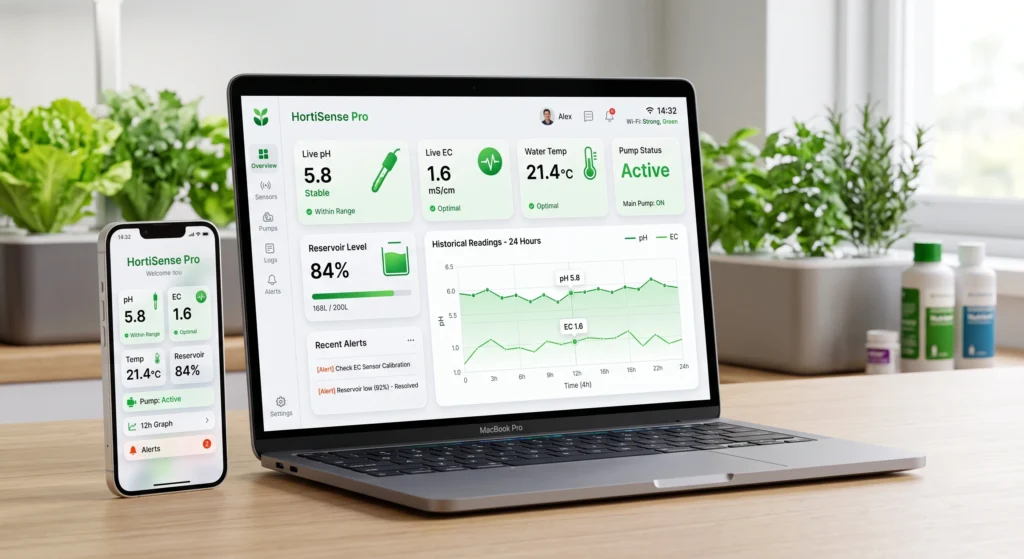
Python on the Raspberry Pi (using PySerial to talk to the Arduino) handles the high-level scheduling and UI well, logging rolling averages to SQLite and displaying them through a Flask or Node-RED dashboard you can check from your phone. Our nutrients guide covers the parameters worth tracking there.
System Parameters: Tuning Your Setup
Dosing volumes and mixing delays need to be calibrated to your specific reservoir capacity and circulation rate. Smaller reservoirs generally need more diluted stock solutions and longer waits between doses to avoid drastic swings.
Calibrating your system starts with knowing exactly how much liquid your pumps move per second, and how fast your circulation pump turns over the reservoir. Run a peristaltic pump for exactly 60 seconds into a graduated cylinder, if it outputs 60mL, your flow rate is 1mL per second.
The table below is a reasonable starting point for tuning, not a fixed prescription, your actual mixing delay depends a lot on your specific circulation pump, reservoir shape, and how far apart your dosing point and sensor are placed. Assumes a 1mL/sec pump and a standard 10% phosphoric acid solution.
| Reservoir Size | EC Nutrient Dose (per pump) | pH Down Dose | Suggested Mixing Delay | Circulation Suggestion |
|---|---|---|---|---|
| 5 Gallons | 2 seconds (2mL) | 1 second (1mL) | 5 minutes | 250 GPH pump |
| 15 Gallons | 5 seconds (5mL) | 3 seconds (3mL) | 10 minutes | 400 GPH pump |
| 30 Gallons | 10 seconds (10mL) | 5 seconds (5mL) | 15 minutes | 800 GPH pump |
| 50+ Gallons | 20 seconds (20mL) | 10 seconds (10mL) | 20 minutes | 1,200+ GPH pump |
For smaller setups, diluting pH down with distilled water (commonly 1 part acid to 4 parts water) before it goes into your doser’s source jug gives the controller much more margin for error, even a 1-second burst of full-strength commercial pH down can swing a 5-gallon bucket too far.
If you’re synchronizing this with lighting and water chilling schedules too, our smart plugs and timers guide covers that layer.
Essential Equipment for Your Custom Dosing Rig
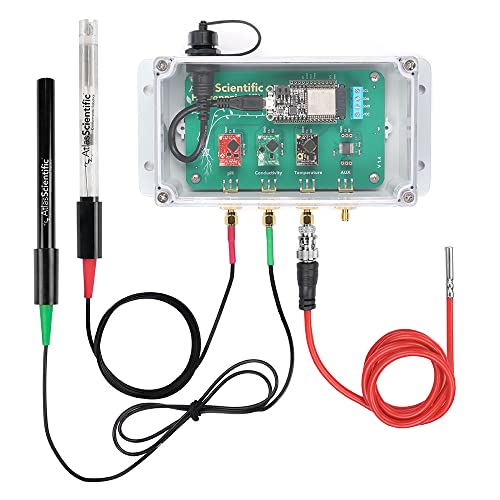
- The Wi-Fi Hydroponics Kit reads pH, Conductivity, and temperature. The pH and Conductivity readings are automatically te…
- Remotely monitor and control your hydroponic system’s chemistry.
- Access to data on phone, tablet or PC
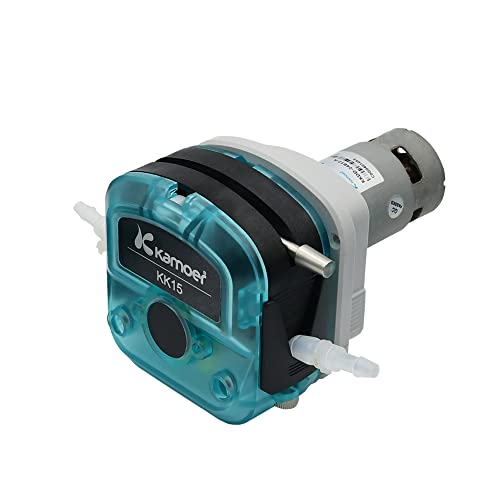
- DC motor, 12V,Silicone tube,7.9mm ID × 11.1mm OD,1240ml/min.Ambient temperature 0~40℃, relative humidity <80%.Reduction ...
- This peristaltic pump is suitable for the transmission of viscous and non-viscous liquids, multi-stage gear movement, ac…
- Peristaltic pump tube is made of food-grade silicone tube.Good flexibility, tear resistance,good temperature resistance …

- Includes Raspberry Pi 4 4GB Model B with 1.5GHz 64-bit quad-core CPU (4GB RAM)
- Includes Pre-Loaded 32GB EVO+ Micro SD Card (Class 10), USB MicroSD Card Reader
- CanaKit Premium High-Gloss Raspberry Pi 4 Case with Integrated Fan Mount, CanaKit Low Noise Bearing System Fan

- This relay module is 5V active low. Relay output maximum contact is AC250V 10A and DC30V 10A.
- Standard interface can be directly connected with microcontrollers.
- Working status indicator lights are conducive to the safe use
Frequently Asked Questions
How often do I need to calibrate my pH and EC sensors in an automated system?
Even lab-grade probes drift over time. Pulling probes to calibrate against standard 4.0 and 7.0 pH buffers, plus a known EC standard, roughly every 30 to 45 days is a reasonable schedule. Building a u0022calibration modeu0022 into your controller code, one that pauses dosing logic during this process, makes it much less error-prone.
Why do my pH readings jump around when my water pump turns on?
A classic ground loop issue. Water conducts electricity, and if any submerged component leaks a small voltage into it, your probes pick that up. A galvanically isolated carrier board (like Atlas Scientific’s EZO line) physically separates the probe’s circuit from the main power supply to fix this.
Can I mix Nutrient Part A and Part B through the same dosing tube?
No. Concentrated calcium nitrate (commonly Part A) and concentrated phosphates or sulfates (commonly Part B) react instantly in concentrated form, forming an insoluble precipitate. Use a dedicated pump and tube for each part, and route them to drop into different high-flow areas of the reservoir so they dilute before ever meeting.
What happens if my Raspberry Pi crashes while a pump is running?
This is exactly why the hybrid architecture matters. If the Pi crashes, the Arduino keeps running its low-level loop independently. Code a failsafe into it: if it doesn’t receive a heartbeat signal from the Pi every 10 seconds or so, it should drive all relay pins LOW automatically, shutting down every pump. Never rely on the OS alone to stop a running acid pump.
Do I need a separate pump for pH Up and pH Down?
In most indoor setups, natural biological processes and acidic fertilizers cause pH to drift downward over time, so most growers only really need a pH Up doser. If you’re using alkaline tap water or a silica additive, pH may drift upward instead, needing a pH Down doser. Monitoring manually for a week or two is the simplest way to learn your own reservoir’s natural drift direction before building out the dosing array.
Dosing Time Calculator
Use the tool below to calculate exactly how long to run your pump for a target dose, based on your own measured flow rate rather than an assumed one.
Calculate exactly how long to run your relay for a target dose volume, using your pump’s actual measured flow rate.
Recalibrate periodically, peristaltic pump tubing wears over time and flow rate can drift as it does.

Continue Your Learning Journey