Master DIY Hydroponic Systems: Build Your Own Indoor Farm

Table of Contents
Hook & Grower Problem Statement
Transitioning from traditional soil gardening to indoor controlled-environment agriculture solves common problems like poor soil quality, pest infestations, and high water usage. DIY hydroponic systems offer a customizable, low-cost entry point into soilless farming that can be tailored to any living space. By building your own setup, you gain complete control over crop nutrition and environmental variables.
Here is the deal: gardening in soil is incredibly rewarding, but it comes with a unique set of headaches. You are at the mercy of the weather, local soil conditions, and the bugs that decide your prized basil looks like a buffet. If you live in an apartment or a house with poor soil, your options are severely limited. You want to grow massive yields of crisp lettuce and fragrant herbs, but space constraints and resource management hold you back.
This is where building your own hydroponic setup changes the game completely. You do not need to spend thousands of dollars on prefabricated, commercial-grade units to get started. With a few common materials from your local hardware store, you can engineer highly productive DIY hydroponic systems right in your kitchen, basement, or garage. I have built countless setups over the years; some were spectacular successes, and others were messy learning experiences. I am going to save you the hassle of making those expensive mistakes. Let us break down exactly how to construct robust, reliable hydroponic growing systems that will keep you in fresh produce all year long.
Legal Note: Regulations vary by location. Always consult local guidelines. This content is for educational purposes only.
Scientific / Theoretical Foundations
Hydroponics relies on delivering a perfectly balanced nutrient solution directly to plant roots in an oxygen-rich liquid environment. This scientific technique eliminates the need for soil while accelerating plant growth and maximizing crop yield. When environmental variables such as light, temperature, and nutrient concentration are optimized, plants can dedicate their energy strictly to vegetative and reproductive growth.
The roots of modern hydroponics stretch back to the 1920s with Dr. William Frederick Gericke at the University of California. He theorized that soil was just a mechanical support and nutrient reservoir; if you could replicate those functions with water and dissolved minerals, the soil itself becomes obsolete. In a traditional garden, a plant must expend a massive amount of energy expanding its root network to search for pockets of water and unevenly distributed nutrients. In indoor controlled-environment agriculture, we spoon-feed the plants exactly what they need.
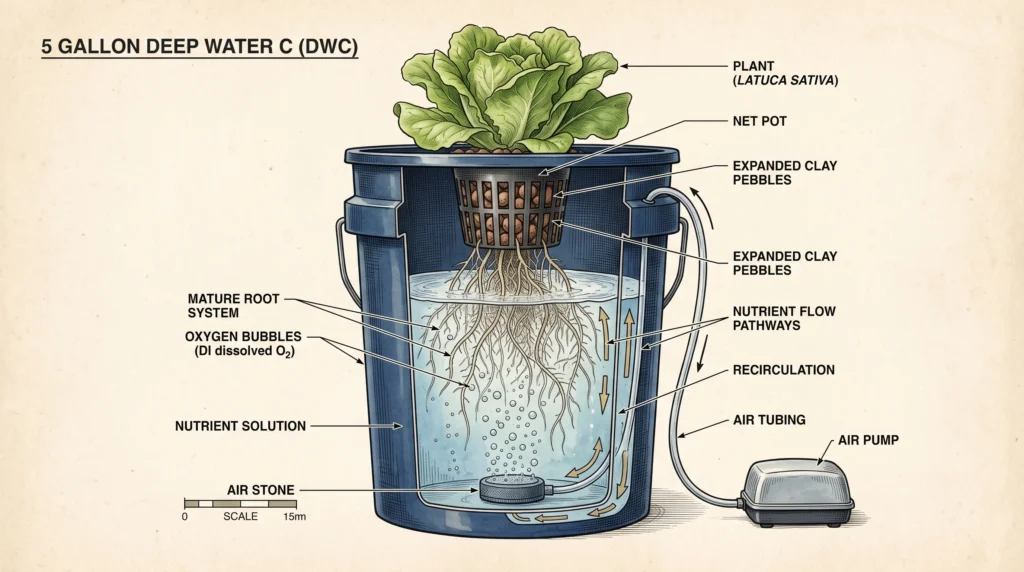
Because we are bypassing the natural soil buffer, we must rely on precise measurements. Two of the most critical metrics in any soilless setup are Electrical Conductivity (EC) and pH. EC measures the concentration of fertilizer salts in your water. If your EC is too high, you risk nutrient burn; if it is too low, your plants starve. The pH dictates nutrient availability. Even if your reservoir is packed with food, a pH outside the optimal 5.5 to 6.5 range will lock those nutrients away from the plant roots.
Light intensity is just as crucial as nutrient delivery. Indoor growers use the Daily Light Integral (DLI) to measure the total amount of photosynthetically active radiation (PAR) delivered to a plant over a 24-hour period. We calculate this using a simple formula:
Where PPFD is the photosynthetic photon flux density measured in $mu mol/m^{2}/s$. By controlling the DLI, you can manipulate leaf size, plant height, and crop yield with incredible precision. For more detailed research on light requirements and nutrient uptake, the University of Arizona Controlled Environment Agriculture Center (CEAC) offers fantastic peer-reviewed documentation.
Recommended Equipment & Setup
A successful setup requires precise equipment including water pumps, air stones, opaque vinyl tubing, and inert substrates. Choosing the correct, high-quality components ensures adequate root aeration and prevents system failures that can destroy a crop in hours. Investing in reliable meters to monitor your water chemistry is absolutely essential.
Before we start cutting plastic and connecting tubes, you need the right tools. Skimping on the core infrastructure will only cost you more money down the line. I cannot tell you how many times a cheap pump has failed on me in the middle of the night.
The Essentials Toolkit:
- Reservoirs: You need an opaque container. Light entering your reservoir will trigger explosive algae growth. Dark-colored storage totes work perfectly.
- Net Pots & Substrates: 2-inch or 3-inch plastic net pots are the standard. Fill them with an inert medium like expanded clay pellets (often called Hydroton) or stone wool to support the seedling. Stone wool has excellent water retention, making it very forgiving for beginners.
- Air Pumps & Air Stones: Plant roots breathe oxygen. If you submerge them in stagnant water, they will drown and rot. A reliable air pump connected to an air stone via 1/4-inch black vinyl tubing is mandatory for deep water setups.
- Meters: Guessing your pH and EC is a recipe for disaster. You must measure accurately.
Essential Gear For Your Grow Room
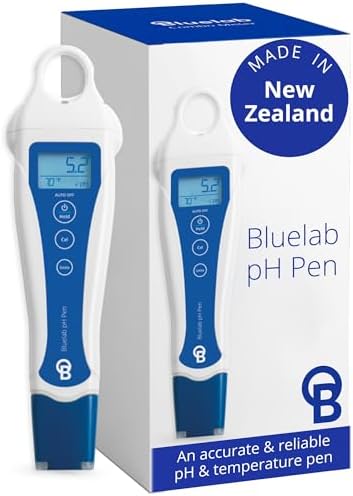
Why I use it: Cheap pH pens lose calibration constantly, leading to nutrient lockout and dead plants. The Bluelab pen is waterproof, rugged, and highly accurate. You need this to keep your water precisely at 5.8.

Why I use it: Plant roots need aggressive aeration. Standard aquarium pumps are too weak for large reservoirs. This pump delivers serious dissolved oxygen to the root zone, preventing Pythium (root rot).

Why I use it: You need real PPFD to grow tomatoes and peppers indoors. This board utilizes efficient diodes that produce almost no heat while bathing the canopy in full-spectrum light.
To connect everything seamlessly, make sure you explore our guide on choosing the right hydroponic nutrient solutions to ensure your new hardware is pushing the best possible food to your plants.
Actionable Step-by-Step Blueprint: Bottle and Floating Raft Gardens
The Kratky method and floating raft gardens are two accessible DIY hydroponic systems that require minimal moving parts. Both setups utilize static or gently aerated nutrient reservoirs to sustain leafy greens and herbs from seedling to harvest. These systems are brilliant for beginners because they are highly forgiving and cheap to build.
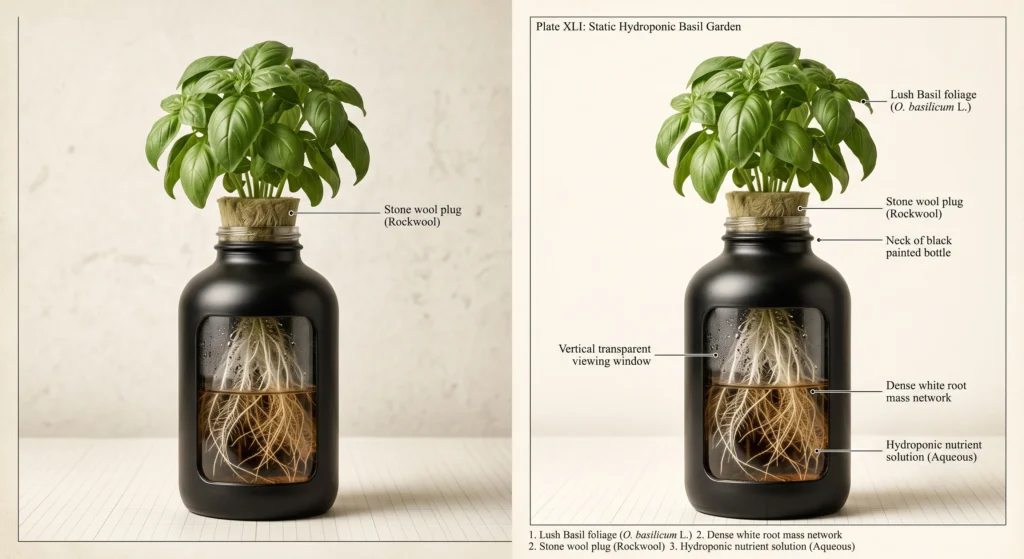
Build 1: The Hydroponic Bottle Garden (Kratky Method)
Dr. Bernard Kratky revolutionized passive hydroponics. This system uses no electricity and relies entirely on a static reservoir. It is perfect for fast-growing crops like basil and lettuce.
Step 1: Prepare the Bottle
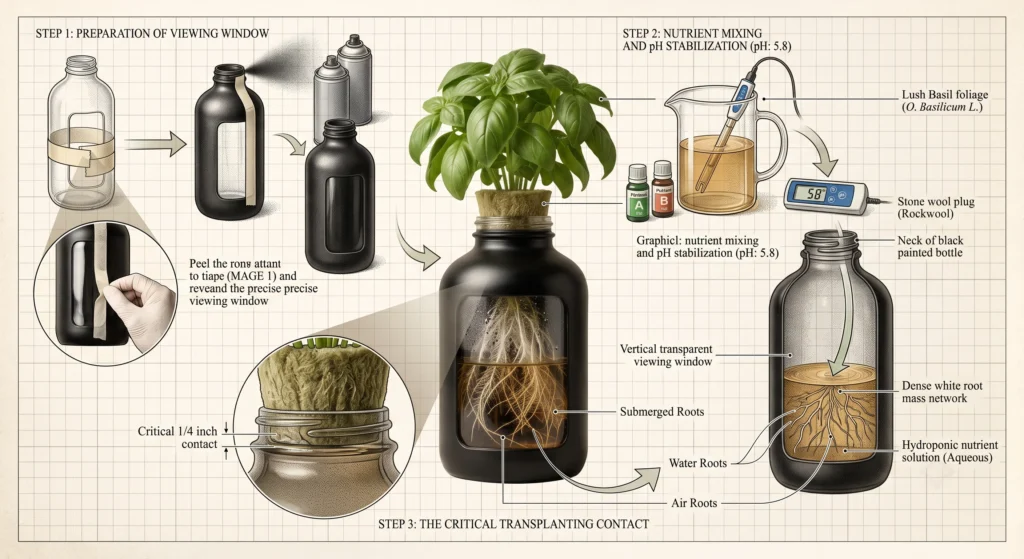
Find a glass or plastic bottle with a relatively wide base and a neck that can support a stone wool plug. You must paint the exterior completely black to block out all light. Pro tip: Wrap a strip of tape vertically down the side before painting. Once the paint dries, peel the tape off; this creates a tiny, unpainted viewing window so you can check the water level without removing the plant.
Step 2: Nutrient Mixing
Mix your hydroponic fertilizer in a separate pitcher according to the manufacturer’s vegetative growth recipe. Check the pH and adjust it to exactly 5.8 before pouring it into your bottle.
Step 3: Transplanting
Take a seedling started in a stone wool plug and place it into the neck of the bottle. Ensure the bottom 1/4 inch of the stone wool is touching the nutrient solution. As the plant drinks, the water level will slowly drop, creating an air gap in the bottle. The plant will develop specialized “air roots” in this humid gap to absorb oxygen, while the lower “water roots” drink the nutrients.
Build 2: The Floating Raft Garden (Deep Water Culture)
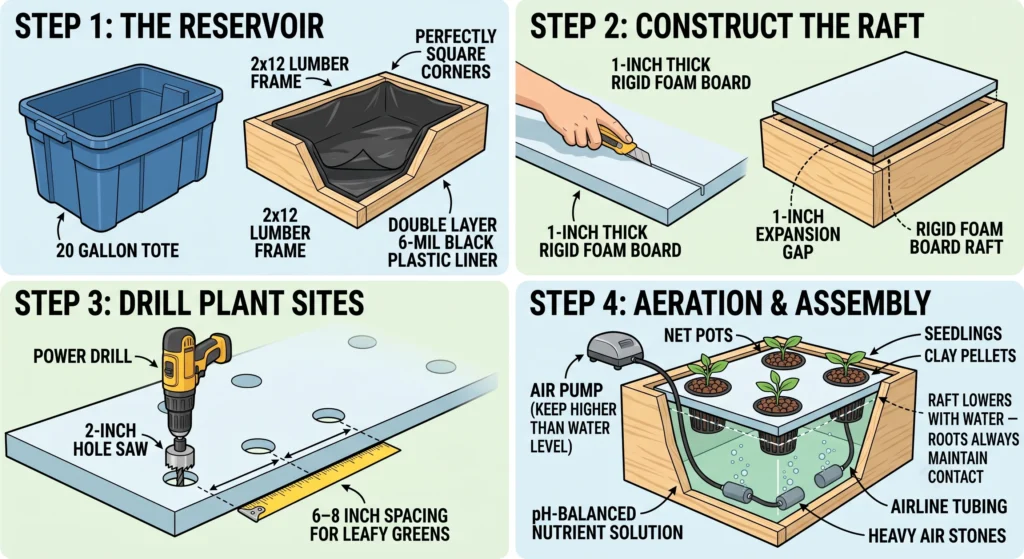
A floating raft garden is a step up in production capacity. The plants sit on a buoyant raft that floats directly on top of the nutrient solution. As the water level drops, the raft lowers with it, ensuring the roots always maintain contact with the food.
Step 1: The Reservoir
You can use a heavy-duty plastic storage tote (at least 20 gallons) or build a custom frame out of 2×12 lumber lined with a 6-mil black plastic sheet. If building with wood, ensure your corners are perfectly square and use two layers of plastic sheeting for added leak security.
Step 2: Construct the Raft
Purchase a 1-inch thick sheet of rigid foam insulation board. Cut the board so it is roughly 1 inch smaller than the inside dimensions of your reservoir; this gap prevents the board from getting wedged against the walls as the water level drops.
Step 3: Drill Plant Sites
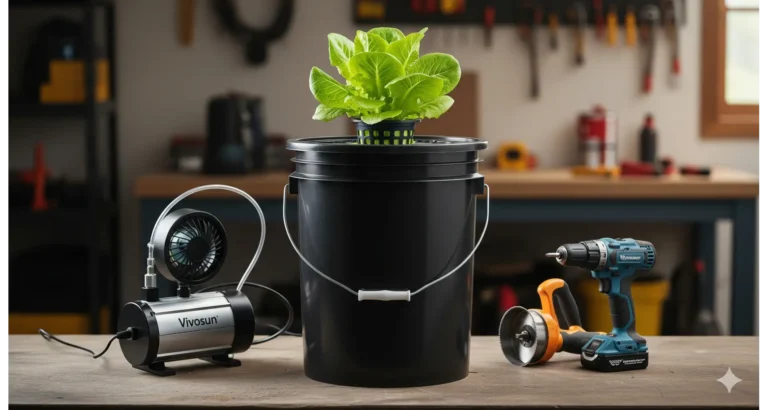
Using a 2-inch hole saw attached to a power drill, cut holes into the foam board. Space the holes roughly 6 to 8 inches apart for leafy greens like romaine lettuce.
Step 4: Aeration and Assembly
Place your air pump outside the reservoir (keep it positioned higher than the water level to prevent back-siphoning during a power outage). Run your black vinyl airline tubing into the reservoir and attach 2 or 3 heavy air stones. Fill the reservoir with your pH-balanced nutrient solution, float your foam raft on top, and drop your net pots (filled with seedlings and clay pellets) into the holes.
Key Parameters Table
Maintaining optimal environmental and chemical parameters is critical for plant health in any hydroponic setup. Regular monitoring of pH, EC, temperature, and light levels prevents nutrient lockout and devastating root diseases.
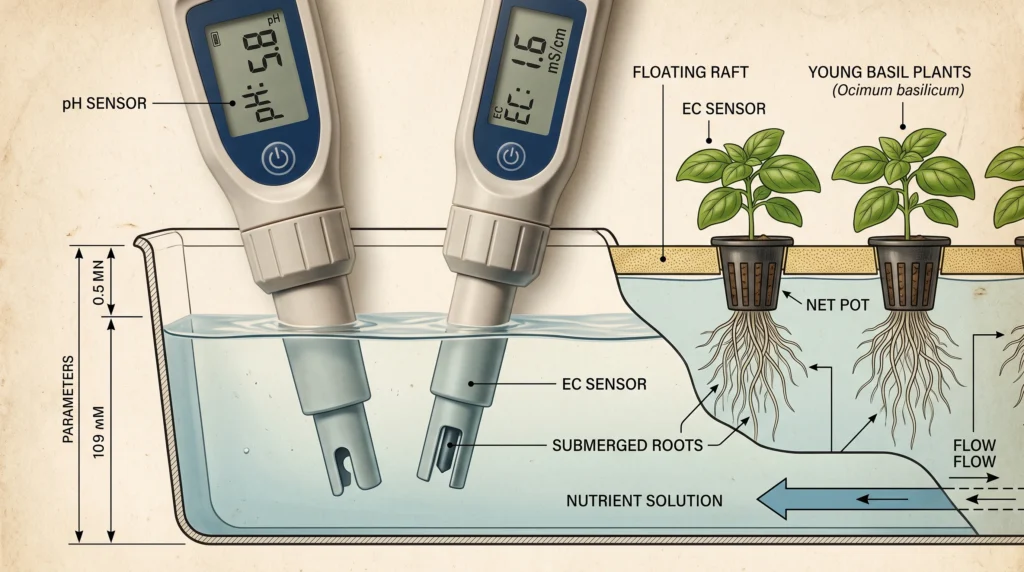
Different crops have different appetites. If you push the EC too high on a delicate lettuce crop, you will burn the leaf tips. If you run your water temperature too warm, oxygen levels will plummet and Pythium (root rot) will wipe out your garden. Keep these targets printed and taped near your reservoir.
| Crop Type | Target pH | Target EC (mS/cm) | Water Temp | Daily Light Integral (DLI) |
| Lettuce (Butterhead/Romaine) | 5.5 – 6.0 | 1.2 – 1.8 | $65^circtext{F} – 68^circtext{F}$ | 12 – 17 $mol/m^{2}/d$ |
| Basil (Sweet/Thai) | 5.5 – 6.2 | 1.5 – 2.2 | $68^circtext{F} – 72^circtext{F}$ | 15 – 22 $mol/m^{2}/d$ |
| Microgreens | 5.5 – 6.0 | 0.8 – 1.2 | $65^circtext{F} – 70^circtext{F}$ | 6 – 12 $mol/m^{2}/d$ |
| Spinach | 5.5 – 6.0 | 1.5 – 2.0 | $60^circtext{F} – 65^circtext{F}$ | 12 – 17 $mol/m^{2}/d$ |
Common Pitfalls & Troubleshooting FAQ
Grower errors such as inadequate aeration, incorrect pH levels, and poor lighting frequently cause stunted growth and root rot. Diagnosing these issues early through routine system checks is the most effective prevention strategy for indoor controlled-environment agriculture.
Even seasoned engineers face catastrophic failures occasionally. The key to mastering hydroponic growing systems is learning how to read the plant’s signals before the damage becomes irreversible. For deeper reading on pathology, I highly recommend consulting the Cornell University Controlled Environment Agriculture guidelines.
FAQ
Why are my plant roots turning brown and mushy?
Brown, slimy roots are the hallmark of Pythium, commonly known as root rot. This usually occurs when your water temperature climbs above $72^u005ccircu005ctext{F}$ or your air pump fails. Warm water holds significantly less dissolved oxygen. To fix this, you must flush the system, sanitize the reservoir with a mild hydrogen peroxide solution, lower your water temperatures, and increase your aeration.
My seedlings are growing tall, spindly, and falling over; what is wrong?
Your plants are suffering from a lack of adequate light and are stretching to find a stronger source. Lower your grow lights so they are closer to the plant canopy, or upgrade to a fixture with a higher PPFD output. Adding a small oscillating fan will also help strengthen the stems by simulating natural wind resistance.
Why do the edges of my lettuce leaves look burnt and crispy?
This is a classic symptom of tip burn. Tip burn is technically a calcium deficiency in the expanding leaf tissues, but it is rarely caused by a lack of calcium in the reservoir. Instead, it is usually caused by insufficient airflow across the plant canopy or an EC that is far too high. Ensure you have fans moving air directly across the leaves to encourage transpiration, and verify your EC is within the 1.2 to 1.8 range.
How often should I completely change the water in my system?
In a floating raft garden, the plants consume water and nutrients at different rates. Over time, unused fertilizer salts build up and create a toxic imbalance. As a general rule, you should dump, flush, and replace your entire nutrient solution every three to four weeks.
Can I use organic soil fertilizers in my hydroponic reservoir?
Absolutely not. Fertilizers designed for soil depend on complex microbial webs in the dirt to break them down into forms the plant can absorb. If you put fish emulsion or bone meal into a sterile hydroponic reservoir, it will rot, smell horrific, and rapidly deplete the oxygen in the water, killing your plants. You must use water-soluble mineral nutrients specifically formulated for hydroponics. Learn more about managing potential issues in our disease and pest management guide.
Build It Yourself and Save: Why buy an expensive pre-built rig when you can engineer your own? Dive into our library of DIY hydroponic blueprints, custom plumbing guides, and high-efficiency reservoir builds. View DIY System Blueprints →

Continue Your Learning Journey