Hydroponics for Beginners: The Complete Start Guide (Systems, Nutrients, First Plants)

Table of Contents
- What Hydroponics Actually Is (And Isn't)
- The Core Components of Any Hydroponic System
- The Six Main Hydroponic Systems
- Selecting the Right System for Your Goals
- Essential Gear for the Beginner Setup
- Step-by-Step Beginner Start-Up Routine
- Water Chemistry Basics: Managing pH and EC
- Common Beginner Mistakes and Technical Fixes
- Frequently Asked Questions (FAQ)
- Conclusion
Disclosure: MistCulture summarizes verified product specs, engineering data, and community feedback. We may earn an affiliate commission if you purchase through our links. Regulations vary by location; this content is for educational purposes only.
Hydroponics is the science and practice of cultivating plants without soil, delivering an aqueous nutrient solution directly to the root zone. While the concept feels futuristic, it has deep historical roots and relies on a fundamental principle: by delivering precise ratios of dissolved minerals, water, and oxygen directly to the root architecture, you eliminate the mechanical and biological search constraints of soil. As a result, crops direct more metabolic energy into vegetative and reproductive growth, resulting in faster development, higher yields per square foot, a total absence of soil-borne pests, and the ability to produce food indoors year-round.
The fundamental trade-off of soilless cultivation is that you become the ecosystem. Soil acts as a massive buffer against environmental swings, nutrient imbalances, and moisture extremes. When you remove soil, water chemistry, root zone oxygenation, system maintenance, and climate regulation fall entirely on your shoulders. This guide establishes a technical foundation to help you select your first system, manage root zone chemistry, and avoid the common traps that plague beginner growers.
What Hydroponics Actually Is (And Isn’t)
Hydroponics replaces soil biology with precise water chemistry, delivering ionic mineral nutrients directly to plant roots. By eliminating the energy plants expend searching for nutrients in soil, soilless systems achieve faster growth rates, higher crop yields, and year-round indoor production.
In a traditional soil matrix, plants absorb nutrients as soil microbes and fungi break down complex organic matter, releasing mineral ions into the film of water surrounding soil particles. Hydroponics eliminates this biological middleman. The plant’s roots sit directly in or near an aqueous solution formulated with the exact ionic elements required for cellular development. You control every input: nutrient concentration measured as electrical conductivity (EC), solution acidity or alkalinity (pH), dissolved oxygen (DO) levels at the root surface, and the surrounding ambient microclimate.
Nutrient Absorption: Soil vs. Hydroponics
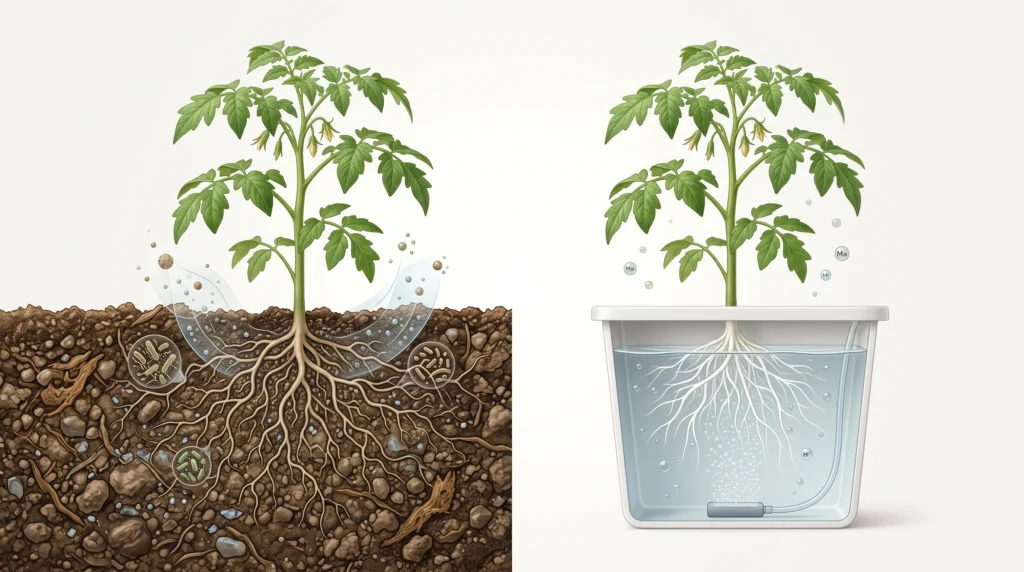
To understand why crops grow up to 50% faster in soilless environments, we must look at how roots physically absorb minerals. In a traditional soil setup, plants depend on a complex biological assembly line to convert organic materials into plant-available elements. Hydroponics completely bypasses this waiting period, delivering pre-dissolved ionic salts straight to the root surface.
Because traditional soil biology requires weeks of microbial activity to convert compost or manure into bioavailable forms, soil-grown plants must spend massive metabolic energy growing expansive root architectures simply to find nutrition. In contrast, hydroponic reservoirs present fully soluble ions directly to root membranes. This allows the plant to redirect almost 100% of its sugar reserves into heavy vegetative expansion and massive fruit sets. Learn more about optimizing this absorption window in our root health care directory.
The Core Components of Any Hydroponic System
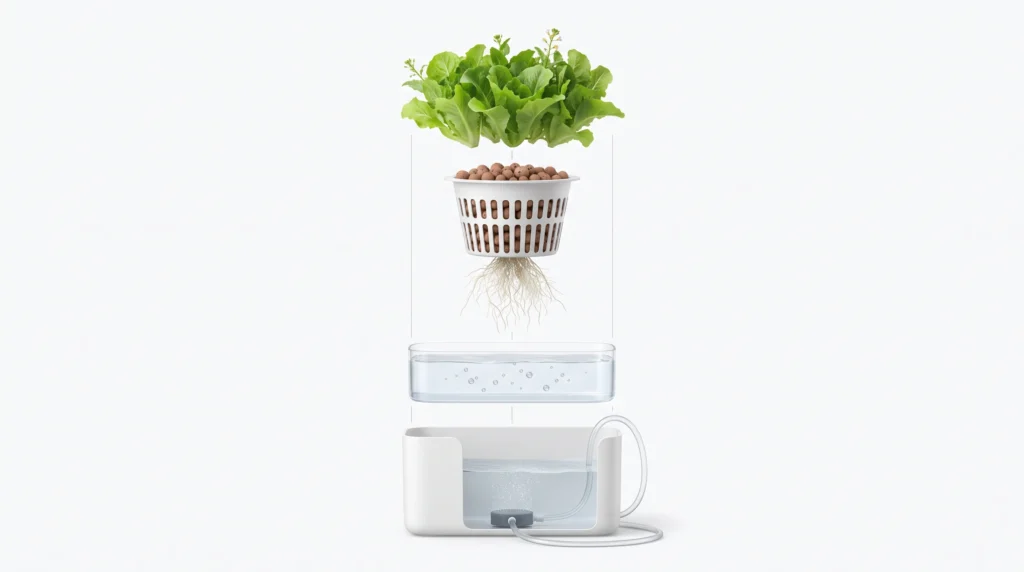
Every hydroponic system, regardless of its mechanical complexity, relies on five fundamental components: an aqueous nutrient solution, an optional inert growing medium, an oxygenation mechanism, a containment vessel, and a solution delivery infrastructure.
| Component | Technical Function | Typical Options / Parameters |
| Nutrient Solution | Delivers essential macro- and micronutrients in bioavailable ionic forms | Water + N, P, K, Ca, Mg, S, Fe, Mn, B, Zn, Cu, Mo |
| Growing Medium | Provides structural support and retains moisture/air in the root zone | Clay pebbles, perlite, coco coir, rockwool, or none (bare-root) |
| Oxygenation System | Supplies dissolved oxygen (DO) to prevent root suffocation and pathogen growth | Air pumps with air stones, cascading waterfalls, or air gaps |
| Containment Vessel | Holds the nutrient reservoir and root delivery channels | Food-grade PVC pipes, polyethylene tubs, or specialized buckets |
| Delivery Infrastructure | Moves the solution from the reservoir to the root architecture | Submersible water pumps, drip lines, flood fittings, or gravity/capillary action |
The 5 Core Components of Any Hydroponic System
Every soilless growth configuration, whether an elementary off-grid windowsill jar or an automated multi-tier vertical farm, relies on the same physical and chemical pillars to support plant life. When you eliminate soil, you must actively engineer containment, oxygenation, and nutritional solubility to keep your crops in a state of systemic equilibrium.
Nutrient Solution
A precise mix of water and dissolved mineral salts providing the 13 essential elements (Macronutrients: N, P, K, Ca, Mg, S; Micronutrients: Fe, Mn, B, Zn, Cu, Mo). These must exist in soluble ionic forms (like NO3–, NH4+, H2PO4–, and K+) so root membranes can absorb them. Balance this easily with a water-soluble nutrient formula.
Growing Medium
Hydroponic substrates (clay pebbles, perlite, coco coir, rockwool) are chemically inert. They do not feed plants, but exist strictly to provide physical root anchoring while maintaining a balanced air-to-water ratio. Dynamic setups like DWC and NFT layouts suspend roots completely bare, requiring no substrate at all.
Oxygenation System
Root zones require continuous oxygen for cellular respiration to generate the energy (ATP) needed for active nutrient transport. Low oxygen saturation starves the root tissue and invites lethal anoxic pathogens like Pythium (root rot). Oxygenation is driven via air pumps, waterfalls, or passive air gaps.
Containment & Channels
This encompasses the reservoirs, plumbing lines, and grow beds that direct water throughout the system. All containment structures must be completely food-grade (e.g., HDPE or uPVC), opaque, and UV-stable. Excluding light from your nutrient solution is critical to preventing invasive algal blooms.
Solution Delivery Method
The physical mechanism that moves nutrient solution from the containment reservoir directly to the plant’s root architecture. This spans active, high-pressure setups using electric submersible pumps and drip emitters, to gravity-fed, non-powered layouts using capillary wicks.
By treating these five key components as integrated parts of a single ecosystem, you gain absolute control over your crops’ micro-environment. This systematic management completely eliminates the environmental risks and nutrient deficiencies common to soil gardening.
The Six Main Hydroponic Systems
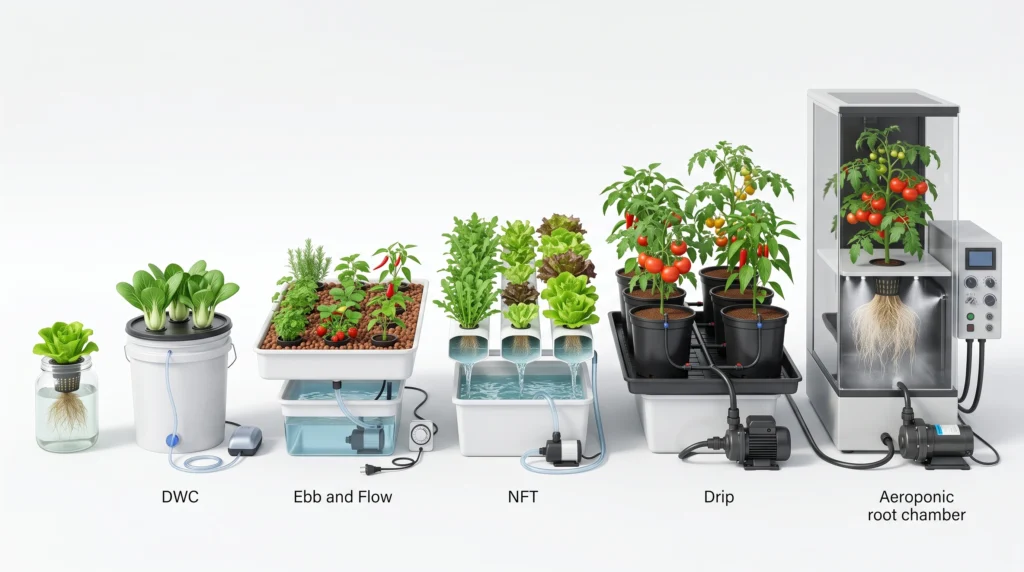
Hydroponic designs are categorized into six standard configurations, ranging from simple passive reservoirs to high-pressure misting networks. Matching the system design to your crop selection and available time is critical for success.
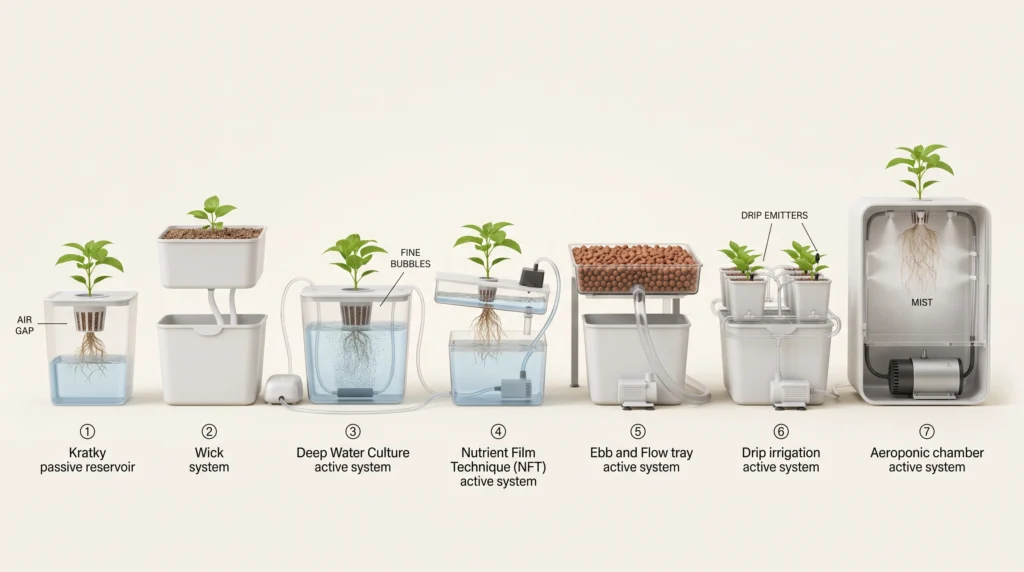
The Hydroponic Master Blueprint
Successful soilless gardening relies on two fundamental pillars: understanding the physical system design you are operating, and executing the step-by-step lifecycle required to take a plant from seed to harvest. Explore both blueprints below to master your grow zone.
Understanding these processes and architectures allows you to accurately control your crop’s macro-environment, turning biological stress into predictable growth cycles.
1. Deep Water Culture (DWC)
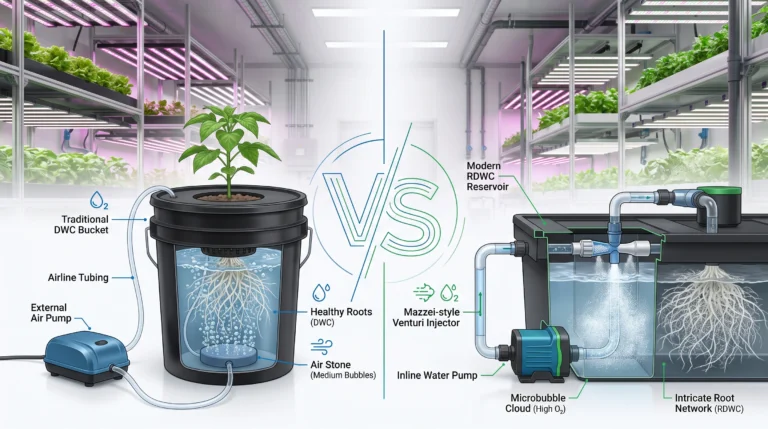
In a Deep Water Culture (DWC) system, plants are supported in net pots filled with clay pebbles or rockwool, suspended from a floating or fixed lid over a deep reservoir of nutrient solution. The plant roots remain continuously submerged in the liquid.
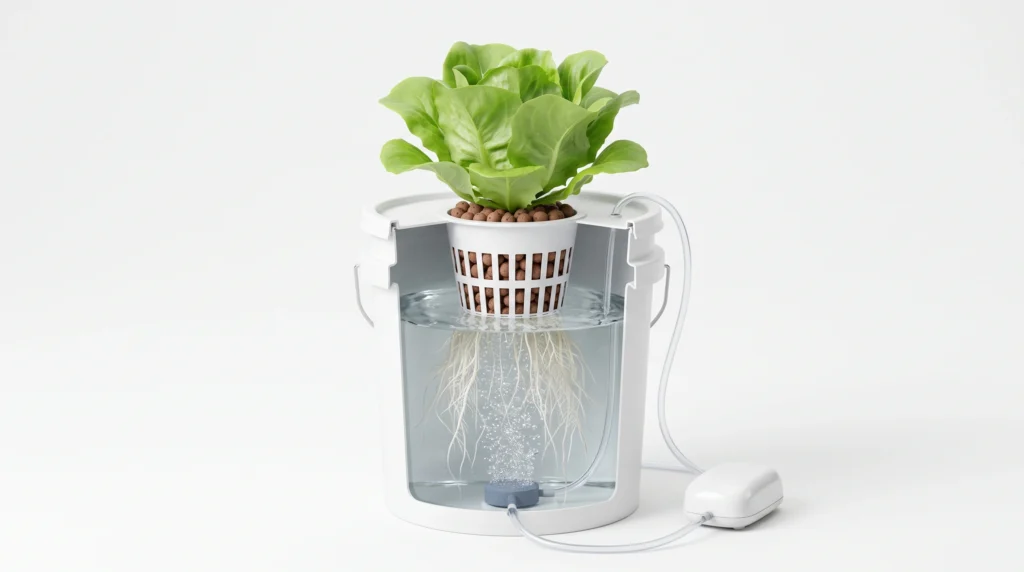
To prevent root suffocation, an air pump continuously forces ambient air through an air stone submerged at the bottom of the reservoir, creating a stream of fine bubbles that saturates the solution with dissolved oxygen. DWC is one of the simplest active systems to construct and operate. The large volume of water in the reservoir acts as a thermal and chemical buffer, making it forgiving for beginners growing leafy greens, herbs, and small foliage crops.

Why it’s necessary: A continuous supply of dissolved oxygen is essential in DWC to prevent root suffocation and suppress anaerobic pathogens like Pythium. This commercial-grade pump provides high-volume, multi-outlet airflow to keep deep reservoirs fully oxygenated.nKey Spec: 45 to 110 L/min airflow rating / Multi-outlet copper manifold
2. Nutrient Film Technique (NFT)
Nutrient Film Technique (NFT) systems utilize rigid, sloped channels (typically set at a 1:30 to 1:40 gradient, or roughly 2-3% slope). Plants sit in net pots along the top of the channel, and a submersible pump continuously delivers a small stream of nutrient solution to the highest point of the slope.
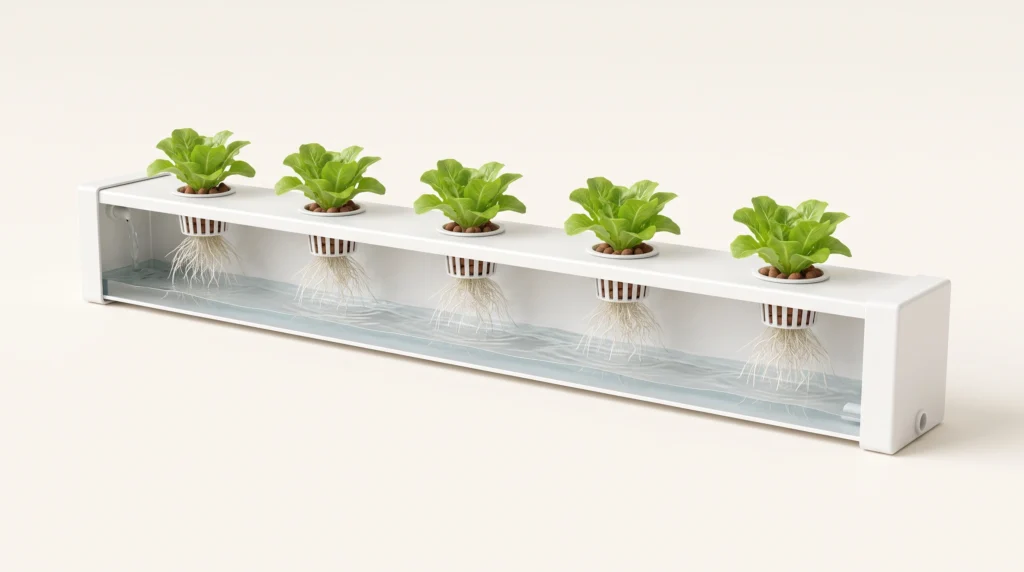
The solution flows down the channel in a shallow “film” over the bottom of the root mass before draining back into a lower reservoir. The top portion of the root mass remains suspended in the humid air of the channel, receiving abundant atmospheric oxygen, while the bottom of the root mass absorbs water and minerals from the flowing film. NFT is highly efficient for high-density production of lettuce, spinach, and culinary herbs. However, because there is no growing medium to hold moisture, a pump failure or power outage will cause roots to dry out and fail rapidly.
3. Ebb and Flow (Flood and Drain)
Ebb and Flow systems feature a watertight growing tray packed with an aggregate medium (like clay pebbles or perlite) or filled with potted plants. A submersible pump in a lower reservoir is connected to a flood fitting in the bottom of the upper tray and controlled by an electric timer.
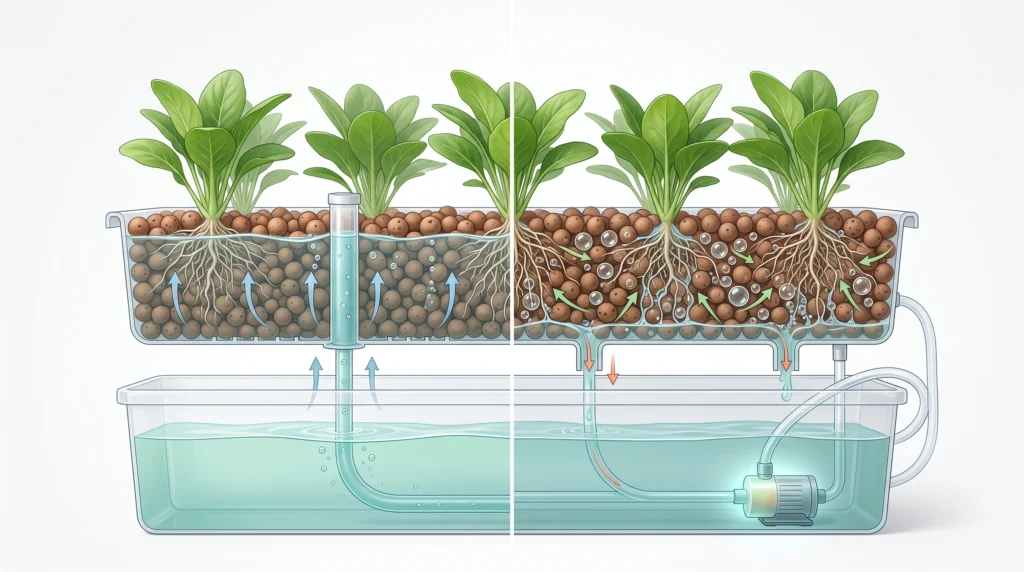
When the timer activates, the pump floods the upper tray with nutrient solution to a preset depth (usually 1-2 inches below the top of the medium), driving out stale soil air. When the pump shuts off, the solution drains back down through the pump fitting via gravity, pulling fresh, oxygen-rich air deep into the root zone. This flood-and-drain cycle repeats several times per day. The medium buffers the roots against quick drying, making Ebb and Flow a versatile system suitable for almost any crop type.
4. Drip Systems
Drip systems are a commercial standard for long-term, heavy-feeding crops like tomatoes, peppers, and cucumbers. Nutrient solution is pumped from a central tank through a main manifold pipe, branching into small-diameter drip lines terminated with pressure-compensating drip emitters at the base of each plant.
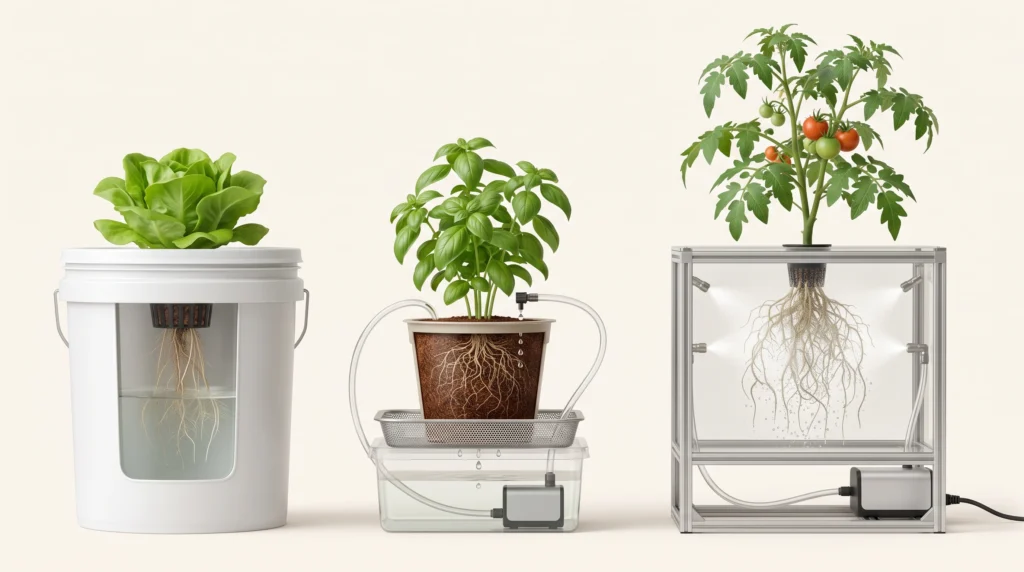
The solution drips onto the top of an inert medium (such as rockwool slabs or coco coir bags) surrounding the root architecture. Drip systems can be configured as recirculating (excess runoff drains back to the reservoir) or run-to-waste (excess runoff is discarded or directed to outdoor plants). Run-to-waste configurations prevent the buildup of root exudates and nutrient imbalances in the main tank, though they require precise control over irrigation volume to minimize runoff.
5. Aeroponics
Aeroponics represents an advanced, high-input form of soilless culture. The roots of the plant hang suspended inside a sealed, light-tight chamber with no growing medium. High-pressure water pumps or ultrasonic transducers force the nutrient solution through specialized misters, creating a fine fog or mist (typically 10-50 micron droplet size) that coats the root architecture on a precise duty cycle (e.g., 5 seconds on, 5 minutes off).
Because the roots are surrounded by air, oxygen saturation is maximized, resulting in rapid root cell division and fast vegetative growth. However, aeroponic misting nozzles are prone to clogging from mineral precipitates, and any power or mechanical interruption will dry out bare roots in minutes.
6. Passive Systems (Wick and Kratky)
Passive systems eliminate electric water pumps, air pumps, and timers entirely, relying on physical phenomena like capillary action or natural air gaps.
- Wick Systems: A fibrous wick (such as braided nylon or felt) extends from an underlying nutrient solution reservoir up into an upper container filled with a porous medium like perlite or vermiculite. Capillary action draws the solution upward to the root zone as the medium dries. Wick systems are limited to small, low-water-demand plants like microgreens or slow-growing herbs.
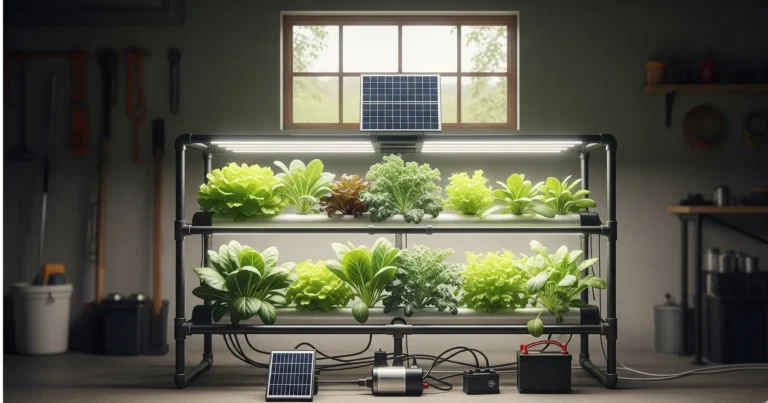
- The Kratky Method: Plants are supported in net pots over a completely filled reservoir of nutrient solution. As the plant absorbs the liquid, the solution level drops, creating an expanding, high-humidity air gap inside the vessel. The upper portion of the root architecture adapts to absorb atmospheric oxygen inside this air gap (“air roots”), while the lower root tips remain submerged in the receding solution (“water roots”). When calibrated correctly, the crop reaches maturity just as the water level reaches the bottom of the container. The Kratky Method is an accessible, zero-electricity entry point for growing leafy greens.
Selecting the Right System for Your Goals
To choose the optimal configuration, evaluate your available space, technical budget, power reliability, and target crop type.
| System Design | Relative Cost | Maintenance Demand | Power Dependency | Ideal Crops | Best Suited For |
| Kratky Method | Very Low | Minimal | None | Lettuce, Spinach, Herbs | Off-grid, Windowsills, Absolute Beginners |
| Deep Water Culture (DWC) | Low to Moderate | Low | High (Air Pump) | Lettuce, Kale, Basil, Bok Choy | Beginners, Small Indoor Tents |
| Ebb and Flow | Moderate | Moderate | High (Timer + Pump) | Peppers, Houseplants, Greens, Root-supported crops | Hobbyists seeking crop versatility |
| Nutrient Film Technique (NFT) | Moderate to High | High | Extreme (Constant Pump) | High-density Greens, Strawberries, Herbs | Scale production, Dedicated spaces |
| Drip System | Moderate to High | Moderate to High | High (Timer + Pump) | Tomatoes, Cucumbers, Large Peppers | Fruiting vine crops, Long-term production |
| Aeroponics | High | Very High | Extreme (High-Pressure Pump) | Clones, Leafy Greens, High-value Herbs | Advanced growers, Root research |
Essential Gear for the Beginner Setup
Building or buying your first hydroponic setup requires a curated selection of physical equipment, water quality monitors, specialized mineral fertilizers, and lighting infrastructure.
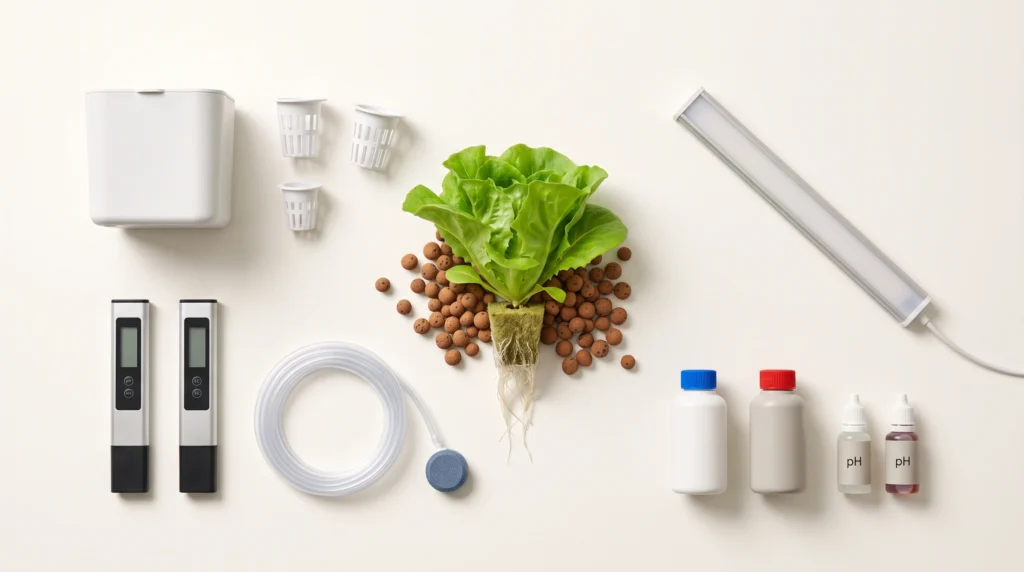
The Beginner's Hardware Checklist
Before launching your first grow cycle, gather your baseline hardware. Ensuring that your physical components are chemically inert and technically compatible prevents system failure, leaks, and toxic nutrient reactions down the line.
- ├── 1. Containment & Infrastructure (Reservoir, Net Pots, Tubing)
- ├── 2. Soluble Hydroponic Fertilizer Set (Part A/B or Complete Powder)
- ├── 3. Inert Growing Medium (Clay Pebbles, Rockwool, or Coco Coir)
- ├── 4. Water Quality Monitors (Digital pH Meter & EC/PPM Meter)
- ├── 5. Water Chemistry Adjustment (pH Up & pH Down Solutions)
- ├── 6. Seed Propagation Supplies (Plug Plugs, Humidity Dome)
- └── 7. Lighting System (Full-Spectrum LED or High-Output T5)
System Infrastructure
A complete commercial kit or a DIY setup utilizing food-grade (HDPE) buckets or totes, uPVC channels, net pots, and appropriate plumbing fittings.
Hydroponic Nutrients
A complete, water-soluble hydroponic nutrient kit containing all essential macro- and micronutrients. Do not use standard outdoor soil fertilizers, as they lack crucial trace minerals and contain insoluble organic components that will clog internal plumbing lines.
Inert Growing Medium
Select an inert medium compatible with your chosen system design: expanded clay pebbles for DWC or Ebb and Flow setups, rockwool cubes for initial propagation, or perlite and coco coir blends for top-fed drip buckets.
pH and EC Testing Meters
Digital, temperature-compensated pH and Electrical Conductivity (EC) meters. Monitoring and recording these two metrics daily is essential for actively managing your crop's sensitive root zone environment.
pH Adjustment Solutions
Commercial "pH Up" (typically potassium hydroxide) and "pH Down" (typically phosphoric or nitric acid) solutions to adjust raw water chemistry after adding mineral salts.
Seeds & Propagation Media
High-viability seeds (such as butterhead lettuce, basil, or kale) and starter plugs (rockwool or peat/coco plugs) to germinate healthy seedlings before transplanting them into net pots.
Supplemental Grow Lighting
While sunny south-facing windows can support low-light crops during summer, dedicated supplemental grow lighting (such as full-spectrum LED or T5 fluorescent fixtures) ensures a consistent daily light integral, tight node spacing, and year-round yield.
Once you secure these seven primary categories of gear, system assembly becomes a highly straightforward process, allowing you to establish a perfectly balanced, hyper-productive growing environment.

Why it's necessary: Precise measurement of root zone chemistry is non-negotiable. This splash-proof, commercial-grade meter set provides accurate, temperature-compensated pH and EC readings, eliminating the guesswork of nutrient dosing.nKey Spec: Fully waterproof / Lab-grade glass pH probe / Factory calibrated EC
Step-by-Step Beginner Start-Up Routine
Executing a structured start-up sequence prevents systemic failures, protects young seedling roots, and establishes a stable root zone environment from day one.
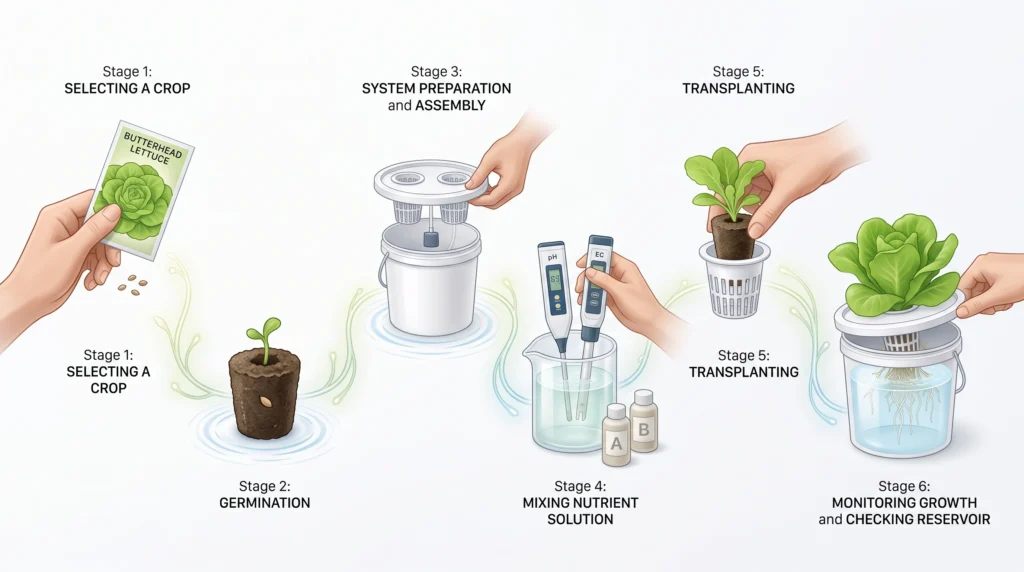
The Hydroponic Lifecycle: 6 Steps to Success
Achieving consistent, high-yield results in soilless cultivation requires a systematic approach. Rather than treating each phase as an isolated task, successful growers follow a continuous feedback loop where early decisions—such as matching crop types with specific system layouts—directly dictate the intensity of your daily maintenance routines.
Begin with forgiving, short-cycle crops. Cultivate butterhead lettuce, bush basil, kale, or spinach in a simple DWC or Kratky system. Avoid heavy-feeding, long-cycle vine crops like vining tomatoes or winter squash during your first run.
Before adding water, wash all reservoirs, channels, net pots, and tubing with a mild bleach solution (1 tbsp of unscented bleach per gallon of water) or food-grade hydrogen peroxide. Rinse thoroughly with fresh water to remove residual chlorine. Assemble components, fill the reservoir, and run pumps for 2–3 hours to verify there are no leaks.
Sow seeds into pre-soaked rockwool or coco propagation plugs. Keep the plugs moist with plain, pH-adjusted water (pH 5.8) under a humidity dome until the radicle (primary root) breaks through the bottom of the plug and the cotyledons fully expand.
Fill your reservoir with clean water. If using tap water, let it sit for 24 hours to off-gas chlorine, or treat it with a reverse osmosis (RO) system. Mix your nutrients, stir until dissolved, and use your digital EC meter and pH meter to adjust the solution strictly within the 5.5 to 6.5 pH window. Learn more about precise dosing with our Hydroponic Nutrient Calculator.
Place rooted plugs into net pots filled with pre-washed clay pebbles for lateral support. Insert net pots into your system. Ensure the nutrient solution in a DWC or Kratky setup touches the bottom 1/4 inch of the net pot until lateral roots extend downward into the main liquid column.
Establish a 5-minute daily monitoring routine: Check solution temperature (aim for 18°C–21°C / 65°F–70°F), check and record pH and EC levels, inspect pumps and air stones, and examine roots for early signs of stress or discoloration.
By standardizing these six fundamental steps into a cohesive routine, you eliminate the guesswork associated with hydroponics, establishing a highly predictable and hyper-productive growth environment.
Water Chemistry Basics: Managing pH and EC
pH controls nutrient availability, while EC measures nutrient concentration. Managing the relationship between these two metrics is the single most critical technical skill in hydroponics.
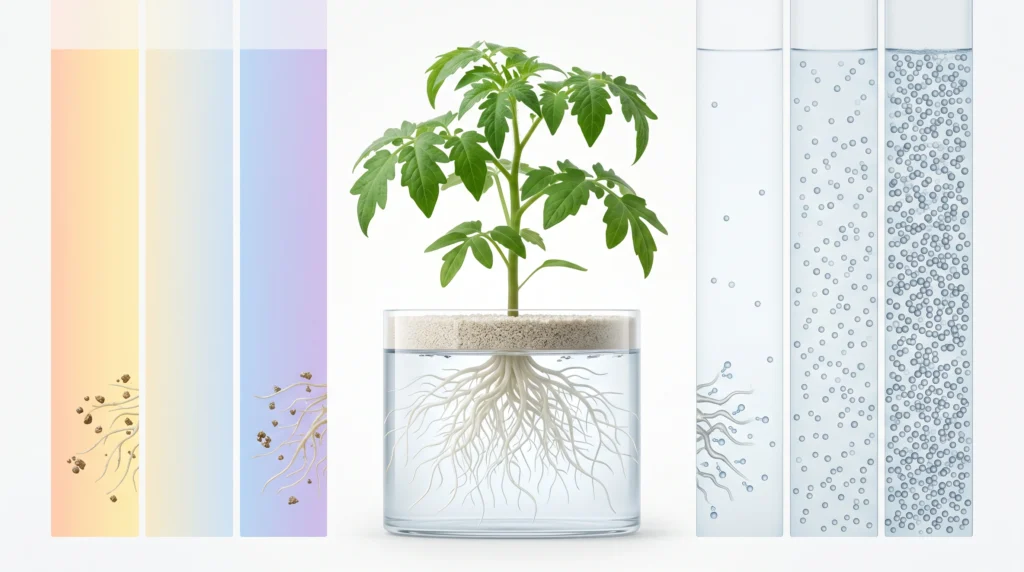
Optimal Hydroponic pH Range
In soilless cultivation, maintaining a strict target pH window is the single most important factor for nutrient bioavailability. When your water chemistry drifts outside these boundaries, plants lose their physical capacity to absorb vital elements, initiating rapid deficiency cascades.
- Calcium (Ca2+), Magnesium (Mg2+), and Potassium (K+) absorption is heavily restricted.
- Increased risk of direct structural cellular damage to root tissues.
- Micronutrients like Iron (Fe), Manganese (Mn), Boron (B), and Zinc (Zn) precipitate out as insoluble solid sludge.
- Leaves develop severe iron chlorosis (yellowing) despite high water mineral levels.
To maintain systemic equilibrium, integrate a quick daily pH monitoring routine. Dosing minor, diluted corrections of food-grade adjusters prevents the massive chemistry spikes that trigger chronic lockout conditions. 🧬 SEO & Usability Features in This Block
The Role of pH (Potential Hydrogen)
pH is a logarithmic scale measuring the concentration of hydrogen ions (H+) in a solution. In hydroponics, pH directly dictates whether nutrient ions remain dissolved and available for root absorption or precipitate out of solution as solid, unusable minerals.
In an acidic environment (pH < 5.5), calcium (Ca2+), magnesium (Mg2+), and potassium (K+) uptake is restricted, and root tissue damage can occur. In an alkaline environment (pH > 6.5), iron (Fe2+/Fe3+), manganese (Mn2+), boron (BO33-), and zinc (Zn2+) form insoluble hydroxide precipitates, causing leaf chlorosis (yellowing) despite high mineral levels in the water.
For most crops, maintain a pH between 5.5 and 6.5 (5.8 is widely considered the ideal target for general mixed crops). Because plants alter solution pH as they selectively absorb different cations and anions, expect daily pH drift. Adjust the pH using small, diluted additions of commercial pH Down (phosphoric acid) or pH Up (potassium hydroxide). Never add concentrated acids or bases directly onto bare plant roots.
Optimal Range (pH 5.8)
5.5-6.5
Solubility
Lockout Range (pH > 6.5)
> 6.5
Solidification
Electrical Conductivity (EC) & PPM Reference
Electrical Conductivity (EC) measures the ability of a solution to conduct an electric current, expressed in Siemens per meter (S/m), millisiemens per centimeter (mS/cm), or microsiemens per centimeter (µS/cm). Because pure water is a poor conductor, adding dissolved mineral fertilizer salts increases the solution's conductivity proportionally. EC provides a direct measurement of the total ionic concentration of your fertilizer mix.
Parts Per Million (PPM) or Total Dissolved Solids (TDS) meters simply take an underlying EC reading and multiply it by a conversion factor. Because different meter manufacturers use different conversion scales (e.g., the 500-scale / NaCl vs. the 700-scale / KCl), relying solely on PPM readings can cause confusion when comparing nutrient recipes. Standardize your measurements by reading raw EC in mS/cm.
Target EC ranges vary significantly by crop type and stage of growth:
- Seedlings / Young Transplants: 0.8 – 1.2 mS/cm
- Leafy Greens & Herbs: 1.2 – 1.8 mS/cm
- Heavy-Feeding Fruiting Crops (Tomatoes/Peppers): 2.0 – 3.5 mS/cm
Common Beginner Mistakes and Technical Fixes
Most early crop failures stem from simple setup oversights and mechanical errors. Identifying these mistakes early protects your root zone from irreversible stress.
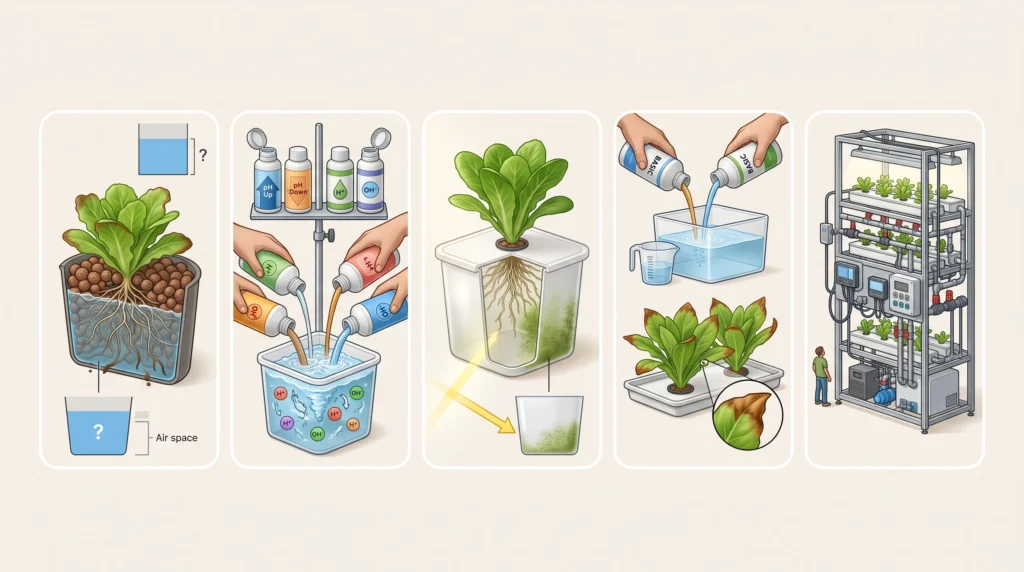
1. Overwatering in Media-Based Systems
- The Mistake: Running flood cycles or drip emitters continuously in porous media like rockwool or coco coir, filling air spaces with liquid and suffocating the root architecture.
- The Technical Fix: Implement an irrigation timer to allow media to drain fully between cycles. The root zone requires oxygen periods between liquid saturation cycles. Use the "lift test": irrigate only when the growing container loses noticeable water weight.
2. Radical Chemistry Swings ("Chasing pH and EC")
- The Mistake: Over-correcting slight pH or EC drifts by pouring large quantities of concentrated pH Up/Down or raw fertilizer directly into the reservoir, causing dramatic chemical swings that shock the plant.
- The Technical Fix: Make small, incremental adjustments. Dilute pH adjusters or concentrated stock fertilizers in a quart of fresh water before stirring them into the main reservoir. Allow the system to circulate for 30–60 minutes before re-measuring.
3. Light Leaks in the Reservoir
- The Mistake: Using translucent plastic totes or failing to seal top access ports, allowing ambient or grow light to penetrate the liquid storage area.
- The Technical Fix: Light plus dissolved mineral salts equals rapid algal growth. Algae competes for nutrients, consumes dissolved oxygen at night, clogs water pumps, and drops dead organic matter that feeds root rot pathogens. Ensure all reservoirs, channels, lids, and access ports are completely opaque. Paint translucent plastic containers black, or wrap them in reflective Mylar or heavy foil tape.
Translucent Tub
& Algae
& Sludge
Sealed Opaque Reservoir
Penetration
Bright Roots

Why it's necessary: Consistent indoor lighting eliminates seasonal growth slumps. This high-efficiency LED panel delivers uniform photosynthetically active radiation (PAR) across the canopy without emitting excessive heat into your root zone.nKey Spec: High-efficacy Samsung diodes / Dimmable driver / Silent passive cooling
4. Guessing Nutrient Ratios Without an EC Meter
- The Mistake: Dosing fertilizers strictly by volume (e.g., "teaspoons per gallon") without measuring actual electrical conductivity, leading to severe nutrient burn or chronic starvation.
- The Technical Fix: Always calibrate and use a digital EC meter. Water evaporation constantly concentrates fertilizer salts in the tank, raising EC even if no extra fertilizer has been added. Adjust concentration based on digital readings rather than volumetric guessing.
5. Starting Too Big
- The Mistake: Building a multi-tier, 50-plant system with mixed crop varieties on day one, resulting in conflicting pH/EC requirements, tangled maintenance schedules, and rapid pest propagation.
- The Technical Fix: Start with a single 5-gallon DWC bucket or a small Kratky reservoir growing one crop variety (e.g., 4 heads of butterhead lettuce). Master water monitoring, pH stability, and plant responses on a small scale before scaling up your footprint.
⚡ Quick-Hitting Video: Hydroponic Crop Killers
Check out this rapid-fire mobile breakdown on Pythium root rot and temperature safety limits!
Frequently Asked Questions (FAQ)
Is hydroponics harder than growing in soil?
Hydroponics involves a steeper initial learning curve because you must actively manage water chemistry (pH and EC) and dissolved oxygen levels rather than relying on soil biology. However, once you establish a daily oversight routine and understand basic water parameters, hydroponics becomes highly predictable and requires less physical labor (no weeding, digging, or heavy soil handling).
Do plants really grow faster in a hydroponic system?
Yes. Because minerals are supplied in ionic forms directly to the roots in an oxygenated liquid medium, plants do not expend energy building expansive root networks to search for water and nutrients. Vegetative growth rates for leafy greens and culinary herbs are often 25% to 50% faster than in conventional soil cultivation, allowing for more harvest cycles per year.
What is the easiest hydroponic system for a complete beginner?
The Kratky Method and Deep Water Culture (DWC) are the most accessible starting designs. The Kratky method requires zero electricity, pumps, or timers, relying entirely on a receding liquid reservoir and an internal air gap. DWC requires only a reservoir, a net pot lid, and a basic aquarium air pump with an air stone to yield reliable crops of lettuce and herbs.
Can you grow any plant hydroponically?
While virtually any plant can theoretically be grown in a soilless system, crops with large underground storage organs—such as carrots, potatoes, sweet potatoes, and radishes—are impractical for standard liquid or channel systems. They require deep aggregate beds (such as coarse perlite or sand) to develop without physical distortion. Leafy greens, brassicas, culinary herbs, tomatoes, peppers, cucumbers, and strawberries perform exceptionally well in hydroponics.
How often should I completely drain and replace my nutrient solution?
In closed, recirculating systems, completely drain and replace the nutrient solution every 14 to 21 days. Over time, plants selectively absorb specific nutrient ions while leaving others behind, and water evaporation concentrates unused minerals. Dumping the reservoir, flushing the plumbing with clean water, and mixing a fresh batch resets the ionic balance and helps prevent nutrient lockouts.
What type of water should I use to mix my nutrients?
A reverse osmosis (RO) system or distilled water with an initial EC near 0.0 mS/cm is ideal, as it allows complete control over the mineral formulation. If using municipal tap water, verify that its starting EC is below 0.3 mS/cm (150 PPM). If using tap water containing chlorine, let it sit in an open container for 24 hours to off-gas before adding nutrients or plants. If your city uses chloramines, filter the water through a specialized catalytic carbon filter.
Conclusion
Hydroponic cultivation provides unmatched control over plant growth, allowing you to maximize space, conserve water, and harvest fresh produce year-round regardless of outdoor soil quality or weather constraints. By understanding the core mechanics of system design, dissolved oxygenation, and nutrient solution chemistry, you eliminate the variable factors that cause traditional gardening failures.
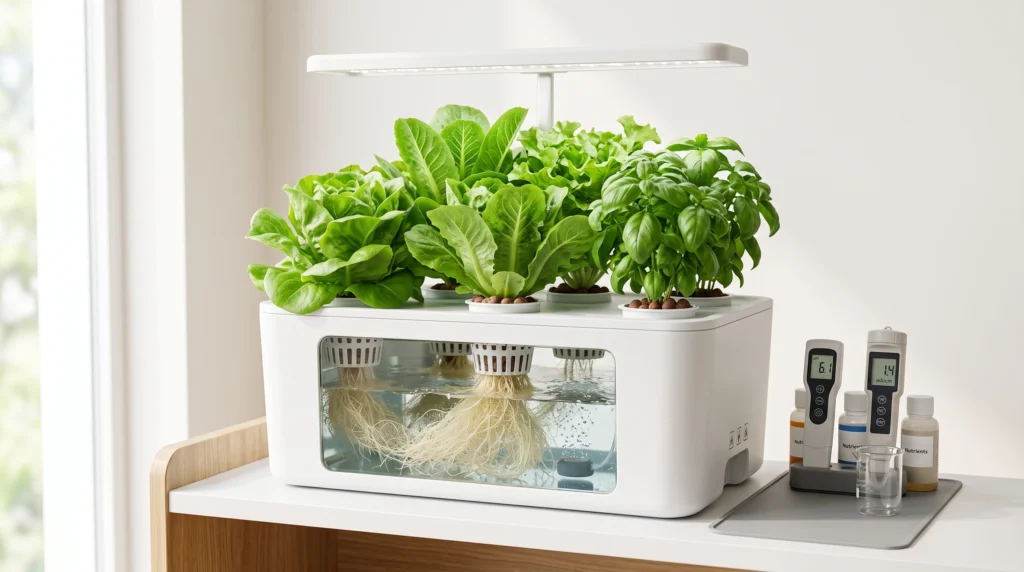
Start small with a manageable design like Deep Water Culture or the Kratky method, focus on cultivating a single crop variety, and maintain a strict daily monitoring routine for pH and EC. As your technical confidence grows, you can expand into multi-channel NFT networks or automated drip bucket systems for heavy-feeding vine crops.
Ready to build your first system? Explore our step-by-step DIY Hydroponic System Plans to access detailed build blueprints, or dive deeper into water parameters with our complete guide to Managing Hydroponic pH and EC.

Continue Your Learning Journey