Siphon Drain Systems: Bell Siphon vs Auto-Siphon in Ebb and Flow Hydroponics

Table of Contents
Legal Note: Regulations vary by location. Always consult local guidelines. This content is for educational purposes only. Handling plumbing and electrical components around water carries inherent risks; ensure all hardware is properly rated for wet environments and use GFCI outlets.
Ebb and Flow, also known as Flood and Drain, relies on a simple biological premise: plant roots need both water and oxygen to thrive. Unlike a static deep water system where you must aggressively pump air into the reservoir to prevent drowning the plants (see our DIY DWC kit guide), Ebb and Flow systems handle aeration mechanically. By flooding a grow bed with nutrient solution, you push out stale, depleted air. As that water drains away, it acts like a giant lung, pulling fresh, oxygen-rich air deep into the root zone.
The mechanism you choose to execute that crucial draining phase dictates the reliability of your entire garden. While you can use electronic cycle timers and motorized drain pumps (a method covered in our hydroponic controllers guide), relying on electricity for the drain cycle introduces a critical point of failure. If a drain pump fails, your roots sit in stagnant water, leading swiftly to hypoxia and crop loss.
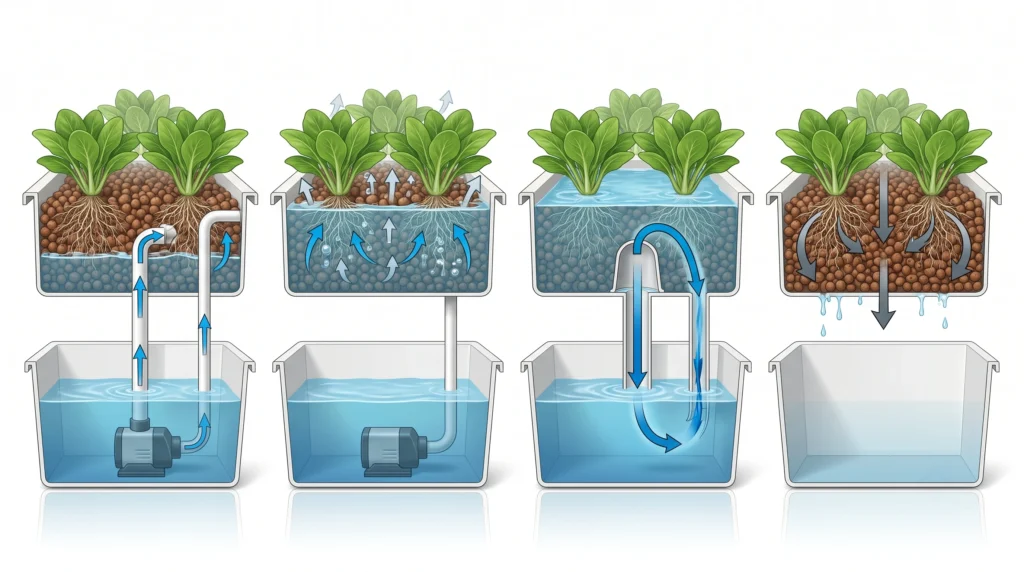
To build a truly resilient system, growers turn to fluid dynamics. Siphons utilize gravity and atmospheric pressure to automatically flush the grow bed once water reaches a specific height, requiring zero electricity, zero moving parts, and zero digital timers. If you are reading our Ultimate DIY Hydroponic System Blueprint and planning a media-based setup, you will inevitably face a choice between the two reigning mechanical champions of the drain cycle: the internal Bell Siphon and the external Auto-Siphon (also called a U-Siphon or Loop Siphon).
We will dissect the physics, construction, and tuning of both siphon designs so you can plumb your system for absolute reliability.
The Physics of Siphon Drainage
Siphon systems operate on the principles of fluid dynamics, specifically atmospheric pressure and gravity, to move liquid over an elevation without mechanical assistance. Once fluid breaches the crest of the siphon tube, gravity pulls it downward, creating a vacuum that continuously draws water from the bed until the seal is broken by the introduction of air.
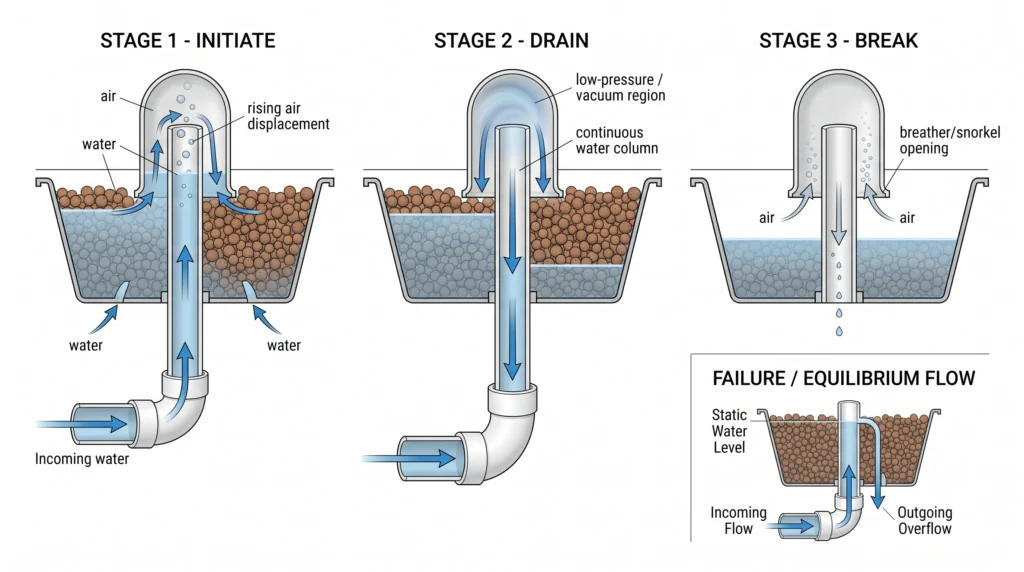
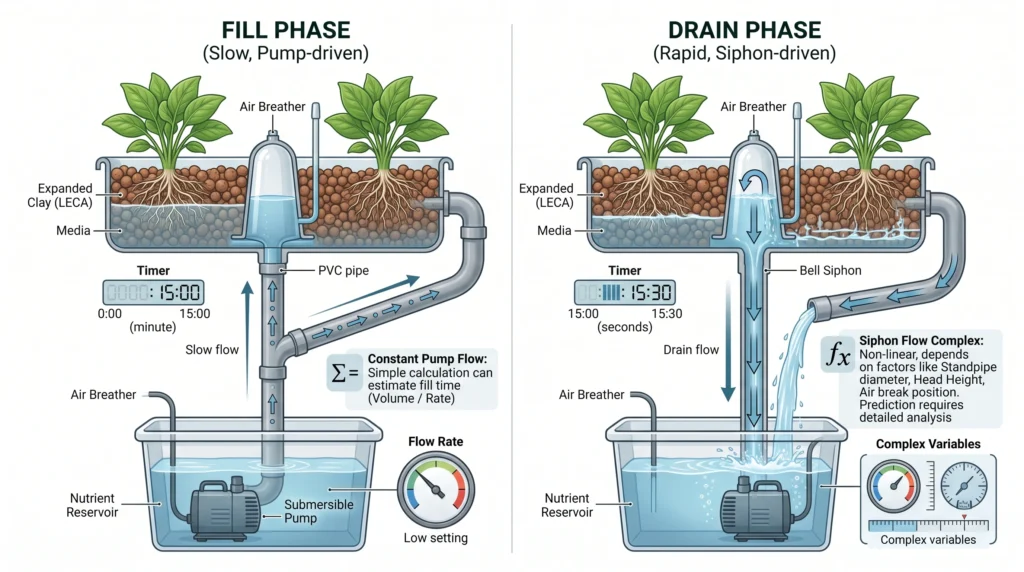
An Ebb and Flow bed must fill slowly and drain rapidly. If the bed drains too slowly, roots sit in water too long, inviting the fungal pathogens covered in our root rot prevention guide. A siphon is the ideal mechanical solution because its activation is binary: it’s either off, letting the bed fill, or fully on, creating a powerful vacuum that flushes the bed violently and rapidly.
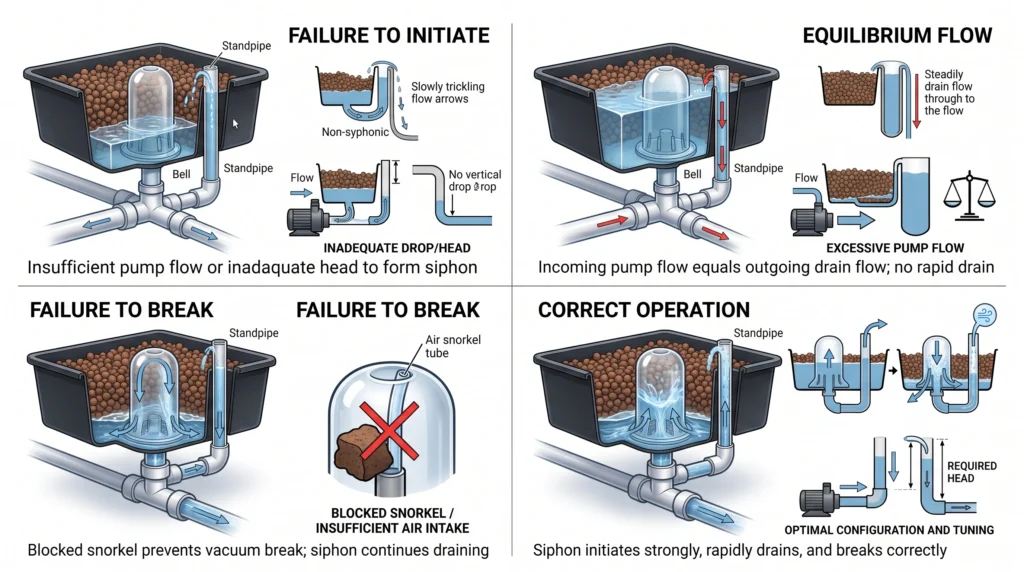
For a siphon to work, it needs to reliably perform three actions:
- Initiate (The Burp). As water reaches the top of the drain pipe, the system restricts airflow just enough that falling water creates a vacuum, triggering the full siphon effect.
- Drain (The Flush). The vacuum must be strong enough to outpace incoming water from the pump, draining the bed down to the bottom.
- Break (The Gasp). Once water reaches the bottom, the system ingests a gulp of air to instantly break the vacuum, letting the bed fill again.
Failure at any stage results in “equilibrium flow,” the state where the siphon drains at the exact same rate the pump fills the bed, keeping water level permanently static instead of cycling.
The Bell Siphon: The Industry Standard
The Bell Siphon is an internal drainage mechanism housed entirely within the grow bed, consisting of a standpipe, an airtight bell cap, and an outer media guard. It’s widely favored for rapid drain speed and its ability to handle high flow rates in large media beds.
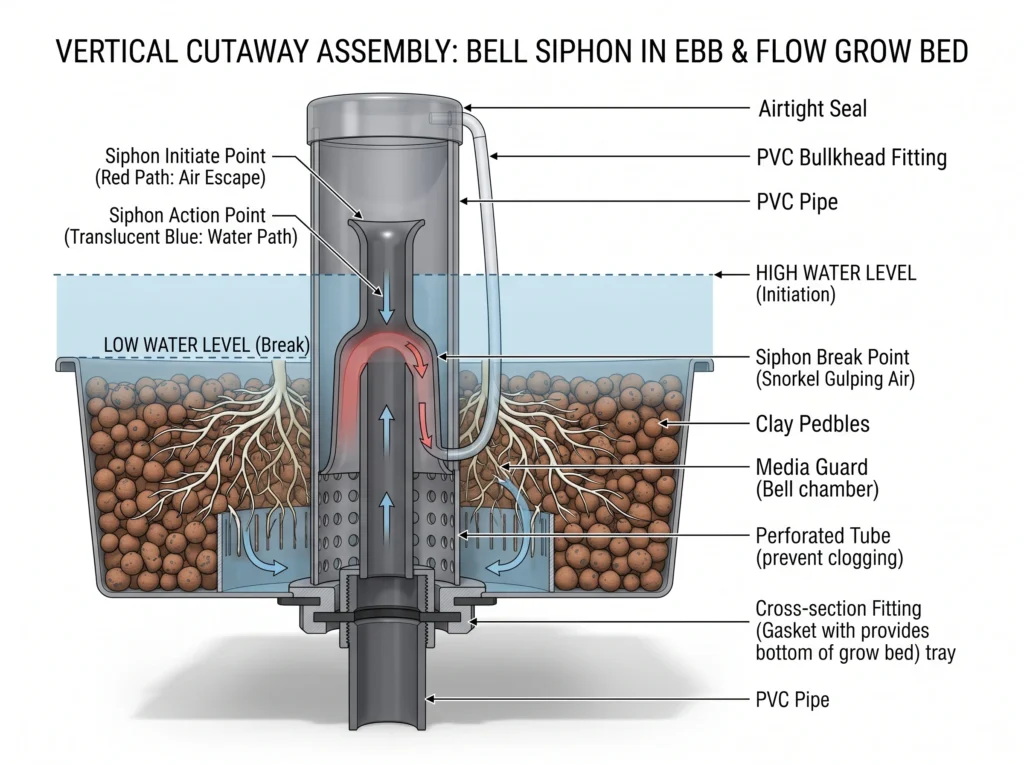
The bell siphon is the most commonly recommended design for media-based Ebb and Flow systems, and appears in the FAO’s Small-scale aquaponic food production technical paper (Somerville et al., 2014), which includes bell siphon diagrams among its plumbing illustrations. The design hides all the complex fluid dynamics inside a simple PVC bell in the center of your grow bed.
Anatomy of a Bell Siphon
The Standpipe. A vertical PVC pipe connected to a bulkhead at the bottom of the grow bed. Its height sets the maximum water level.
The Bell. A larger PVC pipe, airtight-capped at the top, placed completely over the standpipe. Its bottom rests on the bed floor with cutouts (“teeth”) to let water in.
The Snorkel (Breather Tube). Flexible tubing attached to the bell, running down to the target low-water line, sucking in air to definitively break the siphon once the bed is empty.
The Media Guard. A larger, heavily perforated PVC pipe surrounding the whole assembly, keeping clay pebbles or perlite away from the bell.
How It Works
Water fills the bed slowly, entering the bell through the bottom teeth and rising between the standpipe and bell walls. Once water breaches the top of the standpipe, it falls down the drain, pushing air out ahead of it. Because the bell is airtight, this creates a vacuum inside it, forcefully pulling water up and over the standpipe, flushing the bed rapidly. Once the water level drops to the bottom of the snorkel, a rush of air breaks the vacuum instantly, draining stops, and the bed refills.
The Affnan Modification
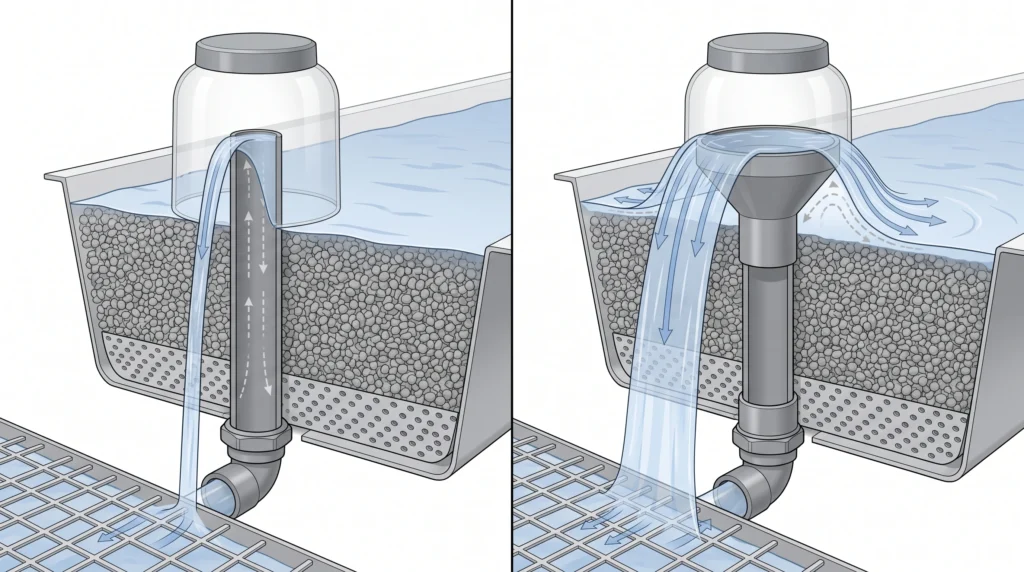
A common failure mode for basic bell siphons is failing to initiate at all, water just trickles over the standpipe edge without ever building vacuum. The “Affnan modification,” a well-documented technique from the aquaponics DIY community associated with the grower known as Affnan, fixes this: placing a PVC reducer (for example, 1-inch to 1.5-inch) at the top of the standpipe like a funnel forces water to sheet across a wider surface before falling. That wider sheet restricts airflow faster, letting the siphon initiate a strong vacuum even with a slow incoming pump flow.
On sizing: CTAHR’s BIO-10 bulletin, Construction of Automatic Bell Siphons for Backyard Aquaponic Systems (Fox, Howerton & Tamaru, 2010), documents a 2:1 diameter ratio as the standard guideline, the bell should be roughly twice the diameter of the standpipe. For grow beds in the 20 to 50 gallon range, a 3/4-inch or 1-inch standpipe paired with a 2-inch bell is a common, proven pairing, though this is a starting point to verify against your specific bed volume and pump flow, not a universal fixed rule.
The Auto-Siphon (U-Siphon / Loop Siphon)
The Auto-Siphon is an external drainage mechanism, a pipe exiting the grow bed, curving up to the desired high-water mark, then looping back down to the reservoir. It keeps the grow bed itself entirely free of plumbing hardware.
For shallow tray setups or closely packed small containers, a bulky internal media guard and bell assembly eats too much valuable bed space. The Auto-Siphon solves this by moving the physics outside the bed entirely.
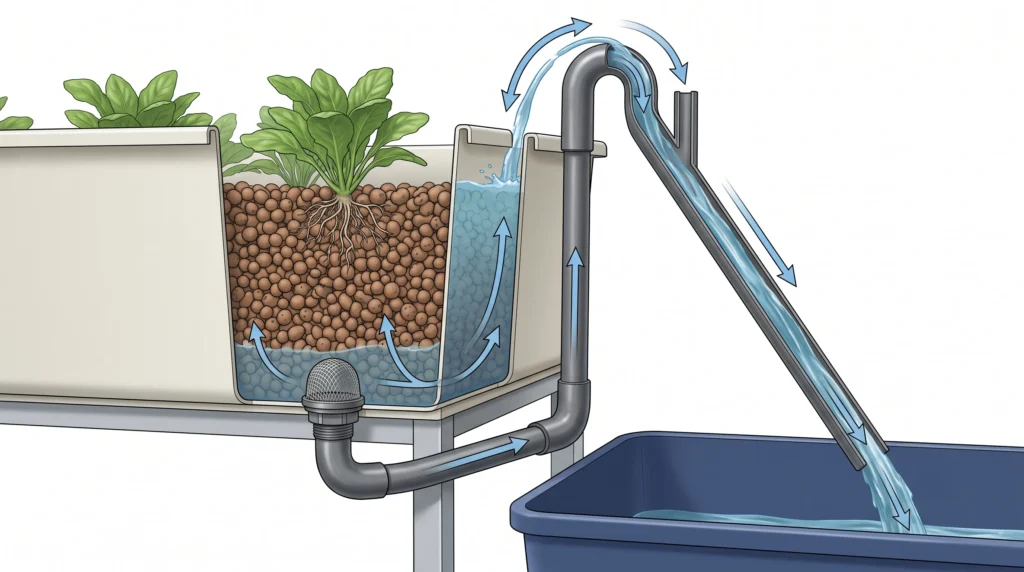
Anatomy of an Auto-Siphon
The Exit Port. A bulkhead fitting at the very bottom of the bed, often protected by an internal screen to keep media out.
The Loop. External PVC forming a “U” or “P” trap, rising to match your target flood height via two 90-degree elbows before running down to the reservoir.
The Vacuum Break. A small hole or breather tube tapped into the loop’s top-most elbow.
How It Works
As the bed fills, fluid equilibrium means water rises to the same level inside the external loop. Once it reaches the top of the upper elbow, it spills over and falls down the return pipe, pushing out air and creating a vacuum that pulls water out of the bed, same underlying mechanism as the bell siphon. When the bed nears empty, air gets pulled in either through the internal screen or the vacuum break tap, breaking the siphon and restarting the cycle.
Head-to-Head: Bell Siphon vs Auto-Siphon
Bell siphons excel in deep, heavily planted media beds thanks to aggressive flush rates. Loop siphons suit shallow, space-constrained trays better.
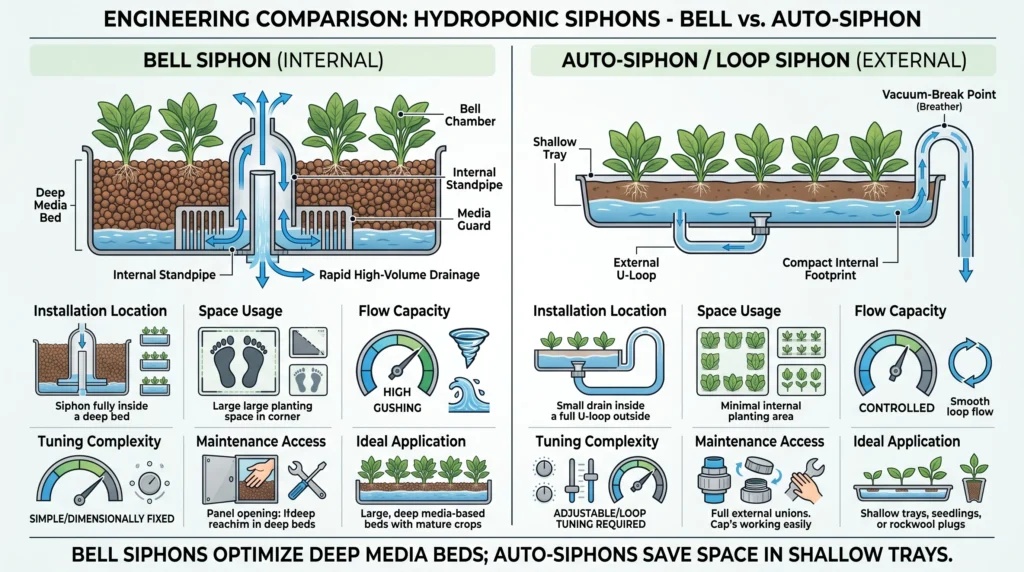
| Feature | Bell Siphon | Auto-Siphon (Loop) |
|---|---|---|
| Location | Internal (inside the grow bed) | External (plumbed outside the bed) |
| Space Efficiency | Reduced, media guard takes up several inches | Excellent, leaves the whole bed open for roots |
| Flow Rate Handling | High, handles powerful incoming pump flows | Low to medium, can struggle to break vacuum under high flow |
| Tuning Difficulty | Moderate, needs precise standpipe sizing and snorkel placement | Higher, prone to continuous trickling if the drop pipe is too short |
| Maintenance | Easy, pull the bell cap off to clear roots | Moderate, may need detaching external PVC to clear a clog |
| Best Application | Deep media beds (hydroton, gravel), large volumes | Shallow flood trays, closely packed containers, rockwool blocks |
Why Bell Siphons Win for Deep Media
Deep media beds (8 to 12 inches) hold a large water volume and need a powerful, high-volume flush to pull oxygen down to the bottom roots. A bell siphon’s large vertical standpipe allows for maximum gravitational pull, and because its intake sits at the very bottom of the bell, it actively pulls settled organic debris out of the bed as a side benefit.
Why Auto-Siphons Struggle with Fast Pumps
The external loop is notoriously prone to equilibrium flow, since the entire pipe stays full of moving water, incoming and outgoing rates can match perfectly and the siphon just trickles instead of cycling. Fixing this generally means reducing pump flow or extending the downward drain pipe to increase gravitational head. See our pump sizing guide to avoid overpowering your drain plumbing from the start.
Building and Tuning a Bell Siphon
Airtight seals are non-negotiable. Even a pinhead-sized leak in the bell cap or bulkhead will destroy the vacuum dynamics the whole system depends on. Test your seal by submerging the assembly and checking for bubbles before installing it in the bed.
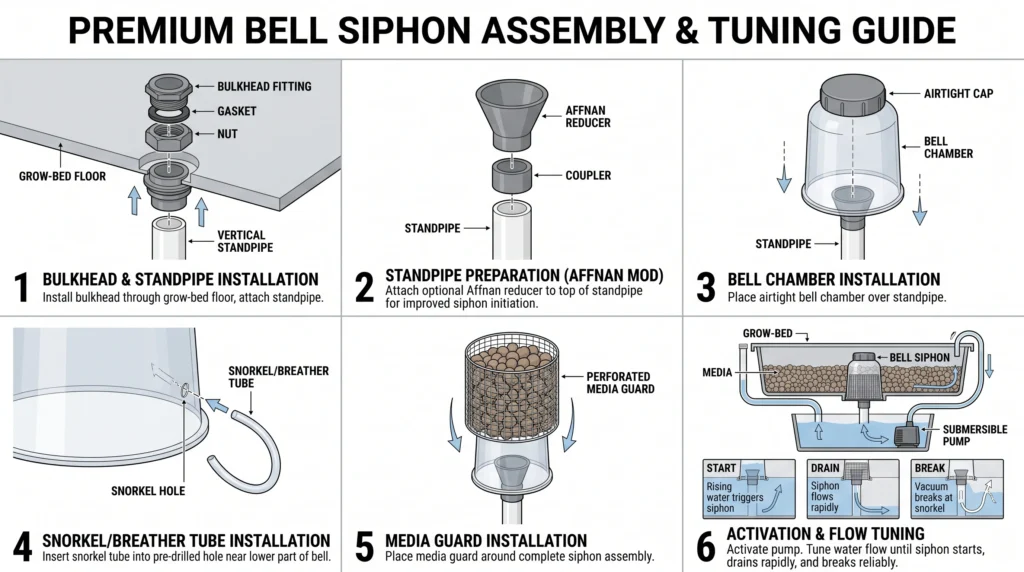
Step 1: Install the bulkhead and standpipe. Drill a hole in the bed bottom and install a bulkhead fitting. Cut PVC for your standpipe, sitting about 1 inch below the media surface to keep the top layer dry and discourage algae. For the Affnan upgrade, cut the standpipe 1.5 inches shorter than target height and glue a PVC reducer to the top as a funnel.
Step 2: Construct the bell. Use PVC taller than your standpipe, following the 2:1 diameter ratio. Cap the top securely and airtight. Cut several large notches (“teeth”) at the bottom to let water in.
Step 3: Add the breather tube. Drill a small hole in the bell, about an inch below the cap, and push in a tight-fitting piece of airline tubing, sealed with marine-grade silicone. Let it hang down so the bottom sits about 1/2-inch above the bell’s teeth, this is what triggers the air rush that breaks the siphon.
Step 4: The media guard. A larger PVC pipe, drilled with dozens of holes, slides over the entire bell assembly to keep media and roots from jamming the teeth. As a rule of thumb, the media guard should be at least double the bell’s diameter.
Step 5: Tune the flow. Turn on the pump and watch it cycle.
- If water just trickles over the standpipe endlessly: pump flow is too low, or the drain pipe under the bed is too short to generate enough pull.
- If the bed drains but never stops: pump flow is too high, overpowering the breather tube. Dial back flow until the siphon breaks cleanly.
Essential Siphon Hardware and Tools

- Heavy wall bulkhead is molded of highest impact resistant PVC eliminating possibility of finding hidden cracks when fill…
- Stock color is jet black to match acrylic tank backgrounds
- All kits contain: bulkhead fitting, gasket, lock nut
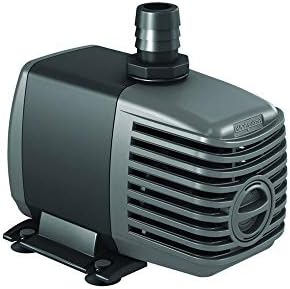
Marketed as 400 GPH, with a real rated flow closer to 370 GPH at 24W/120VAC per the manufacturer’s own spec. Still a solid, appropriate pump for most small-to-medium grow beds, its adjustable flow-restriction dial makes dialing in a siphon’s trigger point straightforward without needing a separate inline valve.

For grow beds built from rounded containers (a 55-gallon drum cut in half, for instance), where rigid flat bulkheads can’t contour to the curve and will leak. Uniseals pop into a drilled hole and let you force PVC pipe through for a permanent, curve-hugging seal, cheaper and simpler than a threaded bulkhead for this specific use.

A hacksaw leaves jagged, angled cuts that keep a standpipe from sheeting water evenly, which directly interferes with siphon initiation. A ratcheting cutter gives a clean, square cut every time.
Frequently Asked Questions
Why is my bell siphon constantly draining but not flushing?
This is equilibrium flow, water trickles over the standpipe at the same rate the pump fills the bed, so vacuum never builds. Increasing incoming flow slightly, making sure the standpipe sits perfectly level, or adding the Affnan funnel modification usually resolves this.
Why won’t my siphon break when the bed is empty?
If it keeps gurgling and draining continuously, incoming pump flow is likely too high, or the snorkel tube is blocked by roots or debris. Check the snorkel first; if it’s clear, reduce incoming flow so the snorkel can actually keep pace with breaking the vacuum.
Can I use a cycle timer and a drain pump instead of a siphon?
Yes, but you trade away the fail-safe reliability. A timer-and-pump setup needs a safety overflow pipe, and if power fails while the bed is full or a timer sticks on, roots drown. A siphon works as long as gravity does, no electricity required.
What size PVC do I need for a 50-gallon grow bed?
A 3/4-inch or 1-inch standpipe with a bell at roughly double that diameter (the 2:1 ratio) is a reasonable starting point for 20 to 50 gallon beds, per CTAHR’s guidance, but verify against your specific bed volume and pump flow rather than treating it as a fixed rule.
How do I prevent roots from clogging the bell siphon?
Use a proper media guard, a perforated PVC pipe surrounding the whole bell assembly, and avoid planting heavy root crops directly adjacent to the siphon. Reserving a roughly 6-inch radius around the hardware for equipment only, not roots, helps a lot.

Continue Your Learning Journey