Grow Room Temperature Swings: Causes, Effects & Stabilization Strategies

Table of Contents
- The Physics of Grow Room Thermal Dynamics
- Diurnal Temperature Patterns and Crop Tolerances
- Dew Point Crashes and Vapor Pressure Deficit (VPD)
- The Lag Effect: Root Zone vs Canopy Temperatures
- Calculating Thermal Mass to Buffer Swings
- Controller Selection: Deadbands and Sawtooth Spikes
- Equipment Coordination and Anticipatory Heating
- Intake Air Buffering and Envelope Sealing
- Commercial vs. Residential Stabilization Tactics
- Frequently Asked Questions
- Final Stabilization Checklist
Disclosure: MistCulture summarizes verified product specs, engineering data, and community feedback. We may earn an affiliate commission if you purchase through our links. Regulations vary by location; this content is for educational purposes only.
Every indoor garden experiences fluctuations in climate. Day shifts to night. Lights switch on and off. Equipment cycles through active and resting states. The physics of an enclosed environment guarantee that your air will expand and contract, taking its thermal energy with it. The real engineering challenge is not whether your room swings in temperature, but how aggressively it swings and how much stress it inflicts on your canopy.
Slow, managed temperature changes mirror the natural diurnal shifts plants evolved to expect. Fast, sawtooth temperature spikes create biological panic. Rapid cooling forces humidity to hit the dew point, instantly covering your leaves in micro-condensation. This moisture feeds mold spores. Sudden heat spikes shock stomatal function, halting nutrient uptake. This guide breaks down the exact mechanics of grow room temperature swings, detailing the math behind thermal loads, and providing the engineering strategies needed to flatline your climate graphs.
The Physics of Grow Room Thermal Dynamics
Heat energy never disappears; it only moves from one mass to another. Understanding how sensible heat and latent heat interact in your grow room allows you to anticipate temperature spikes before they destroy your crop.
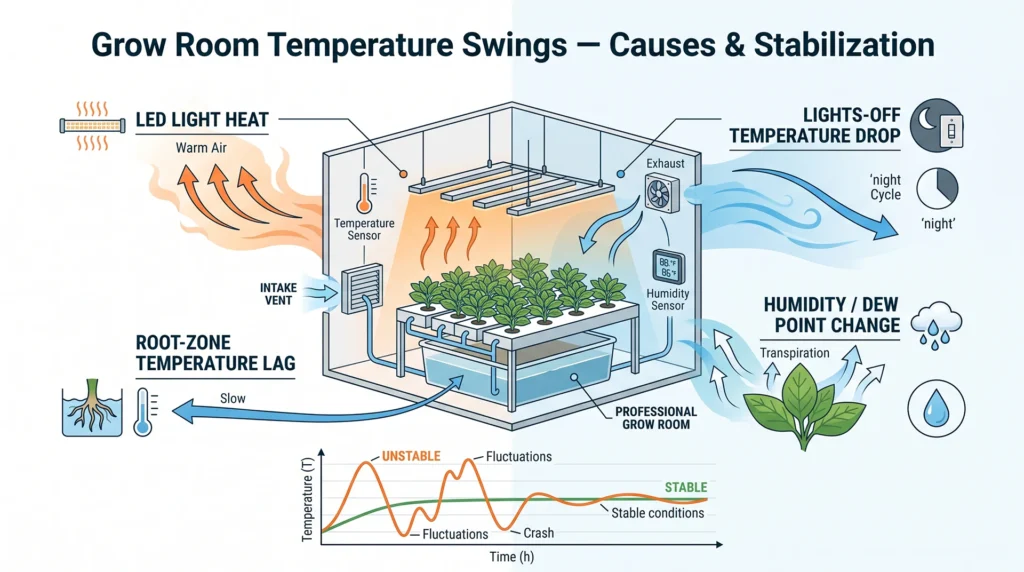
To stop temperature swings, you must map out where the heat originates. Grow lights are the largest thermal engines in any indoor setup. A single watt of electrical energy converts to exactly 3.41 BTUs of heat. If you run a standard 1,000-watt LED fixture, you are injecting 3,410 BTUs of heat into your room every single hour. Multiply that by four fixtures, and your lighting array dumps over 13,600 BTUs into the space continuously.
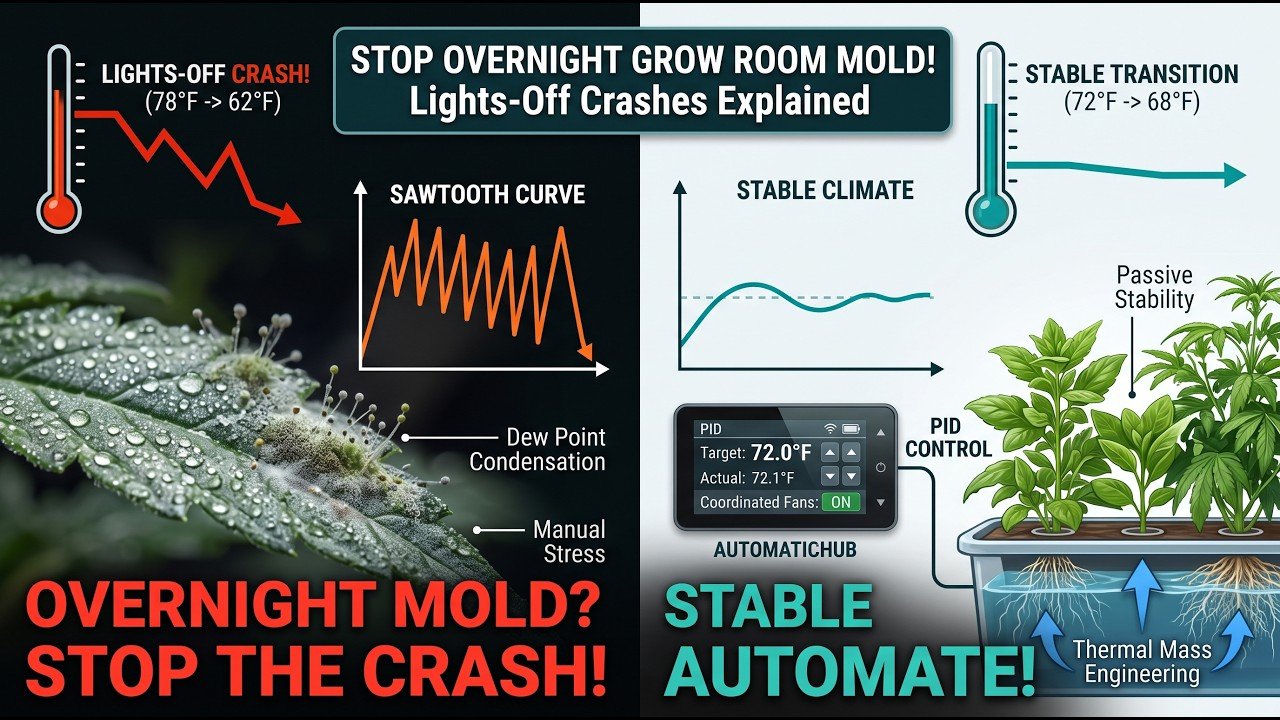
When your lighting timer triggers the “off” cycle, that massive heat injection drops to zero instantly. The air inside the room loses its primary thermal support. Unless the room is heavily insulated or actively heated, the ambient temperature freefalls. This rapid descent is what growers call the “lights-off crash.”
You can predict how hard your room will crash by calculating the R-value of your walls and the ambient temperature of the structure surrounding your grow space. A thin canvas tent parked in an unheated garage during winter has almost zero thermal resistance. The inside air will equalize with the freezing garage air in less than thirty minutes. Conversely, a sealed room built with rigid foam insulation traps the residual heat, creating a slow, graceful glide down to the target night temperature. For specific details on how light spectrums and intensities generate localized heat, review our LED lighting specifications and heat output research.

Why it’s necessary: This dual-relay controller automates your heating and cooling devices, preventing the extreme highs and lows that shock plant development. You plug a space heater into one side and an exhaust fan into the other to automate your thermal boundaries.nnKey Spec: 1200W capacity with customizable high/low temperature alarms.
Diurnal Temperature Patterns and Crop Tolerances
Plants rely on the temperature difference between day and night to regulate respiration and dictate stem elongation. A targeted 10-degree drop at night enhances fruit density, while a 25-degree drop stalls metabolic function.
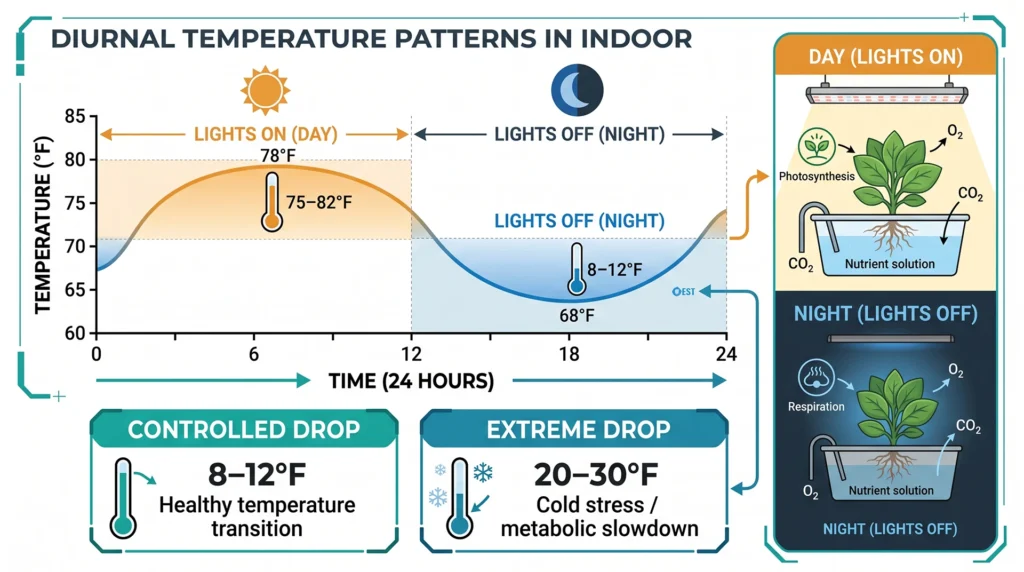
Indoor environments attempt to synthesize the perfect summer day. This includes the diurnal temperature shift. Healthy thermoperiods dictate that nights should be cooler than days. During the lights-on phase, plants run photosynthesis, absorbing light and carbon dioxide to create sugars. Most fruiting and flowering crops operate at maximum efficiency between 75 F and 82 F during this stage.
When the lights go out, photosynthesis stops. The plant switches entirely to respiration, burning the sugars it created during the day to build cellular structure. Running cooler temperatures at night slows this respiration rate, preventing the plant from burning through its energy reserves too quickly. A controlled drop of 8 to 12 degrees F signals the plant to produce tighter internodal spacing and denser flowers.
However, crossing the threshold into a 20-degree or 30-degree drop pushes the plant into survival mode. Cold air slows the biochemical reactions necessary for growth. If a room drops from 80 F to 55 F in twenty minutes, the rapid thermal contraction shocks the vascular system. Water and nutrient transport halts. To ensure your crop maintains access to base nutrition during cold swings, you must calculate precise fertilizer ratios. Use our advanced nutrient calculations to adjust for slow metabolic uptake during extreme night drops.
Dew Point Crashes and Vapor Pressure Deficit (VPD)
Rapid temperature drops slash the air’s ability to hold moisture, forcing water directly onto your leaves. Calculating your dew point ensures you never trigger an overnight mold outbreak.
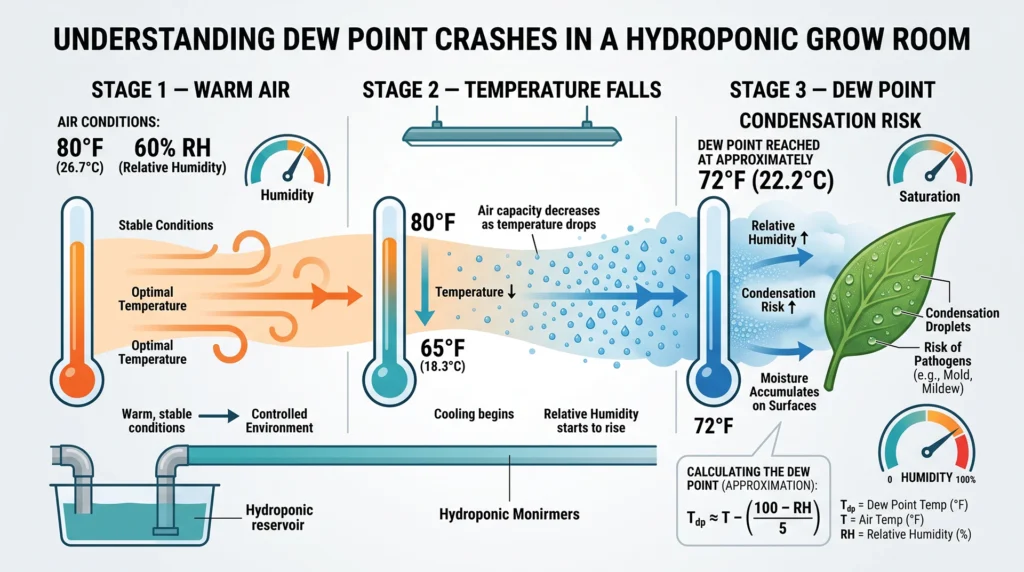
Temperature and humidity are physically locked together. Warm air expands, creating space to hold water vapor. Cold air contracts, squeezing that water out. If your room is running at 80 F and 60% relative humidity, your air is holding a specific volume of water. When the lights shut off and the temperature crashes to 65 F, the air shrinks. It can no longer hold that same volume of water.
The exact temperature where the air is forced to dump its moisture is called the dew point. You can calculate a rough estimate of your dew point using a simple formula:
🌡️ Dew Point Temperature Approximation Formula
To quickly estimate the dew point temperature when relative humidity is above 50%, use the simple approximation formula:
Tdp ≈ T − ((100 − RH) / 5)
- Tdp = Estimated dew point temperature (°F)
- T = Daytime air temperature (°F)
- RH = Relative humidity (%)
📊 Step-by-Step Example Calculation
Given conditions: Daytime Temperature (T) = 80°F, Relative Humidity (RH) = 60%
Tdp = 80 − ((100 − 60) / 5)Tdp = 80 − (40 / 5)Tdp = 80 − 8- Dew Point Temperature (Tdp) = 72°F
If your room drops below 72 F before your dehumidifier can strip the moisture out of the air, condensation forms on every surface in the room. Your walls sweat. Your lights drip. Most dangerously, your plant leaves become coated in a microscopic layer of water. Fungal pathogens require standing water to germinate. A room that crashes past the dew point every single night is guaranteed to develop powdery mildew or botrytis. Maintaining stable temperatures keeps the VPD curve flat and prevents the dew point crash. To combat the moisture-driven pathogens that arise from poor climate control, implement the protocols outlined in our root rot prevention breakdown.
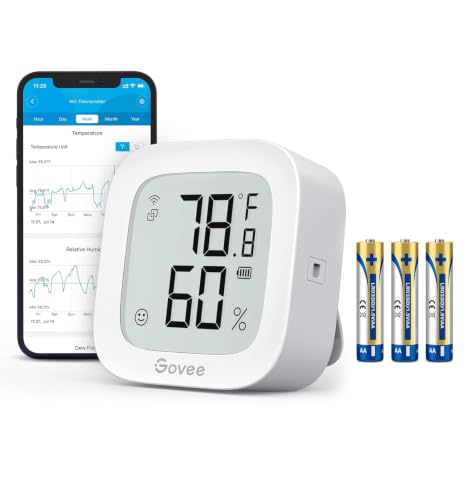
Why it’s necessary: You cannot fix a temperature swing if you cannot see the data. This smart sensor logs your climate 24/7, pushing precise graphs to your phone so you can identify exactly when the dew point crashes occur.nnKey Spec: Swiss-made sensor with 0.54 F accuracy and automated data export.
The Lag Effect: Root Zone vs Canopy Temperatures
Air temperature changes in minutes, while water and soil take hours to adapt. This thermal lag creates a hidden stress vector where roots freeze while the canopy roasts.
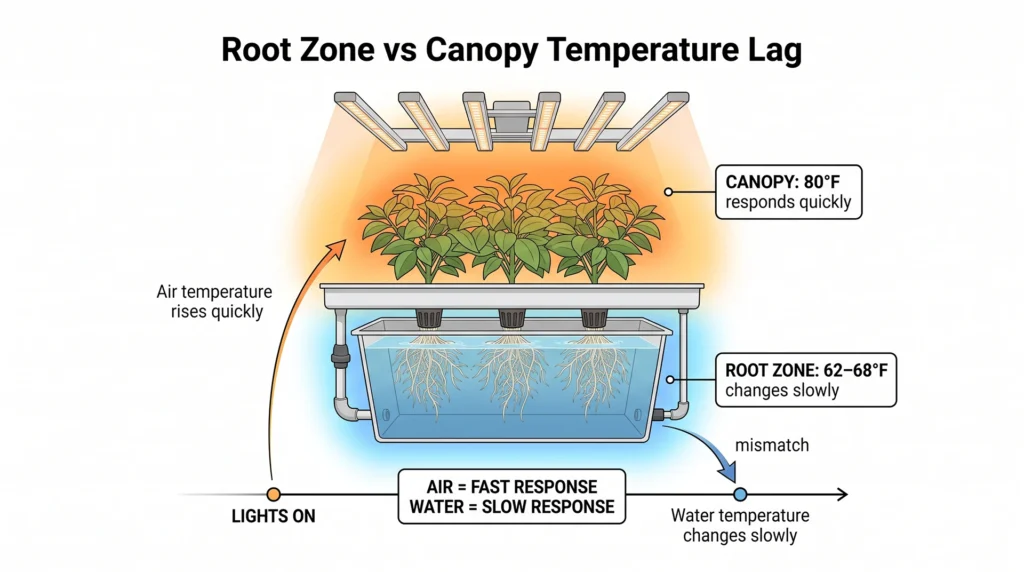
Growers often obsess over the thermometer hanging at canopy level while entirely ignoring the temperature of the root zone. Air has a very low specific heat capacity. It heats up fast and cools down fast. Water and wet media have a massive specific heat capacity. They absorb thermal energy slowly and release it slowly.
When your lights turn on, the air temperature shoots up to 80 F almost immediately. The canopy registers the heat, opens its stomata, and demands water to fuel transpiration. However, the 50-gallon nutrient reservoir sitting on the concrete floor is still sitting at 62 F from the cold night cycle. Cold roots function sluggishly. The viscosity of water is higher at cold temperatures, making it physically harder for the roots to push liquid up the stem. The hot canopy demands water, but the cold roots refuse to deliver it. The plant droops, starved of moisture despite sitting in a flooded system.
This exact thermal lag also disrupts pH stability and nutrient lockout. Cold water restricts the uptake of phosphorus and calcium. If you run heavy thermal swings, you must map out your ionic interactions. Review the chemical relationships in our pH and EC interactions manual to mitigate cold-shock lockout.
Calculating Thermal Mass to Buffer Swings
Introducing dense materials into your grow space acts as a thermal shock absorber. Water reservoirs absorb excess heat during the day and bleed it back into the room at night.
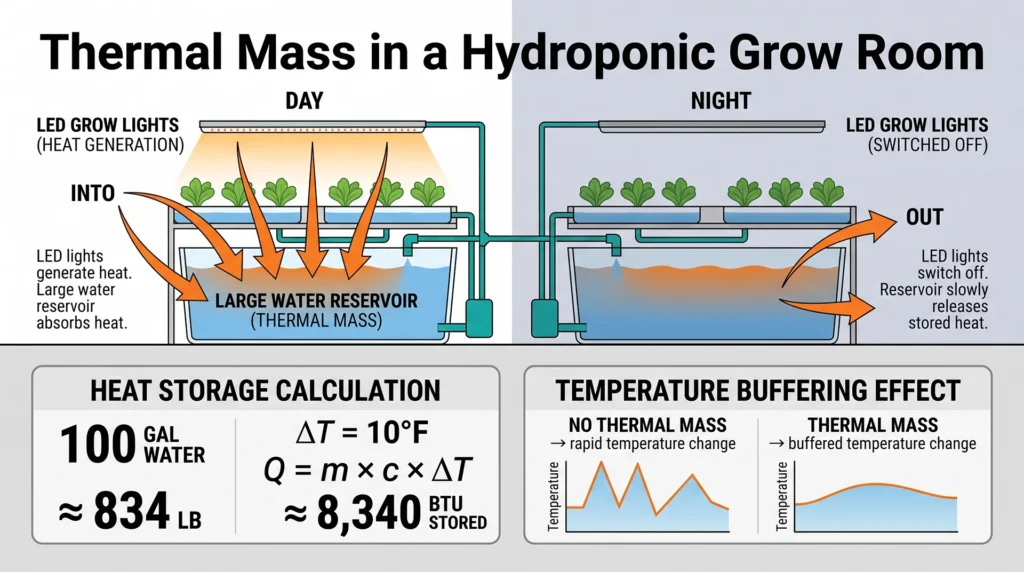
You can engineer your way out of rapid temperature swings without buying expensive electric heaters. Adding thermal mass to your room flattens the climate curve passively. Water is one of the most efficient thermal batteries on the planet. It takes 1 BTU of energy to raise one pound of water by 1 degree Fahrenheit.
Imagine a grow room with a 100-gallon hydroponic reservoir. Water weighs roughly 8.34 pounds per gallon. That reservoir holds 834 pounds of water.
If the room heats up during the day and raises the water temperature by 10 degrees F, that water has absorbed 8,340 BTUs of heat energy.
🌡️ Thermal Energy Calculation Formula
To calculate the total heat energy required to change water temperature, use the sensible heat formula:
Q = m × c × ΔT
- Q = Heat energy added or removed in BTUs
- m = Mass of water in pounds (834 lbs ≈ 100 Gallons)
- c = Specific heat capacity of water (1.0 BTU/lb·°F)
- ΔT = Temperature difference in °F
📊 Step-by-Step Calculation
Q = 834 lbs × 1 BTU/(lb·°F) × 10°FQ = 834 × 1 × 10- Total Thermal Energy (Q) = 8,340 BTUs
When the lights shut off and the air temperature plummets, the reservoir acts as a radiator. It slowly releases those 8,340 BTUs back into the air, fighting the temperature drop and keeping the room stable. You can intentionally increase the thermal mass of your space by keeping sealed 55-gallon drums of water in the corners, or by lining the floor with dense masonry bricks. For further application of physics to lower your HVAC costs, read our passive cooling strategies.
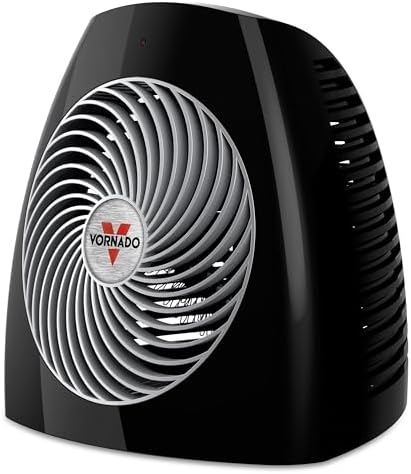
Why it’s necessary: When passive thermal mass is not enough to stop the night crash, this heater gently circulates warm air throughout the entire space rather than blasting intense heat in a single spot.nnKey Spec: Three heat settings (750W, 1125W, 1500W) with built-in thermostatic control.
Controller Selection: Deadbands and Sawtooth Spikes
Standard thermostats create continuous micro-swings in your environment. Upgrading to proportional control eliminates the sawtooth climate graph.
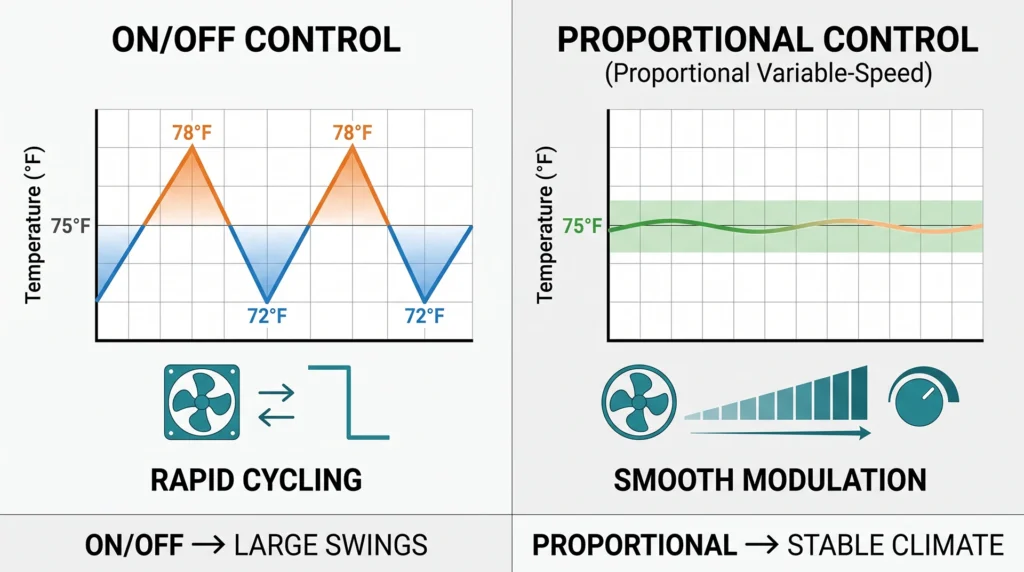
The equipment you use to manage your temperature directly dictates the stability of your room. A standard, cheap thermostat operates on an ON/OFF binary logic with a built-in deadband. A deadband is a temperature gap where the controller does nothing.
If you set a dumb thermostat to 75 F, it waits until the room hits 78 F before turning on the exhaust fan. The fan blasts cold air into the space until the sensor reads 72 F, then it violently shuts off. The lights heat the room back up to 78 F, and the cycle repeats. If you look at a data log of this room, the temperature line looks like the jagged teeth of a saw. These continuous 6-degree swings happening every ten minutes force the plant to constantly adjust its stomatal apertures, wasting massive amounts of metabolic energy.
To fix this, elite engineers use PID (Proportional-Integral-Derivative) controllers or variable speed drives. Instead of slamming fans on at 100% speed, a proportional controller monitors the rate of temperature change. If the room is just slightly too warm, it runs the exhaust fan at 15% speed. It continuously throttles the equipment up and down to match the exact thermal load of the room, keeping the temperature perfectly pinned at 75 F. Selecting the right automation hardware prevents environmental whiplash. Evaluate the best entry-level automation gear in our hydroponic controllers breakdown.
Equipment Coordination and Anticipatory Heating
Timers that overlap create thermal chaos. Coordinating your heating elements to fire exactly ten minutes before your lights turn off prevents the daily temperature freefall.
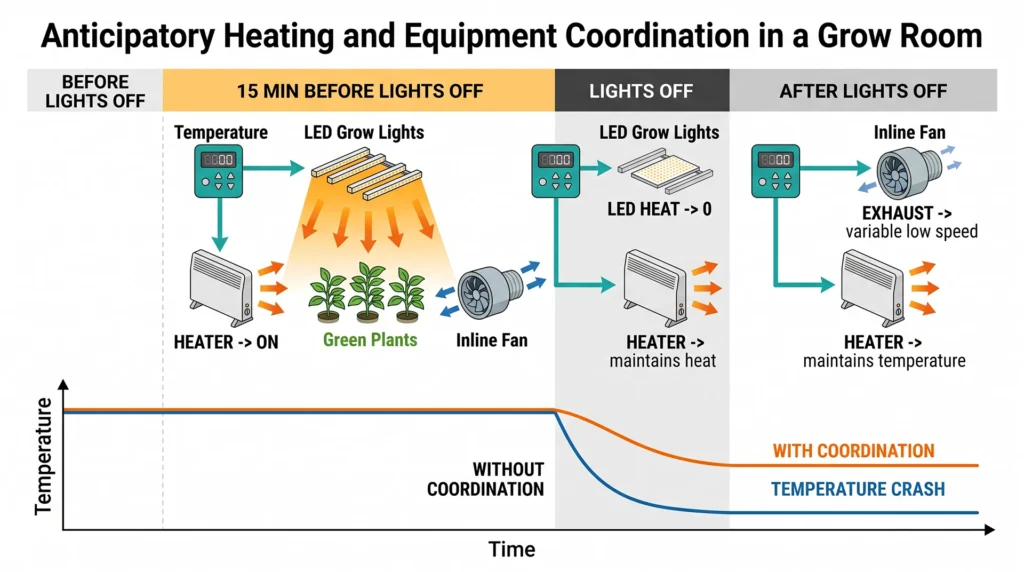
Your grow equipment must operate as a synchronized team. Temperature swings often occur because devices fight each other. If an exhaust fan is programmed to vent humidity, it will often suck all the heat out of the room during the night cycle, causing severe thermal drops.
To achieve maximum stability, utilize anticipatory scheduling. The most dangerous moment in an indoor grow is the exact second the primary lighting array shuts down. To catch the falling temperature, program your space heaters to turn on exactly fifteen minutes before the lights shut off. The room will run slightly hot for a few minutes, but the heater element will be fully warm and actively blowing BTUs into the space right as the lighting heat vanishes. This creates a seamless thermal handoff. You eliminate the lag time it takes for a thermostat to realize the room is cold. For strategies on wiring your hardware to trigger precisely on time, see our smart plugs and timers schematic.

Why it’s necessary: This smart fan features an automated variable speed motor. It ramps up gently to address minor heat fluctuations without blasting your canopy with arctic air, eliminating the sawtooth temperature effect.nnKey Spec: 402 CFM capacity with an intelligent digital controller for temp and humidity targeting.
Intake Air Buffering and Envelope Sealing
Pulling raw weather directly into your grow space guarantees instability. Conditioning the air before it reaches your plants is the hallmark of professional room design.
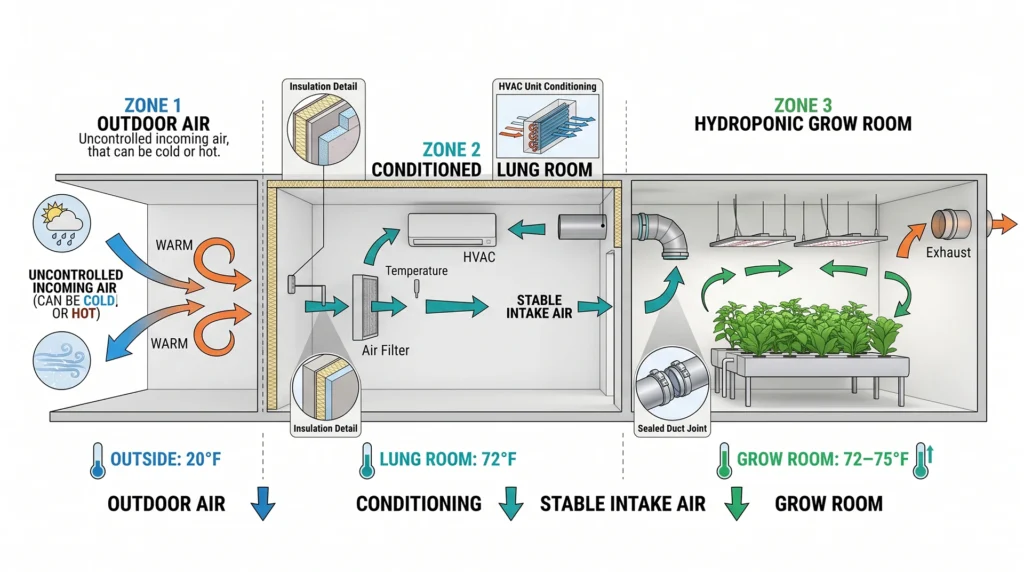
A frequent mistake made by residential growers is ducting intake air directly from the outdoors or an unconditioned attic space. When you pull air directly from the outside, your room temperature becomes completely enslaved to the weather. If a blizzard rolls in at 2:00 AM, your intake fan starts blasting 20 F air straight onto your root zones.
Professional facilities utilize the “lung room” concept. Instead of pulling air from the outside directly into the grow tent, they pull outside air into a larger, heavily insulated exterior room. A central HVAC unit conditions the air in this lung room, stabilizing it to a perfect 72 F. The grow tents then pull their intake air from the lung room. The plants only ever experience perfectly conditioned, buffered air.
If you do not have the space for a dedicated lung room, you must heavily seal the growing envelope. Line the interior of your space with rigid foam board insulation. Seal every ducting joint with aluminum foil tape. Slowing the transmission of heat through the walls is the cheapest way to buy stability. A tightly sealed room requires a fraction of the energy to heat and cool. Growers operating in dense residential buildings face unique airflow challenges. Review our apartment hydroponic setups guide to learn how to route and buffer air in tight quarters without violating lease agreements.
Commercial vs. Residential Stabilization Tactics
Large scale facilities manipulate thousands of cubic feet of air using massive rooftop chillers, while home growers must rely on micro-climate manipulation and efficient tent placement.
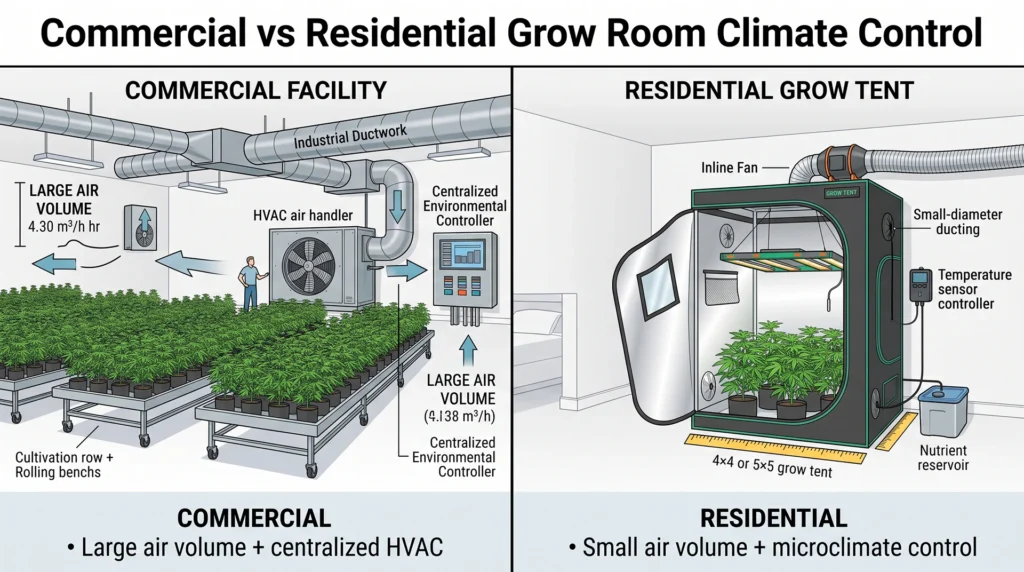
The scale of your operation dictates your thermal stabilization strategy. Commercial warehouse builds have an inherent advantage: air volume. A 10,000 square foot room has an immense volume of air that resists rapid temperature changes simply due to its size. Commercial operators install massive rooftop chiller units and hot water bypass loops to maintain precise setpoints. They calculate the total sensible and latent heat loads of the room and size their air handlers to match the exact BTU output of the lighting grids.
Residential growers working in 4×4 or 5×5 tents suffer from low air volume. Small spaces react violently to heat input. A single high-powered light can push a small tent past 90 F in minutes. To combat this, residential growers must rely on strategic placement. Putting a grow tent inside a temperature-controlled bedroom automatically stabilizes the exterior envelope. If you place your tent in a basement, elevate the actual floor of the tent on wooden pallets to create an air gap. This air gap prevents the concrete slab from acting as a massive heat sink that constantly drains thermal energy away from your root zones. If you fail to manage the micro-climate properly, you will experience cascading failures in plant health. Learn how to diagnose resulting plant stress in our troubleshooting environmental issues handbook.
Frequently Asked Questions
What is the maximum safe temperature drop from day to night?
Aim for a drop of no more than 10 to 15 degrees F between the lights-on and lights-off phases. For example, dropping from 80 F to 68 F is perfectly healthy and mimics a natural outdoor evening. Dropping 20 degrees or more shocks the plant’s vascular system, slows metabolic function, and severely increases the risk of dew point condensation on the foliage.
Why does my grow tent overheat the second my lights turn on?
Your exhaust fan is undersized or your intake air is too warm. Every watt of lighting generates 3.41 BTUs of heat. If your fan cannot exchange the total volume of air in the tent fast enough to vent those BTUs, heat accumulates exponentially. You must upgrade to a higher CFM exhaust fan or switch to dimmable LED fixtures to lower the thermal output.
Will a cold nutrient reservoir slow down my plant growth?
Yes. Cold water increases in viscosity, making it harder for the root pressure to push liquid up the xylem. Cold temperatures also directly lock out the uptake of specific minerals, most notably phosphorus. If your reservoir drops below 62 F, plant growth stunts and stems turn purple. Keep reservoirs buffered around 68 F.
How do I prevent humidity from spiking when the temperature drops?
Cold air holds less water vapor than warm air. When your room cools down at night, the relative humidity physically must rise even if no new water is added to the room. To stop the spike, your dehumidifier must turn on proactively as the temperature begins to fall, stripping the moisture out of the air before it reaches the dew point.
Is it better to run my exhaust fan constantly or on a thermostat?
If you run an exhaust fan on a standard ON/OFF thermostat, you will create rapid, aggressive temperature swings as the fan blasts on and shuts off. It is far superior to use a variable speed controller that runs the fan continuously at a low speed, ramping up only when extra heat needs to be purged. This creates a flat, stable climate graph.
How does thermal mass actually help stabilize my grow room?
Thermal mass absorbs energy slowly and releases it slowly. A large volume of water or dense stone inside your room will absorb heat from your lights during the day. When the lights shut off, that stored heat radiates back into the air, preventing the room from instantly turning freezing cold. It acts as a natural, electricity-free shock absorber for your climate.
Can fixing temperature swings actually increase my harvest weight?
Absolutely. Rapid temperature swings force the plant to constantly close and open its stomata in a panic response to environmental stress. While the plant is defending itself, it is not building flowers or creating essential oils. A stable environment maximizes the time the plant spends synthesizing sugars. Calculate your exact potential gains using our hydroponic yield calculator.
Final Stabilization Checklist
Achieving a perfectly flat climate graph requires engineering your space, not just reacting to it. You must insulate your exterior boundaries, properly size your exhaust and intake fans, and coordinate your heating and cooling equipment with intelligent controllers. Pay attention to the thermal lag in your water reservoirs and always maintain a safe buffer above the dew point. Stop battling your environment manually and let the physics of thermal mass and proportional control do the heavy lifting. Head over to our main hub for deeper technical schematics on exactly how to route and optimize your environmental controls.
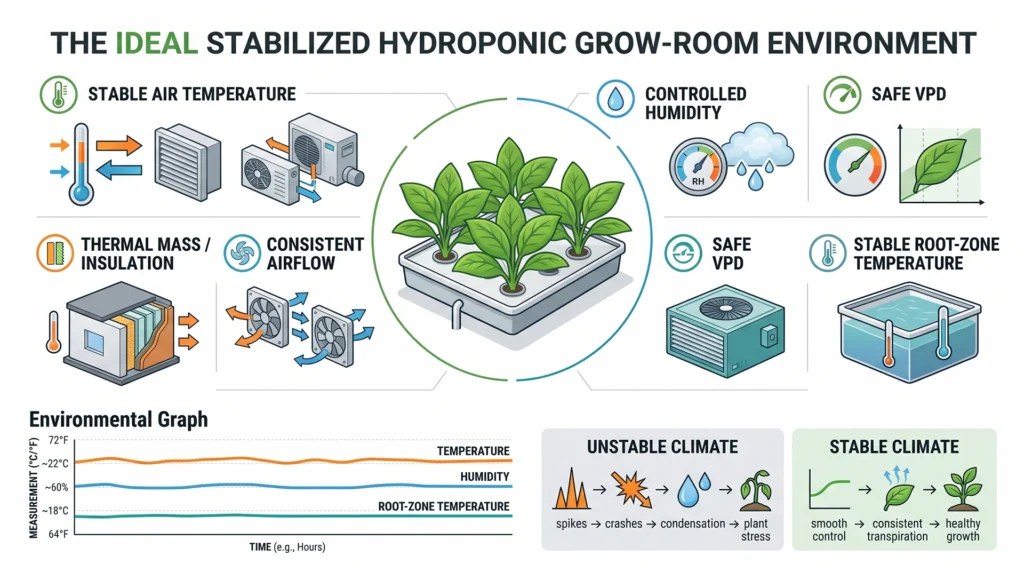
Calculate Your Grow Room’s Thermodynamic Targets Instantly
Don’t let manual math stand between you and a rock-solid grow room environment. Use our interactive, science-backed climate calculator below to estimate your exact dew point limits, calculate lighting thermal output, and determine the precise volume of water thermal mass required to buffer temperature crashes passively
💡 MistCulture Pro Tip: If you discover that your tent requires more than 50 gallons of water to buffer your temperature swings, do not panic! You do not need to cram a massive reservoir into your tent. Instead, start by insulating your grow room walls with rigid foam boards and coordinating your heaters to turn on 15 minutes before lights-out—this drastically lowers the thermal load your buffer needs to absorb
Prefer Visual Learning? Watch the Complete Video Guide
If you want to see these thermodynamic principles in action, check out our comprehensive video breakdown below.
We map out the physics behind the lights-off temperature crash, walk through real-world dew point calculations to safeguard your canopy against powdery mildew, and show you exactly how to install thermal mass buffers and PID smart controllers in your own space. Learn how to transform your climate graph from a stressful sawtooth spike into a flat, stable, high-yielding line.

Continue Your Learning Journey