Hydroponic Vanilla Orchids: Vertical Trellising & Hand Pollination

Table of Contents
- Botanical Physiology of Vanilla planifolia
- Climate Control Engineering for Tropical Simulation
- Vertical Trellis and Aerial Root Management
- Nutrient Formulations and Media Chemistry
- Lighting Specifications for Understory Vines
- The Mechanics of Hand Pollination
- Curing and Quality Processing
- Pests, Diseases, and Troubleshooting
- Economic Analysis and System Scaling
- Frequently Asked Questions
- Final System Considerations
Disclosure: MistCulture summarizes verified product specs, engineering data, and community feedback. We may earn an affiliate commission if you purchase through our links. Regulations vary by location; this content is for educational purposes only.
Cultivating Vanilla planifolia represents a high-tier challenge in controlled environment agriculture. Vanilla beans command exceptional market prices, frequently retailing at 600 USD or more per kilogram for Grade A quality, driven by intensive labor requirements and strict environmental demands. Transforming a wild tropical climbing vine into a predictable hydroponic crop requires exact climate simulation, engineered vertical trellising, and rigorous hand pollination protocols. Growers who master these variables can convert limited indoor square footage into a highly profitable specialty crop operation.
Botanical Physiology of Vanilla planifolia
Understanding the physiological mechanics of the vanilla orchid dictates the design of the hydroponic system. Vanilla is a monopodial climbing orchid that produces two distinct types of roots. Terrestrial roots anchor the base of the plant in the growing medium and absorb primary macro-nutrients. Aerial roots emerge from the vine nodes as it climbs, serving a dual purpose: adhering to physical structures and absorbing atmospheric moisture and dissolved nutrients directly from the air.
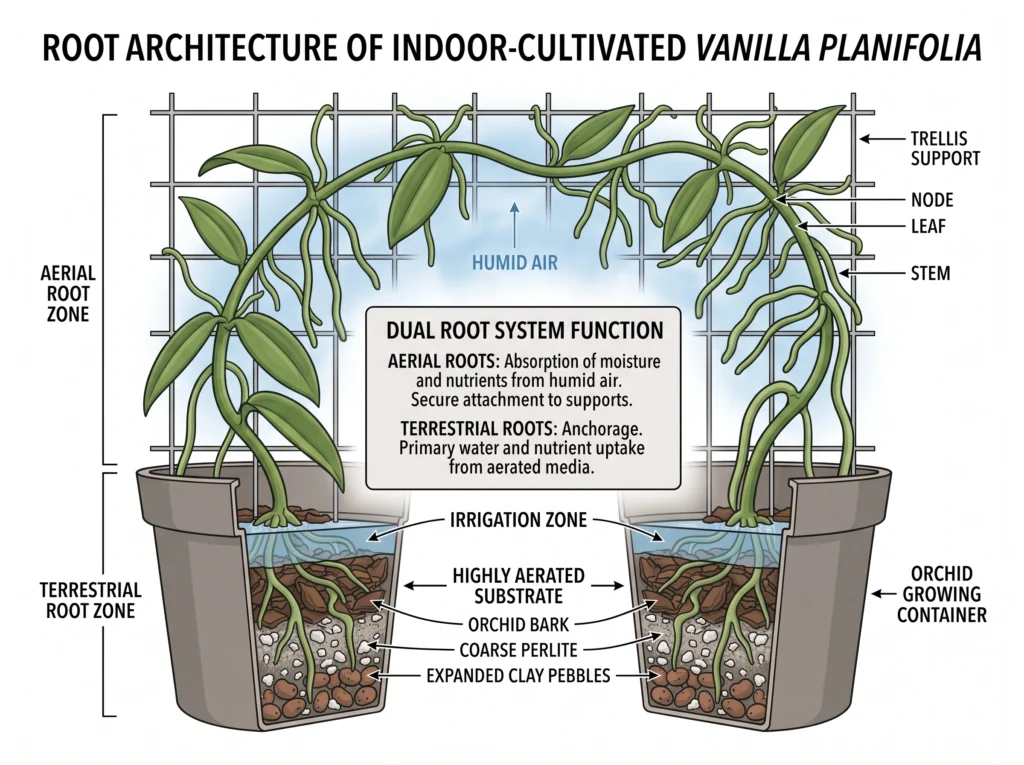
System design must cater to both root systems. A standard deep water culture setup will drown the terrestrial roots, while a dry vertical trellis will starve the aerial roots. Successful cultivation relies on a hybrid approach using a porous, fast-draining base media coupled with high-humidity aerial misting. The plant operates on a sluggish metabolic timeline compared to leafy greens. A vanilla vine grown from a cutting requires three to four years of vegetative growth before initiating its first reproductive flowering phase.
Climate Control Engineering for Tropical Simulation
The native habitat of the vanilla orchid spans the understory of tropical forests in Mexico and Madagascar. Replicating this environment requires strict management of temperature, humidity, light, and airflow. The precise interplay between temperature and relative humidity dictates the Vapor Pressure Deficit (VPD), which controls the plant’s transpiration rate and nutrient uptake.
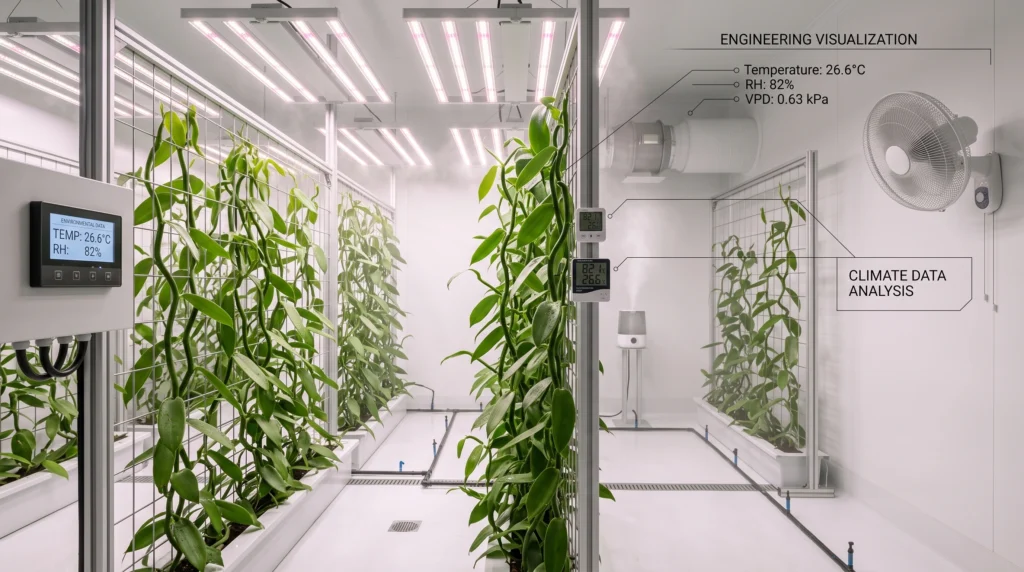
Target environmental parameters:
- Daytime Temperature: 75-82 F (24-28 C)
- Nighttime Temperature: 65-70 F (18-21 C)
- Relative Humidity (RH): 80-85% continuously
- Light Levels: 150-250 micromoles/m2/s (approx. 60-70% shade)
- CO2 Enrichment: 800-1,000 ppm during light cycles
Calculating the exact VPD for a vanilla grow room helps prevent stomatal closure. At a target daytime temperature of 80 F (26.6 C) and 82% relative humidity, the saturation vapor pressure (SVP) is roughly 3.49 kPa.
Actual vapor pressure (AVP) = 3.49 * 0.82 = 2.86 kPa.
VPD = 3.49 – 2.86 = 0.63 kPa.
This low VPD of 0.63 kPa keeps the stomata open without dehydrating the delicate aerial roots. Managing this balance indoors often requires specialized equipment. For sizing your enclosure to handle this humidity load, reviewing a grow tent buying guide provides baseline insulation and ventilation metrics.
Constant high humidity presents a risk for fungal pathogens if the air becomes stagnant. Gentle, oscillating air movement is mandatory to disrupt micro-climates of saturated air clinging to the leaves while avoiding direct drafts that could physically chill or dry the vine tips. Relying on advanced sensors and relays is the only way to manage these narrow parameters reliably. Evaluating options among the best hydroponic controllers under 200 will help you automate humidifiers, exhaust fans, and cooling systems to maintain a stable VPD.

- Powerful Mist Output: Enjoy a pleasant mist experience with our humidifier. Equipped with 10 head ultrasonic mist makers…
- Automated Humidity Control: Say goodbye to manual adjustments! Set your desired humidity level(20-95%RH) with our advanc…
- Versatile Water Supply Options: Choose between direct water line or pump connection for ultimate convenience. Our automa…
- Why it’s necessary: Standard household humidifiers hold too little water and fail quickly under continuous operation. A commercial ultrasonic unit provides the required 80-85% RH without generating excess heat, ensuring aerial roots remain turgid.
- Key Spec: 15L capacity / 1500mL per hour mist output / Built-in humidistat.
Vertical Trellis and Aerial Root Management
In the wild, vanilla vines can scale tree canopies to heights exceeding 50 feet. Indoor cultivation restricts this vertical spread, forcing growers to train the vines across structured trellises to maximize linear vine length within a confined space. Commercial operations loop the vines around vertical supports, maintaining a working height of 6 to 8 feet to facilitate hand pollination and harvesting.
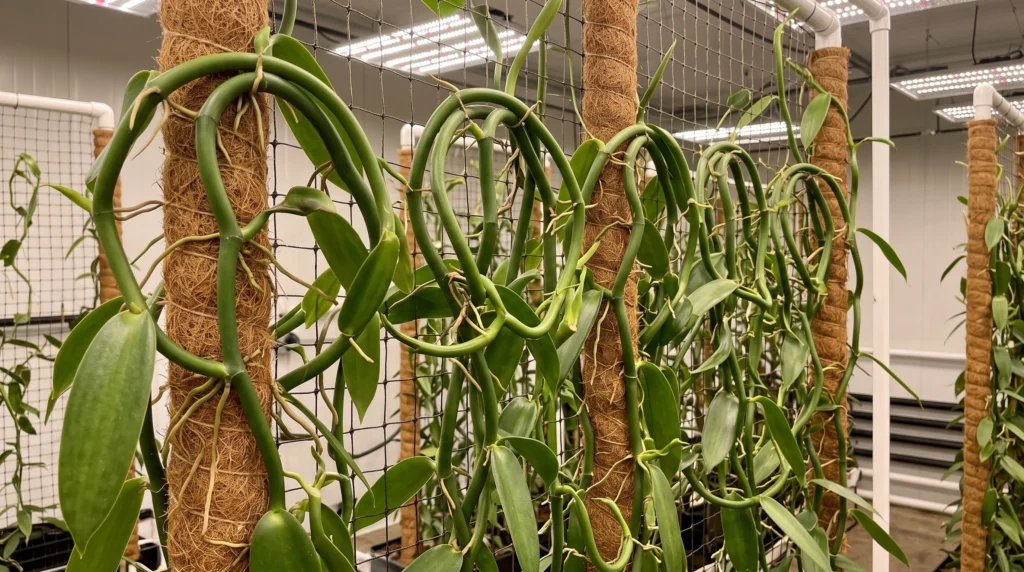
The trellis material must support the weight of a mature, water-heavy vine and provide a textured surface for the aerial roots to grasp. Smooth PVC pipes are ineffective unless wrapped in a fibrous material.
Trellis Construction Materials:
- Coir Poles: Stackable PVC pipes wrapped in natural coconut coir fiber.
- Cedar Slabs: Rough-sawn, untreated cedar planks resistant to rot.
- Hardware Cloth Cylinders: Galvanized 1×1 inch mesh rolled into cylinders and stuffed with long-fiber sphagnum moss.
Implementing a vertical system for heavy vining crops requires robust structural engineering. Before building, assessing load-bearing designs through a vertical hydroponics review can prevent catastrophic frame collapses under the weight of mature fruiting vines.
As the vine grows, it is trained clockwise around the trellis. Once the vine reaches the top of the 6-foot support, it is carefully bent downwards toward the base media, creating a loop. This “looping” technique induces stress at the bend, which alters hormonal distribution and encourages the development of flowering racemes at the stress points.
Aerial roots must be misted to simulate tropical rain. The misting nozzles should deliver droplets in the 50-micron range, large enough to settle on the roots but small enough to evaporate before pooling and causing rot. Designing the misting circuit requires precise pressure calculations based on the total number of nozzles. If you are configuring a custom manifold, consulting a hydroponic pump sizing guide ensures your pump delivers the necessary PSI to atomize the nutrient solution effectively without over-taxing the motor.

- Reusable and Versatile: Made of pliable, braided, and heavy-duty polyester, this netting can be used for vertical garden…
- Easy to Install and Adjust: This tellis netting comes in a size of 5 x 30 ft., and you can easily cut it to the size you…
- Save Space: You can direct the growth of your plants and maximize your space by weaving the netting around poles or othe…
- Why it’s necessary: Vanilla vines require lateral support as they are looped downwards. Standard string trellises cut into the heavy, fleshy stems, while thick nylon mesh supports the weight without causing tissue damage.
- Key Spec: 5×15 ft continuous roll / 6-inch square mesh / Rot-resistant nylon.
Nutrient Formulations and Media Chemistry
Vanilla orchids are epiphytic in nature, meaning they are adapted to scavenging scarce nutrients from decaying organic matter and rainwater runoff. Applying a standard, high-concentration hydroponic tomato nutrient solution will instantly burn the roots and kill the plant. The electrical conductivity (EC) must be kept exceptionally low.
Vegetative Growth Phase (Years 1-3):
- Target EC: 0.6 – 0.8 mS/cm
- Target pH: 5.5 – 6.0
- NPK Ratio: 3-1-3 focusing on calcium nitrate and potassium sulfate.
Generative/Flowering Phase (Years 3+):
- Target EC: 0.8 – 1.0 mS/cm
- Target pH: 5.5 – 6.0
- NPK Ratio: 1-3-4 emphasizing phosphorus for blossom development and potassium for pod swelling.
Because exact measurements are required to prevent toxicity, batching your own raw salts allows complete control over the parts-per-million (PPM) of individual elements. Utilizing a hydroponic nutrient calculator takes the guesswork out of formulating custom dry salt blends tailored to epiphytic orchids.
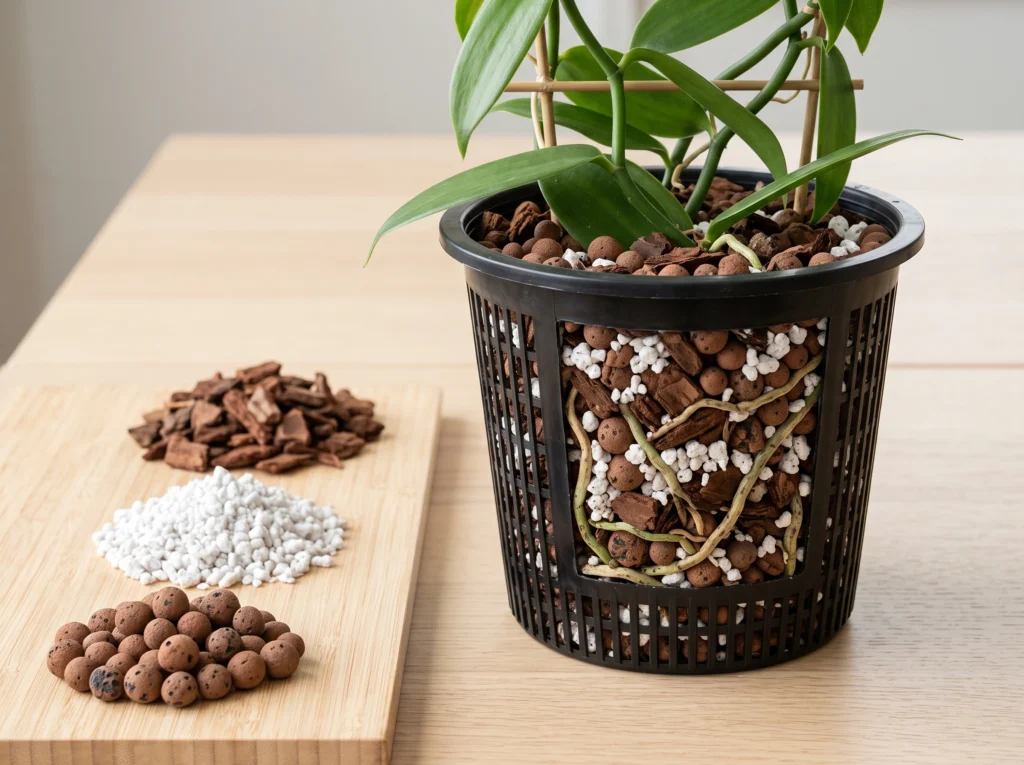
The base media holding the terrestrial roots must drain rapidly. A mix consisting of 50% medium-grade orchid bark, 30% coarse perlite, and 20% expanded clay pebbles provides the exact air-to-water ratio the base roots demand. The terrestrial roots should be irrigated sparingly—only when the top two inches of the bark mix feel completely dry. Overwatering the base pot is the leading cause of vanilla vine mortality. To fully grasp how nutrient salts interact with bark-based substrates and affect your pH drift, review an up-to-date hydroponic pH and EC guide.
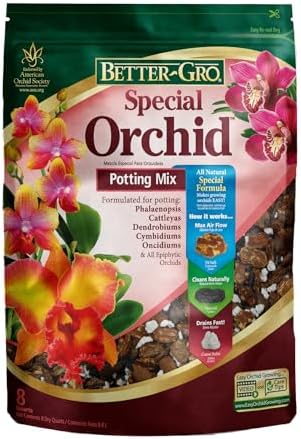
- MULTI-PURPOSE FORMULA FOR ALL EPIPHYTIC ORCHIDS: Specially developed for growing a wide range of orchids, including Catt…
- OPTIMAL ROOT GROWTH AND DEVELOPMENT: A dynamic blend of western fir bark, hardwood charcoal, and sponge rock promotes he…
- DRAINAGE AND AIR FLOW FOR THRIVING ORCHIDS: This unique mix ensures excellent drainage and airflow, mimicking orchids’ n…
- Why it’s necessary: Hydroponic vanilla requires a base anchor that will not compact or decompose quickly in a high-humidity environment. This specific bark blend resists compaction, ensuring maximum oxygen transfer to the terrestrial roots.
- Key Spec: 4-quart bag / Heat-treated Douglas Fir bark / Blended with coarse perlite.
Lighting Specifications for Understory Vines
Vanilla orchids burn under intense, direct light. In their native habitat, they receive dappled sunlight filtered through the forest canopy. In a hydroponic setting, utilizing adjustable LED fixtures is the most efficient way to replicate this exact lighting profile.
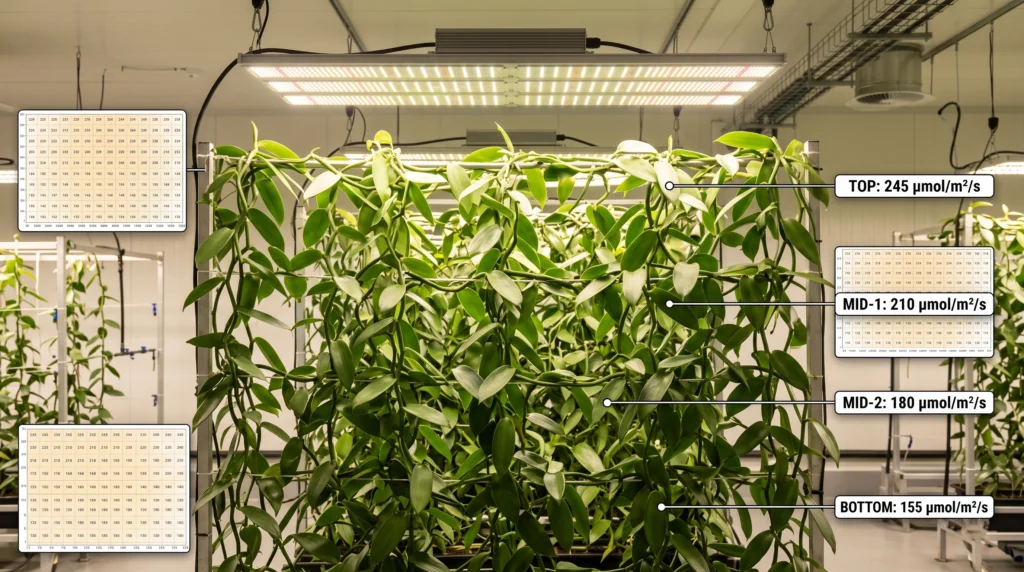
Target Photosynthetic Photon Flux Density (PPFD) ranges from 150 to 250 umol/m2/s. Exceeding 300 umol/m2/s will cause the leaves to turn pale yellow and eventually scorch. The light spectrum should be broad, heavily weighted in the blue spectrum (400-500nm) during the years of vegetative growth to keep internode spacing tight, and shifted toward the red spectrum (600-700nm) to stimulate flowering in mature vines. Mapping out the exact hanging height of your fixtures to achieve a perfect 200 umol/m2/s across the vertical trellis requires understanding light spread; referencing an LED distance and PPFD guide will ensure your canopy receives uniform illumination without hot spots.
The Mechanics of Hand Pollination
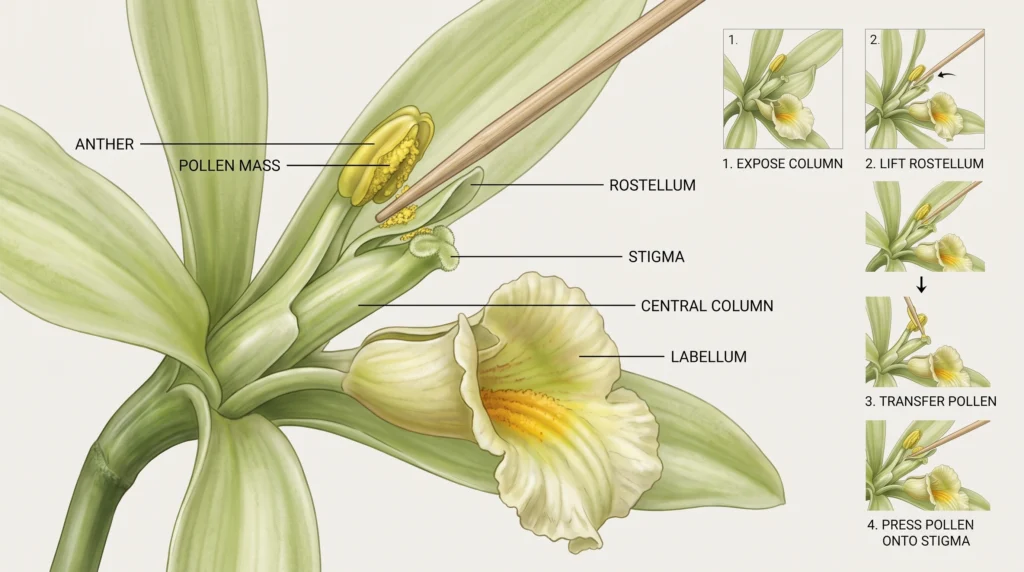
The most labor-intensive aspect of vanilla cultivation is pollination. The Vanilla planifolia flower is anatomically designed to prevent self-pollination. A physical barrier called the rostellum separates the male anther (which holds the pollen) from the female stigma. In the wild, specific species of Melipona bees breach this barrier. In an indoor hydroponic environment, the grower becomes the bee.
Vanilla flowers open sequentially along the raceme, blooming in the early morning and dying by mid-afternoon. The window for successful pollination is strictly limited to 6 to 8 hours.
Step-by-Step Hand Pollination:
- Tool Selection: Use a clean, narrow instrument. A bamboo skewer, toothpick, or specialized pollination needle is required.
- Expose the Column: Gently hold the flower with your non-dominant hand. Use the needle to tear the lip (labellum) downwards, exposing the central column housing the reproductive organs.
- Lift the Rostellum: Insert the needle just below the anther cap and lift the rostellum flap upwards and out of the way.
- Transfer the Pollen: With the rostellum lifted, press your thumb gently against the anther cap, pushing the sticky pollen mass down onto the sticky surface of the stigma below.
- Release and Mark: Withdraw the needle and release your thumb. The pollen is now pressed against the stigma. Tie a small piece of colored thread around the base of the pollinated flower to track your success rate.
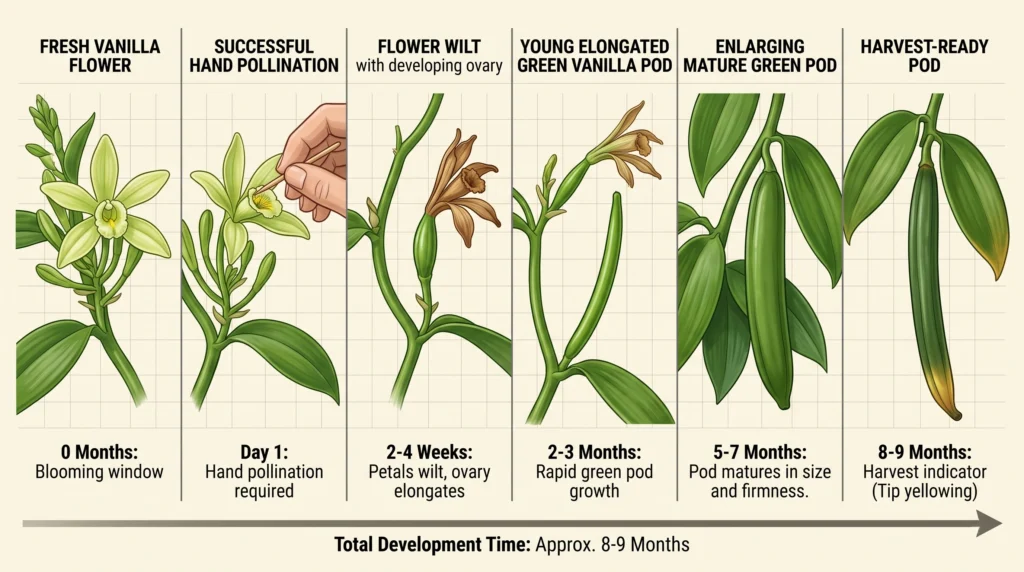
A successful pollination results in the flower wilting but remaining attached to the stem while the base slowly swells into a green pod. If the process fails, the entire flower will drop off the stem within 48 hours. A mature vine can support roughly 40 to 50 beans. Over-pollinating a single vine will drain its carbohydrate reserves, resulting in stunted, low-quality pods.
Curing and Quality Processing
Harvesting occurs 8 to 9 months after pollination. The pods must remain on the vine until the very tip begins to turn pale yellow. Harvesting too early yields beans with negligible vanillin content; harvesting too late causes the pods to split open, ruining their market value.
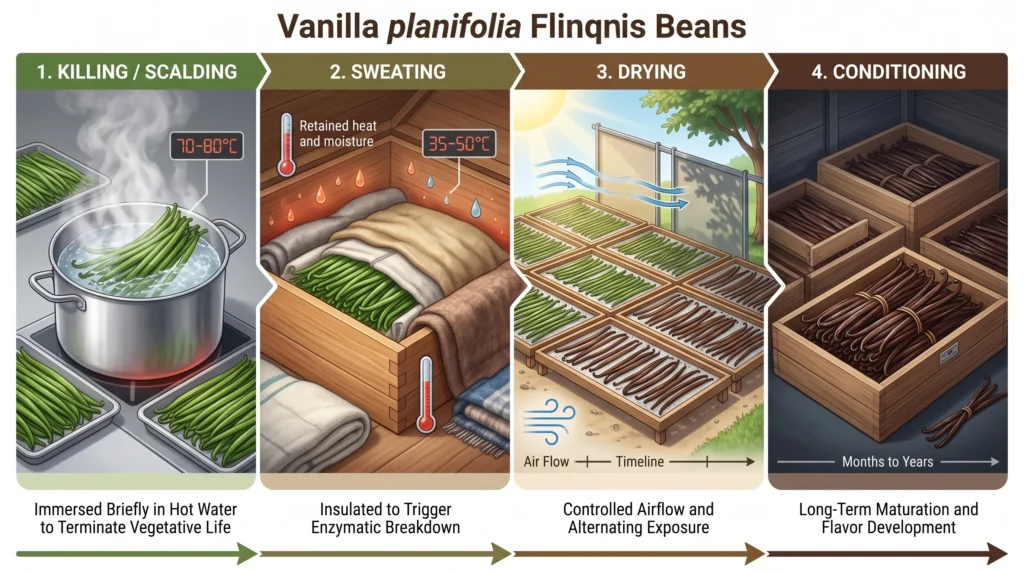
The transition from a flavorless green pod to a highly aromatic, dark brown vanilla bean requires a complex enzymatic curing process consisting of four stages:
- Killing (Scalding): The green beans are submerged in water heated exactly to 150 F (65 C) for 2.5 to 3 minutes. This halts the vegetative life of the pod and bursts the cell walls, releasing the enzymes required for flavor development.
- Sweating: The hot beans are rapidly wrapped in wool blankets and placed inside insulated wooden boxes for 48 hours. The high heat and humidity trigger enzymatic reactions that convert glucovanillin into vanillin.
- Drying: The beans are spread on racks in a well-ventilated room, alternating between gentle sun exposure and shade over 3 to 4 weeks. The target is a slow reduction of moisture content down to 25-30%. Rushing this step causes the beans to become brittle.
- Conditioning: The dried beans are bundled, tied, and sealed in wax paper-lined boxes for an additional 3 to 6 months. This aging process allows the complex matrix of over 200 flavor compounds to mellow and integrate.
Pests, Diseases, and Troubleshooting
Vanilla grown in high-humidity hydroponic systems faces constant pressure from fungal pathogens and specific soft-bodied insects.
Fungal Pathogens:
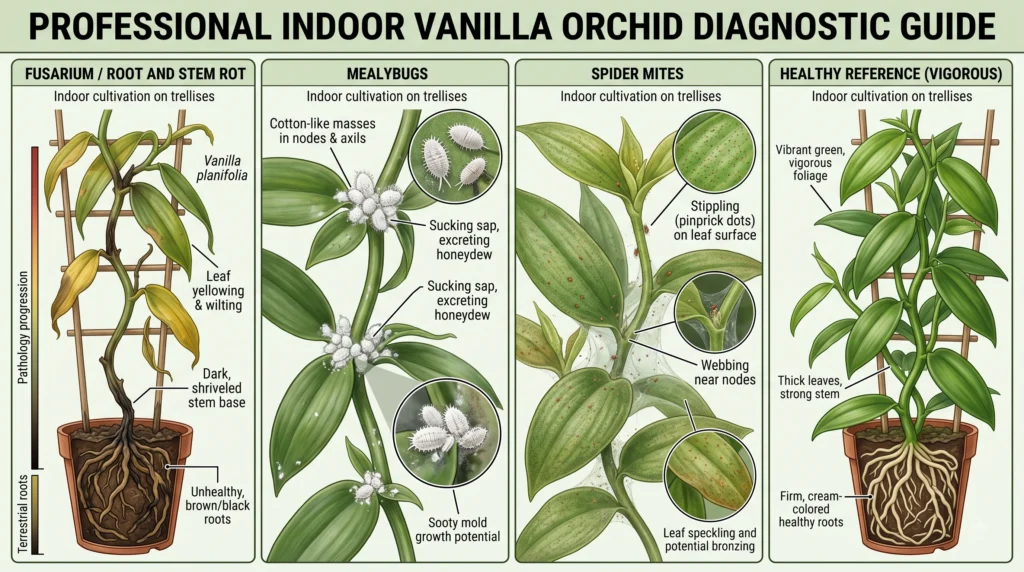
Fusarium oxysporum (Root and Stem Rot) is the most devastating disease for vanilla. It manifests as dark, mushy lesions at the base of the terrestrial stem, eventually girdling the vine and cutting off water transport. Prevention requires keeping the base media well-aerated and avoiding waterlogged terrestrial roots. Incorporating beneficial bacteria into your media can outcompete pathogenic fungi. A deep dive into utilizing these biological shields is available in the hydroponic microbes and enzymes guide.
Pests:
Spider mites and mealybugs thrive in the dense overlapping foliage of a trellised vanilla vine. Mealybugs cluster in the leaf axils, draining sap and secreting honeydew, which leads to sooty mold. Standard chemical pesticides damage the delicate orchid tissues. Establishing a proactive hydroponic IPM (Integrated Pest Management) guide utilizing predatory mites (Phytoseiulus persimilis) and localized 70% isopropyl alcohol swabs manages infestations without chemical shock.
If vines show yellowing leaves without the presence of pests or root rot, the issue is likely environmental. Evaluate your lighting intensity and confirm your nutrient pH has not drifted outside the 5.5 to 6.0 range. For systematic diagnosis of common indoor growing issues, refer to a comprehensive hydroponic troubleshooting guide.
Economic Analysis and System Scaling
The financial return on hydroponic vanilla is substantial but delayed. Assuming a 10-vine system operating optimally:
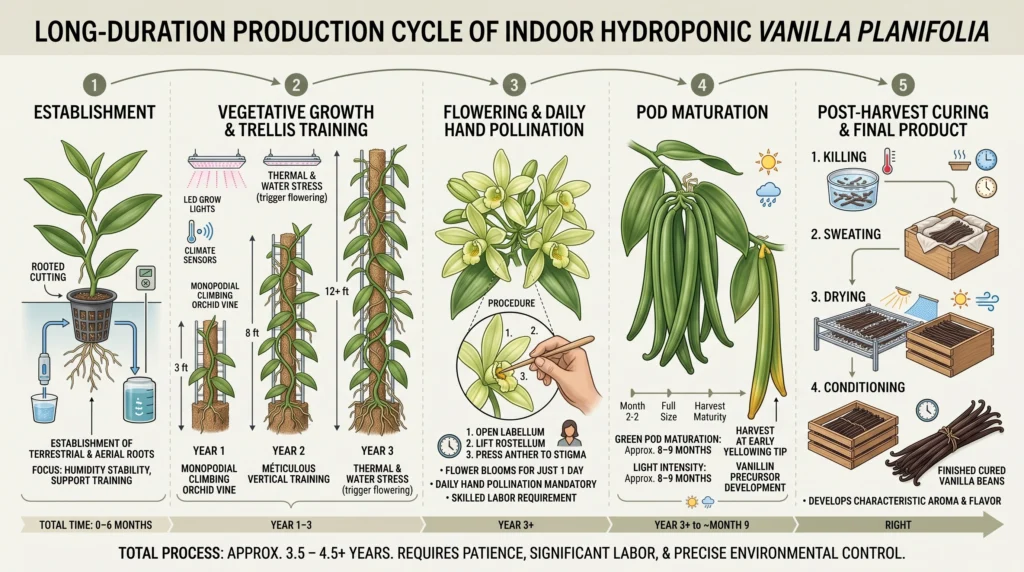
- Timeline: 3 years to first flower, plus 9 months for bean maturation, plus 4 months for curing.
- Yield: A mature vine produces roughly 50 beans per year. 10 vines = 500 beans.
- Weight: Average cured Grade A bean weighs 4 grams. Total yield = 2,000 grams (2 kg).
- Revenue: At a retail rate of 600 USD per kg, gross revenue is roughly 1,200 USD annually per 10 vines, operating within a 4×8 foot footprint.
Initial capital expenditure covers the lighting, commercial humidification, RO water filtration, and custom trellising. The operational costs include strict climate control power consumption and premium orchid fertilizers. The labor cost of daily hand pollination during the blooming season is the heaviest recurring operational expense.
Frequently Asked Questions
How long does it take to grow vanilla beans hydroponically?
From a rooted cutting to the first harvested and cured bean, the timeline is approximately 4 to 4.5 years. Once the vine reaches maturity, it will produce a crop annually.
Can I grow vanilla in a standard DWC (Deep Water Culture) bucket?
No. Submerging the terrestrial roots of an epiphytic orchid in a static water reservoir will quickly induce root rot. Vanilla requires a highly aerated bark/perlite substrate for its base roots and high-humidity misting for its aerial roots.
What should the nutrient PPM be for vanilla orchids?
Vanilla demands very low nutrient concentrations. During vegetative growth, keep the total dissolved solids around 300-400 PPM (EC 0.6 – 0.8). Pushing concentrations higher will burn the aerial root tips and stunt vine growth.
Why are my vanilla flowers dropping off before forming beans?
Flower drop usually results from either un-pollinated flowers, unsuccessful hand pollination technique, or severe temperature/humidity fluctuations within the grow room during the blooming cycle.
Do I need a special grow light for vanilla orchids?
While you don’t need a specific “orchid” light, you must use a dimmable LED fixture. Vanilla vines require lower light intensities (150-250 PPFD) than fruiting crops like tomatoes. Over-lighting will bleach and scorch the leaves.
Final System Considerations
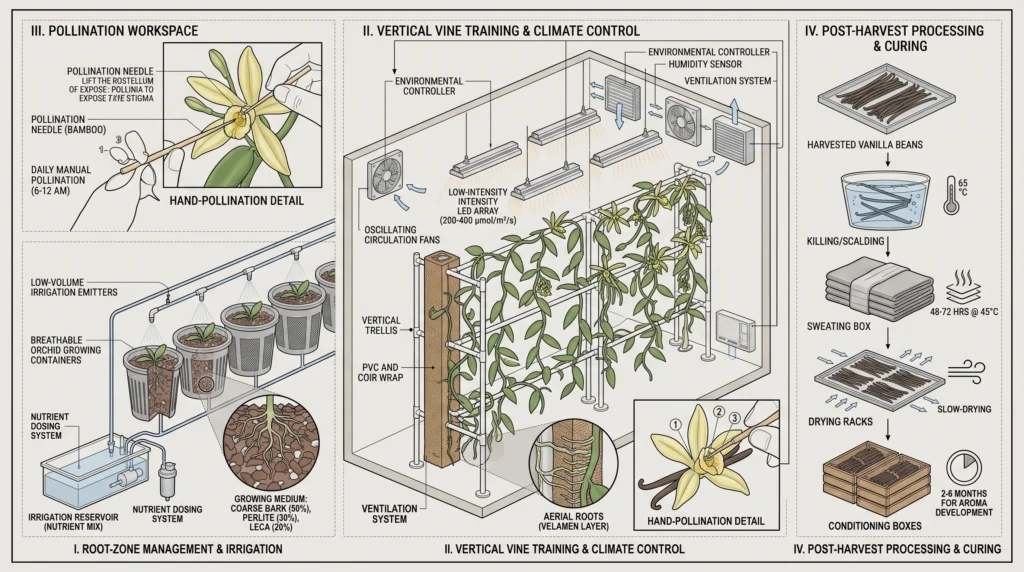
Mastering the cultivation of hydroponic vanilla requires patience, precise environmental control, and dedication to the daily tasks of vine training and hand pollination. While the learning curve is steep, the ability to harvest premium, aromatic vanilla beans indoors is a remarkable horticultural achievement. The mechanics of balancing VPD, low-EC nutrient delivery, and simulated tropical micro-climates push growers to refine their technical skills. For those looking to expand their knowledge into other long-term, high-value indoor crops, exploring the mechanics outlined in hydroponic systems for fruits provides the next logical step in mastering advanced controlled environment agriculture.

Continue Your Learning Journey