Turn PVC Pipe Into a Real NFT Channel: The Crown Wedge Method

Table of Contents
- The Fluid Dynamics of Standard PVC in Hydroponics
- Slope Mechanics: Why Gradient Dictates Film Thickness
- Engineering the Crown Wedge Insert
- Designing the Outlet and Drain Assembly
- Testing and Validation Protocol (Empirical Flow Calibration)
- Real-World Application: Commercial vs. Residential Builds
- Troubleshooting Common Crown Wedge Modifications
- Frequently Asked Questions
Disclosure: MistCulture summarizes verified product specs, engineering data, and community feedback. We may earn an affiliate commission if you purchase through our links. Regulations vary by location; this content is for educational purposes only.
Nutrient Film Technique (NFT) relies on a single, non-negotiable variable: a consistent, highly oxygenated, millimeter-thin film of nutrient solution flowing continuously past the plant root zone. When system builders substitute commercial extruded NFT channels with standard round PVC pipe to save on upfront material costs, they encounter a hydraulic problem that most online guides ignore. A round PVC pipe does not possess the engineered geometry required to maintain a uniform thin film. Without internal structural modification, the nutrient solution pools, the film thickness varies drastically from the inlet to the outlet, and the system fails to deliver the oxygenation rates required for maximum crop yield.
Commercial channels use a flat or slightly ribbed bottom to spread water evenly. A standard PVC pipe forces water into the lowest center point, creating a deep, narrow, and fast-moving river rather than a wide, slow-moving film. This deep pooling is the primary mechanism behind the stagnant DIY system failures that many first-time builders experience.
The engineering fix requires altering the internal geometry of the pipe. By fabricating and installing a controlled, wedge-shaped flow path inside the round pipe, you can approximate the internal crown profile of a commercial NFT channel. This guide covers the fluid dynamics of PVC, exact slope calculations, and the specific crown wedge modifications needed to make round pipe perform to commercial standards.
The Fluid Dynamics of Standard PVC in Hydroponics
Standard round PVC pipe forces nutrient solution to pool in a deep, narrow center channel, suffocating roots. Commercial NFT systems require a flat, spread-out film to maximize the surface area exposed to air, ensuring high dissolved oxygen levels at the root boundary layer.
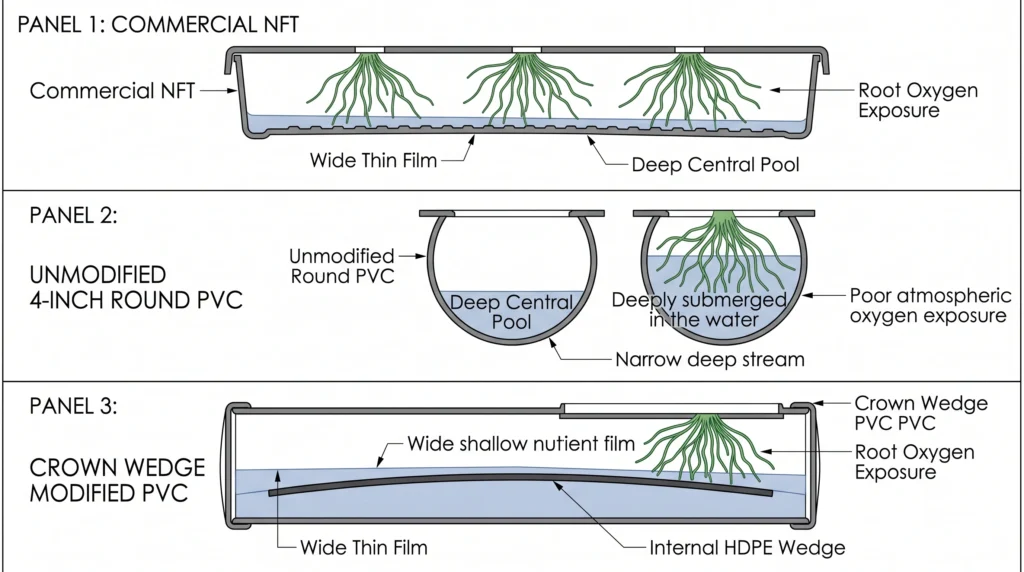
To understand why unmodified PVC fails for NFT for beginners, we have to look at the cross-sectional geometry of the pipe. Commercial NFT channels are precision-extruded with a slightly domed “crown” profile or a flat bottom with micro-ribs. These features force the water to spread out across a width of 3 to 4 inches. The resulting film depth is roughly 0.5 to 1.5 millimeters at the downstream end. At this depth, the upper portion of the root mass remains entirely exposed to the humid air inside the channel, allowing for massive oxygen uptake, while the lower root tips draw water and nutrients from the passing film.
When water flows through a standard 4-inch Schedule 40 PVC pipe, it naturally seeks the lowest point due to gravity. Because the bottom of the pipe is concave, the water does not spread out. A flow rate of 1 liter per minute in a flat-bottomed commercial channel creates a film 1 millimeter deep and 3 inches wide. That exact same flow rate in a 4-inch round PVC pipe creates a stream that is 0.5 inches wide and nearly 0.5 inches deep.
Roots sitting in half an inch of standing water are entirely submerged. This submergence cuts off the atmospheric oxygen supply to the root crown. The biological oxygen demand of the root mass quickly strips the remaining dissolved oxygen from the pooled water, leading to localized anaerobic zones. These anaerobic conditions invite pathogens like Pythium, which cause root rot and systemic plant failure. For a deeper look at pathogen prevention, check our hydroponic root rot prevention guidelines.
| Feature | Commercial NFT Channel | Unmodified 4″ PVC Pipe | Crown Wedge Modified PVC |
| Internal Base Geometry | Flat with micro-ribs | Concave / Circular | Raised flat or slight V-taper |
| Film Width (at 1L/min) | 3.0 to 4.0 inches | 0.5 to 0.75 inches | 2.5 to 3.0 inches |
| Film Depth (at 1L/min) | 0.5 to 1.5 millimeters | 10.0 to 15.0 millimeters | 1.0 to 2.0 millimeters |
| Root Oxygen Exposure | High (70%+ roots exposed) | Low (Most roots submerged) | High (mimics commercial) |
| Pathogen Risk | Low | Very High (Anaerobic pooling) | Low |
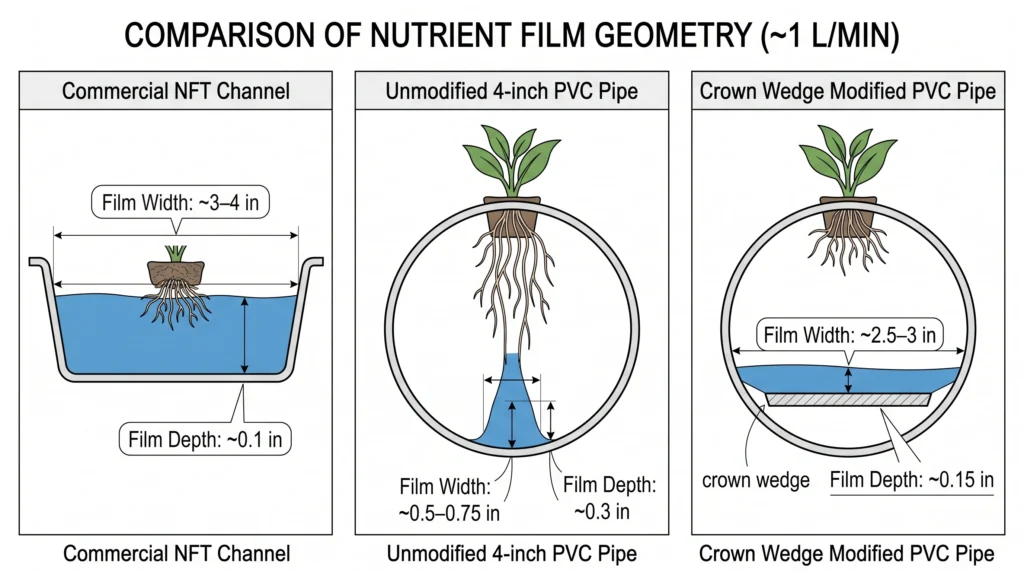
To fix this, builders must elevate the flow path inside the round pipe, creating an artificial floor that mimics commercial extrusion. This modification changes the hydraulic radius of the channel and forces the water to behave as a film rather than a stream.
Slope Mechanics: Why Gradient Dictates Film Thickness
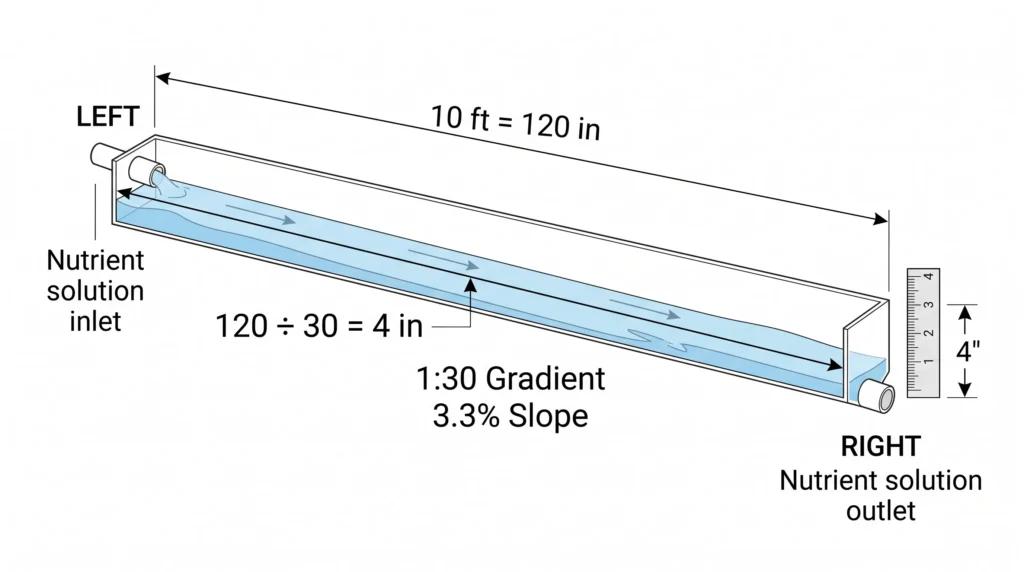
Slope gradient and channel geometry dictate the velocity and depth of your nutrient solution. A 1:30 gradient (3.3%) provides the acceleration needed to maintain a millimeter-thin film across a 10-foot modified PVC channel, preventing the anaerobic pooling common in 1% slopes.
Slope controls both the velocity of the fluid and the depth of the film moving through your channel. Many DIY builders default to a standard plumbing slope of roughly 1/4 inch per foot (about a 1% to 2% gradient). For a true Nutrient Film Technique setup, this is too shallow. Commercial systems target a steeper gradient, operating strictly between 1:40 (2.5%) and 1:30 (3.3%). The steeper slope accelerates the water, keeping the film exceptionally thin and pulling atmospheric oxygen into the root zone via friction.
The physics of open channel flow is governed by Manning’s equation. If you are designing a DIY PVC vertical hydroponics system or a horizontal rack, understanding this formula helps clarify why slope and surface roughness matter.
The formula is written as:
V = (1.49 / n) * R^(2/3) * S^(1/2)
Where:
- V = Velocity of the fluid in feet per second (ft/s)
- n = Manning’s roughness coefficient (Standard smooth PVC is roughly 0.009 to 0.011)
- R = Hydraulic radius (Cross-sectional area of flow divided by the wetted perimeter)
- S = Slope gradient (Rise over run, expressed as a decimal)
In an unmodified round pipe, the hydraulic radius (R) changes drastically as the water level rises even a fraction of an inch. When you insert a flat or slightly angled crown wedge, you stabilize the hydraulic radius, forcing the water to spread wide. This drops the value of R, which in turn means you need a steeper slope (S) to maintain velocity and keep the film thin.
To execute a 1:30 gradient on a standard 10-foot PVC pipe run, the math is straightforward. A 1:30 ratio means for every 30 units of horizontal run, you need 1 unit of vertical drop.
10 feet = 120 inches.
120 inches / 30 = 4.0 inches of drop.
Your channel inlet must be exactly 4 inches higher than your channel outlet. If you lower this to a 1% slope (1.2 inches of drop over 10 feet), Manning’s equation dictates that the velocity will drop significantly. To pass the same volume of water (1 liter per minute) at a lower velocity, the water depth must increase, ruining your thin film and suffocating the plants. Precise grading is non-negotiable.

- HIGH-ACCURACY — Accurate to the ±0.1° at 0° and 90° and ±0.2° from 1-89°.; displays angle and bevel readings in degrees…
- JOBSITE TOUGH — Sturdy solid I-beam aluminum frame, Neodymium magnets, rubber end caps and IP54 dust/water splash resis…
- DUAL FUNCTIONALITY With STRONG NEODYMIUM MAGNETS — As a true (absolute) digital level and electronic inclinometer / pro…
Engineering the Crown Wedge Insert
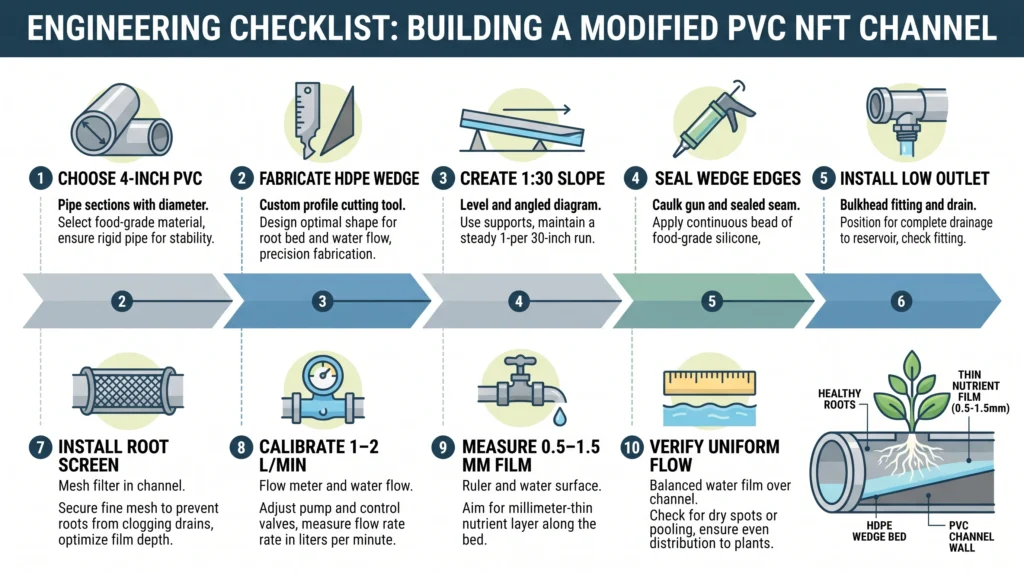
The crown wedge is a rigid, shaped insert placed at the bottom of a PVC pipe to create an elevated, flat, or slightly crowned flow path. High-Density Polyethylene (HDPE) is the best material for this insert due to its chemical resistance and rigidity.
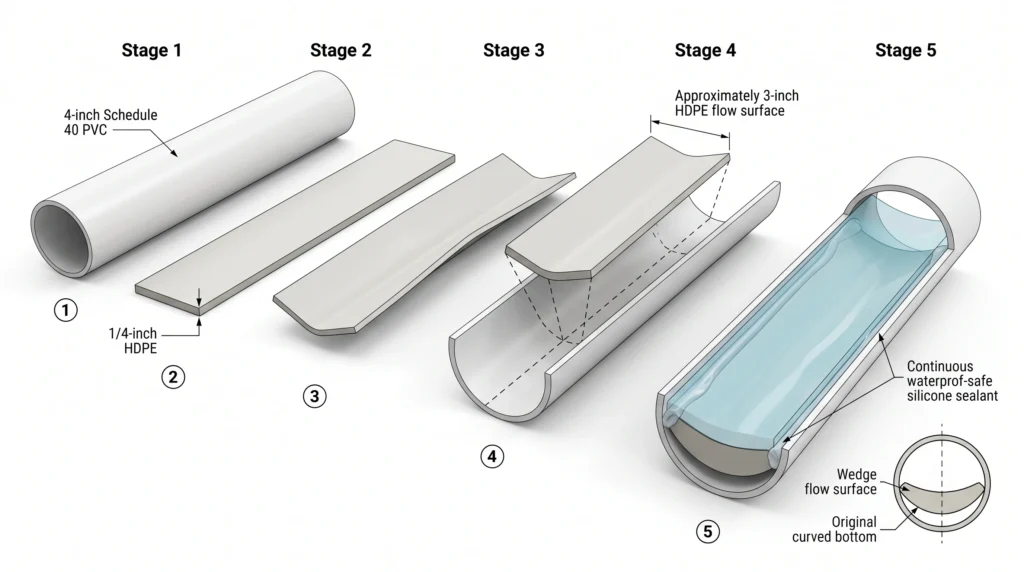
Creating a crown wedge requires precision cutting and secure installation. Standard 4-inch Schedule 40 PVC has an inner diameter of approximately 4.026 inches. To force the water into a film, we need to create an insert that spans the internal width of the pipe and provides a flat or slightly peaked surface.
High-Density Polyethylene (HDPE) or Acrylonitrile Butadiene Styrene (ABS) sheets are the ideal materials. They will not degrade in highly oxygenated, salt-rich fertilizer environments. Standard 1/4-inch HDPE sheet is rigid enough to support the weight of wet root mats without bowing but flexible enough to slide into a pipe.
Step-by-Step Wedge Fabrication:
- Measure the Inner Chord: To get a flow path that is roughly 2.5 to 3 inches wide, you need to cut your HDPE sheet to match a chord across the lower half of the 4-inch pipe. For a 4-inch Schedule 40 pipe, a 3-inch wide strip of HDPE will seat nicely about 0.5 inches off the bottom curve of the pipe.
- Cut the HDPE Base: Cut the 1/4-inch HDPE sheet into strips that are exactly 3 inches wide and match the length of your PVC pipes (e.g., 10 feet). If you cannot source 10-foot sheets, cut 5-foot sections and butt them tightly together during installation.
- Create the Crown (Optional but Recommended): A perfectly flat piece of HDPE works well, but creating a slight “crown” or peak in the center forces water to channel down the two outer edges of the insert, preventing pooling in the dead center where the root mass is thickest. To do this, you can run a heat gun along the exact centerline of the HDPE strip and bend it to a very shallow 5-degree angle.
- Surface Preparation: PVC and HDPE do not bond well with standard glues. You must score the inside of the PVC pipe and the edges of the HDPE wedge with heavy-grit sandpaper (e.g., 60 grit).
- Adhesion and Sealing: Slide the wedge into the pipe. Ensure it sits level horizontally. Use a 100% waterproof, aquarium-safe silicone sealant to run a continuous bead along both edges where the HDPE meets the PVC wall. This prevents nutrient solution from bypassing the wedge and flowing underneath it in the round bottom of the pipe.
- Cure Time: Allow the silicone to cure for a full 48 hours in a well-ventilated area before running any liquids through the channel.
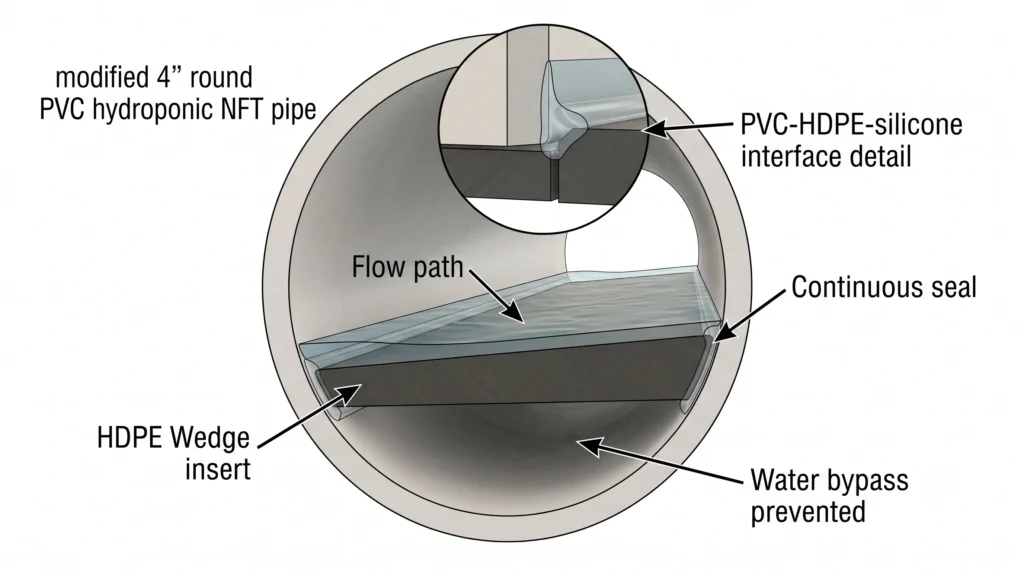
By elevating the flow path, the nutrient solution runs over the top of the wedge. The roots of the plants rest on this flat surface, bathing in the moving film rather than drowning in a curved pool.

u003cliu003eu003cstrongu003eWhy it’s necessary:u003c/strongu003e Standard bathroom silicones contain anti-mildew chemicals that will leach into your nutrient solution and cause phytotoxicity. You must use a 100% silicone rated for aquariums to ensure it is completely biologically safe for delicate root systems.u003c/liu003enu003cliu003eu003cstrongu003eKey Spec:u003c/strongu003e 100% pure silicone, completely inert once cured.u003c/liu003e
Designing the Outlet and Drain Assembly
PVC builds lack the precision-molded end caps found on commercial channels. Fabricating a custom end cap with a weeping hole and bulkhead fitting ensures proper drainage rates, prevents root clogging, and stops stagnant water from accumulating during pump shutdowns.
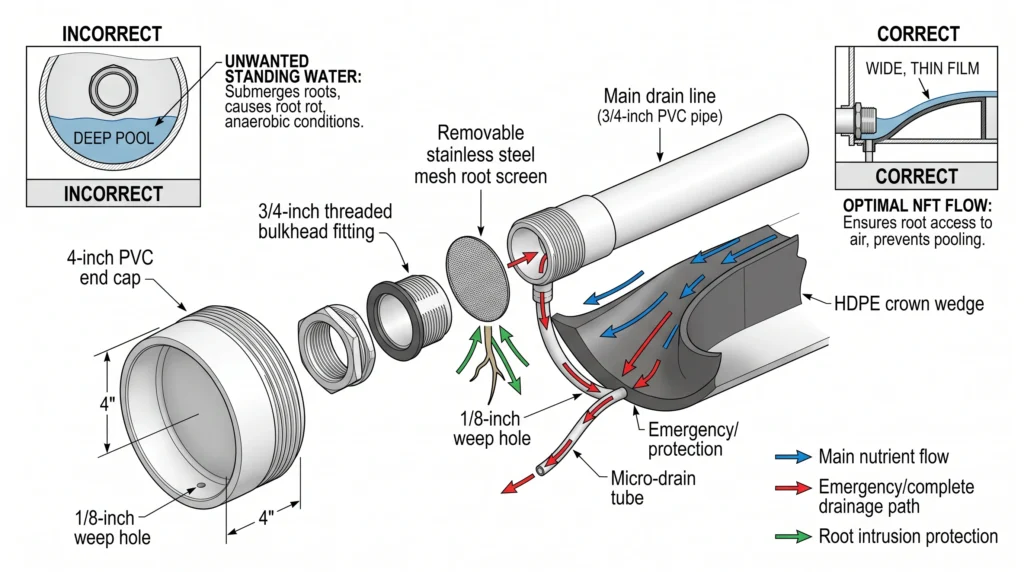
Commercial NFT systems utilize square end caps with integrated drainage spouts that perfectly match the flat bottom of their channels. When modifying a 4-inch PVC pipe, you have to engineer an outlet assembly using standard plumbing parts. The outlet has to handle the continuous flow of the system, catch debris before it hits your main drain line, and drain the pipe entirely when the system cycles off.
To build the outlet, start with a standard 4-inch PVC end cap. You will need to install a 1/2-inch or 3/4-inch threaded bulkhead fitting into the face of this cap to connect your return lines.
Locating the Bulkhead:
Do not center the bulkhead in the middle of the 4-inch cap. If you put it in the center, water will have to pool 2 inches deep before it reaches the drain hole, entirely defeating the purpose of the crown wedge. The bottom edge of the bulkhead opening must sit perfectly flush with the top surface of your internal HDPE wedge.
The Weep Hole:
Even with careful placement, a standard bulkhead fitting has a slight internal lip. When you shut off your pumps for maintenance or cleaning, a small amount of water will remain trapped behind this lip on the wedge surface. To prevent this, drill a small 1/8-inch “weep hole” at the absolute lowest point of the PVC end cap, positioned below the wedge line. Run a micro-tube from this weep hole to your drain manifold. This guarantees that 100% of the liquid evacuates the pipe during a shutdown, leaving no stagnant puddles.
Root Intrusion Defense:
Tomato and pepper roots will aggressively seek out flowing water and grow straight down your drain lines, causing catastrophic backups. You must install a removable stainless steel mesh screen over the inside of the bulkhead fitting. Secure it with a threaded PVC collar so you can easily unscrew it, clean the trapped roots, and replace it during your weekly maintenance checks. Ignoring this step is the fastest way to flood your grow room. If you struggle with maintaining clean lines, consult our NFT channel clogs guide.

Why it’s necessary: A high-quality threaded bulkhead allows you to securely attach drain lines and internal root screens without relying on permanent glue, making system teardowns and deep cleaning highly efficient.nnKey Spec: 3/4-inch heavy-duty ABS construction with thick EPDM gasket.
Testing and Validation Protocol (Empirical Flow Calibration)
Theoretical math gets you close, but empirical testing validates the system. A 24-hour water-only calibration test is required to measure exact flow rates, film depth uniformity, and identify any channeling issues before loading live plants into the system.
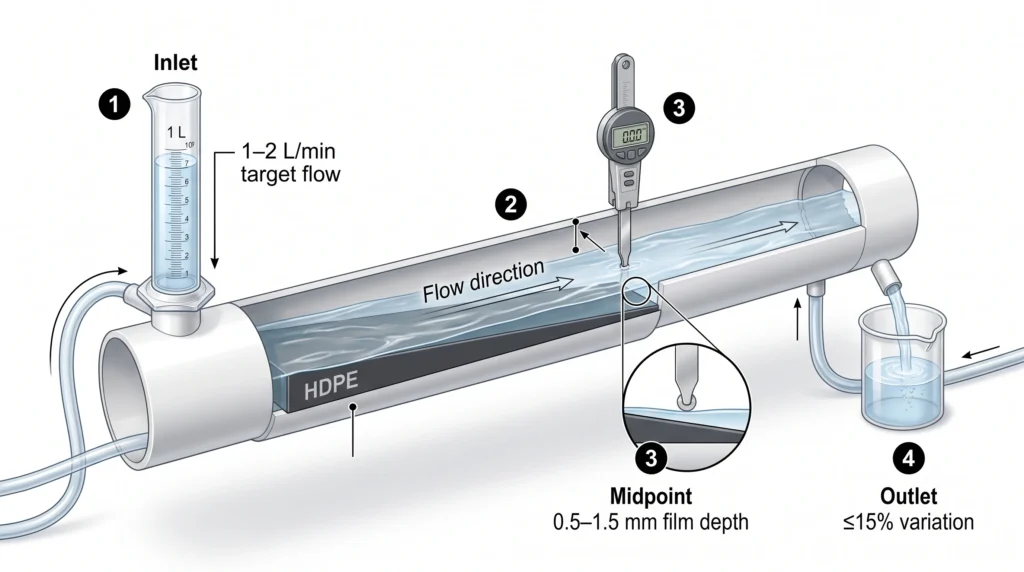
Do not place plants into a newly modified PVC channel without running a comprehensive calibration test. Small variations in your silicone bead, slight warping in the HDPE wedge, or a miscalculated slope will ruin the film dynamics. You must verify the flow using plain water. For accurate volume management, utilize a hydroponic nutrient calculator to determine exactly how much water your total system holds.
The Calibration Process:
- Set the Flow Rate: Turn on your pumps and adjust your inlet valves. You are targeting a flow rate of 1 to 2 liters per minute per channel. Verify this by placing a graduated cylinder or a marked bucket at the inlet and timing how long it takes to collect exactly 1 liter. Adjust your manifold valves until every channel hits this exact metric.
- Run the 24-Hour Prime: Let the system run for a full 24 hours. This allows the water to find its natural path, forces trapped air out of the lines, and highlights any slow leaks in your bulkheads or silicone seals.
- Measure Film Depth: While the system is running at 1L/min, use a set of automotive feeler gauges or a depth micrometer to measure the water depth resting on top of the HDPE wedge. Measure at the inlet, the midpoint, and just before the outlet.
- Analyze Uniformity: The water depth should range between 0.5 mm and 1.5 mm. You want to see less than a 15% variance in depth across the entire 10-foot run. If the water is 3 mm deep at the midpoint, your pipe is bowing under its own weight. Add a physical support bracket under the center of the PVC pipe to straighten the run.
- Check for Channeling: Look closely at the water moving over the wedge. Is it covering the entire 3-inch width, or is it carving a narrow river down one side? If it favors one side, your pipe is twisted. Rotate the PVC pipe slightly in its mounting brackets until the water spreads evenly across the entire flat surface.
If you find that your flow rates are inconsistent across multiple channels, your primary feed pump may be undersized or experiencing too much head pressure. Review the hydroponic pump sizing guide to ensure your equipment matches your system’s total flow demand. Proper hydroponic sensors can also be deployed inline to monitor flow rates automatically.
Real-World Application: Commercial vs. Residential Builds
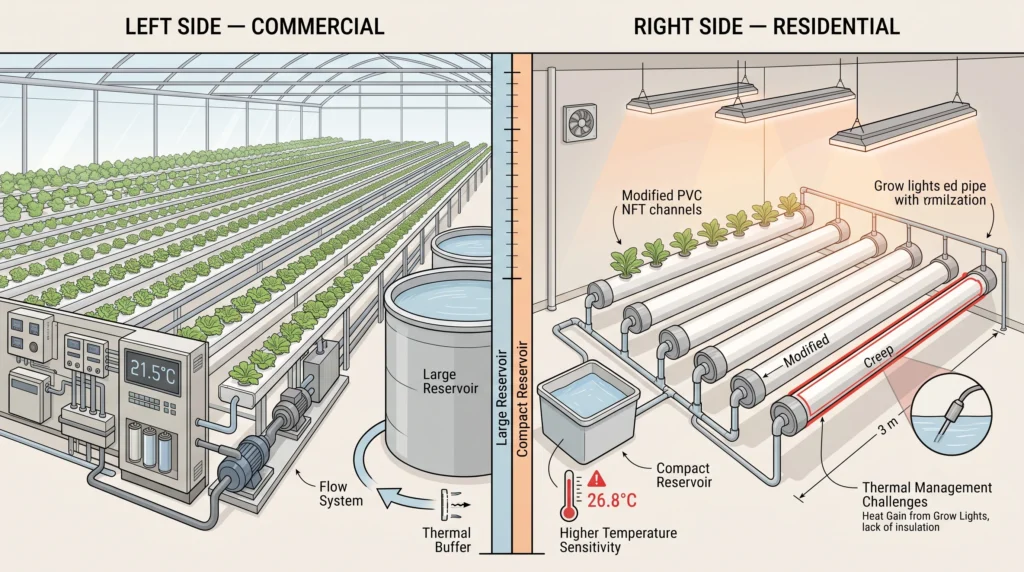
Scaling a crown wedge PVC system introduces variables in thermal mass and fluid velocity. Commercial operators utilize large reservoirs to buffer temperature, whereas residential DIY builds require strict environmental monitoring to prevent heat spikes in the root zone.
When adapting the crown wedge modification for larger setups, builders must account for thermal dynamics. Standard white PVC pipe has a relatively low thermal mass, meaning ambient room temperatures rapidly influence the temperature of the water inside the pipe.
In a commercial greenhouse, ambient air temperatures are tightly controlled, and massive central reservoirs (often 500+ gallons) buffer the nutrient solution temperature. In a residential DIY build, a 20-gallon reservoir attached to six 10-foot PVC channels will heat up quickly if exposed to direct sunlight or hot grow lights. When the thin film of water flows over the HDPE wedge, it has a high surface-area-to-volume ratio, making it highly susceptible to rapid warming.
If the water temperature exceeds 75°F (24°C), the capacity of the water to hold dissolved oxygen plummets, negating the benefits of the thin film. Residential builders must insulate their reservoirs, paint the exterior of the PVC pipes with reflective white or silver paint (if using darker pipe), and route return lines away from heat sources. For those scaling up into multi-tier racks, understanding the logistics of vertical water delivery is critical. You can review our analysis on vertical farming reality check to avoid common scaling pitfalls.
Troubleshooting Common Crown Wedge Modifications
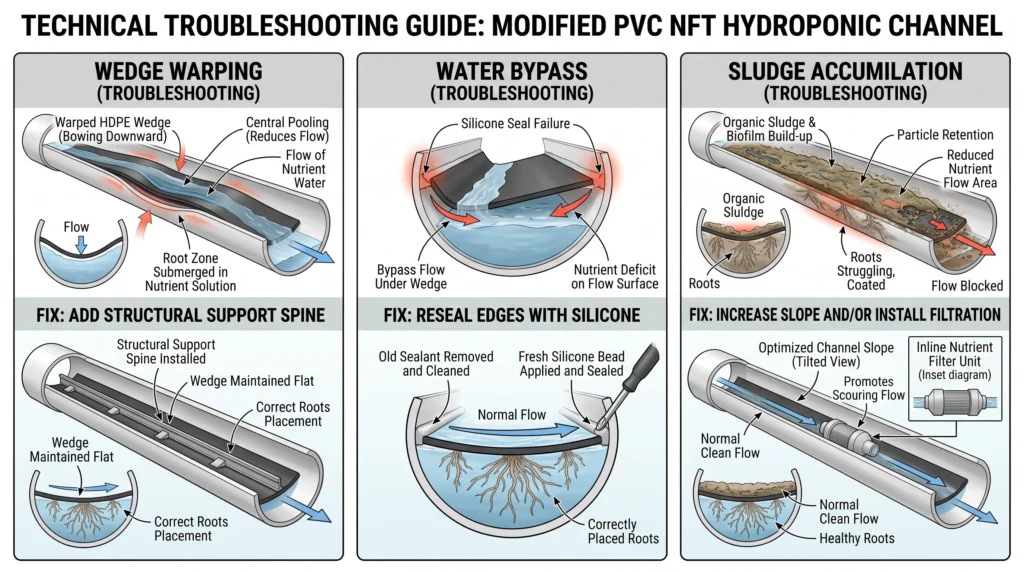
Even with careful fabrication, physical variables like wedge warping, silicone failure, and fluid bypass can compromise the system. Identifying these issues early prevents root suffocation and crop loss.
After the system has been running for a few weeks, environmental stress can reveal flaws in the initial build. Here is how to troubleshoot the most common crown wedge failures.
Issue: The HDPE Wedge Warps
If you used material thinner than 1/4-inch, the weight of the water and growing root mass can cause the center of the wedge to bow downward. This recreates the exact concave pooling problem you tried to fix.
Fix: You must drain the pipe, remove the root mass, and slide a rigid support spine (like a thin strip of structural acrylic) underneath the wedge to prop it back up into a flat position.
Issue: Fluid Bypassing the Wedge
If you see very little water flowing over the top of the wedge, but a large volume exiting the drain, water is traveling underneath the insert. This happens when the silicone seal fails, usually due to poor surface preparation (not sanding the PVC) prior to gluing.
Fix: The system must be shut down and dried completely. Resand the edges where the wedge meets the pipe wall and apply a heavier, continuous bead of aquarium silicone. Allow 48 hours for a full cure.
Issue: Sludge Accumulation on the Wedge
Because the flow is spread thin and wide, particulate matter from organic nutrients or decaying root material can settle on the flat HDPE surface, building up a layer of sludge that harbors bacteria.
Fix: Increase the slope gradient slightly to raise the fluid velocity, effectively sweeping the particulate down the drain. Alternatively, install an inline 120-mesh filter on your main pump feed to catch debris before it enters the channels. For comprehensive diagnostic steps on system health, consult our hydroponic troubleshooting guide.
Frequently Asked Questions
Why does water pool in standard round PVC pipes during NFT?
Gravity forces liquid to the lowest central point of any curved surface. In a round PVC pipe, a 1 liter-per-minute flow creates a narrow, deep stream rather than a wide, shallow film. This deep pooling submerges the roots, preventing them from accessing atmospheric oxygen, which causes asphyxiation and root rot.
How does a crown wedge insert fix the flow dynamics in PVC?
A crown wedge is a rigid, flat, or slightly peaked insert placed at the bottom of the round pipe. It provides a flat surface that forces the water to spread out horizontally into a millimeter-thin film. This mimics the internal geometry of a commercial extruded NFT channel, ensuring roots are exposed to highly oxygenated air.
What is the correct slope for a modified PVC NFT channel?
Commercial NFT systems require a slope between 1:40 (2.5%) and 1:30 (3.3%). For a 10-foot PVC channel, a 1:30 slope translates to exactly 4 inches of vertical drop from the inlet to the outlet. Steeper slopes maintain fluid velocity, keeping the nutrient film thin and preventing stagnant pooling.
How thick should the nutrient film be in a properly modified channel?
When testing the system with plain water at a flow rate of 1 to 2 liters per minute, the film depth passing over the crown wedge should measure between 0.5 millimeters and 1.5 millimeters. Depth variance from the inlet to the outlet should not exceed 15%.
Why do I need a weep hole in the PVC end cap?
Standard bulkhead fittings sit slightly raised inside the end cap, creating a lip that traps standing water on the wedge when the main pump shuts off. Drilling a small weep hole at the absolute lowest point of the cap allows complete drainage, preventing stagnant water and anaerobic bacteria buildup during system downtime.
Can I use standard bathroom silicone to seal the crown wedge?
No. Standard bathroom silicones contain anti-mold and anti-mildew chemical additives that will leach into the recirculating nutrient solution and cause severe phytotoxicity (poisoning) to the plants. You must use 100% pure, aquarium-safe silicone that is completely inert once cured. Ensure you check your chemical balances frequently with a reliable hydroponic pH & EC guide.

Continue Your Learning Journey