Bar LED vs Quantum Board vs COB: Thermal Efficiency Compared

Table of Contents
- Why Thermal Efficiency Matters More Than Marketing Wattage
- Quick Summary Table
- Key Evaluation Criteria
- Head-to-Head: Thermal Management
- Head-to-Head: Light Distribution and Canopy PPFD
- Technology Profiles: Strengths and Weaknesses
- Recommended Gear
- Frequently Asked Questions
- Which Light Type Fits Your Grow Space
- Find the Right Lighting System for Your Tent
Trying to make sense of the indoor lighting market can feel like learning a new language. Growers get hit with acronyms and bold marketing claims about which fixture will maximize their yield, and most of that marketing focuses entirely on raw output numbers. Veteran growers tend to care about something else first: thermal efficiency, since that’s what actually determines a fixture’s lifespan, safety, and real-world performance over time.
Heat management is the quiet problem that kills a lot of indoor yields. A fixture that can’t dissipate the heat its diodes generate ends up with reduced output, a shifted spectrum, and diodes that fail early. On top of that, excess heat changes the room’s environment, throwing off vapor pressure deficit and forcing you to spend more on cooling than you should need to. This comparison looks past the marketing to focus on how bar LEDs, quantum boards, and COB (chip-on-board) fixtures actually handle heat, distribute light, and perform in a real tent.
Why Thermal Efficiency Matters More Than Marketing Wattage
A fixture’s ability to pull heat away from its diode junctions determines how long those diodes last, how stable their spectrum stays over time, and how much extra cooling load gets dumped on your grow room’s environmental controls.
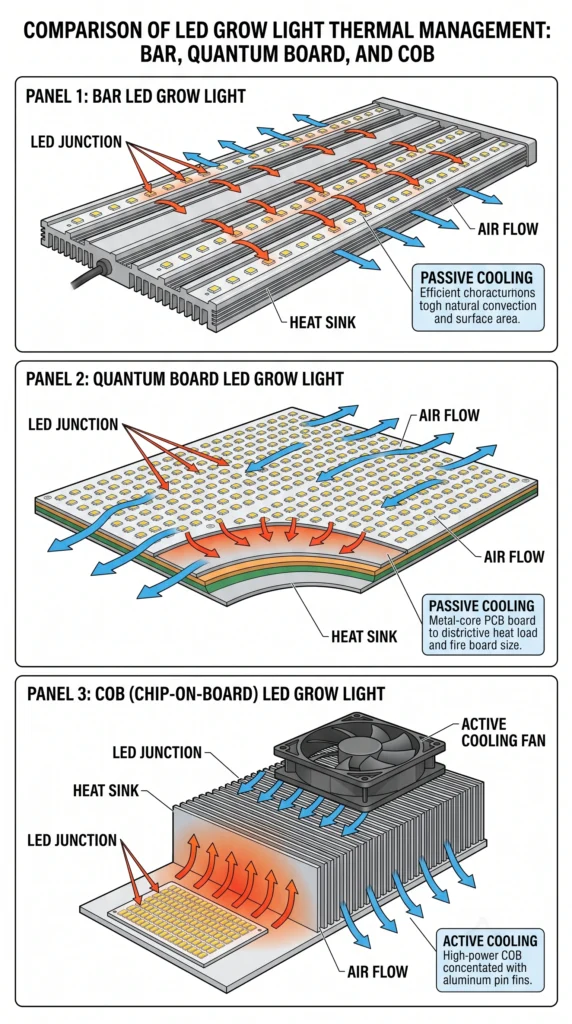
LEDs are far more efficient than older HID lighting at turning electricity into usable light, but they still generate real heat, released right at the back of the diode, at the semiconductor junction. If that heat isn’t pulled away and dispersed quickly, the diode itself degrades over time.
Overheated diodes lose efficacy. A fixture rated for a certain output will gradually produce fewer usable photons for the same electrical draw, something commonly called thermal droop. Excess heat can also shift the diode’s actual color output, changing the light recipe you thought you were delivering.
This heat doesn’t stay contained to the fixture either. It raises leaf temperature directly under the light, and when leaves get too hot, plants close their stomata to conserve water, which halts photosynthesis and stalls growth right when you don’t want it to. Sizing your ventilation correctly matters a lot here, see our grow tent buying guide for help matching exhaust capacity to your lighting footprint. Picking a fixture with genuinely good thermal design protects both your investment and your ability to hold a stable indoor climate.
Quick Summary Table
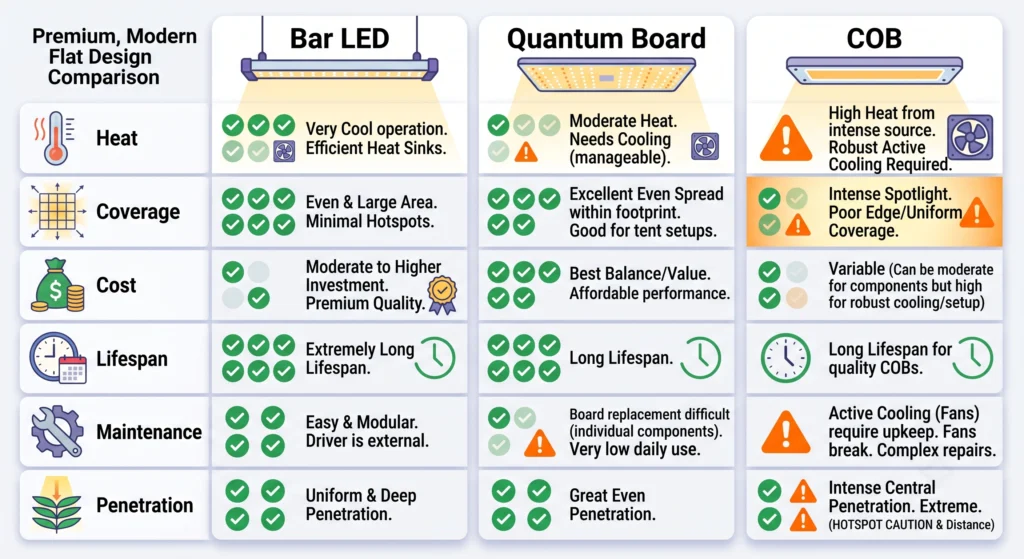
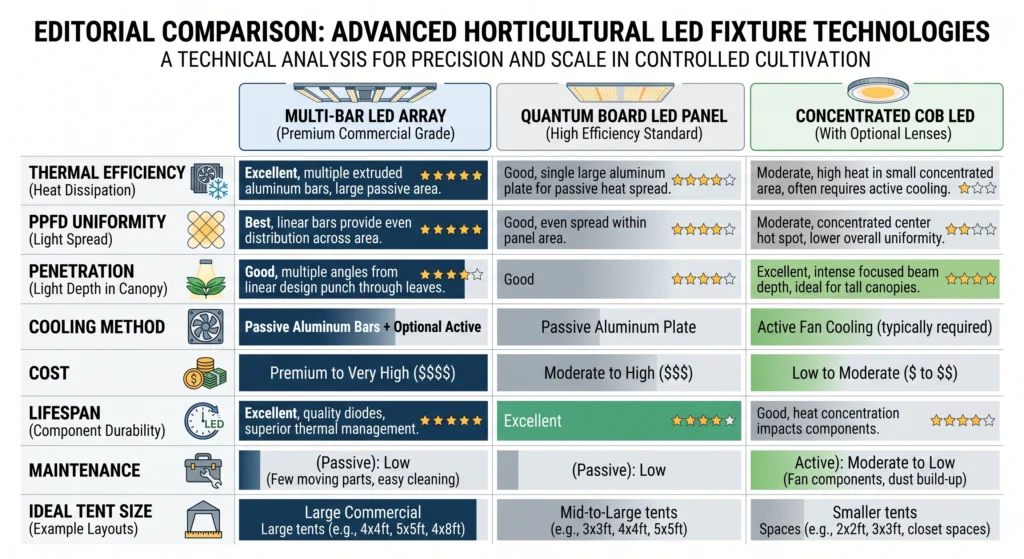
Bar LEDs tend to win on uniform distribution and passive cooling. Quantum boards pack high efficacy into a compact, affordable footprint. COBs deliver the deepest canopy penetration at the cost of the hardest thermal management. Which one actually fits best depends heavily on your tent size and budget.
| Feature | Bar LED | Quantum Board | COB (Chip-on-Board) |
|---|---|---|---|
| Thermal Dissipation | Generally excellent (passive) | Good, but more concentrated (passive/active) | Hardest to manage (active cooling typically required) |
| Light Distribution | Generally uniform | More center-focused | Highly concentrated |
| Canopy Penetration | Moderate to good | Moderate | Excellent |
| Grow Tent PPFD Pattern | Tends to be consistent corner to corner | Peaks in center, drops toward edges | Peaks sharply directly under the chip |
| Best Tent Size | 4×4, 5×5, commercial | 2×2, 3×3 | Tall spaces, deep canopies |
| Initial Cost | Higher | Lower to moderate | Moderate |
Note: these are general tendencies based on how each form factor is typically built, not measurements from one specific tested fixture. Actual performance varies a lot between specific products within each category.
Key Evaluation Criteria
Evaluating a grow light means looking past the wattage number entirely, toward PPFD uniformity, how the fixture manages heat, how deep it penetrates a canopy, and whether its physical form factor actually fits your space.
Whether you’re weighing bar LED vs quantum board, or trying to decide if a COB vs quantum board grow light makes more sense for a specific setup, a few criteria matter most:
- Thermal management. Does the fixture rely on passive aluminum heat sinks, or does it need active cooling fans? Passive cooling is generally preferred since fans are mechanical parts that can fail, especially in a humid grow tent environment.
- PPFD uniformity. Peak intensity in the center of a tent doesn’t help much if the edges are starved for light. Uniformity is what lets every plant in a system yield close to evenly.
- Canopy penetration. How deep does usable light reach past the top leaves to reach lower bud or fruit sites? Better penetration generally means less wasted lower-canopy growth.
- Form factor and scalability. Does the physical shape actually fit your space, and can you link multiple units together as you scale up?
If you’re building a custom grow area from scratch, matching your light’s footprint to your system’s physical layout matters as much as any spec sheet number. See our DIY hydroponic systems guide for more on that.
Head-to-Head: Thermal Management
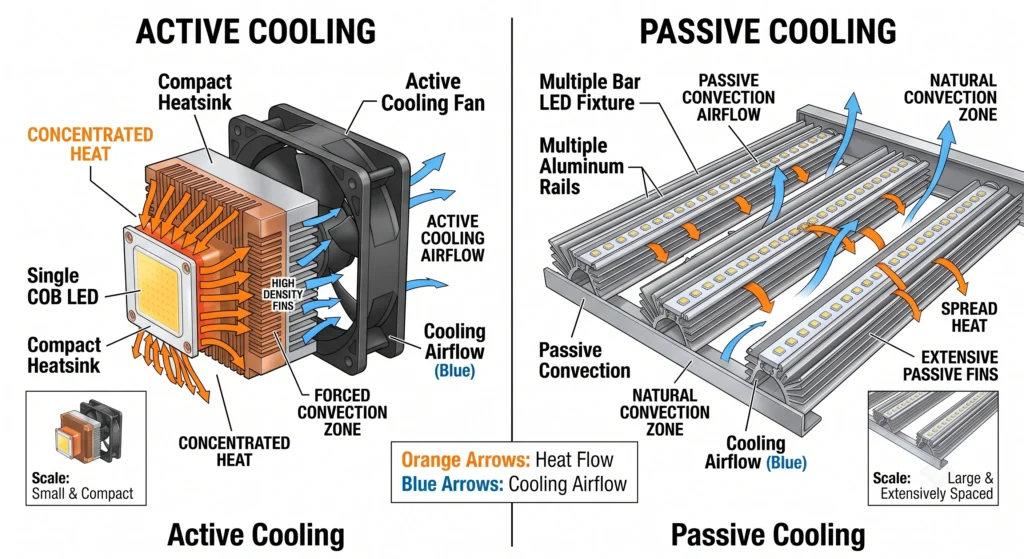
Bar-style fixtures generally spread diodes across a wider physical footprint, giving passive cooling more surface area to work with. Quantum boards concentrate more heat onto a single compact plate. COB fixtures generate the most localized heat of the three and almost always need active cooling.
Bar-style designs generally come out ahead on thermal efficiency, and the reason is fairly intuitive: spreading diodes across several individual aluminum rails maximizes the surface area exposed to ambient air, so heat radiates away passively rather than pooling in one spot. Because the heat load is spread out, ambient temperature directly under the light tends to stay cooler, which is part of why bar lights can often be hung closer to the canopy than a comparable quantum board.
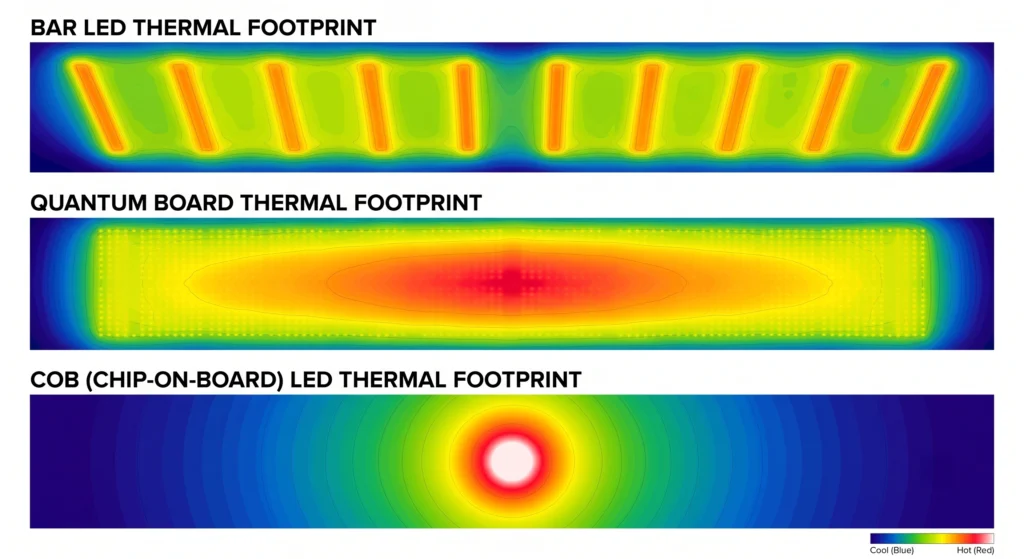
Quantum boards take a different approach, packing a large number of diodes onto a single, solid aluminum plate. Modern quantum boards typically use highly efficient diodes (Samsung’s LM301B or LM301H series show up often) that generate relatively little heat per watt of light produced, but concentrating that many diodes in one compact area still creates more of a thermal hot zone at the center of the board than a spread-out bar design would. Running a high-wattage quantum board in a small, poorly ventilated space can mean real radiant heat pushing down on the canopy, so solid airflow between the fixture and the plants matters more here than it does with a bar light.
COB fixtures face the toughest thermal challenge of the three. A COB packs a large number of individual LED chips into a tight circle, often not much bigger than a coin, which concentrates heat intensely in one small area. Passive cooling generally can’t keep up with that on its own, which is why COB fixtures typically ship with substantial aluminum pin-fin heat sinks and rely on active cooling fans. If that fan fails, the chip can degrade quickly. If minimizing moving parts and active cooling dependence is a priority for your setup, our passive cooling guide covers how to reduce overall equipment heat load across a system.
Worth knowing: a meaningful number of “bar light” products on the market actually use the same style of diodes as quantum boards (Samsung LM301B/H and similar), just mounted on narrow bars instead of one wide plate. The distinction here is really more about physical form factor and how that affects heat and light spread, not two fundamentally different diode technologies competing with each other.
Head-to-Head: Light Distribution and Canopy PPFD
Bar LEDs generally deliver more consistent PPFD across a tent’s full footprint. Quantum boards and COBs tend to create a stronger central hotspot with a more pronounced drop-off toward the edges of the canopy.
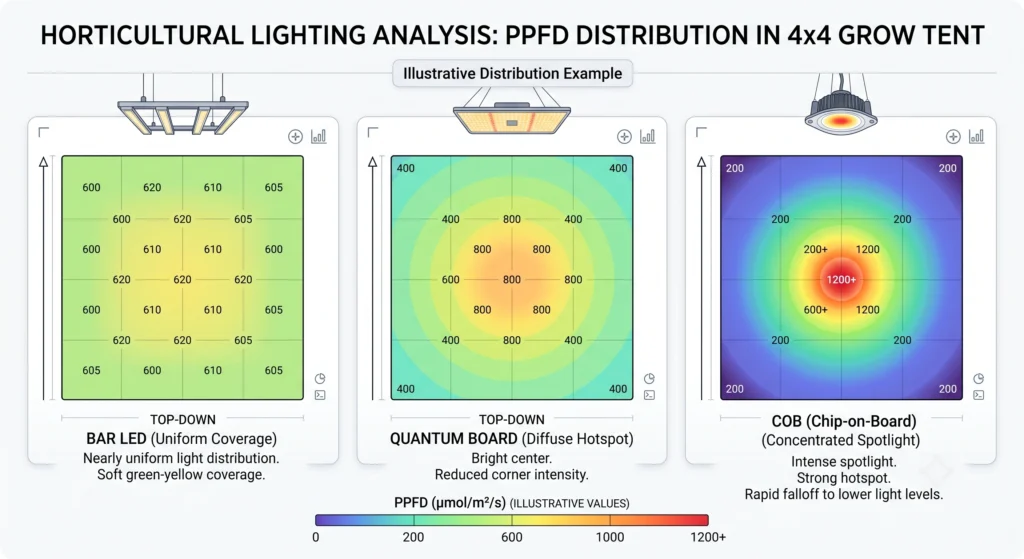
A PPFD map is the clearest way to see how a light actually behaves in the real world. Heavy concentration in the center of a tent means plants directly underneath get pushed hard while perimeter plants stretch and underperform. If uneven nutrient uptake shows up as a result of uneven lighting like this, our hydroponic nutrients guide covers balancing feed for that kind of situation.
Bar lights are specifically built to solve the uniformity problem, since diodes run out to the very edges of the fixture rather than stopping short. As an illustrative example of the kind of pattern this produces (not a measured benchmark from one specific product), a quality bar light in a 4×4 tent might show something like 900 µmol/m²/s in the center and 800 µmol/m²/s in the corners, a fairly tight spread that lets you push a crop hard without constant pot rotation or dealing with a noticeably uneven canopy height.
Quantum boards run into what’s sometimes called the umbrella effect. Since all the light originates from one central panel, it has to travel outward at an angle to reach the edges of a tent, losing intensity as it goes. Again as an illustrative example rather than a tested figure, a quantum board might show something like 1,100 µmol/m²/s in the center but drop to around 400 µmol/m²/s in the corners of a larger tent. Fixing that generally means hanging the board higher, which wastes some light on the tent walls and reduces overall efficiency.
COB lights behave more like spotlights, often using secondary lenses (commonly 90 or 120 degree glass optics) to focus their beam straight down. That gives excellent penetration through a dense canopy, but produces the most pronounced hotspot of the three technologies. Getting anything close to uniform coverage from COBs generally means overlapping several fixtures rather than relying on one.
Technology Profiles: Strengths and Weaknesses
Matching a lighting technology to your specific space and goals matters more than picking a single “best” option. Bar lights tend to suit larger spaces, quantum boards suit tight enclosures and budgets, and COBs suit setups where deep canopy penetration is the priority.
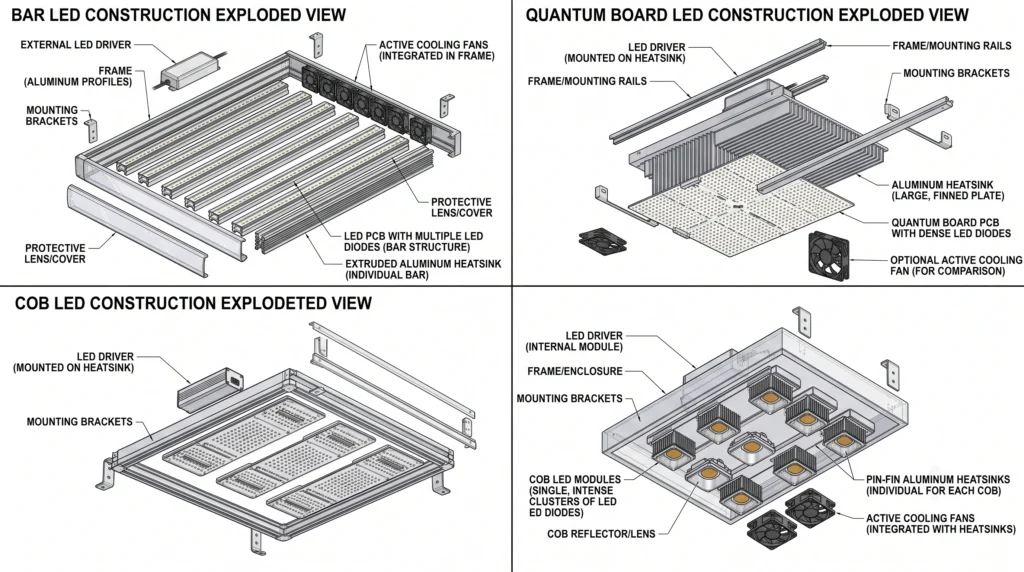
Bar LED Grow Lights
A common choice for commercial vertical farms and serious home growers.
Strengths: Strong thermal efficiency from a wide passive heat sink footprint. Generally the most uniform PPFD corner to corner. Low profile, which works well in low-ceiling spaces or stacked vertical racks. Often can be hung quite close to the canopy (commonly 6 to 12 inches) without burning plants, see our LED distance and PPFD guide for dialing in exact hanging heights.
Weaknesses: Higher upfront cost. Heavier and bulkier, sometimes awkward to install solo. Often genuine overkill for a small 2×2 or 3×3 tent where the fixture’s footprint doesn’t physically make sense.
Quantum Board Grow Lights
Quantum boards made high-efficacy white LED lighting affordable and accessible to home growers in a way that reshaped the hobby market.
Strengths: Strong price-to-performance ratio. Efficient diodes producing bright, full-spectrum white light. Lightweight and easy to hang in a tight space. Works well in 2×2 and 3×3 tents, where reflective walls help compensate for edge drop-off.
Weaknesses: More concentrated heat, the board itself runs noticeably hot to the touch. Often needs a higher hanging height to spread light adequately, which eats into usable vertical space. Meaningful PPFD drop-off toward the edges in larger tents.
COB (Chip-on-Board) Grow Lights
Before quantum boards and bar lights became affordable, COBs were one of the only ways to get real canopy penetration without switching to an HID bulb.
Strengths: Intense light output that drives photons deep into lower canopy layers. Well suited to tall, dense plants where lower bud or fruit sites typically struggle for light. Modular, DIY builds using individual COB chips and custom drivers are genuinely accessible for hobbyists who like to build their own rigs.
Weaknesses: Real risk of light bleaching or thermal damage if mounted too close to the canopy. Heavy reliance on active cooling fans, a real point of mechanical failure. Uniformity suffers unless several COBs are spaced closely together. Efficacy (µmol per joule) tends to lag behind modern bar or quantum board fixtures using current-generation diodes, though this gap has narrowed with newer high-end COB chips. For more on electrical efficiency generally, see our hydroponic power savings guide.
Recommended Gear

A solid entry point into bar-style lighting. Offers strong edge-to-edge uniformity for a 4×4 tent and runs cool thanks to a detachable driver and passive aluminum bars.
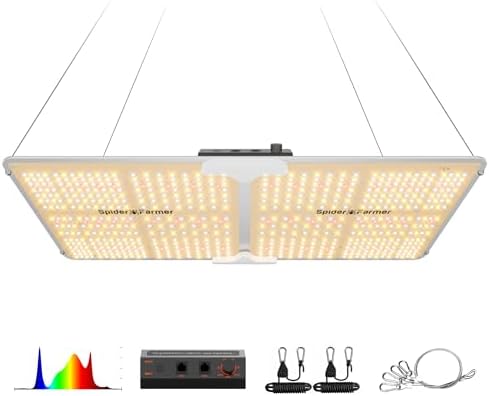
A strong choice for a small 2×4 or 3×3 space. Uses Samsung LM301B diodes on a reflective aluminum board, with a daisy-chain dimming feature for linking multiple units. [Insert Amazon Associate link.]
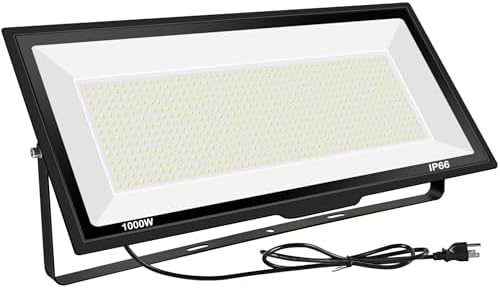
Useful for tall, dense fruiting crops where deep canopy penetration to lower fruit sites is the priority, using active cooling fans to manage the concentrated heat.

Useful for actually mapping your tent’s PPFD and dialing in hanging height with real data rather than guesswork, regardless of which fixture type you choose.

Even efficient LED lighting needs real airflow management to control localized heat and hold a stable VPD. This fan’s smart controller automates that response.
Which Light Type Fits Your Grow Space
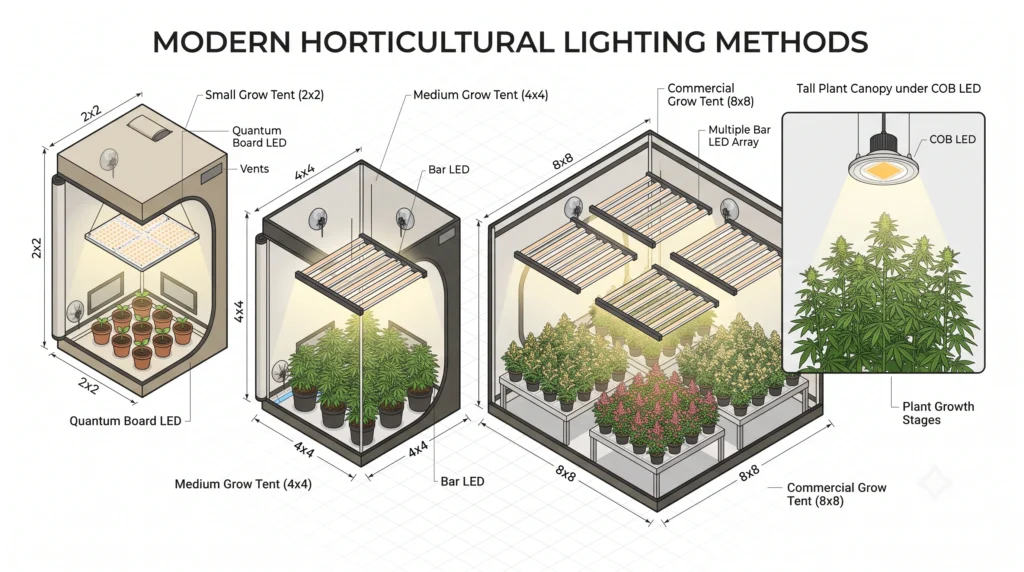
Answer a few quick questions below to get a starting recommendation based on your tent size, budget, and priorities. Treat this as a starting point for research, not a final purchase decision, since specific products within each category vary a lot.
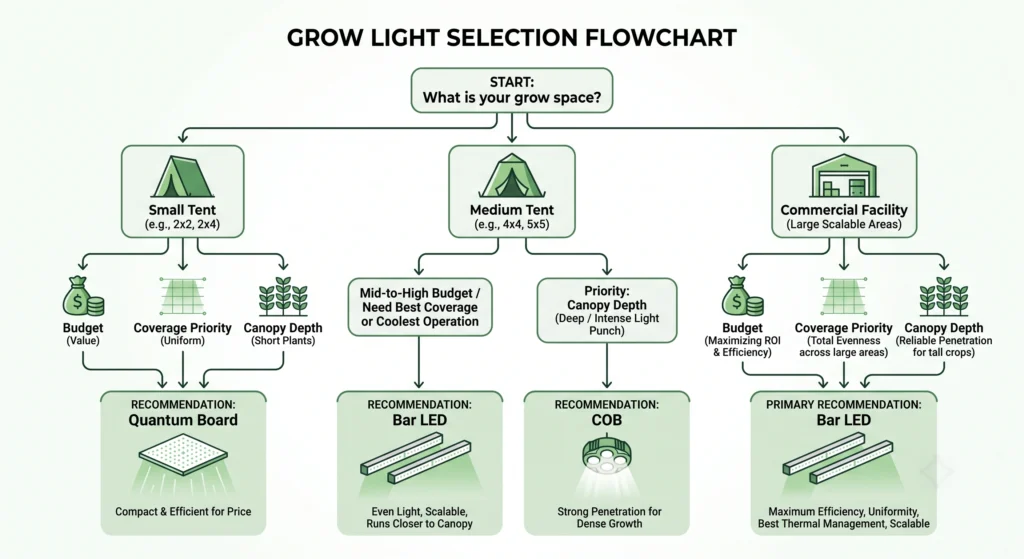
Answer these to get a starting recommendation. This is general guidance based on typical tradeoffs between the three categories, not a substitute for checking specific product specs.
A general starting point based on typical category tradeoffs. Specific products within each category vary, always check individual fixture specs before buying.

Continue Your Learning Journey