DIY Vertical Hydroponics Blueprint: Build a High-Yield Urban Tower

Table of Contents
- Why Horizontal Is Obsolete: Maximizing Space with Vertical Systems
- Component Command Center: Sourcing Your DIY Parts
- DIY Tower Bootcamp: Step-by-Step Building Guide
- Plant Selection Science: Lightweight vs. Heavyweight Crops
- The Physics of a Fail-Proof PVC Vertical Hydroponic System
- Channel Spacing Science: Stop Light Hunger & Lopsided Growth
- Flow Rate Math: How to Calculate GPH for Vertical Towers
- Drippers vs. Spray Rings: The Hydro Civil War
- LED Lighting Angles: How to Cover 5 Tiers Without Hotspots
- Maintenance War Room: Keeping Your System Flawless
- FAQ - Upgrade Red Flags & Green Lights
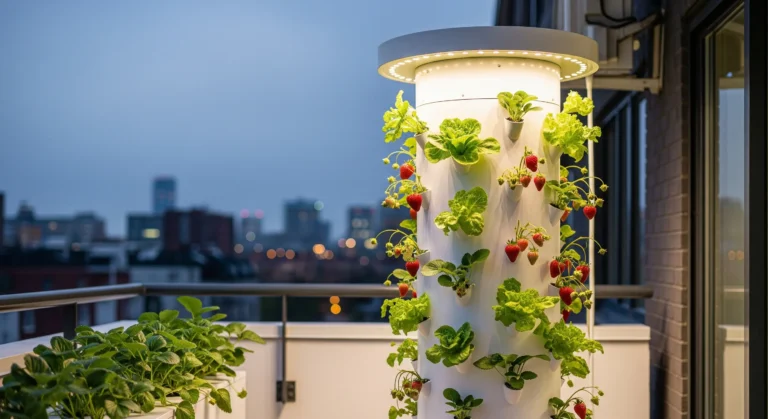
Listen up, space warriors. My first urban farm project was a tiny, sun-drenched balcony that had no business growing anything. But through a mix of structural engineering, garage-tinkering, and a healthy dose of sheer stubbornness, I turned it into a food factory that produced over 40 plants at a time. The result? A flood of fresh greens, herbs, and even strawberries that fed my entire apartment building. This isn’t just about gardening; it’s about reclaiming your urban space, turning your balcony or a spare corner into a vertical food tower. I’ve seen my first tower collapse under the weight of 12 full-grown lettuce plants, and I’ve spent countless hours with a wet-vac after a faulty pump turned my kitchen into a disaster zone. My goal is to give you a blueprint to build a rock-solid, high-yield system and avoid all of my hard-won mistakes.
⚡ DIY Vertical Hydroponics Blueprint (Quick Specs):
- Ideal System Type: NFT (Beginners) or Low-Pressure Aeroponics (Advanced)
- Core Material: 4″ UV-Stabilized PVC or 4″x4″ Vinyl Fence Posts
- Pump Spec: 400 GPH Submersible Pump (Minimum 8 ft. Head Height)
- Plant Spacing: 6″ Vertical Gap, 3″ Horizontal Stagger, 15° Downward Drill Angle
- Best Starter Crops: Butterhead Lettuce, Strawberries, Basil, Mint
Urban Farming Disclaimer: Structural integrity is your responsibility. Verify weight limits and electrical codes before build.
Why Horizontal Is Obsolete: Maximizing Space with Vertical Systems
In the concrete jungle, every square foot is a battleground. Traditional horizontal farming, be it in-ground or on a table, is a luxury most of us can’t afford. It’s inefficient and limits your yield to the square-foot footprint of your space. With vertical hydroponics, we’re not thinking in two dimensions; we’re thinking in three. A standard 2’x2′ floor footprint can support a 6-foot tall tower that holds over 20 plants. That’s a 10x increase in yield per square foot. You’re not just growing food; you’re maximizing your harvest, and your balcony becomes a food factory. It’s a game-changer for urban gardeners and a foundational principle of modern urban agriculture.
System Smackdown: NFT vs. Aeroponic Towers
Before you start cutting PVC, you need a plan of attack. There are two primary vertical systems, each with their own strengths and weaknesses.
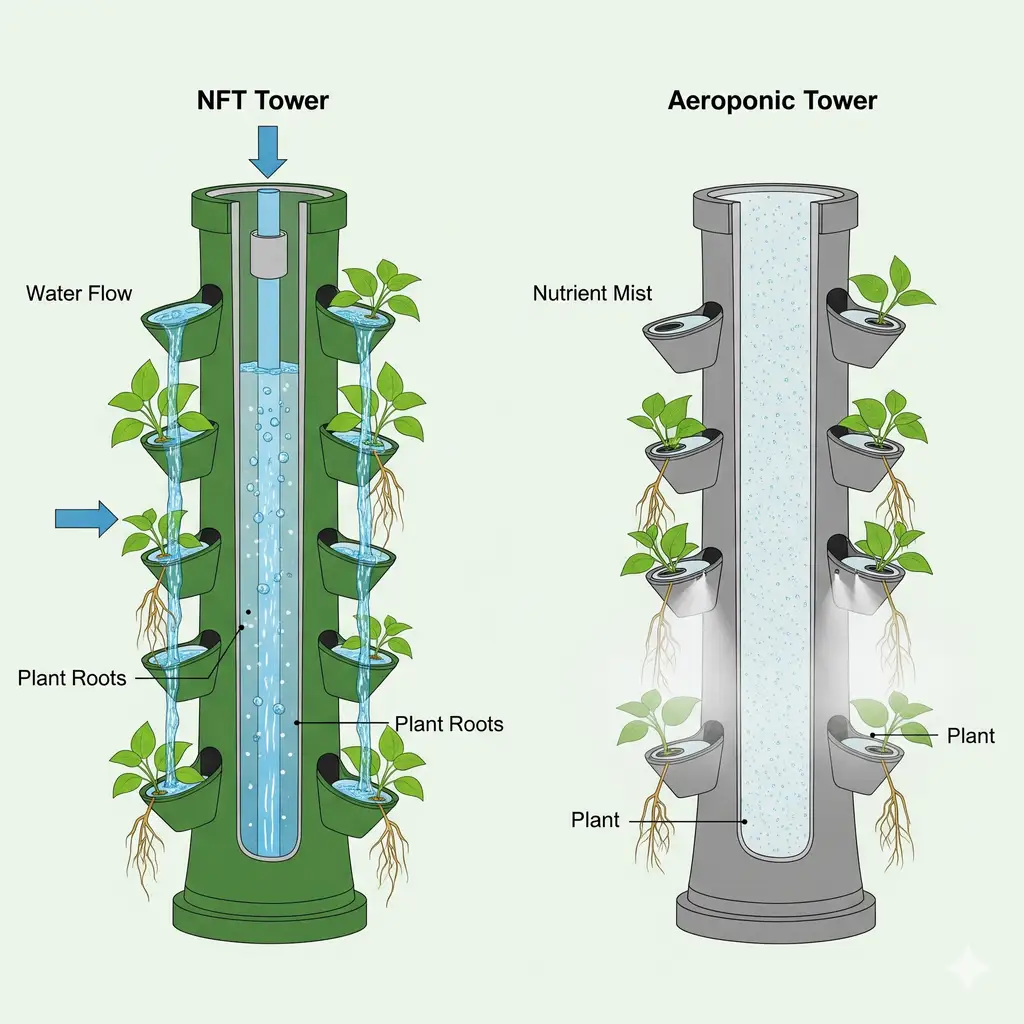
NFT (Nutrient Film Technique) Towers: Reliability for Beginners
These systems use gravity to drip a thin film of nutrient solution down a vertical pipe. The roots are constantly bathed in a film of water and nutrients, with plenty of air exposure. This is a reliable, low-maintenance option that’s great for beginners. A classic example is a PVC pipe with staggered holes.
Aeroponic Towers: High-Tech, High-Yield Performance
This is the high-tech, high-yield option. A pump pressurizes a fine mist of nutrients into the tower’s interior, where plant roots hang freely in the air. This method gives roots maximum oxygen exposure, leading to faster growth and higher yields. The downside? It’s more complex to build and more vulnerable to pump failure or clogged nozzles.
f you are running misting nozzles on a timer, use our Aeroponic Mist Timer Calculator to calculate your exact ON/OFF pulse intervals.”
Hard-Won Hack #1: The Flow Plate Trick for Even Water Distribution
For an NFT tower, don’t just let the water fall. Create a small, perforated “flow plate” or “rain cap” at the top of the pipe to distribute the water evenly. This prevents uneven watering and ensures every plant gets a consistent dose of nutrients. My first 8ft PVC tower became a waterfall, drenching the first few plants and starving the rest. The flow plate saved my sanity.

- Efficient Growing: This hydroponic tower features a 6-tier vertical design with 30 plant pods. It maximizes growing effi…
- Water Circulation System: Our hydroponics growing system tower includes a 20 L water tank that needs refilling only once…
- Smart Remote Care: This hydroponics tower allows you to control the power and adjust pump runtime via a smart app. It he…
Wall-Mounted Wonders
If you don’t have a floor space, think about your walls. These systems are great for balconies, fences, or even indoor walls. They’re often made from fabric pouches or custom-built PVC frames that hold multiple plants.
My structural failure story: My first wall-mounted system, a cheap-fabric-based one, collapsed after a week. The waterlogged fabric, combined with the weight of the plants, was too much. The plants ended up in a heap on the floor, and I flooded my neighbor’s balcony. The lesson? Structural integrity is non-negotiable.
Component Command Center: Sourcing Your DIY Parts
Before you start building, you need to know your parts.
Pump Physics: Calculating GPH and Pressure Head
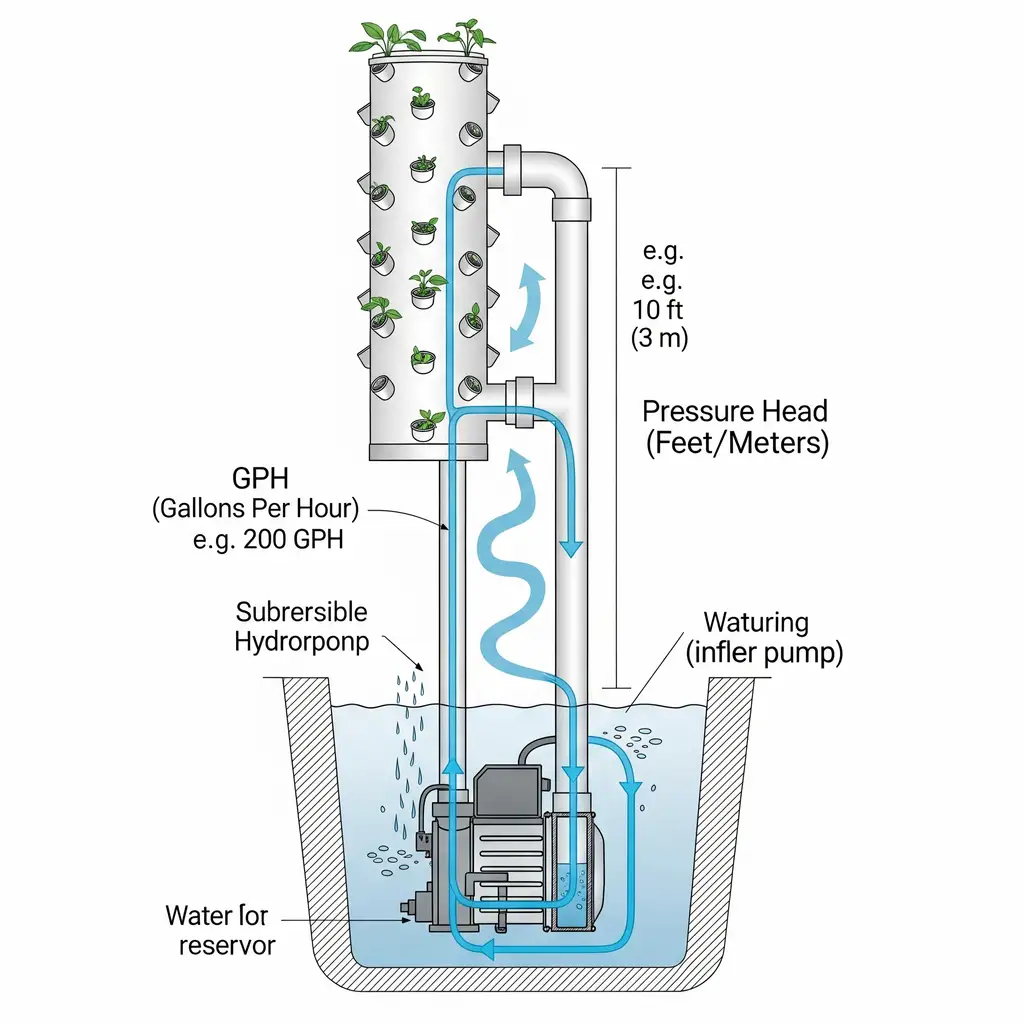
The heart of your vertical system is the pump. Get this wrong, and you’ll either starve your plants or turn your home into a swamp. A good rule of thumb is to size your pump to deliver enough water to fill the system’s channels or mist chamber, and return it to the reservoir.
GPH (Gallons per Hour) Calculation: For a standard 6-foot NFT tower, you need approximately 400 GPH to ensure a constant flow.
Minimum Flow Rate: For a single 6-foot vertical tower, target 25 to 50 GPH per tower drop to ensure adequate root coverage without overflowing.
Sizing the Pump (Accounting for Lift & Friction): Submersible pumps lose flow rate as water rises. To ensure you deliver 50 GPH at a 6-foot height, multiply your tower height by 50 to find the base pump rating, then add 25% for friction loss:
Required Pump GPH = (Tower Height in Feet × 50) × 1.25
For a 6-foot tower: (6 × 50) × 1.25 = 375 to 400 GPH rated pump

- PROVIDE YOU COMFORT & QUIET ENVIROMENT–Our fountain pump’s ultra-quiet operation will let you feel that the sounds of t…
- MULTI-OCCASIONS–The fountain pump can make circulation to your tank and give your lovely fish a near-natural environmen…
- ADJUSTABLE–The fountain pump is designed with an adjusting knob, allowing to get just the amount of water pressure you …
Plumbing Matrix: PVC vs. Vinyl Fence Post vs. ABS Pipe
This is a key structural choice. You have options, and each has trade-offs.
- 3-Inch Pipe: Strict limit for small leafy greens, herbs, and strawberries (roots won’t clog the line).
- 4-Inch+ Pipe (or 4×4 Vinyl Posts): Essential for large-root crops like Kale, Swiss Chard, or Basil. A 3-inch pipe will suffer root damming and overflow if planted with full-grown Kale.
| Material | Cost/ft | Durability | Weight (full) | DIY Difficulty |
| PVC Schedule 40 | $2.50 | 8/10 | 28 lbs | Beginner |
| Vinyl Fence Post | $4.75 | 9/10 | 18 lbs | Intermediate |
| ABS Pipe | $3.20 | 7/10 | 32 lbs | Advanced |
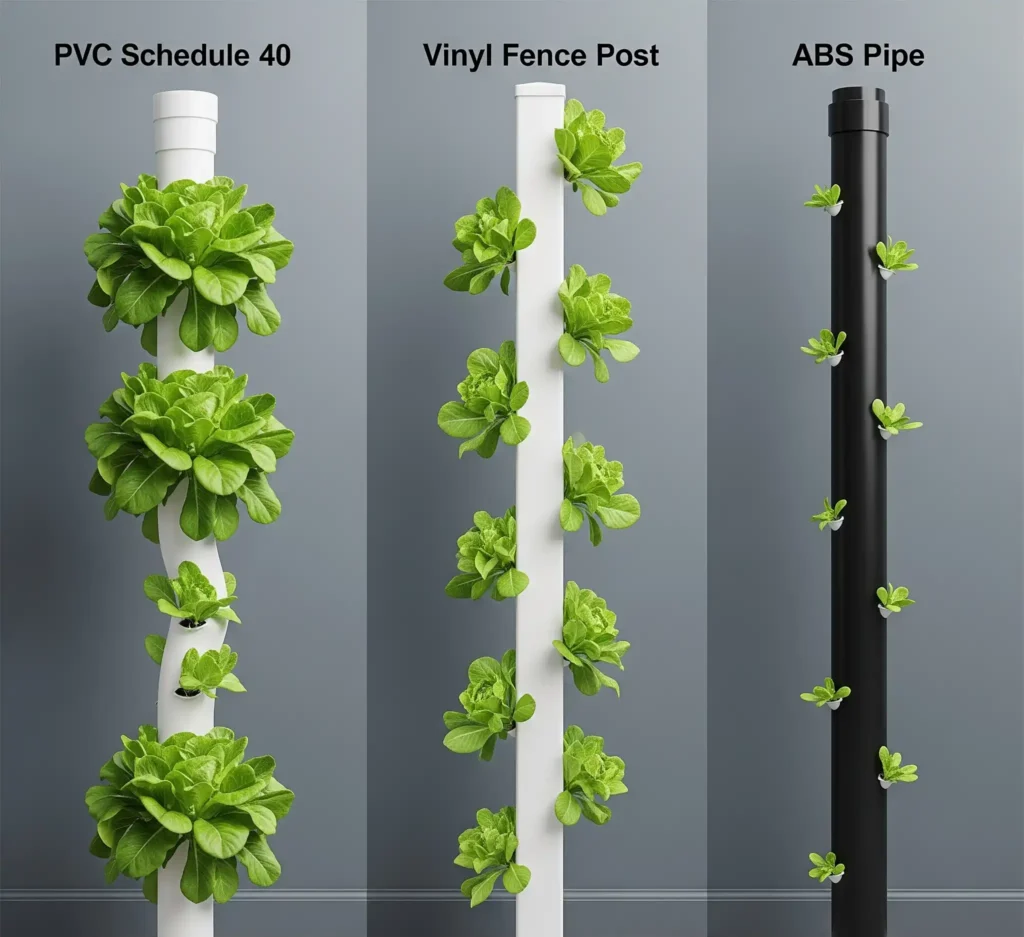
Autopsy Revelation #1: My first tower was made of standard PVC pipe. It was cheap, but the structural integrity was weak. I drilled a staggered hole pattern for my plants, but after 12 full-grown lettuce plants, the pipe started to bow and eventually collapsed. The lesson? Don’t skimp on materials. Vinyl fence posts are stronger, lighter, and more durable.
DIY Tower Bootcamp: Step-by-Step Building Guide
You’ve got your gear. Now it’s time to build.
Drilling Dynamics: Staggered Hole Patterns and Angles
Your hole pattern is a critical design choice. A good pattern maximizes plant density while ensuring each plant has enough light and space to grow.
- Vertical Spacing: 6 inches between each hole.
- Horizontal Offset: 3 inches between each staggered hole.
- Hole Size: 2-inch holes are perfect for most microgreens, herbs, and strawberries.
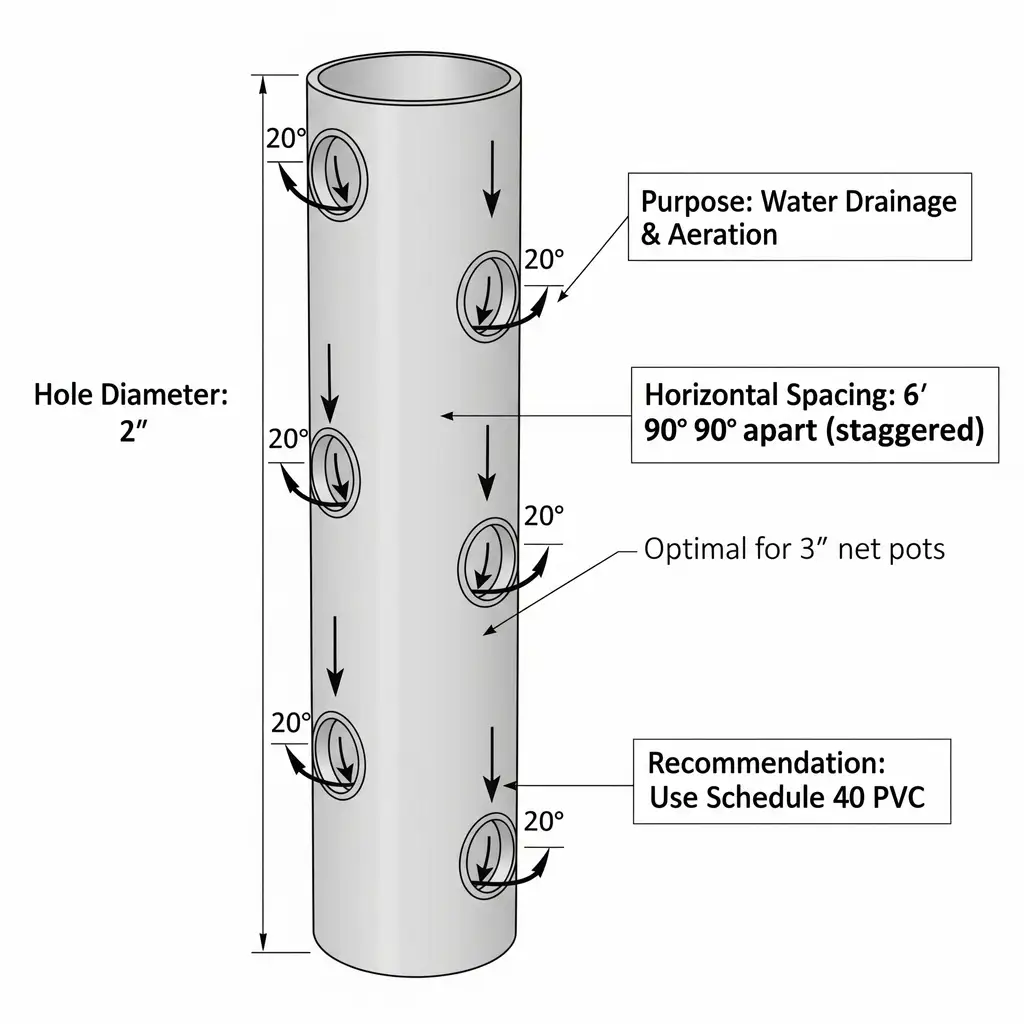
Hard-won Hack #2: The Angle is Everything: Don’t drill straight holes! Drill them at a slight downward angle (15 degrees) so that the water flows out and over the roots, rather than just straight through. This hack ensures every plant gets a full dose of nutrients.

- Tubing Details – Black vinyl tubing, 1/2 inch (12.7mm) inner diameter, 5/8 inch outer diameter, wall thickness 1/16 in, …
- Great flexibility and No kink – PVC tubing is made of high quliaty PVC material, non-toxic, lightweight, great flexibili…
- Easy to use and storage – The plastic tubing is wear-resistant, resistant to aging, and resistant to acid and alkali che…
Leak-Proofing Secrets
Leaks are the enemy of urban hydroponics. I’ve had my share of disasters, and I’ve learned a thing or two about how to prevent them.
- Silicone vs. Teflon Tape: For all pipe fittings, a generous amount of Teflon tape and a bead of food-grade silicone sealant is a must. Teflon tape creates a watertight seal, and silicone adds a layer of protection that will save you from a catastrophic flood.
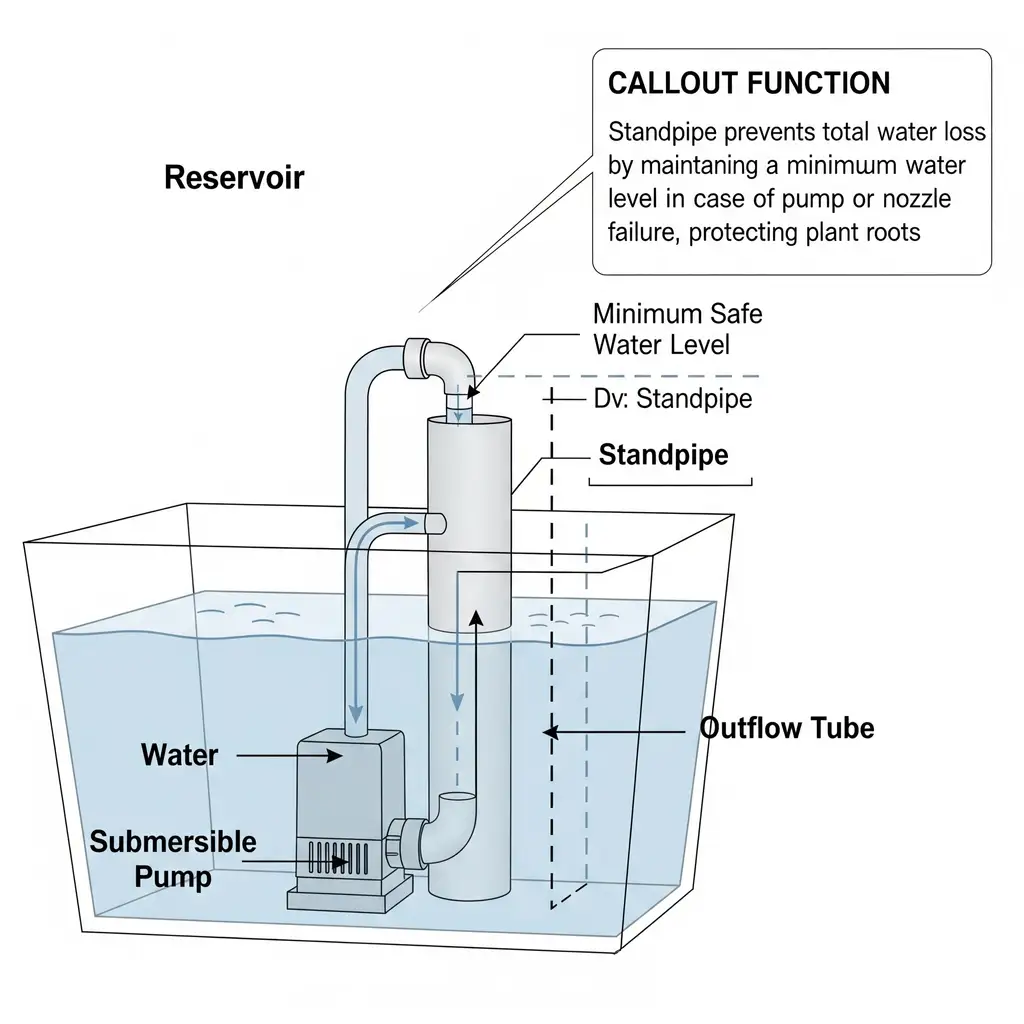
- The Standpipe: A simple PVC pipe that extends from the bottom of your reservoir up to a specific height. If your pump fails, the water will only drain down to the level of the standpipe, preventing a complete disaster.
Autopsy Revelation #2: My first aeroponic tower’s nozzle broke, and the entire reservoir drained. Because I hadn’t installed a standpipe, the pump kept running, and the plants were left high and dry. The lesson: a $5 part can prevent a $100+ disaster.
Plant Selection Science: Lightweight vs. Heavyweight Crops
Your tower’s structural integrity is only as good as the plants it supports. Not all plants are created equal.
| Crop | Root Mass | Tower Height Limit | Yield/Tower |
| Lettuce | Light | 6 ft | 18 heads |
| Strawberries | Medium | 4 ft | 36 berries |
| Kale | Heavy | 3 ft | 8 plants |
Lightweight Champions: Strawberries, Lettuce, and Greens
These are your workhorses. They’re light, they’re fast-growing, and they produce a massive amount of food in a small space.
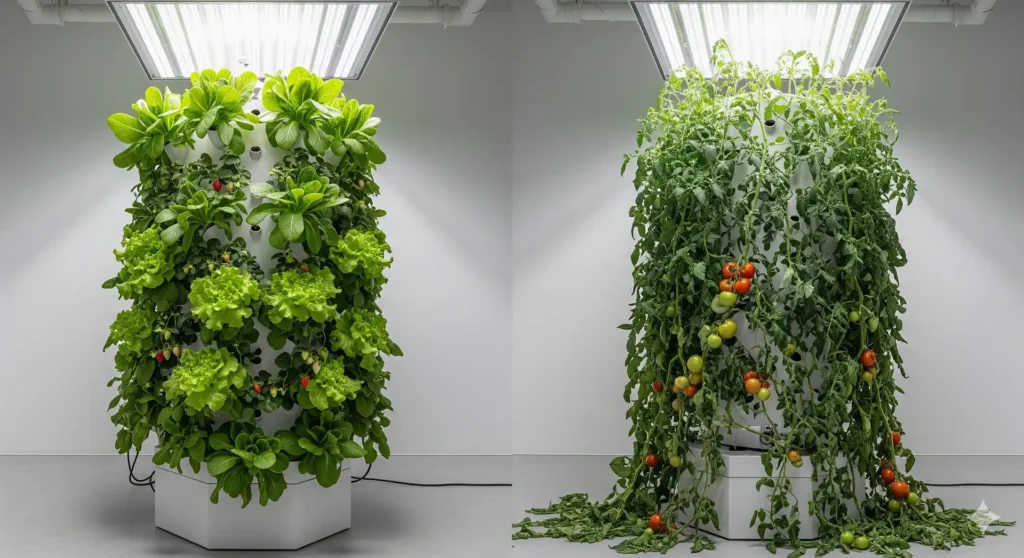
- Lettuce & Greens: A 6-foot tower can easily support 18-24 plants.
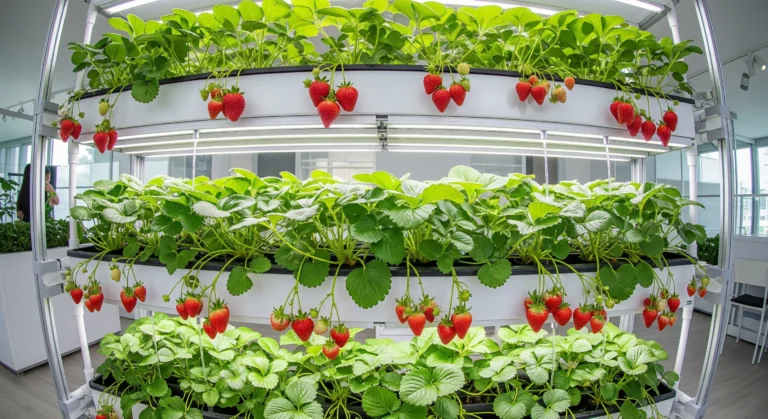
- Strawberries: A 4-foot tower is perfect for strawberries. They love the vertical space and consistent watering.
Hard-won Hack #3: The Vining Secret For vining plants like cucumbers and peas, give them a separate trellis. Don’t let them climb the tower. The weight of the plants and their fruit will pull your tower down.
Heavyweight Hazards: Why Tomatoes and Root Vegetables Fail
- Tomatoes: I know you want to grow them, but don’t. A single, full-grown tomato plant can weigh 15 lbs or more. A full tower of them will cause a catastrophic structural failure. Use a separate, heavy-duty bucket or bag system for them.
- Root Vegetables: These are not meant for vertical hydroponics. They need a deep, stable medium to grow into.
Autopsy Revelation #3: My first attempt at a “vertical tomato factory” ended with me serving slimy tomatoes to my neighbor as I apologized for flooding their balcony. The lesson: know your plant’s weight and plan accordingly.
The Physics of a Fail-Proof PVC Vertical Hydroponic System
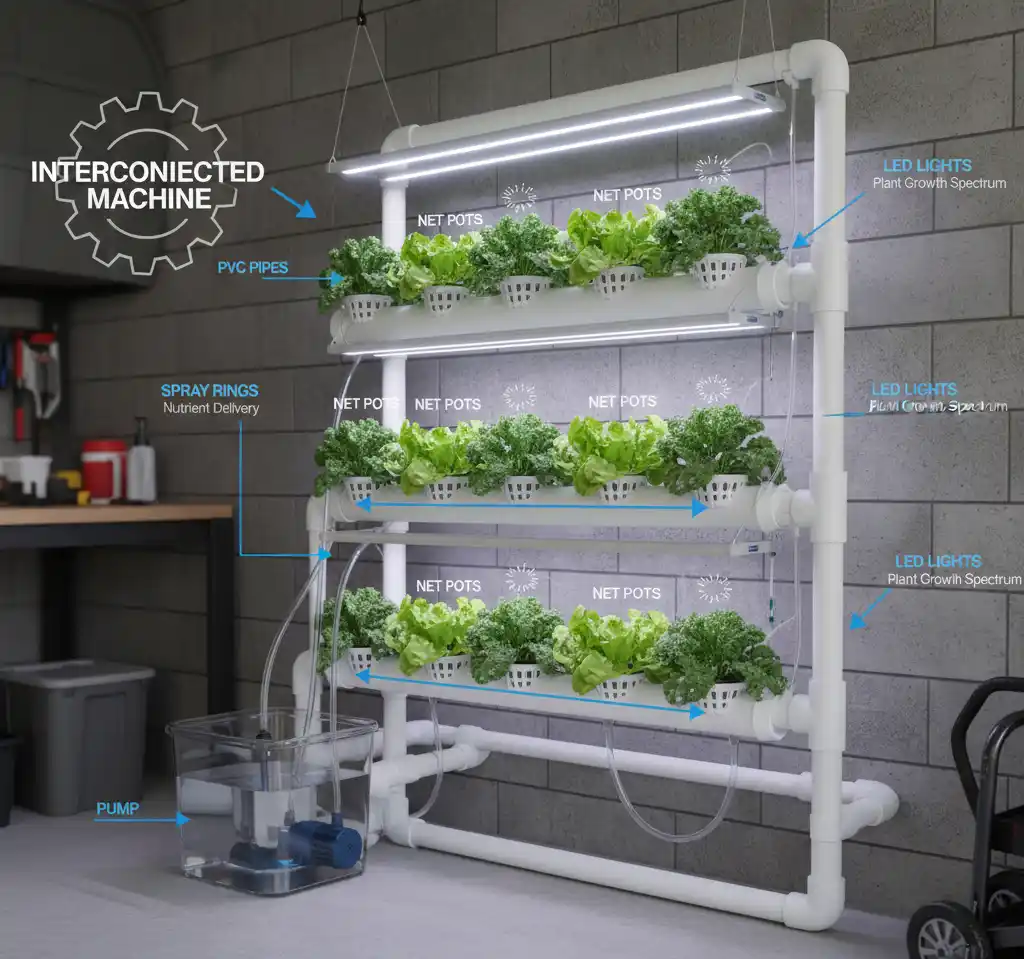
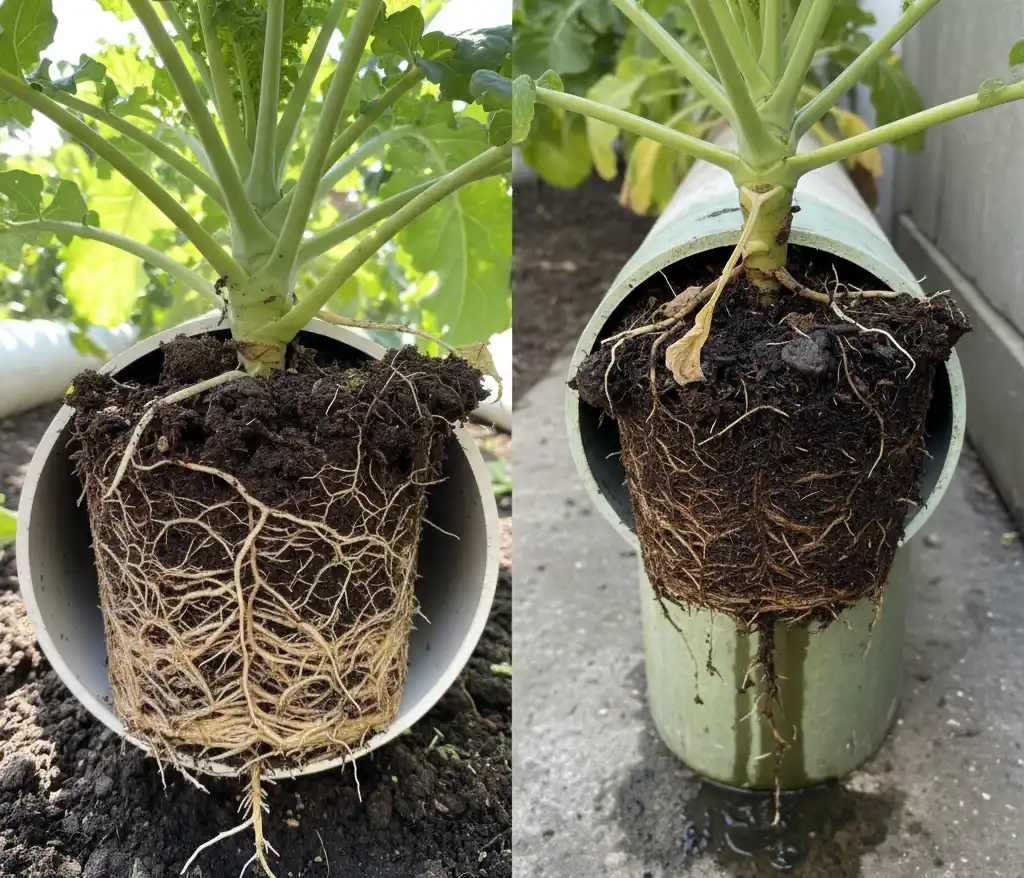
Don’t get it twisted. A vertical hydro tower isn’t just a glorified drainpipe. It’s a root chamber, a nutrient highway, and a plant’s home. Undersize your pipe and you’re building a death trap. I’ve seen it firsthand. Trying to cram a lush, full-grown kale plant’s root system into a 2-inch pipe is like trying to squeeze a bowling ball into a coffee mug. It’s not just a tight fit; it’s a recipe for root suffocation and disease. Your roots need breathing room and unrestricted access to the nutrient solution.
PVC Pipe Sizing Guide: Why 4″ Isn’t Always King
The key to proper pipe sizing is simple: think about the root ball at maturity, not the seedling in your hand. The last thing you want is a root mat clogging everything up, turning your beautifully engineered system into a stagnant, drowning gurgle. It’s a fundamental principle of fluid dynamics and organic life: flow and space.
My personal rule, scarred by early failures, is this: the minimum diameter of your pipe should be at least 1.5 times the expected diameter of your mature root mass. This simple formula leaves plenty of room for roots to expand, for oxygen to circulate, and for water to flow freely.
Plant-Specific Pipe Size & Spacing Chart
Here’s a quick guide based on what I’ve seen survive (and what didn’t):
| Plant | Pipe Size | Vertical Gap | Min GPH/Plant |
| Lettuce | 3″ | 8″ | 0.4 |
| Basil | 4″ | 10″ | 0.5 |
| Kale | 6″ | 14″ | 0.7 |
A quick hack for cutting perfect holes? Get a cheap, 2-inch hole saw and drill guide from your local hardware store. Use a drill press if you have one, but a steady hand and a piece of scrap wood behind the PVC works in a pinch. It’s a small detail, but a clean hole prevents cracks and gives your net pots a snug, secure fit.
Channel Spacing Science: Stop Light Hunger & Lopsided Growth
The cardinal sin of vertical hydroponics isn’t a bad pump or a shoddy seal. It’s bad spacing. Bad spacing = light hunger. Light hunger = sad plants. The top-tier plants, basking in the glow, hog all the good photons while their lower-level brethren wither in shadow. This is a cruel, zero-sum game, and the only loser is your yield.
Channel spacing is like elevator etiquette in a crowded building—everybody needs enough room to function without stepping on each other’s toes. Or, in this case, blocking each other’s light.
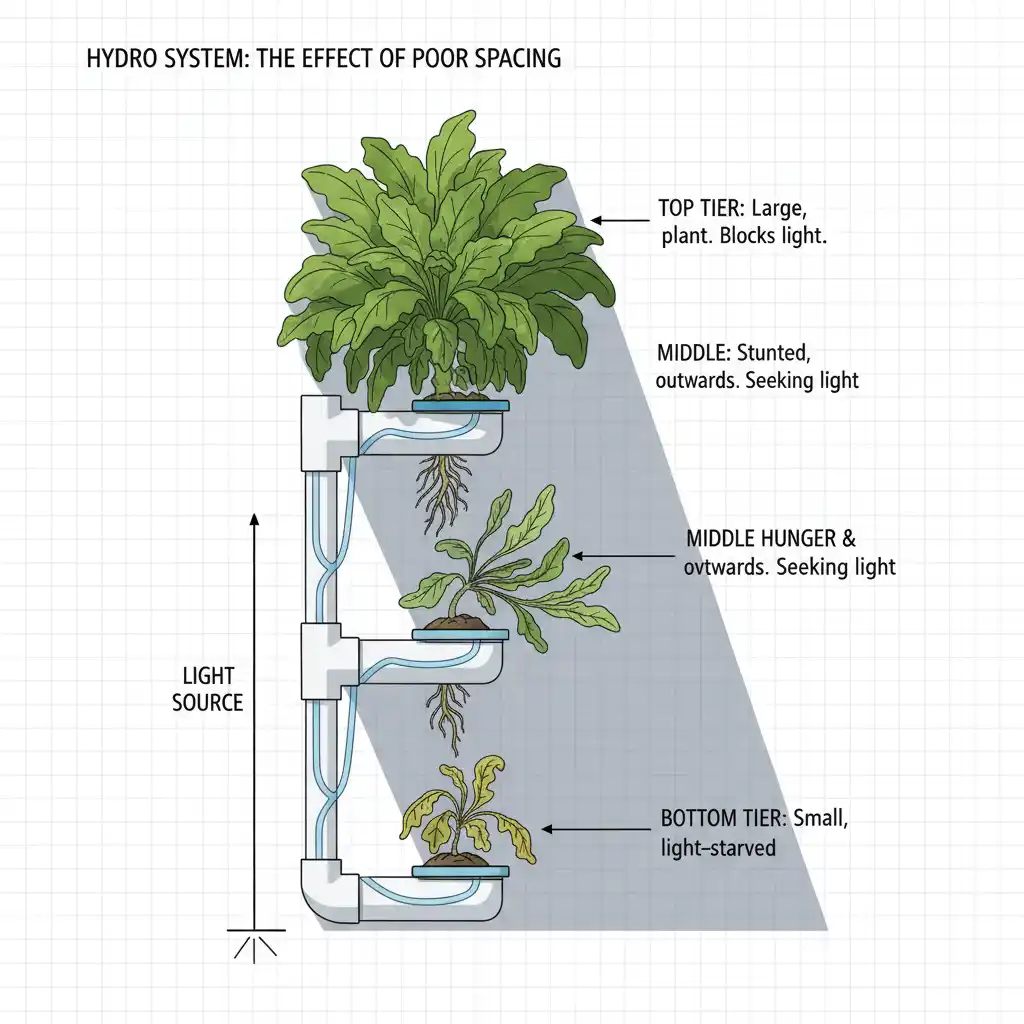
A single kale leaf is a solar panel; shade it out, and it’s useless. The result is a lopsided, disappointing harvest where your top plants are massive and the bottom ones are just sad, yellowing memories of what could have been.
I’ve learned from my failures, and the golden rule for vertical hydro tower spacing is a bitter truth, forged in the heat of a failed grow.
The Golden Rule for Vertical Plant Spacing
This formula isn’t about guesswork; it’s about giving every plant a fighting chance. It accounts for a plant’s natural spread and guarantees that every leaf, from the top tier to the bottom, gets enough light to thrive. Ignore this, and you’re just growing a few good plants and a whole lot of expensive compost.
| Crop | Vertical Gap | Notes |
| Basil | 10″ | A compact herb needs less space, but still breathes. |
| Kale | 14″ | Broad leaves mean this light hog needs its own space. |
| Cilantro | 8″ | Fast-growing and needs constant trimming, but a small footprint. |
| Strawberries | 12″ | Give them room to vine out, or they’ll strangle each other. |
Flow Rate Math: How to Calculate GPH for Vertical Towers
Now we’re getting into the quantum mechanics of plumbing. The GPH (Gallons Per Hour) of your pump isn’t just a number on a box; it’s the heartbeat of your system. An undersized pump is like a failing heart, starving your lower plants and causing a slow, painful death. I learned this the hard way with a prototype, undersized pump that cost me six weeks of growth on a beautiful NFT channel. The top plants looked great, but the bottom half—a sad, wilted confession of my ignorance. The flow was so weak it couldn’t make it to the end of the channel, let alone the reservoir. The flow rate has to be a precise, relentless cascade.
The solution? A simple formula that accounts for both the total water your plants need and the physical forces working against your pump.
How to Calculate Pump Head Height for Hydroponics
GPH=(Plants×0.5L/hr)+(Height ft×1)
This formula isn’t a suggestion. It’s a survival guide. It calculates the raw flow needed to nourish your plants and adds a crucial “head height hack” to account for the vertical lift. For every foot of vertical lift, add one gallon per hour to your pump’s required capacity. This is the difference between a pump that’s choked and a pump that can breathe.
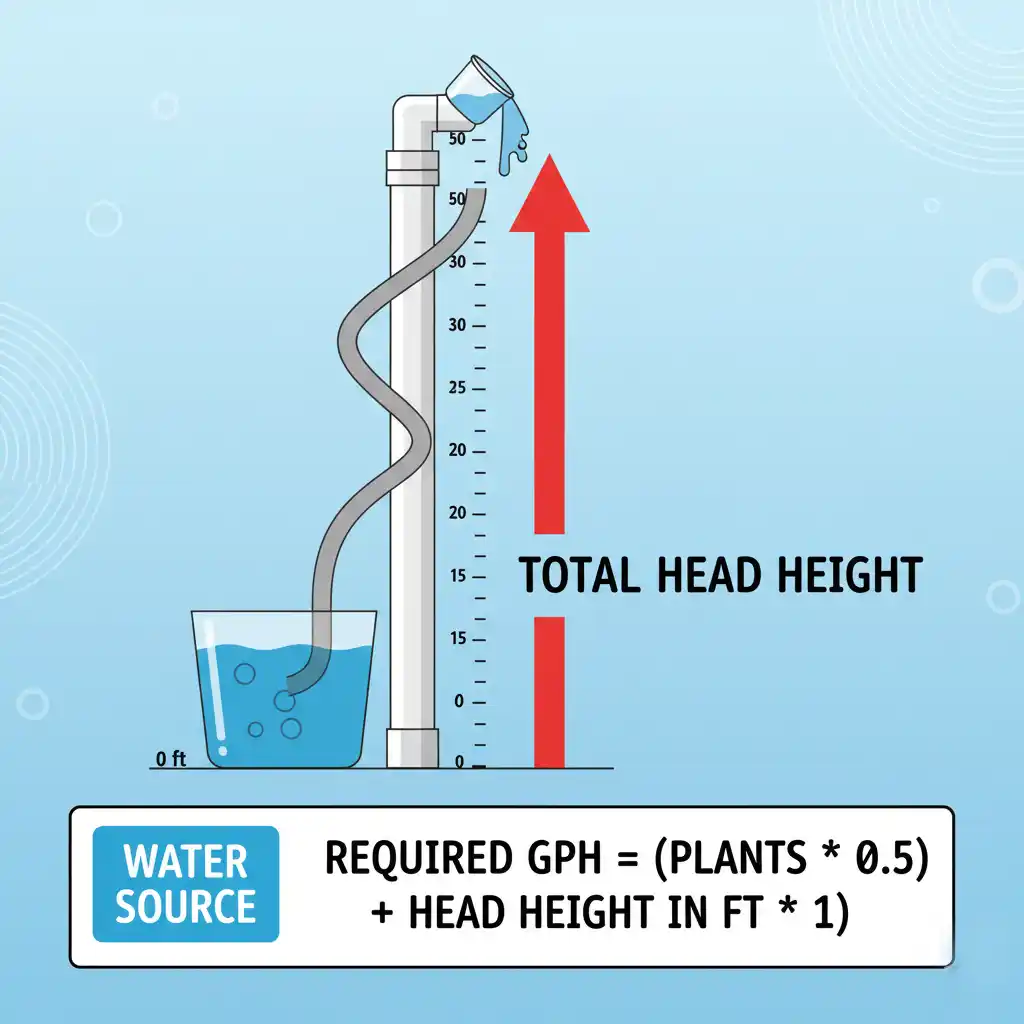
How to calculate pump head height: Your pump’s head height isn’t just the height of your tower; it’s the total vertical distance the water has to travel. For a vertical NFT system, this is the distance from the bottom of your reservoir to the highest point in your system where water is introduced.
When looking for a pump, always check the “max head” rating. Your system’s head height should be well within the pump’s capability to ensure adequate flow.
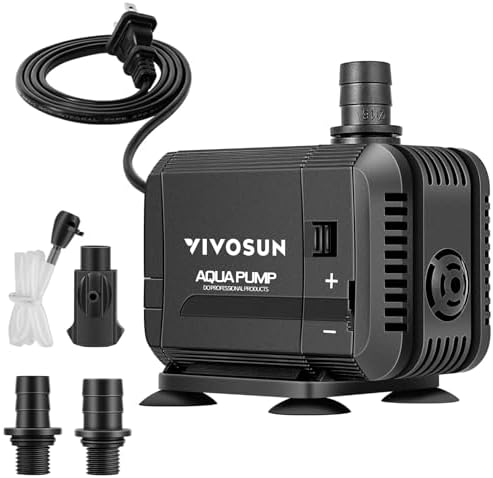
Solves: Multi-tier flow starvation and anemic GPH on a budget.nVerdict: Lifted a 15ft tower without choking. Has a real, measurable GPH that holds up under load. Don’t cheap out here. My first undersized pump cost me six weeks of growth.
Drippers vs. Spray Rings: The Hydro Civil War
This is where the fight starts. The argument between drippers and spray rings is the “civil war” of vertical hydroponic system design. It’s a battle of efficiency versus reliability, and there are no easy answers. A dripper system is a series of tiny, surgical strikes. A spray ring is a wide, nourishing rain.
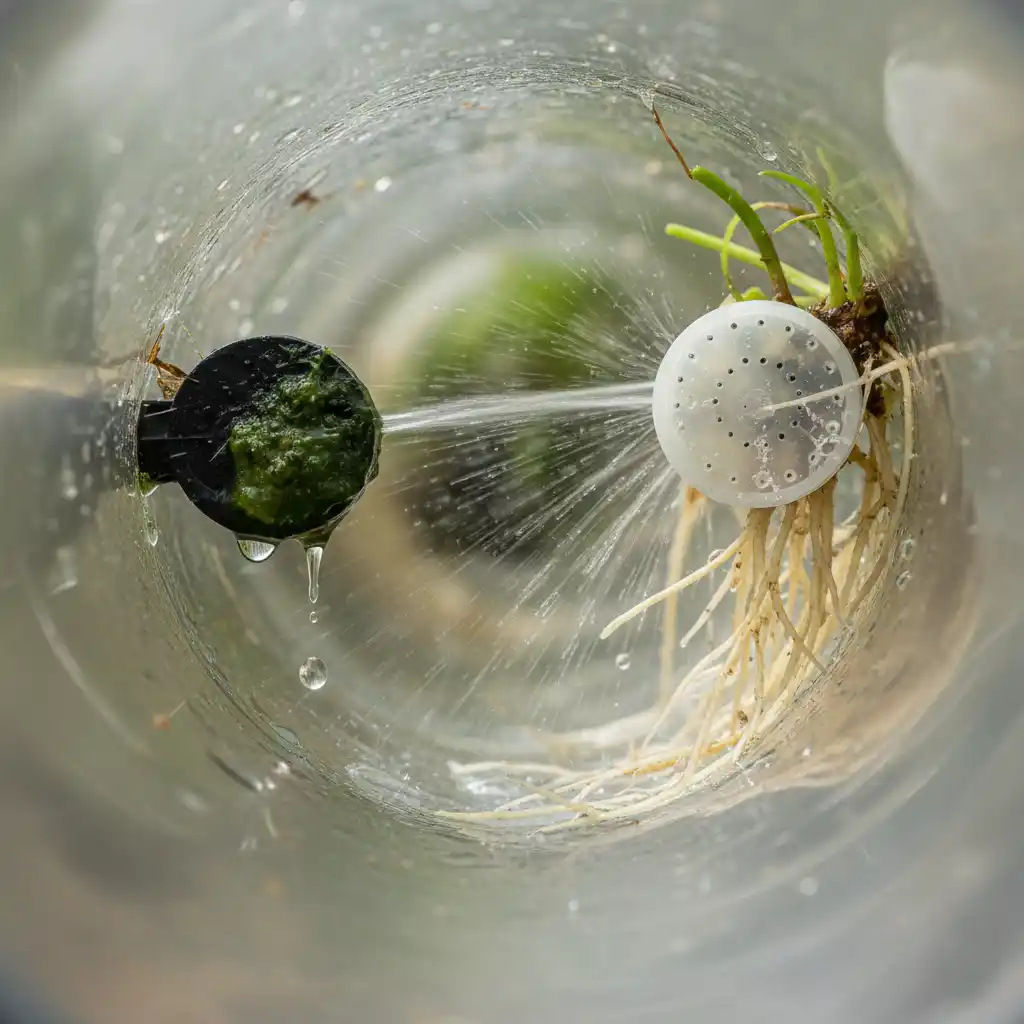
My catastrophe confession #2:
My first foray into a vertical drip system was a nightmare. The cheap, flimsy drippers clogged constantly, leaving entire sections of the tower parched. I spent more time unclogging tiny tubes than admiring my plants. The worst part? The death wasn’t sudden. It was a slow, uneven, frustrating starvation. Spray rings fixed this, but the initial cost and the need for higher pressure was a shock.
Dripper vs. Spray Ring Comparison Table
Here’s the battle-tested truth, laid out in a simple table.
| Type | Cost | Clog Risk | Flow Uniformity | Verdict |
| Drippers | 💸 | High (from nutrients/algae) | Low (prone to blockages) | Use for small, simple systems. Not for commercial use. |
| Spray Rings | 💸💸 | Low (fewer, larger holes) | High (wide, even spread) | The professional choice. Worth the higher initial cost. |
DIY Hack: If you’re running a dripper system, put a small coffee filter over the intake of your pump. It won’t stop everything, but it will dramatically extend the life of your drippers. This simple trick saved me from daily unclogging on my second prototype.

Solves: The confusion and hassle of sourcing compatible parts.nVerdict: Their parts fit. Every time. Their manifold kit is a godsend for building a leak-free spray system. My first system leaked like a sieve because I mixed brands.
LED Lighting Angles: How to Cover 5 Tiers Without Hotspots
A light is just a light, right? Wrong. In vertical farming, a bad lighting setup is a heat death ray for your top plants and a starvation zone for the bottom. My third catastrophe confession: I once built a vertical garden with a single, massive LED fixture directly overhead. The light-starved plants at the bottom were bad enough, but the top-tier plants looked like they had been hit with a blowtorch. The heat from the fixture was so intense it cooked them.
Light coverage isn’t just about brightness; it’s about geometry. You need to blanket your entire system in an even, nurturing glow, not a series of blinding hotspots and dark shadows.
The physics here is brutal and unforgiving. Light intensity drops off dramatically with distance. To compensate, you have to use multiple, smaller light sources and angle them to create a seamless overlap.
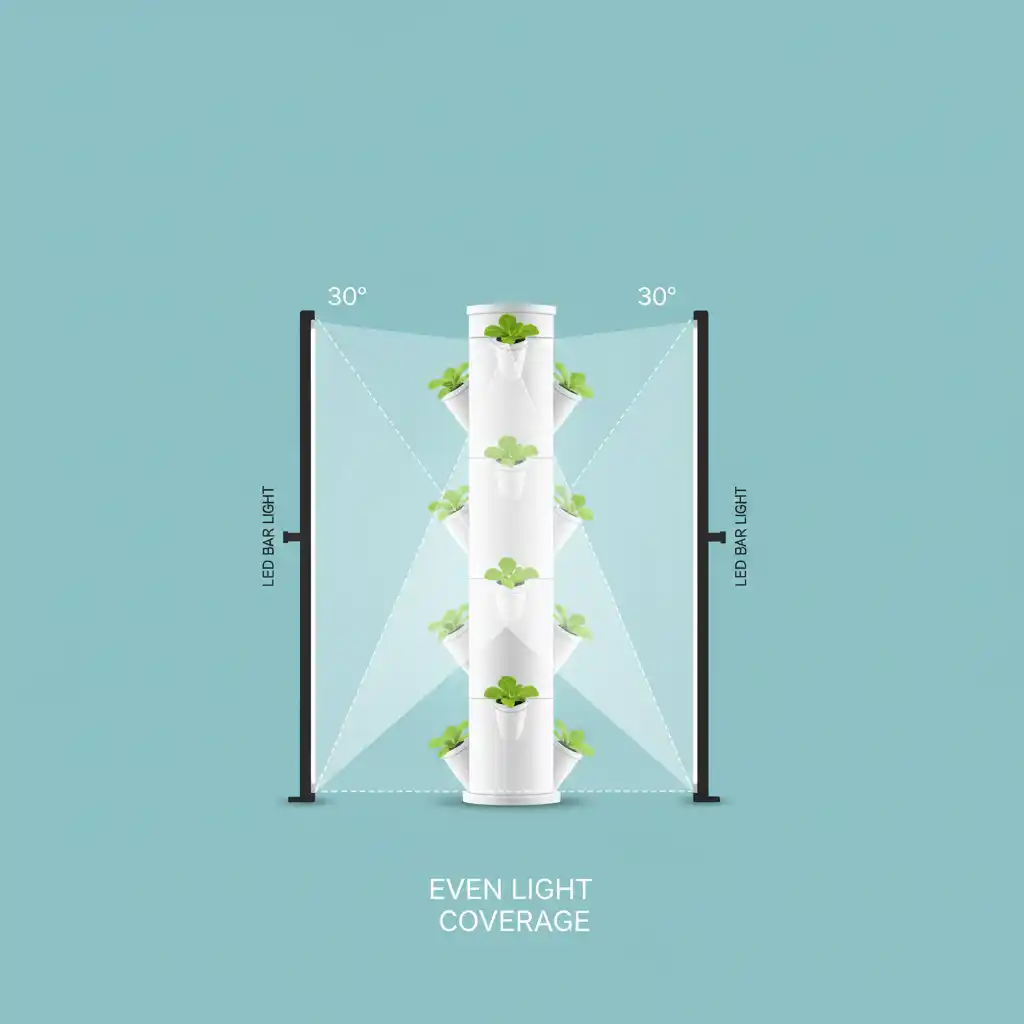
The 30° Angle + 50% Overlap Rule for Even Light
This rule creates a uniform light field from top to bottom, ensuring every plant gets the photons it needs. A 30° angle pushes light down and out, and the 50% overlap guarantees no dark corners.
This is what separates a professional, high-yield system from an expensive light-starved plant graveyard.
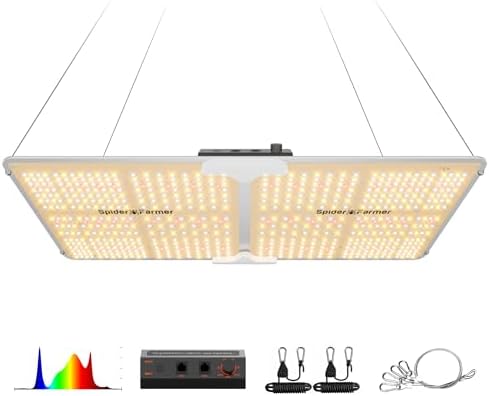
Solves: Uneven lighting and deadly hotspots from a single-source setup.nVerdict: The full-spectrum diodes create an even, consistent light field that won’t cook your top plants. I’ve tested it on leafy greens and flowering plants, and the results are consistently solid.
Maintenance War Room: Keeping Your System Flawless
Forget the romanticized version of gardening. A vertical hydroponic system isn’t a “set it and forget it” project; it’s a machine. And like any high-performance machine, it requires regular, meticulous maintenance to avoid catastrophic failure. I’ve lost more crops to laziness than to any pest or pathogen. This section is your drill sergeant for system upkeep. Follow these protocols, and your tower will hum. Ignore them, and you’ll be on wet-vac duty.
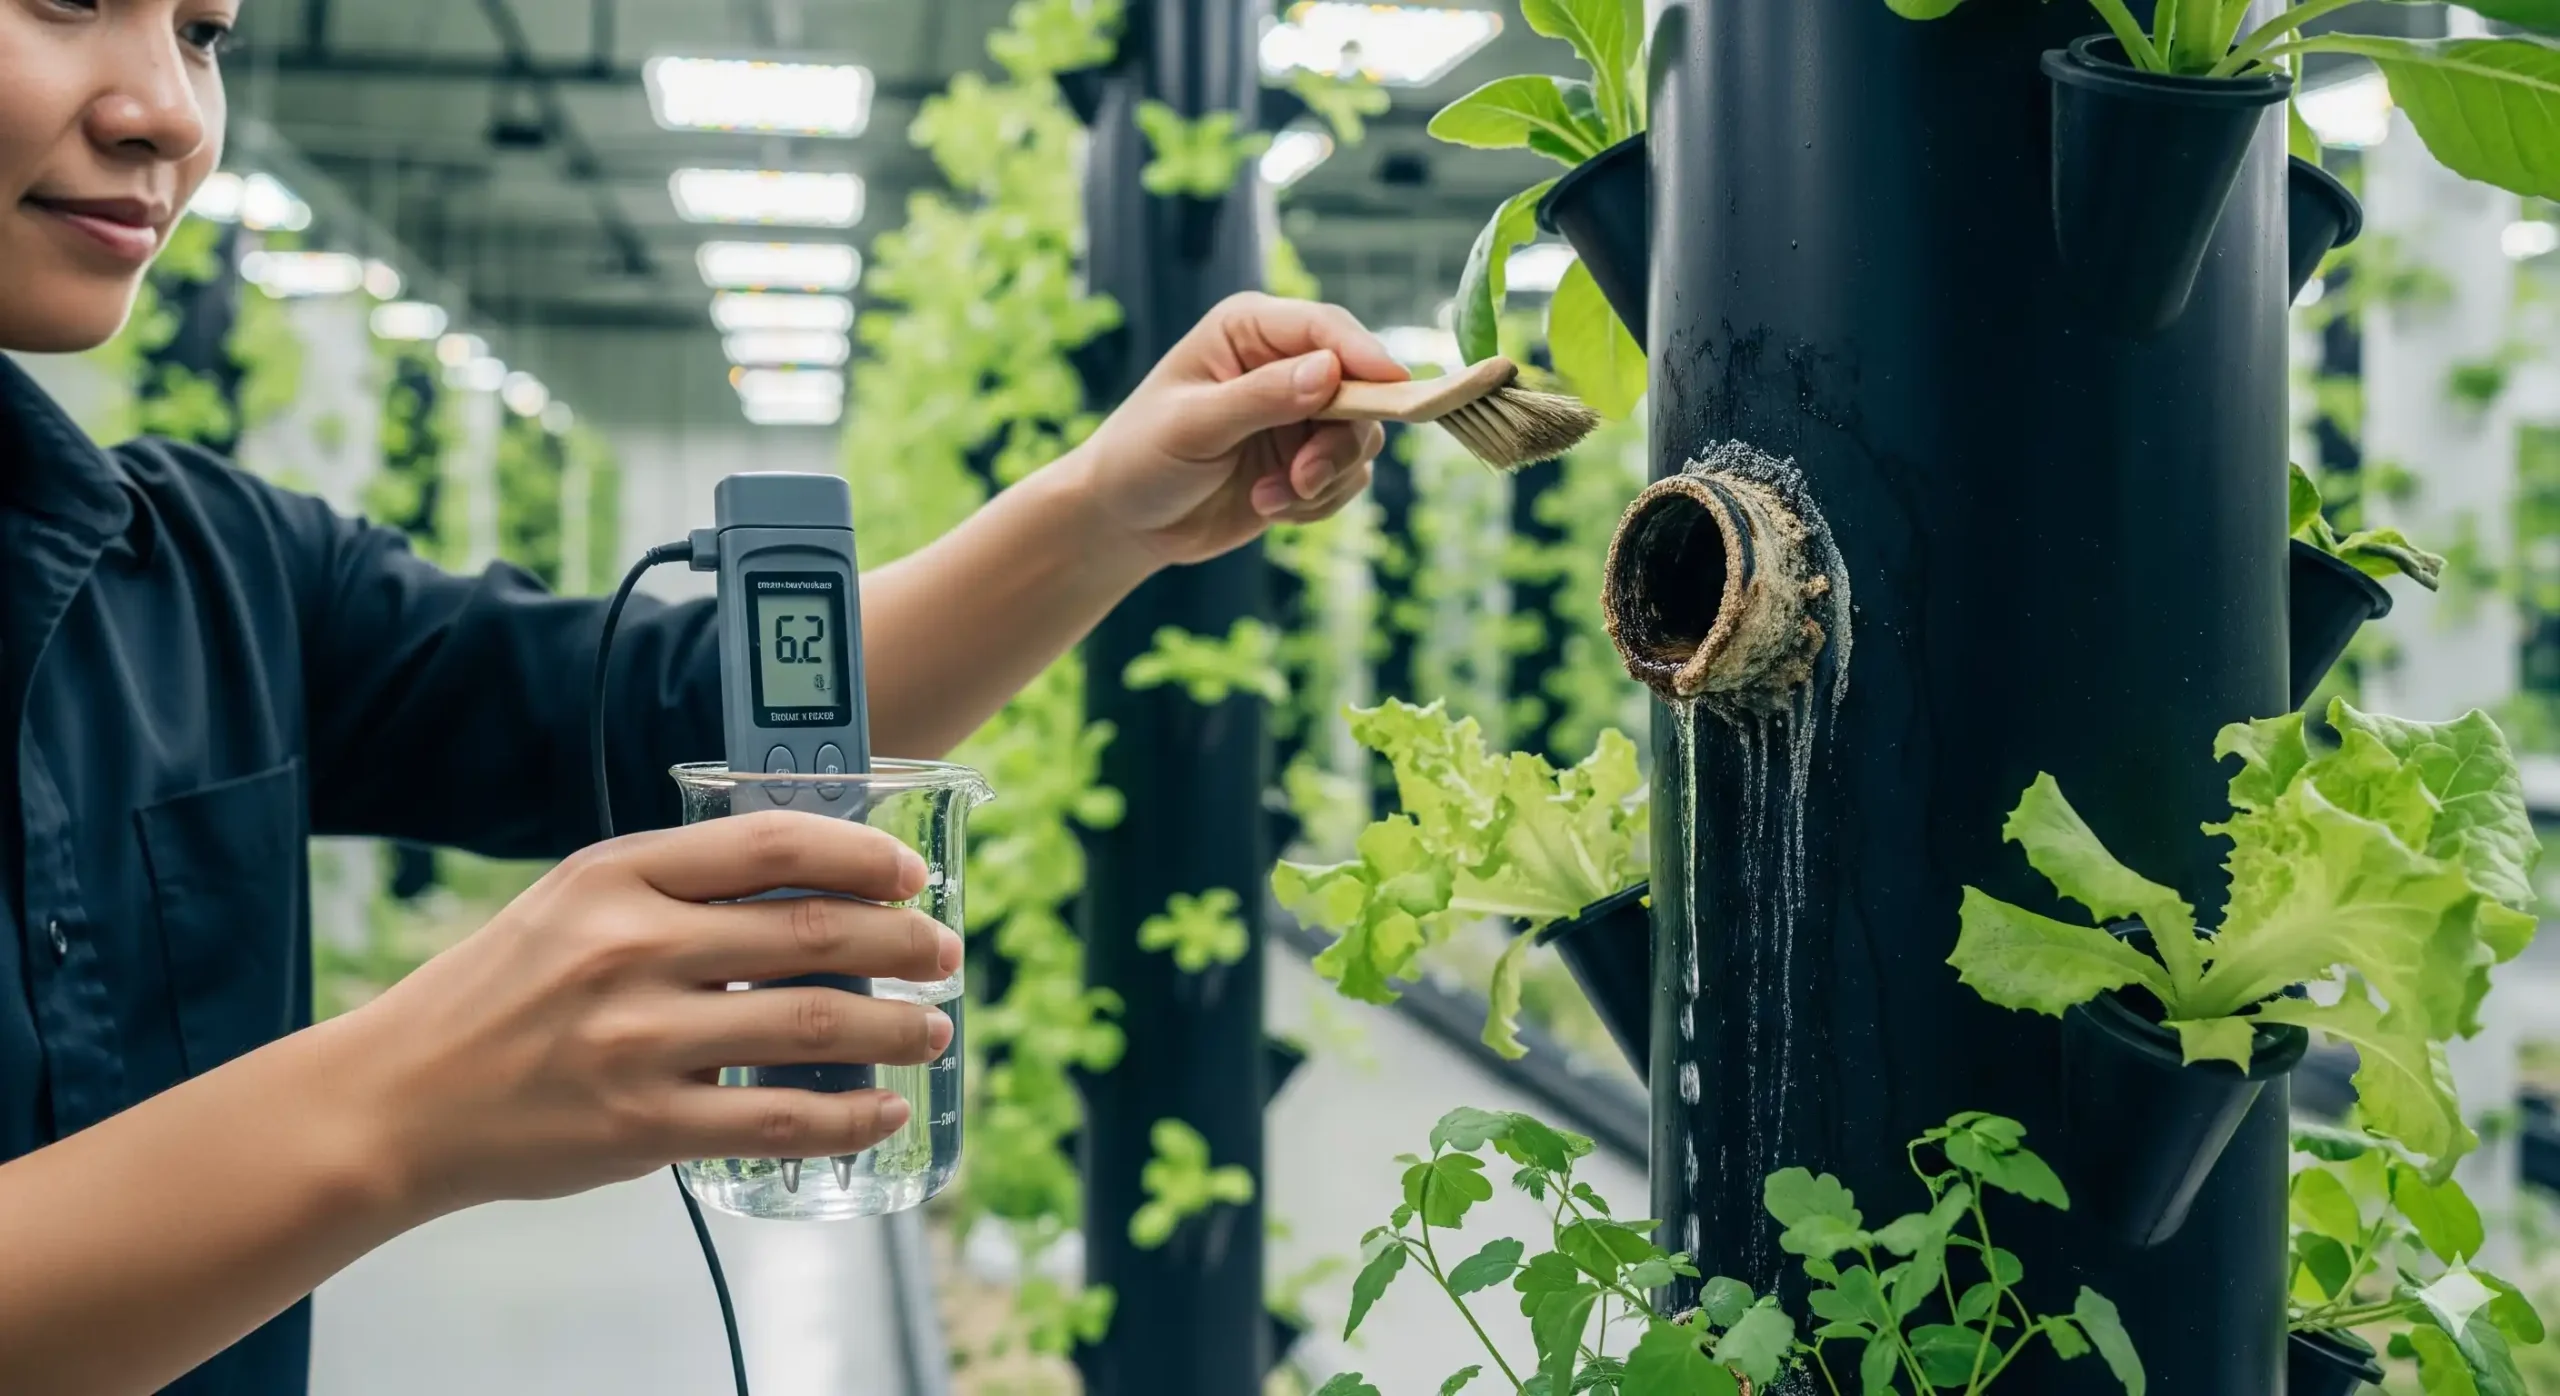
Clog Prevention: Pre-Filters and Regular Flushing
A clog isn’t an inconvenience; it’s a death sentence for your plants. It can strike anywhere: a tiny nozzle, a pump inlet, or a drip line. When it does, the water stops, the roots dry out, and your entire crop can be dead in hours. Your maintenance routine must be obsessive about prevention.
The Protocol:
- The Pre-Filter Guard: This is non-negotiable. Every single pump you run must have a pre-filter sponge or mesh guard over its intake. This catches sediment, root fragments, and organic gunk before they can enter and seize the pump’s impeller. I use the VIVOSUN Pre-Filter Sponges because they’re cheap, easy to clean, and last for ages.
- The Weekly Flush: Every seven days, without fail, you do a reservoir flush.
- Drain the entire system.
- Scrub the reservoir with a soft brush and a mild hydrogen peroxide solution (1 tbsp per gallon) to kill any lurking biofilm.
- Refill with fresh, pH-balanced water and run the system for an hour to flush the lines.
- Then add your nutrients. This weekly reset prevents the slow buildup of minerals and organics that eventually form a clog.
- The Nozzle Check: For aeroponic systems, your misting nozzles are sacred. Every two weeks, remove them and soak them in a vinegar solution to dissolve any mineral deposits. A clogged nozzle is a single point of failure that can kill every plant downstream of it.

- REPLACEMENT PRE-FILTER FOAM: Fits inside your Tetra Water Garden Pump Pre-Filter to help reduce pump clogging.
- CYLINDRICAL PAD: The coarse-textured black foam pad features a 1-inch diameter hole through the center to fit the pump p…
- TETRA PRODUCT: You can trust your pond to Tetra products.
Algae Battles: Light-Blocking Solutions
Algae is the scum of the hydroponic world. It’s not usually a direct killer, but it’s a resource-hogging parasite. It thrives on light and excess nutrients, competing with your plants and creating a messy, oxygen-depleting sludge in your system. The strategy is simple: eliminate its fuel source.
The Protocol:
- Total Light Blackout: Algae can’t grow in the dark. Every single component that holds or transports water must be light-proof.
- Reservoir: Use only solid, opaque, dark-colored buckets (black or dark blue). If you’re using a clear tote, wrap it in reflective insulation foil or black duct tape.
- Tubing & Towers: Use black tubing instead of clear vinyl. For towers, this is another reason vinyl fence posts are superior to white PVC—their darker pigment allows less light penetration.
- Net Pots: If you’re using them, get black ones and cover the top of the growing medium with a clay pellet or foil to block light from the top.
- The Hydrogen Peroxide Flush: If you see algae starting to form (that green slime on surfaces), it’s time for a shock treatment.
- Add 3ml of 3% food-grade hydrogen peroxide per gallon of water to your reservoir.
- Run the system for 4-6 hours, then perform a complete flush and refill with fresh nutrients.
- This will nuke the algae without harming your plants’ roots if used at this concentration.

- Contains One – 16 fl oz Bottle of Food Grade Hydrogen Peroxide
- It Works! The ultimate cleaner for 1st AID cuts and scrapes; BODY ears, throat and diffusers; HOUSEHOLD counters, surfac…
- It’s Clean! Free of toxic stablizers found in brown bottle peroxide. NON GMO. Great for homes with gray water systems.
pH and Nutrient Management: Daily Checks
Before dosing your reservoir, run your numbers through our free Hydroponic Nutrient Calculator to avoid over-concentrating salts. This is the most important minute of your day. pH drift and nutrient depletion are silent killers. You won’t see the damage until your plants are yellowing and stunted, and by then, you’ve lost a week of growth. Consistency is everything. Before dosing your reservoir, run your numbers through our free Hydroponic Nutrient Calculator to avoid over-concentrating salts.
The Protocol:
- The Daily Check: Every morning, before coffee, you check two things:
- pH Level: Use your Bluelab PENPH pH Meter. Dip it in the reservoir, swirl gently, and record the reading. The ideal range for most crops is 5.5 – 6.2.
- EC/TDS Level: Use your meter to check the Electrical Conductivity (EC) or Total Dissolved Solids (TDS). This tells you the concentration of nutrients. If the number is rising, your plants are drinking more water than nutrients (add plain water). If it’s falling, they’re eating more than drinking (add nutrients).
- The Calibration Ritual: Your meter is useless if it’s not accurate. Calibrate it every two weeks without fail. Use the included calibration solutions. It takes two minutes and is the difference between guessing and knowing.
- The Logbook: Data is your best friend. Keep a simple notebook by your system. Log your daily pH, EC, and any additions you make (water, nutrients, pH Up/Down). After a few cycles, you’ll see patterns and be able to anticipate your system’s needs.
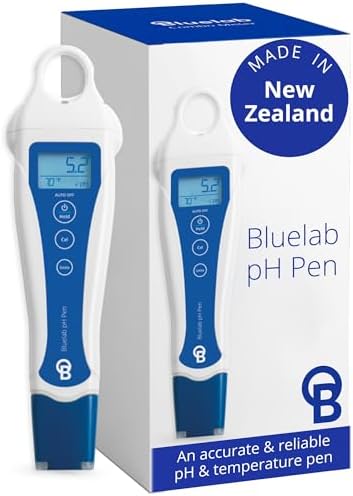
- Perfect pH control for various media – ph meter for water hydroponics can be used for growing tents, swimming pools, dri…
- Easy calibration – Set up our digital pH meter with a two-point calibration process. Calibrate the handheld meter before…
- Thrives in the toughest environments – Our soil pH tester comes with waterproof casing. It can withstand the knocks, dro…
- General Hydroponics pH Control Kit contains everything you need to measure pH levels of your hydroponic grow reservoirs
- RELIABLE RESULTS: The streamlined testing system delivers fast, accurate, and easy-to read results every time
- ALL-IN-ONE KIT: Includes 8 oz. General Hydroponics pH Up Liquid, 8 oz. General Hydroponics pH Down Liquid, 1 oz. Test In…
The Weekly Maintenance Checklist
- Check & Rinse Pump Pre-Filter
- Top Off Reservoir with pH-balanced water (if needed)
- Record Daily pH & EC/TDS Readings
- Visually Inspect roots for discoloration (brown = rot, white = healthy)
- Scan for Clogs in drippers or misters
Every 2 Weeks:
- Calibrate pH/EC Meter
- Perform a Complete Reservoir Flush & Scrub
Every 4 Weeks:
- Deep Clean all tubing and nozzles with hydrogen peroxide solution
- Inspect All Fittings for leaks and re-tighten
FAQ – Upgrade Red Flags & Green Lights
Q: Why should I choose vertical hydroponics over traditional horizontal gardening?
A: Vertical hydroponics is an incredibly efficient way to maximize your yield in a small space. By growing plants in three dimensions, you can achieve up to a 10x increase in the number of plants you can grow in the same footprint. This makes it ideal for urban environments, balconies, or small indoor spaces where horizontal space is limited.
Q: What is the difference between an NFT tower and an aeroponic tower?
A: NFT (Nutrient Film Technique) towers use gravity to drip a thin film of nutrient solution over the plant roots, which is a reliable and easy-to-manage method. Aeroponic towers, on the other hand, use a high-pressure pump to spray a fine mist of nutrients onto the roots, providing superior oxygen exposure for faster growth, but requiring more complex equipment.
Q: What is the most common mistake beginners make when building a vertical hydroponics system?
A: The most common mistake is a structural failure due to underestimating the weight of water and plants. Using a flimsy material, like a standard PVC pipe without reinforcement, can lead to the tower bowing or collapsing. It is crucial to use a durable, load-bearing material like a vinyl fence post and to choose plants that are suitable for vertical growing.
Q: How do I calculate the right pump size for my vertical hydroponic system?
A: To calculate your pump size, you must consider its Gallons Per Hour (GPH) and its pressure head rating. The GPH needs to be high enough to circulate water throughout the system, while the pressure head must be greater than the height of your tower to account for friction. Our guide recommends a VIVOSUN 400GPH pump with an 8ft pressure head for a standard 6-foot tower to ensure a consistent flow.
Ready to expand your indoor harvest?
Mastering your current system is just the beginning. Whether you are looking to dial in massive leafy greens, experiment with heavy-feeding fruiting plants, or troubleshoot a specific root zone, success comes down to crop-specific blueprints. Explore All Hydroponic Crop Guides →

Continue Your Learning Journey