Grow Tent Buying Guide: Fabric, Poles & Ports Explained

Table of Contents
- The 2021 Tent Collapse: Anatomy of a Budget Hardware Disaster
- Fabric Face-Off: 600D vs. 1680D vs. Material Scams
- Pole Physics - Steel Gauge, Diameter, and Corner Joint Engineering
- Duct Porting Engineering & Atmospheric Seals
- The Usable Space Illusion - Frame Loss & Negative Pressure
- Spill Trays & Flood Containment Engineering
- Advanced Tent Hacks for Tight Spaces
- The Comprehensive Grow Tent Selection Checklist
- Tents That Survive Real Grows
- The Pre-Purchase Inspection Checklist
- FAQ's
Selecting a commercial or hobby grow tent requires auditing four structural pillars: Fabric Mass Density (1680D canvas offers 2.8x higher tear strength than 600D), Frame Pole Physics (≥22mm steel tubing for overhead loads), Atmospheric Duct Engineering (double-cinching ports to block light leaks), and True Canopy Footprint (accounting for a 14.1% area loss caused by negative-pressure wall bowing). A tent is not just a box—it is an engineered Controlled Environment Agriculture (CEA) micro-climate.
The 2021 Tent Collapse: Anatomy of a Budget Hardware Disaster
In 2021, our audit of a failed indoor grow setup revealed a catastrophic structural failure that every beginner needs to see.
A grower attempted to hang a high-output LED fixture, a 6-inch carbon filter, and an inline ventilation fan inside an $80 budget 4×4 grow tent. The total hanging overhead reached 76.0 lbs. The tent utilized 16mm hollow steel poles with paper-thin 0.5mm walls and hollow plastic corner connectors rated for a maximum static load of 80 lbs. That left a razor-thin safety margin of just 1.05x.
Under the heat and continuous vibration of the exhaust fan, the top plastic connectors sheared. The entire ceiling frame collapsed onto the flowering crop below—destroying the harvest, crushing the light bars, and severing active electrical wiring.
The takeaway: If your structural frame or fabric enclosure fails, you risk complete crop destruction, light toxicity, environmental humidity spikes, and severe electrical hazards. Here is exactly how to audit your hardware before you buy.
Fabric Face-Off: 600D vs. 1680D vs. Material Scams
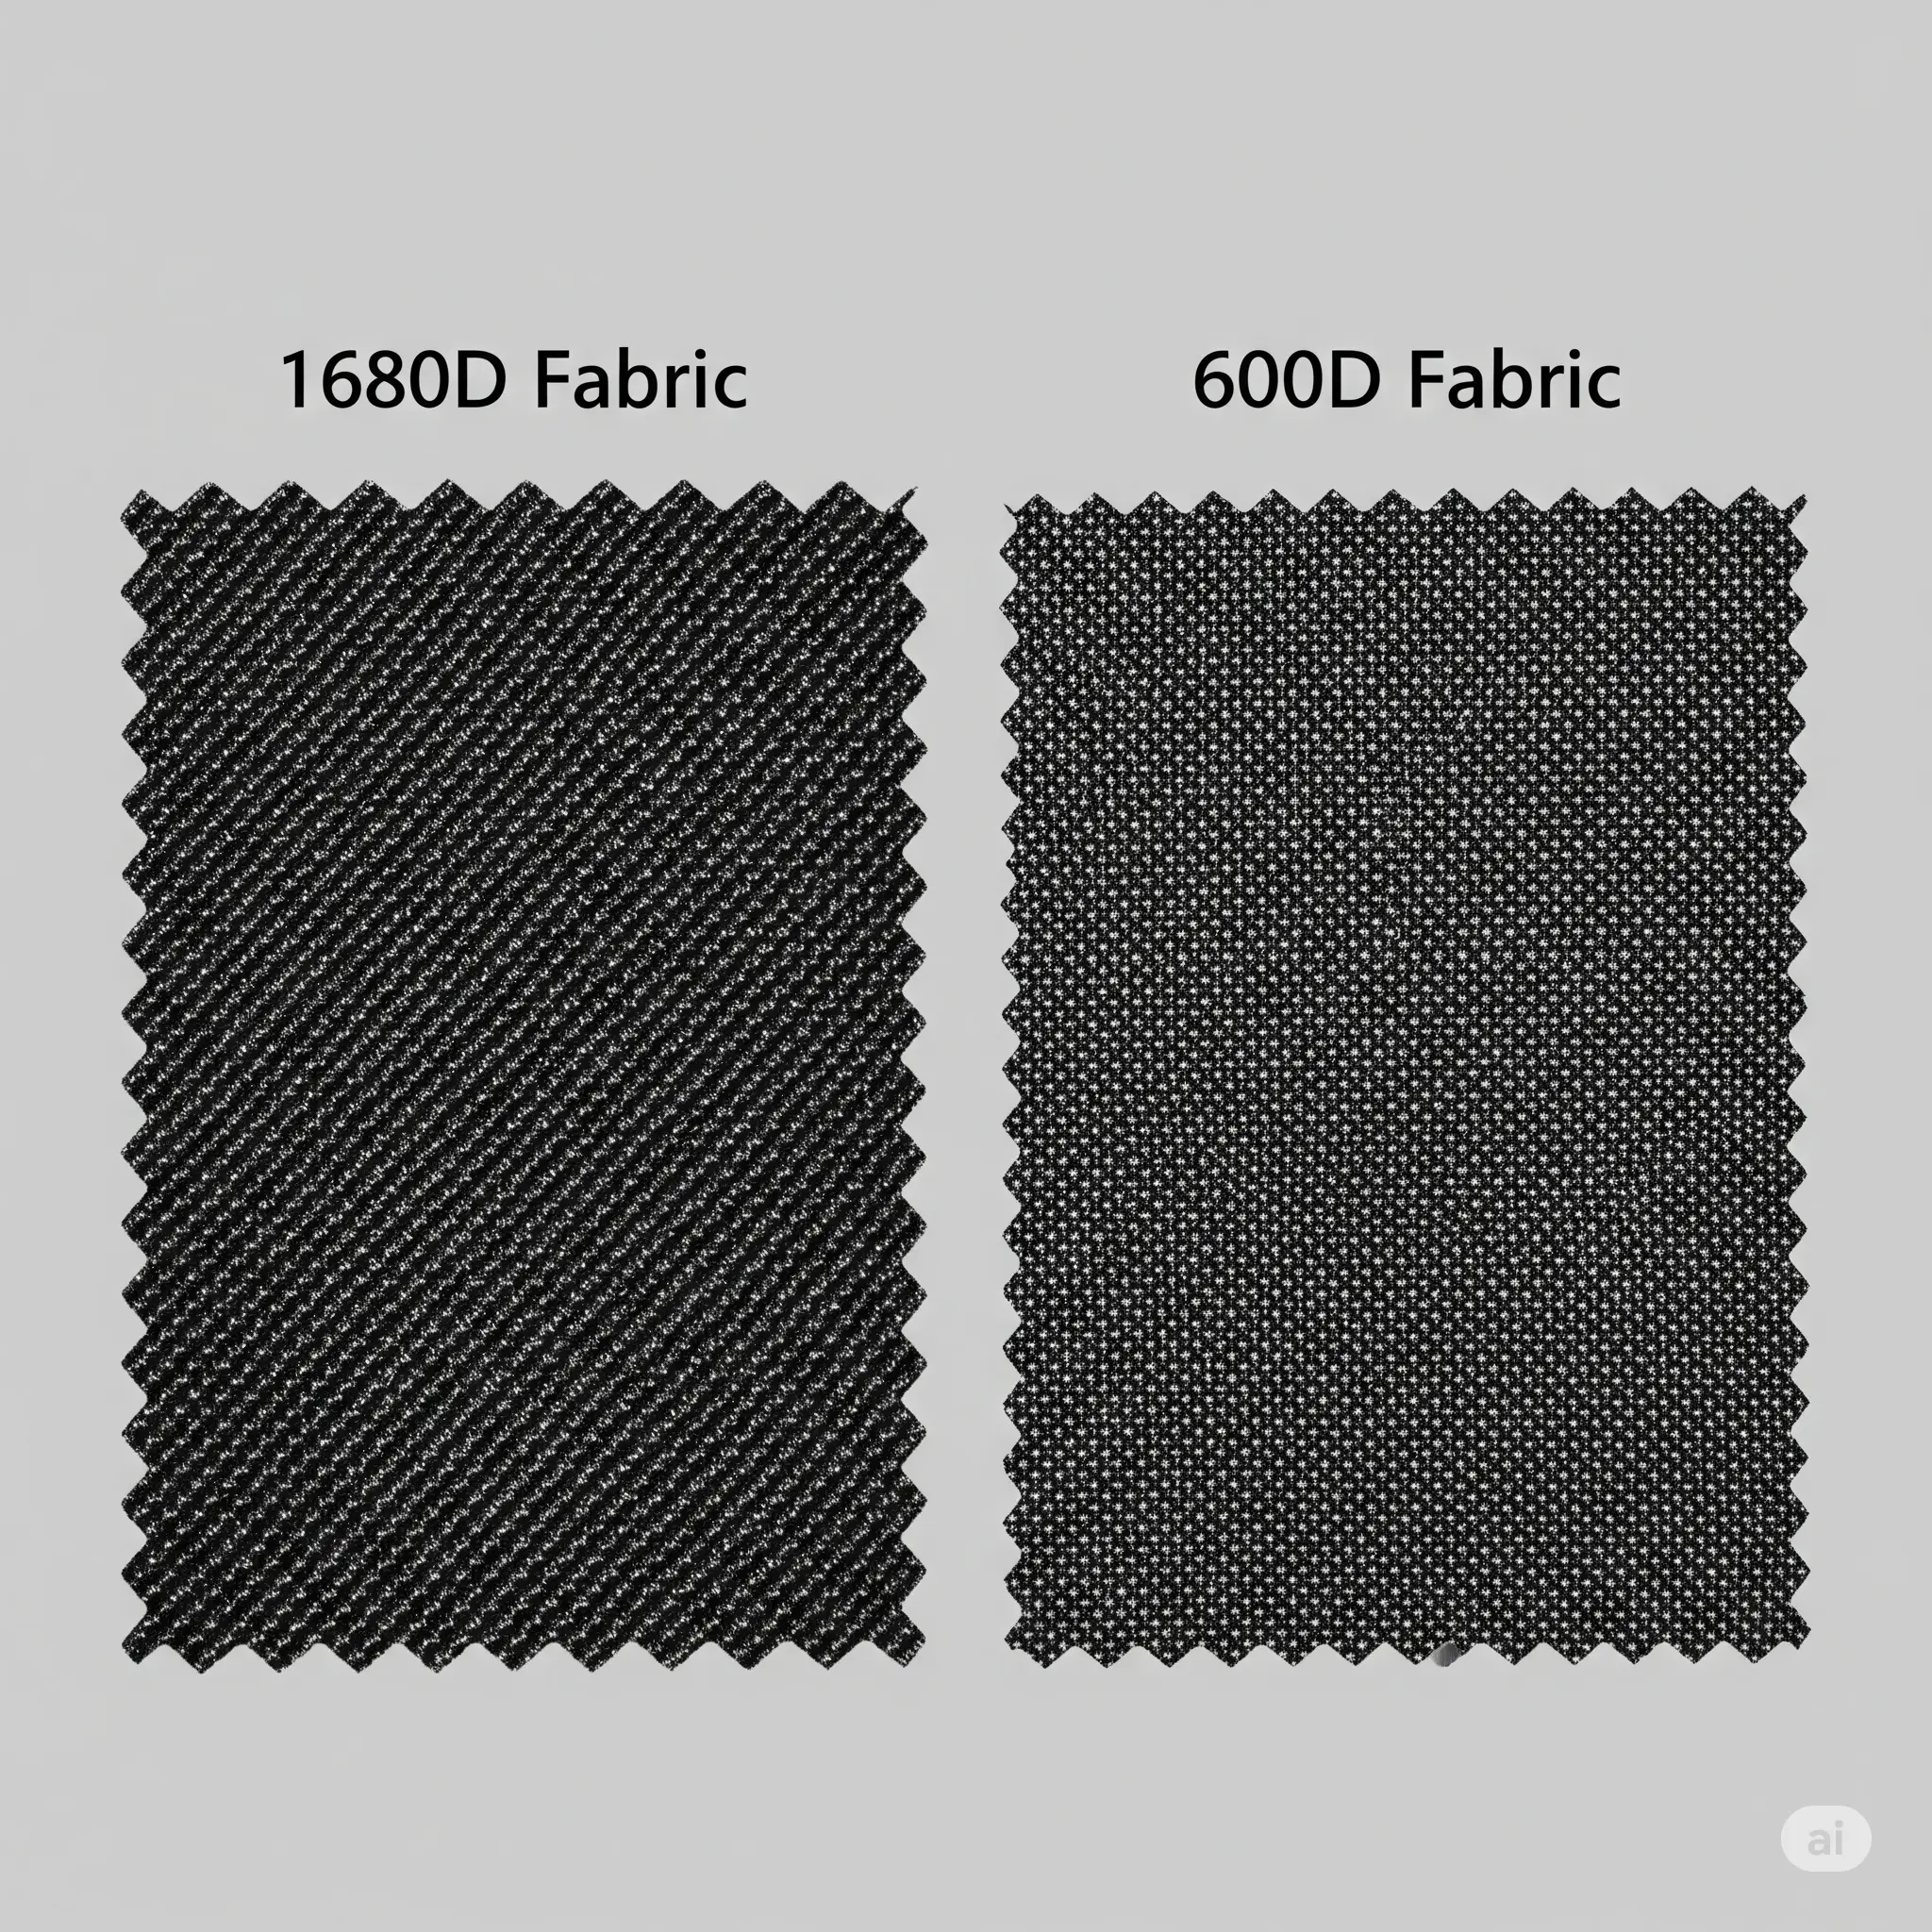
Your tent’s exterior canvas is the primary barrier against light leaks, thermal loss, pests, and odor. Canvas durability is measured in Denier (D), representing the mass in grams per 9,000 meters of yarn fiber.
600D Oxford Fabric (Budget Standard)
Most entry-level grow tents use 600D Oxford polyester canvas. While functional for temporary setups, it has distinct vulnerabilities:
- Pinhole Light Leaks: Under structural tension, 600D threads shift, creating micro-pinholes that let ambient light penetrate during critical 12-hour dark cycles.
- Lower Tear Strength: Typically rated under 45 N, making it vulnerable to tearing around zippers under high negative static pressure.
1680D Ballistic Canvas (Commercial Gold Standard)
Commercial-grade tents use 1680D double-knitted ballistic canvas. With 2.8 times the fiber density of 600D, it delivers:
- Absolute Lightproof Enclosure: Eliminates pinhole light penetration completely, protecting photoperiod crops from stress-induced hermaphroditism.
- Acoustic & Thermal Insulation: Dampens operational noise from exhaust fans by 4 to 6 dB while providing superior thermal retention.
Reflective Inner Liners: Mylar vs. Diamond Pattern
The interior must be laminated with a highly reflective material to push photons to lower canopy leaves.
| Reflective Surface Type | Reflectivity Rating | Photon Diffusion Profile | Hotspot Risk |
| Smooth Silver Mylar | 88%-92% | Direct / Specular reflection | High (can cause localized canopy burning) |
| Diamond Pattern Pressed | 95%-97% | Multi-angle diffuse reflection | Negligible (spreads light uniformly) |
Warning: Toxic Off-Gassing
Cheap, unbranded tents often use recycled PVC backing containing volatile plasticizers. Under high heat (above 85°F), these glues off-gas toxic volatile organic compounds (VOCs), causing interveinal chlorosis and sudden crop stunting. Always verify your manufacturer certifies non-toxic, zero-VOC materials.
Pole Physics – Steel Gauge, Diameter, and Corner Joint Engineering
The structural integrity of a grow tent relies entirely on its skeleton. Calculating frame load safety margins requires evaluating three key variables: pole outer diameter, wall thickness gauge, and corner connector material.
1. Pole Diameter and Wall Thickness Metrics
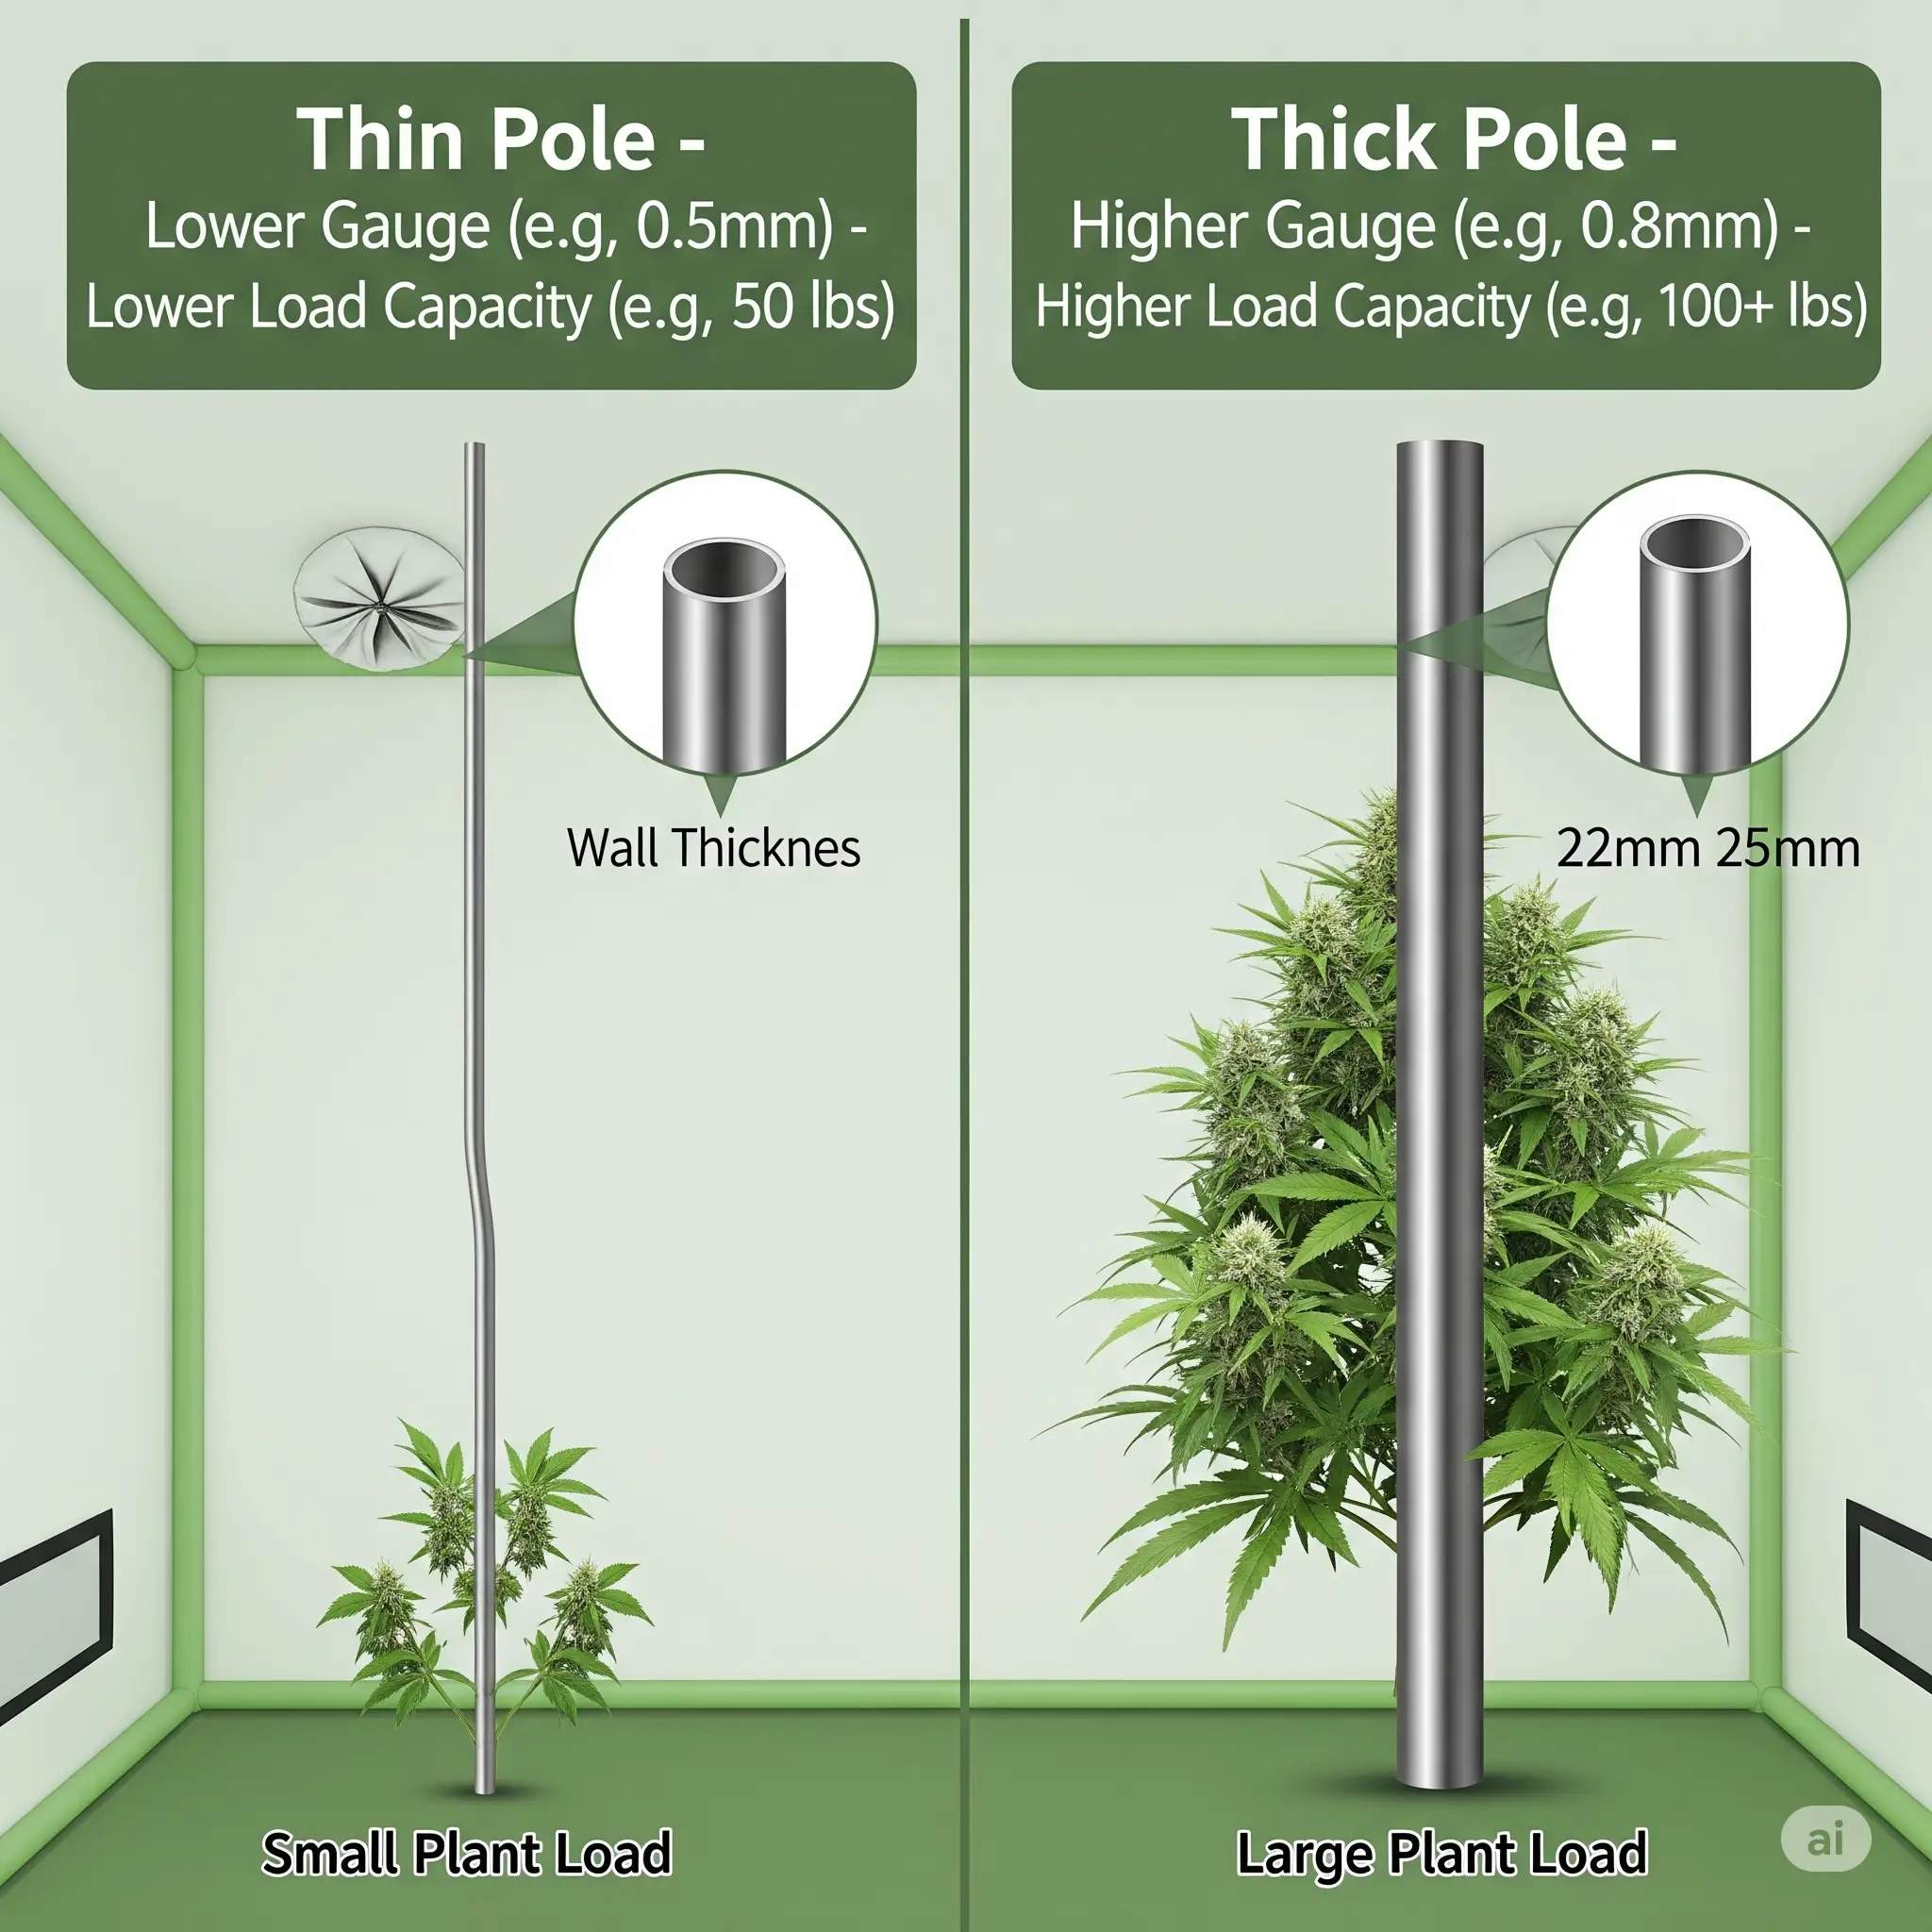
Steel tubing strength scales exponentially with outer diameter and wall thickness. Standard industry specifications fall into three performance tiers:
- 16mm poles (0.5-0.6mm wall): Found in budget hobby tents. Maximum static ceiling load capacity is restricted to 70-80 lbs, and prone to bowing under negative static pressure.
- 19mm poles (0.7-0.8mm wall): Intermediate standard for mid-sized setups (e.g., 2×4 or 3×3 tents). Supports overhead loads up to 110-130 lbs.
- 22-25mm heavy-duty poles (≥0.8-1.0mm wall): Commercial-grade rating. Supports ceiling static loads exceeding 150 to 300 lbs on 4×4 and 5×5 frames.
2. Corner Connector Shear Strength: Plastic vs. Steel
Corner joints are the primary shear stress points in any box-frame structure, and connector material makes a stark difference to safety margins:
- Plastic/nylon polymer joints are vulnerable to UV degradation and thermal embrittlement over time, with a shear failure threshold under vibration load of roughly 80-90 lbs.
- Molded zinc-alloy or coated steel joints carry zero risk of UV breakdown or thermal cracking, with a shear failure threshold that exceeds 300+ lbs — securely holding ceiling equipment.
3. Equipment Hanging Weight Distribution Audit
Before installing gear, calculate your total overhead load to ensure a minimum 1.8x safety factor relative to the manufacturer’s rated frame limit:
| Overhead Component | Average Weight | Weight Distribution Strategy |
|---|---|---|
| 640W Commercial LED Fixture | 28.5 lbs | Center crossbars (spread across two parallel poles) |
| 6″ x 24″ Carbon Filter | 22.0 lbs | Rear ceiling crossbar (closest to vertical corner poles) |
| 6″ ECM Inline Exhaust Fan | 12.5 lbs | Top corner crossbar or external mounting |
| Circulation Fans & Accessories | 13.0 lbs | Vertical frame poles |
| Total Overhead Static Load | 76.0 lbs | Requires ≥150 lb frame load capacity (1.97x safety factor) |
Duct Porting Engineering & Atmospheric Seals
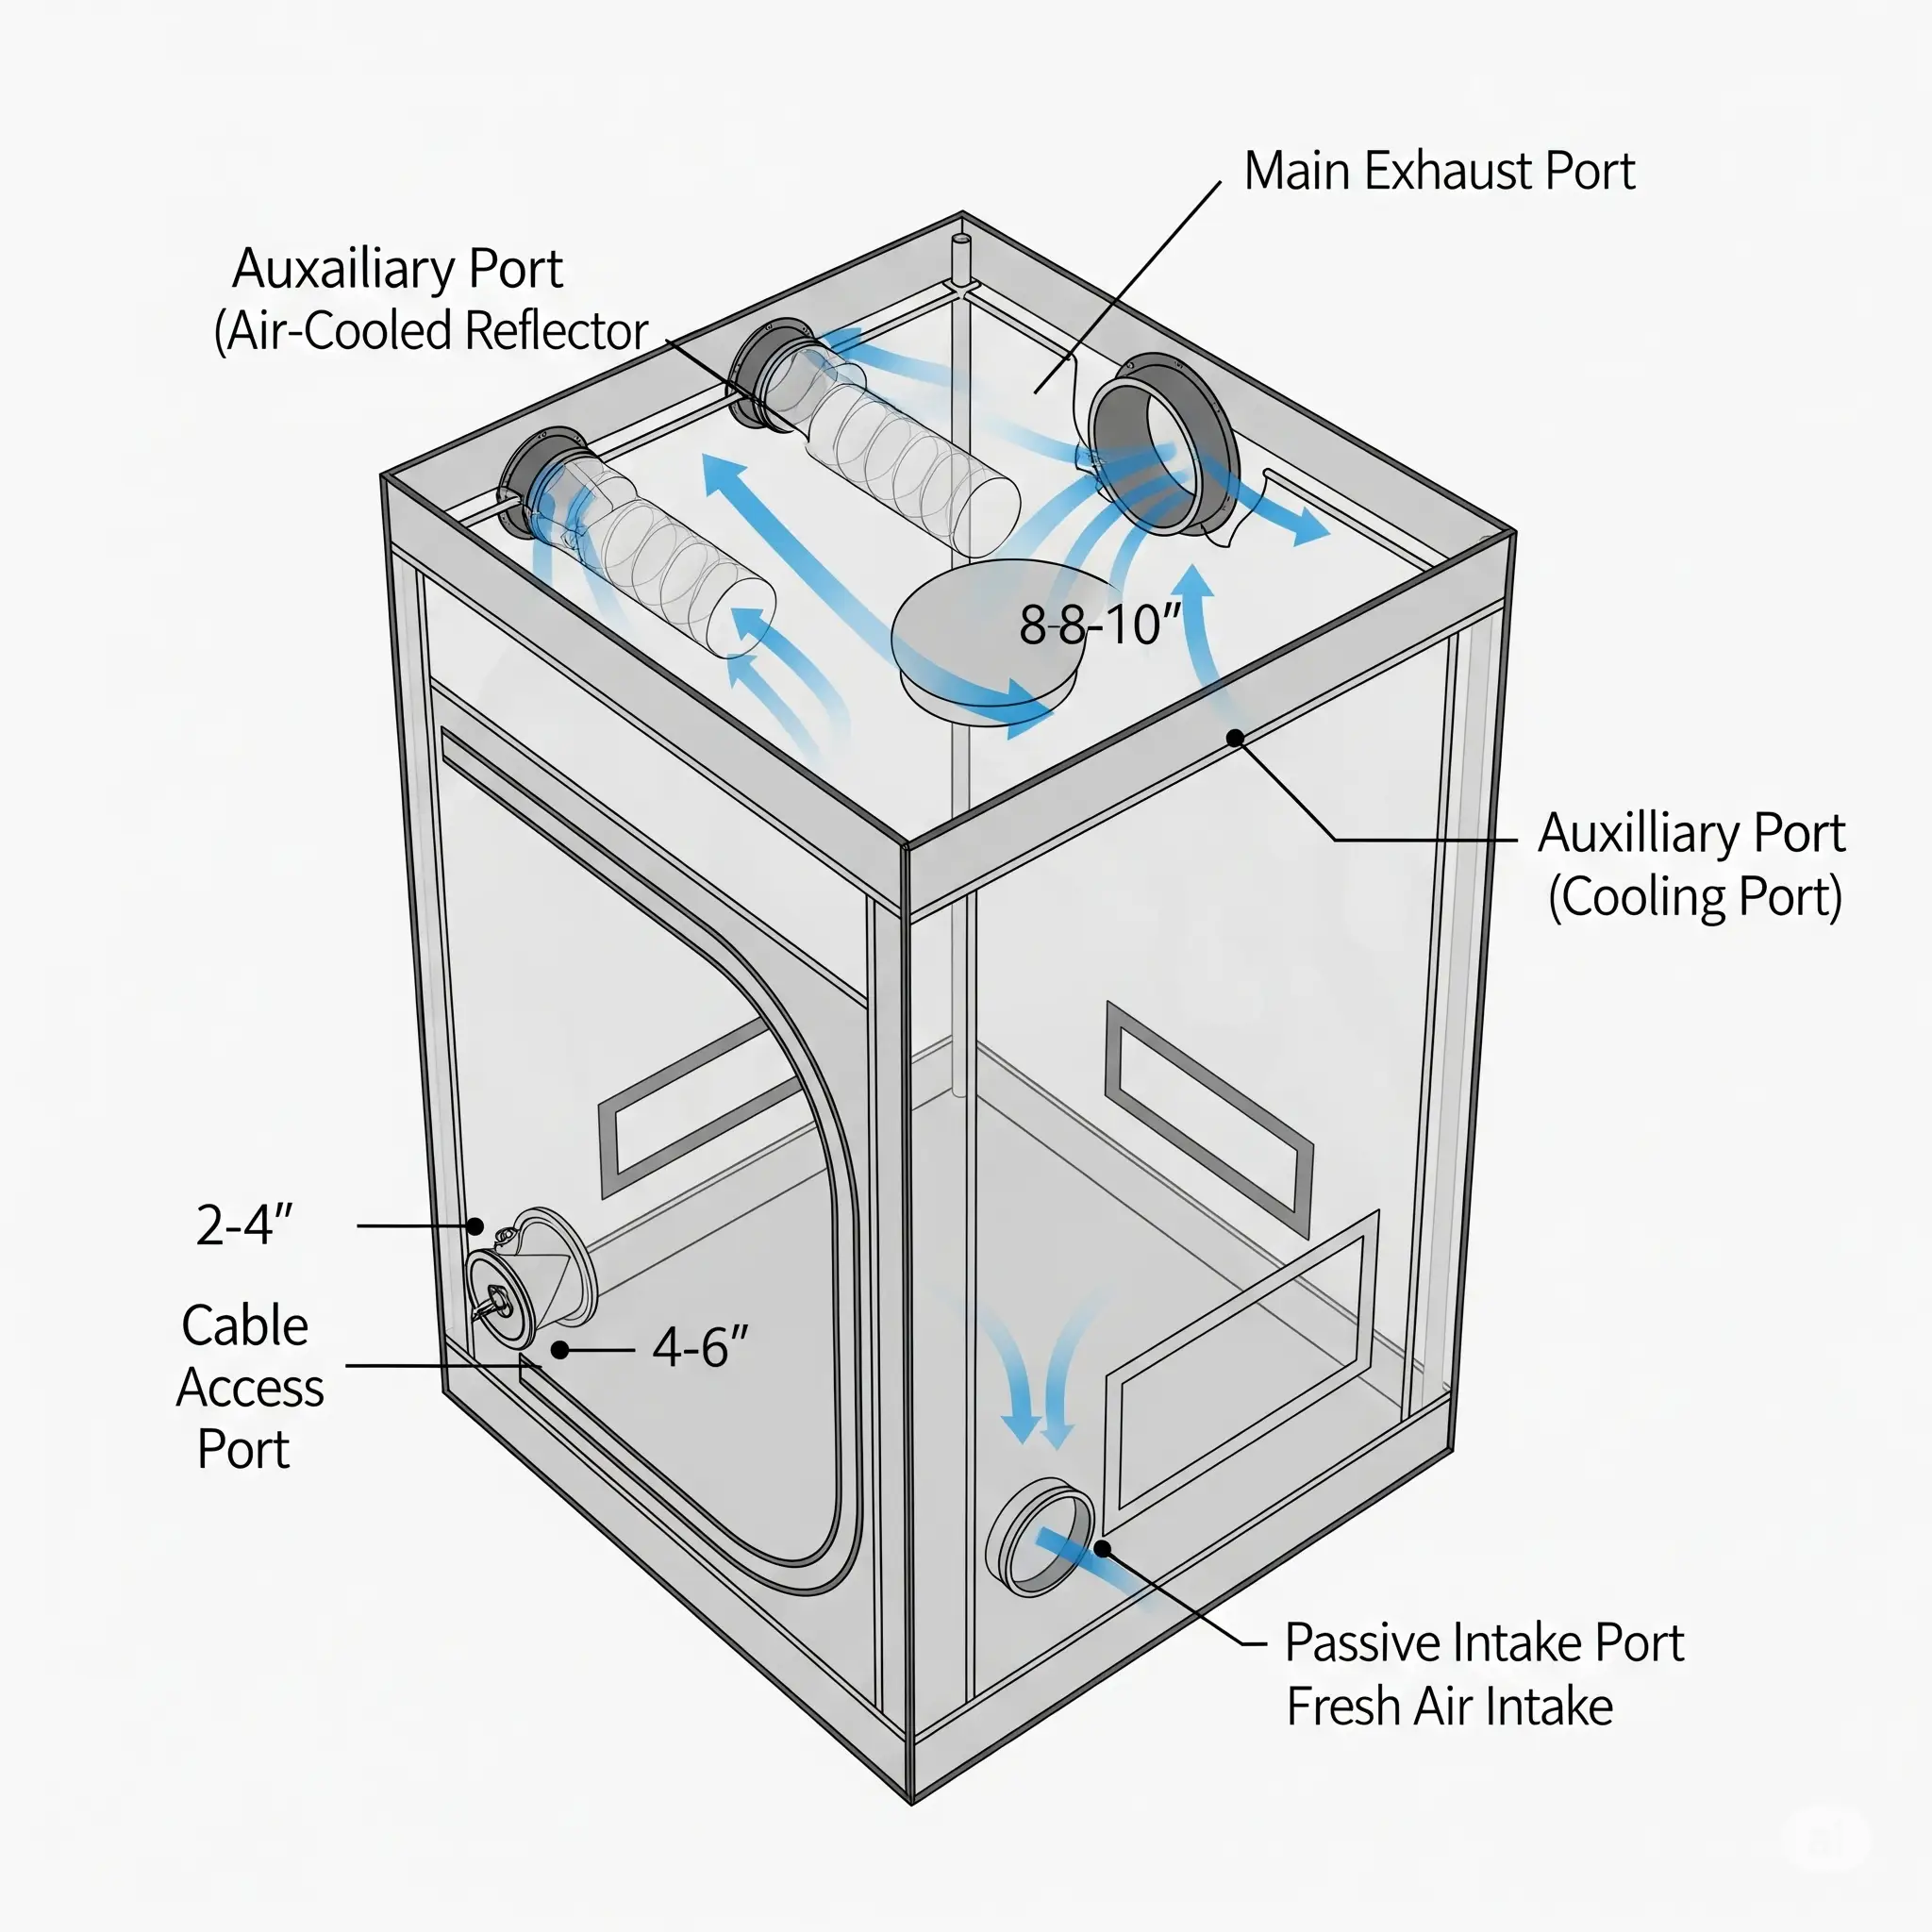
Duct and electrical ports are necessary penetrations in your tent’s sealed environment. Poorly designed ports create air resistance, leak light during dark cycles, and let odor escape into surrounding spaces.
1. Double-Cinching Light Trap Ports
Single-sleeve duct ports with simple drawstrings leak air and light around flexible ducting connections. Professional grow tents feature dual-layer double-cinching sleeves with dual drawstring locks: the inner sleeve clamps directly to the aluminum ducting, while the outer sleeve cinches over the insulation layer, creating a 100% light-tight and airtight seal.
2. Strategic Port Placement Strategy
Correct ventilation port configuration leverages natural thermal convection (hot air rising) to optimize airflow efficiency:
- Top roof port: The dedicated exhaust port. Venting hot air out the top eliminates thermal buildup in the upper canopy.
- Lower side ports: Passive intake ports located at floor level on opposite sides, drawing cool, fresh air evenly across the bottom root zone.
- Rear electrical pass-throughs: Smaller 3″ or 4″ ports positioned near top and bottom frame poles, specifically for sensor probes, power cords, and automated irrigation lines.
The Usable Space Illusion – Frame Loss & Negative Pressure
A common misconception among growers is assuming that a “4×4 grow tent” provides a true 48 x 48 inch planting footprint (16.0 sq ft). In practice, real usable canopy area is restricted by frame pole loss and negative static pressure bowing.
Calculating Canopy Loss from Negative Pressure
When high-CFM inline exhaust fans run to control humidity, they pull air out faster than passive intake ports bring it in, creating internal negative pressure. This causes tent side walls to bow inward by 1.5 to 2.0 inches per side.
For a nominal 4×4 tent, that’s a footprint of 48.0″ x 48.0″ (16.00 sq ft) shrinking to roughly 44.5″ x 44.5″ (13.75 sq ft) once the walls bow in by about 1.75″ per side — a loss of 2.25 sq ft, or 14.1% of the effective usable canopy.
This footprint reduction forces outer plant branches inward, crowding foliage, restricting lower canopy airflow, and raising localized humidity — increasing the risk of Botrytis (bud rot).
Solution: Space Saver Frame Reinforcement Kits
To recover lost canopy space, install horizontal support bars configured with clip-on corner braces mid-way up the tent walls. These bars lock outward against the canvas, preventing inward wall collapse under high exhaust suction and preserving your full planting footprint.
Spill Trays & Flood Containment Engineering
A major risk in indoor hydroponics or soil cultivation is irrigation water spilling onto subfloors, ceiling spaces, or electrical systems below. A grow tent’s spill tray serves as your secondary containment barrier.
Key Spill Tray Audit Criteria
- High-density waterproof liner: Make sure the removable floor tray is constructed from thick-gauge waterproof PVC or HDPE material rather than thin fabric.
- Secure frame attachment velcro: The tray should have long, heavy-duty side straps that wrap securely around vertical corner poles at a height of at least 4 to 6 inches, creating a reliable catch basin for runoff water.
- Chemical and nutrient resistance: The tray liner must resist degradation from concentrated mineral salts, acidic pH adjusters (phosphoric/nitric acid), and organic additives.
Advanced Tent Hacks for Tight Spaces
When operating in tight quarters like closets, basements, or spare rooms, these practical structural modifications help maximize efficiency:
1. Custom PVC Anti-Bowing Cross-Braces
If your budget tent lacks factory space-saver kits, build custom wall supports using ¾-inch Schedule 40 PVC piping. Cut pipes to fit the exterior wall width and secure them horizontally against the vertical steel frame using heavy-duty snap clamps. This low-cost modification holds canvas walls rigid against internal suction.
2. Corner Pole Fan Mounts
Placing traditional oscillating floor fans inside a grow tent eats up valuable plant floor space. Switch to specialized pole-mounting clip fans designed to clamp directly to vertical 19mm/22mm frame poles. Position fans at opposing diagonal corners to establish a uniform cross-ventilation pattern above and below the plant canopy.
3. Active Intake Air Balancing
If inward canvas bowing remains severe even with structural braces, install a small, low-wattage variable-speed intake fan on a lower port. Match intake speed to roughly 70-80% of exhaust fan output. This reduces extreme internal negative pressure while maintaining enough air draw to prevent odor leakage through seams.
The Comprehensive Grow Tent Selection Checklist
Use this pre-purchase checklist to evaluate hardware specifications before buying a grow tent:
Phase 1: Fabric & Material Inspection
- Confirm canvas density is true 1680D ballistic weave (or minimum 600D for small tents).
- Verify inner liner uses diamond-pattern pressed silver Mylar (95%+ diffusion).
- Check manufacturer certification for non-toxic, zero-VOC plasticizer materials.
- Inspect zipper construction for heavy-duty #10 size metal teeth with light-guard flaps.
Phase 2: Frame & Structural Load Audit
- Verify pole diameter is ≥22mm for 4×4 or larger tents (≥19mm for smaller sizes).
- Confirm corner connectors are solid zinc-alloy metal (avoid hollow plastic joints).
- Calculate total overhead gear weight and ensure a minimum 1.8x frame safety factor.
Phase 3: Ducting & Atmospheric Seals
- Verify dual-sleeve, double-cinching drawstrings on all exhaust and intake ports.
- Confirm top ceiling exhaust port position to efficiently vent hot rising air.
- Check for dedicated lower electrical pass-through ports.
Phase 4: Usable Canopy & Floor Containment
- Account for a 10-14% footprint reduction from negative pressure wall bowing.
- Install horizontal space-saver support bars to maintain full interior volume.
- Confirm removable waterproof spill tray attaches securely at 4-6 inches height.
Tents That Survive Real Grows
These are the tents that have survived my torture tests. They’ve been subjected to humidity swings, LED weight, and clumsy growers.
Vivosun Smart Grow Tent Kit 4’x4′
An IoT-enabled system with AeroLight wing design and GrowHub automation for hands-free climate management.

- Keeps All Light In: VIVOSUN Hydroponic Mylar Grow Tent blocks all light from escaping and is lined with 100%-reflective …
- Energy-Saving & Low-Noise Fan: This Fan is controlled by PWM more energy-efficient; The mixed-flow design allows the fan…
- Integrated Circulation Fan: The centrally located circulation fan in the LED balances airflow where other fans cannot re…
WARNING: Check local laws before purchasing. Product links are for ‘horticultural research’ only.
The Pre-Purchase Inspection Checklist
Before pulling out your credit card, run through this final audit:
- Canvas: True 1680D ballistic weave (minimum 600D for small hobby tents).
- Reflectivity: Diamond-pattern pressed silver Mylar.
- Frame: ≥22mm metal poles with solid zinc-alloy metal corner joints.
- Ports: Dual-sleeve, double-cinching drawstrings on all exhaust/intake ports.
- Spill Tray: Removable waterproof PVC/HDPE tray that attaches securely at 4-6 inches height.
FAQ’s
What’s the best size for a beginner’s grow tent?
A 2×2 or u003ca href=u0022https://mistculture.com/best-beginner-hydroponic-kits-small-tents/u0022u003e2x4 grow tentu003c/au003e is the best size for a beginner. These tents are small, easy to manage, and allow you to learn the fundamentals of indoor growing without being overwhelmed by a larger, more complex setup.
How do I prevent light leaks from my grow tent?
To prevent light leaks, you need to pay attention to two things: the fabric and the zippers. A tent made from a high-density material like 1680D fabric with a quality zipper and double-cinching ports is your best defense against light leaks.
What is the biggest mistake a beginner can make when buying a grow tent?
The biggest mistake is buying a cheap tent with weak poles. A flimsy frame can easily collapse under the weight of a light, fan, and filter, leading to a total crop loss. Always check the pole gauge and load capacity before you buy.
Why is the usable space in a grow tent smaller than the advertised size?
The advertised size of a grow tent is its external dimensions. The internal space is smaller due to the thickness of the poles, fabric, and zippers. You can expect to lose a few inches on each side, so always account for this when planning your grow.
How do I prevent heat buildup in my grow tent?
The best way to prevent heat buildup is to use a good inline exhaust fan and a carbon filter. They work together to pull hot air out of the tent and bring in fresh, cooler air, which helps maintain a stable and healthy temperature for your plants.
Work Smarter, Grow Harder: Automate your workflow, eliminate daily maintenance bottlenecks, and streamline your grow room operations with our top-tier efficiency tools. Explore Efficiency Tools →

Continue Your Learning Journey