DIY Drip Irrigation Hydroponics: Build a Precision Manifold for Tomatoes & Peppers

Table of Contents
Disclosure: MistCulture summarizes verified product specs, engineering data, and community feedback. We may earn an affiliate commission if you purchase through our links. Regulations vary by location; this content is for educational purposes only.
Implementing an automated drip irrigation system (fertigation) is the single most effective hardware upgrade you can make to unlock the true genetic potential of hydroponic tomatoes and peppers. Unlike passive watering strategies, a pressurized drip network allows you to deliver highly calibrated, low-volume nutrient pulses directly to the root zones of your plants several times a day. This precision feeding strategy, known as crop steering, controls root zone moisture content and electrical conductivity (EC), maximizing vegetative vigor during early growth and redirecting plant energy toward explosive fruit development during flowering.
However, moving from hand-watering or simple passive reservoirs to a pressurized drip manifold strips away the physical buffer capacity of large water volumes. A minor plumbing misalignment, a single clogged emitter, or an under-powered pump can result in dry root zones, salt toxicity, or complete crop loss within forty-eight hours. To build a system that rivals commercial-grade infrastructure, you must understand the underlying fluid dynamics, mechanical pressure thresholds, and substrate hydrology of modern soilless growing.
DIY Drip Sizing Blueprint & Parts Checklist
Printable 2‑page PDF with Bill of Materials, friction loss charts, and substrate hydrology matrix.
Drip-System Components
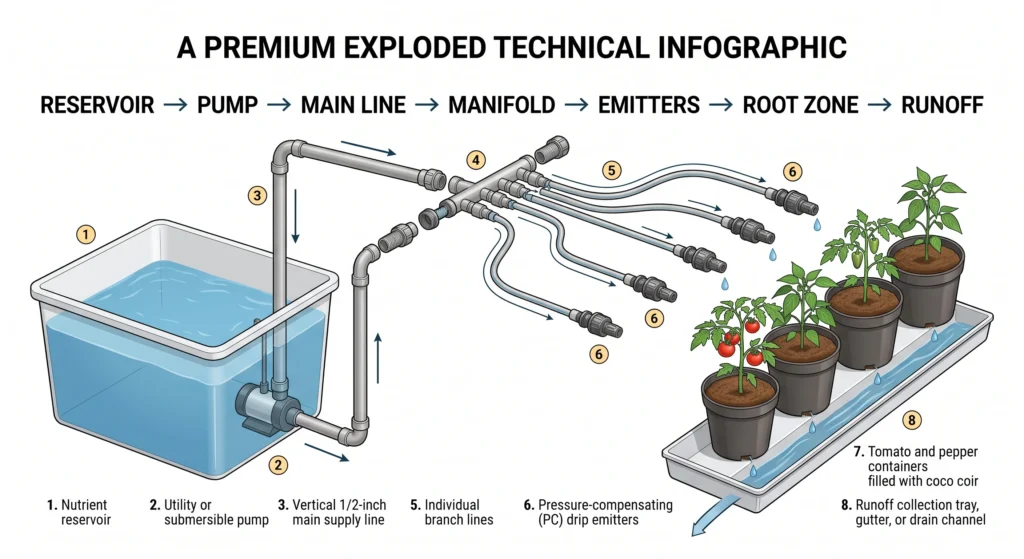
A reliable DIY drip irrigation build requires a submersible pump, a 1/2-inch main supply line, a structured distribution manifold, pressure-compensating emitters, a dedicated runoff collection system, and a programmable digital timer capable of executing short cycles. You cannot assemble a high-functioning drip system simply by attaching random hoses to a water pump. Each part of the system must be matched to the flow demands, the vertical lift, and the specific operating pressure of your emitters.
Submersible Pump Sizing and Head Room
The pump drives the entire fertigation cycle. For most home hydroponic systems, a submersible pump rated between 200 and 600 gallons per hour (GPH) is standard. While the raw flow rate requirement for a few drip emitters is incredibly small, the raw GPH is not the defining metric for component selection. You must size the pump to deliver the total emitter flow while providing significant head-room to overcome vertical lift (head height) and frictional line losses within the manifold. Emitters require a specific operating pressure to function properly, meaning the pump must push water hard enough to pressurize the line before the emitters will open and distribute fluid uniformly.
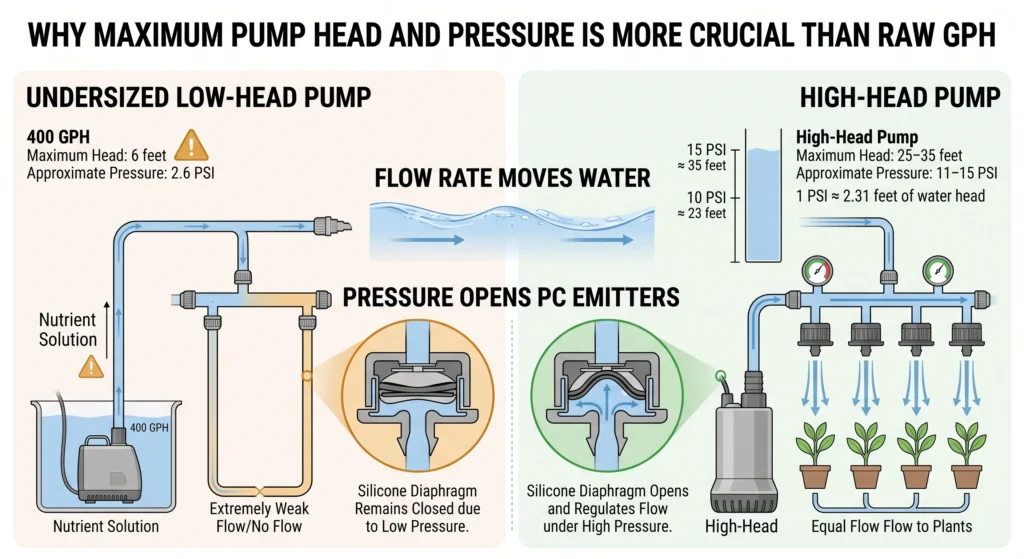
Most online guides recommend a standard 200 to 600 GPH pond pump rated with a maximum head lift of 5 to 8 feet. This is a critical engineering error.
Pressure-compensating (PC) emitters contain a flexible internal silicone diaphragm that requires a minimum threshold pressure of 10 to 15 PSI (Pounds per Square Inch) to pop open and begin regulating flow. Because 1 PSI is equivalent to 2.31 feet of water column lift, a pump must be able to push water at least 23.1 to 34.6 feet high just to generate the static pressure required to open the emitters.
If you use a standard 400 GPH aquarium pump with only 6 feet of maximum head lift (~2.6 PSI), the water will reach your growing table, but the line pressure will never rise high enough to activate the PC diaphragms. The system will remain completely locked, and no nutrient solution will reach your plants.
To build a reliable system, you must ignore generic GPH ratings and standardize on a high-head submersible pump or a small utility pump with a maximum head lift rating of at least 25 to 35 feet (11 to 15 PSI). This guarantees instant manifold pressurization and uniform water delivery across every plant.
💧 Drip Irrigation Sizer PRO v3.0
Precision hydraulic calculator – flow, friction loss, and pump sizing.
🔗 Embed This Tool
Embed just the calculator (no extra page elements) on your own site. The iframe auto‑adjusts its height.
Powered by MistCulture

Why it's necessary: A pump in this flow range ensures you have enough static pressure to overcome vertical lift and line friction, activating the diaphragms in PC emitters without stalling the flow.nKey Spec: 200–600 GPH output / Minimum 5-8 feet max head lift
The 1/2-Inch Main Supply Line
The main supply line transports the nutrient solution from the submersible pump up to the level of your growing bench or containers. A 1/2-inch line is the industry standard for small to mid-sized builds. Using a 1/2-inch supply line reduces friction loss compared to smaller 1/4-inch tubing, allowing the pump to maintain the static pressure needed at the manifold.
Manifold and Distribution Network
The manifold serves as the central distribution spine of the system, constructed from either rigid 1/2-inch PVC pipe or flexible 1/2-inch polytube. This line runs parallel to your row of plants. From this 1/2-inch spine, smaller 1/4-inch drip lines (often called spaghetti tubing) are tapped into the main line and dropped directly down into each individual pot. The 1/2-inch size provides enough internal volume to ensure that the water pressure equalizes across the entire length of the manifold before the nutrient solution begins exiting through the individual 1/4-inch drop lines.

Why it's necessary: Kits provide the matched 1/2-inch main line, 1/4-inch distribution tubing, hole punches, and assorted fittings required to build a leak-free manifold from the pump to the pots.nKey Spec: 1/2-inch outer diameter (OD) mainline tubing compatible with standard barbed fittings
Pressure-Compensating (PC) Emitters
The single most important component for ensuring even feeding across a multi-plant system is the pressure-compensating (PC) emitter. Rated typically between 0.5 and 2 GPH, PC emitters utilize an internal silicone diaphragm that restricts or opens based on the line pressure. This mechanism guarantees that the plant located at the very end of a 20-foot manifold receives the exact same volume of nutrient solution as the plant located two feet away from the water pump. Without PC emitters, the flow will follow the path of least resistance, soaking the nearest plants and starving the plants at the far end of the run.

Why it's necessary: PC emitters contain a flexible diaphragm that equalizes flow across varying pressure zones, ensuring every plant on the manifold receives the exact same volume of nutrient solution regardless of distance from the pump. Key Spec: 0.5 to 2.0 GPH continuous flow rate
Drain and Runoff Collection
Because drip irrigation is an open-loop feeding strategy where excess fluid flushes through the media, managing the wastewater is critical. Runoff collection requires trays, sloped gutters, or individual catch saucers positioned under each pot. The system must route this excess solution away to a waste drain or a collection bucket. Allowing pots to sit in stagnant runoff re-soaks the media with the exact salts you are trying to flush out, defeating the purpose of the irrigation design.
Programmable Timer and Controller
The timer triggers the pump to run on a precise schedule. You need a timer capable of managing multiple short cycles per day, sometimes operating in increments of just one or two minutes. Standard mechanical timers that only allow 15-minute intervals often overwater plants, wasting expensive nutrients. Smart controllers can integrate fertigation dosing alongside the pump timing to automate the exact concentration and delivery schedule.

Why it's necessary: Hydroponic media like coco coir requires frequent, short pulses of water. A digital timer allows you to program feed cycles down to the exact minute, preventing substrate flooding and optimizing oxygenation. Key Spec: Minimum 1-minute interval programming / Multiple daily cycle capacity
Manifold and Emitter Math
“Precision hydroponics is governed by mathematics.”
Before cutting PVC or punching holes in your poly tubing, calculate your exact flow requirements and size your manifold to handle the volume without excessive friction loss.
Counting Plants and Picking Emitters
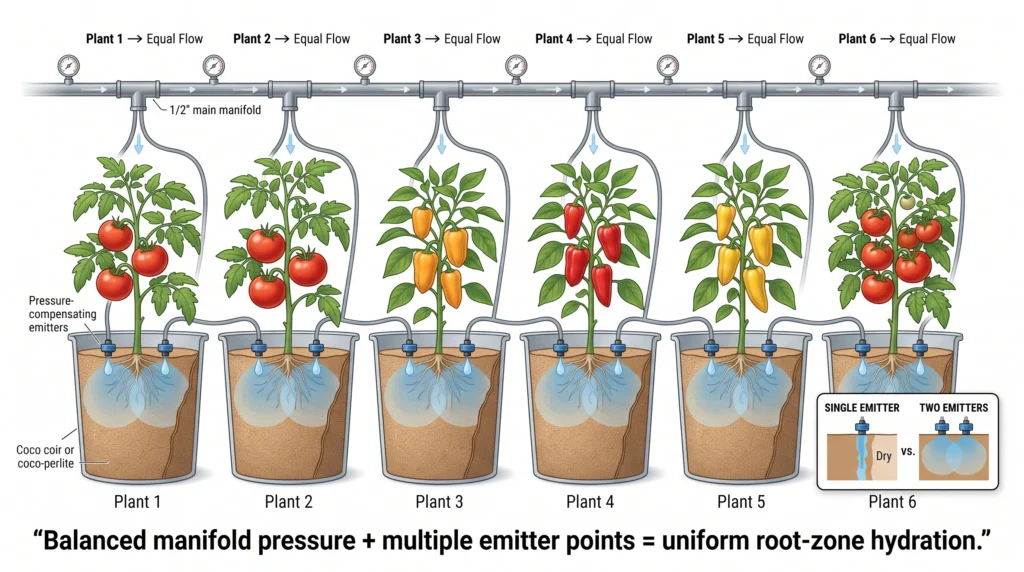
A mature, heavily fruiting tomato or pepper plant sitting in a 3-gallon to 5-gallon container requires roughly 0.5 to 1 gallon of nutrient solution per feeding. To deliver this volume evenly across the surface of the root zone, you should install two emitters per plant. Placing a single emitter on one side of a large pot forces the water to channel down a single column, leaving the opposite side of the root mass dry.
Using two pressure-compensating emitters rated at 0.5 to 2.0 GPH per plant distributes the moisture evenly. Alternatively, you can use a single adjustable drip stake designed to spray water in a small 360-degree umbrella pattern over the top of the media.
Total Flow Calculations
To determine the raw flow demand on your submersible pump, multiply your total number of emitters by their stated GPH rating.
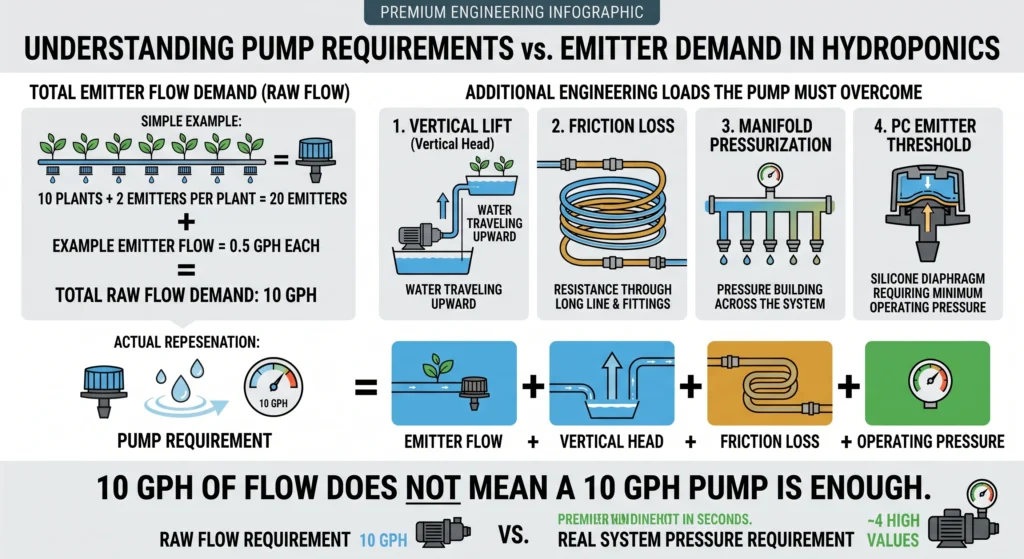
Take a standard DIY residential build consisting of 10 mature tomato plants:
A flow rate of 10 GPH is incredibly tiny, less than a slow trickle from a garden hose. So why do we recommend pumps rated for 200 to 600 GPH?
Where: L = pipe length · Q = flow rate · C = roughness coefficient · d = pipe diameter
Pushing fluid through 50 feet of 1/2‑inch PVC creates physical resistance. Pressure‑compensating emitters only “pop” open to deliver their 0.5 GPH flow when the line pressure hits a minimum threshold (10 to 15 PSI).
If you use an undersized pump, the fluid will reach the end of the line, but it will lack the pressure required to push open the silicone diaphragms inside the PC emitters.
✅ The Takeaway: Oversizing your pump ensures the entire manifold pressurises instantly, guaranteeing uniform water delivery to every plant on the table.
Pump generates 12–15 PSI (28–35 ft max head) at the source to push water up the main riser line.
Water travels up the 1/2″ supply riser, experiencing a minor -1.5 PSI drop due to pipe wall friction.
The 1/2″ PVC pipe acts as a pressure vessel, evening out flow so the far end is equal to the near end.
Diaphragms “pop” open. All emitters deliver the exact same flow rate across the entire table.
Sizing the Line for the Run
For short, small builds involving just three or four plants, you can sometimes route the nutrient solution using a 1/4-inch main drip line. For anything larger, or for long manifold runs, a 1/2-inch supply line is mandatory. The internal volume of the 1/2-inch pipe acts as a pressurized reservoir. As the pump fills the 1/2-inch pipe, the pressure stabilizes across the entire distance, ensuring the PC emitters keep the far end of the manifold equal to the near end. For large-scale setups, review our breakdown of hydroponic greenhouse cucumber and tomato production systems to see how commercial manifolds scale up.
Substrate-Specific Hydrology & Runoff
You cannot design your drip manifold in a vacuum; it must be matched to your physical substrate's water-holding capacity, dry-back limits, and aeration traits.
Substrate Chemistry and the Cation Exchange Capacity (CEC) Buffer
Standardizing on coco coir is highly recommended for tomatoes and peppers. Coir has a natural Cation Exchange Capacity (CEC), meaning its physical structure naturally attracts and buffers calcium (Ca2+) and magnesium (Mg2+) ions, acting as a nutritional safety net. Conversely, rockwool slabs have zero CEC, making the plant 100% reliant on the exact mineral concentration currently exiting your emitters.
Because drip setups are open-loop systems, you must achieve a 10% to 30% runoff rate per feeding event. As plant roots transpire, they consume pure water faster than mineral salts, causing the salt concentrations (EC) inside your pots to climb rapidly.
If you feed without runoff, the substrate's osmotic pressure will eventually rise so high that it pulls water out of the root cells, causing localized leaf tip margins to yellow, dry, and die (nutrient burn). Over-watering slightly at every pulse pushes out the older, stagnant water and resets your root zone chemistry.
Hydrology: Outstanding moisture retention with strong capillary pull.
Dosing: 2–6 pulses per day. Holds water well, providing a safety net if a pump fails.
Hydrology: High drainage, fast dry‑backs, excellent root oxygenation.
Dosing: 4–8 feeds per day. Drains fast; needs frequent, smaller pulses to prevent the root mass from drying completely.
Hydrology: Total structural porosity. Basalt glass fibres hold water with zero chemical ion retention.
Dosing: Aggressive multi‑pulse schedule. Highly vulnerable to immediate crop collapse if emitters clog, as rockwool has no chemical buffer.
Runoff Target & Flushing
Open‑loop drip systems rely on a specific percentage of runoff to maintain chemical balance in the root zone. You should plan for a 10% to 30% runoff rate per feeding event.
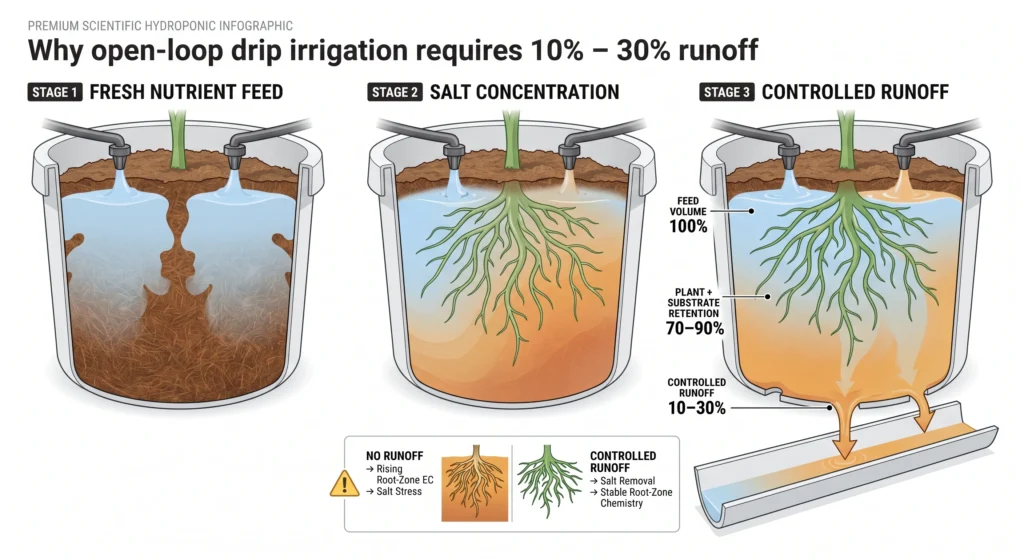
As a tomato plant takes up water through transpiration, it selectively absorbs certain elements and leaves others behind in the substrate. Over time, the nutrient salts the plant did not absorb begin to concentrate.
By over‑watering by 10% to 30% at every feed, the incoming fresh nutrient solution physically pushes the old, concentrated salt buildup out the bottom of the pot.
Why This Works: This continuous flushing is the exact reason why running a drip system in media like coco coir is so forgiving; every single feed resets the chemical balance of the root zone.
To easily calculate your specific reservoir concentration before mixing, run your parameters through our free:
👉 Hydroponic Nutrient Concentration Calculator
Runoff & Drain Management
Managing the 10% to 30% runoff is a core component of the initial build. You must catch and dispose of the waste fluid effectively.
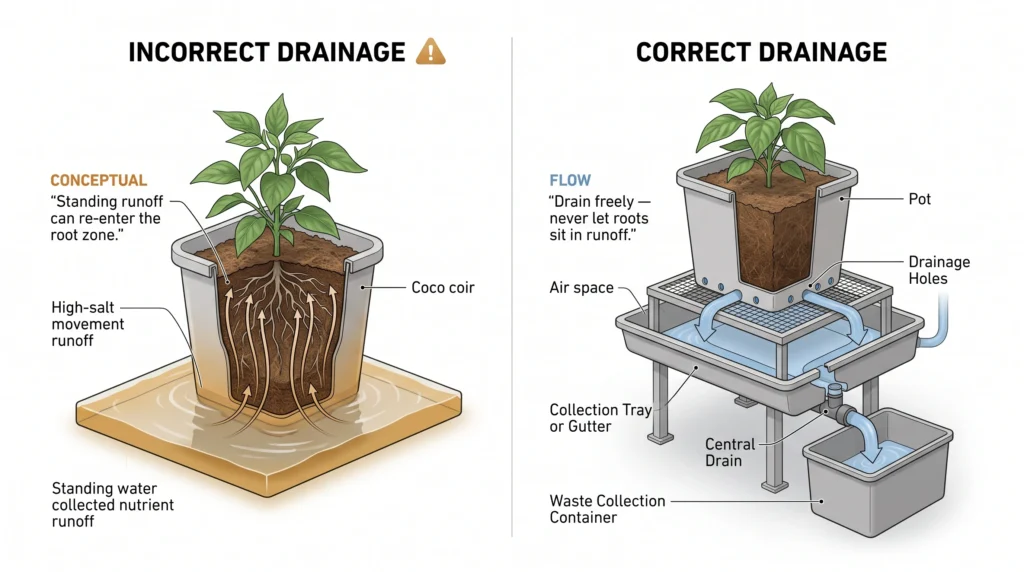
Critical: Never Let Pots Sit in Runoff
Elevate your pots using mesh stands, or place them inside plant saucers equipped with a drainage spout. The runoff must flow freely away into a centralised floor gutter or low‑profile collection bucket.
Standing runoff is dangerous. If a pot sits in a puddle of its own drained fluid, the capillary action of the growing media will pull that high‑salt wastewater right back up into the root zone, entirely defeating the flushing process.
Optional: Recirculating Systems (Advanced)
There is a recycling option for advanced growers. If your runoff is clean, you can collect it, filter it, and route it back into your primary reservoir.
While this saves water and nutrients, monitoring the EC and pH of a recirculating system becomes exponentially harder. The returning water brings varying salt concentrations and altered pH levels back to the main tank, requiring constant buffering.
For a first build, let the runoff drain to waste.
Watch Your First Few Runs Carefully
Fresh coco coir and perlite will naturally produce dark, discoloured runoff for a day or two. This is simply the fine dust washing out of the media and the initial chemical buffering taking place; it is not a sign of system failure.
However, if you experience persistent high‑EC runoff after the first week, it indicates that you are either:
- Feeding the plants too high of a baseline nutrient concentration, or
- Your 10% to 30% runoff volume is insufficient to flush the media thoroughly.
Timer and Fertigation Integration
Delivering nutrients through a drip line gives you complete control over crop steering. Instead of flooding the pots once a day and letting them dry out, you use your programmable timer to pulse nutrients into the media exactly when the plant needs them.
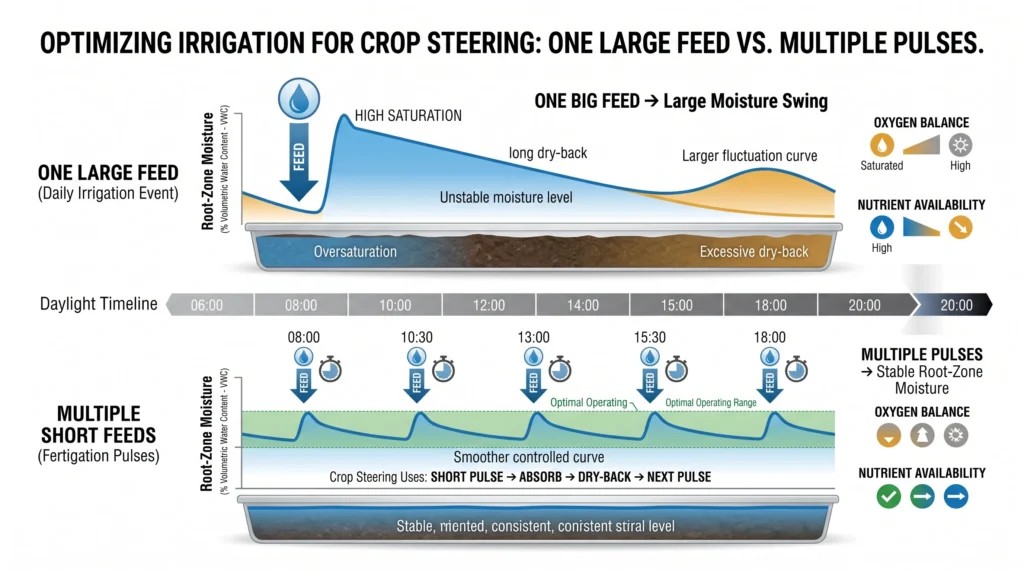
Multiple Feeds Beat One Big Feed
Tomatoes and peppers in coco coir thrive on 2 to 6 short feeds per day. In peak summer weather under heavy fruiting loads, these plants transpire at incredible rates and may require feed pulses as often as once an hour.
❌ One Big Feed
80% of water channels straight down the sides before the media can absorb it.
✅ Multiple Small Feeds
Media stays evenly saturated, roots have continuous access to water, nutrients, and oxygen.
Pro Insight: By pushing 0.2 gallons of water into the pot across five distinct feeding times throughout the daylight hours, the media stays evenly saturated, ensuring the roots have continuous access to fresh water, nutrients, and oxygen.
Timer Capabilities
Executing a multi-pulse feeding strategy requires a timer that supports multiple short cycles. Standard mechanical pin-timers typically only allow adjustments in 15-minute or 30-minute blocks. Running a drip pump for 15 straight minutes will flood the root zone and waste gallons of expensive nutrient solution. You need a digital smart outlet with a customized schedule or a dedicated hydroponic irrigation controller capable of setting runtime down to the precise minute. Simple twice-a-day timers severely underfeed heavy fruiting crops during peak light hours.
Fertigation Integration & Maintenance SOPs
Fertigation is the process of injecting fertilisers directly into the irrigation water.
🥣 Bulk Reservoir
Mix a single large bulk nutrient tank. Balance pH and EC manually, drop your pump in, and let the timer run the feed schedule.
⚡ Doser / Venturi Injector
Mix nutrients on‑the‑fly. As fresh water flows, the doser siphons concentrated liquid nutrients into the line at a precise ratio.
🧹 Maintenance SOPs – Mandatory Weekly
Whether you use a bulk reservoir or an inline injector, keeping the line clean is mandatory:
- Flush the 1/2‑inch manifold with clean water or a mild line‑clearing solution weekly to dissolve salt buildup.
- Inspect your emitters regularly, and clean or replace any that clog.
⚠️ Critical Warning: Because drip irrigation is a localised feeding method, one clogged emitter will silently starve a single plant to death while the rest of the row continues to thrive.
Setup Cheat Sheet
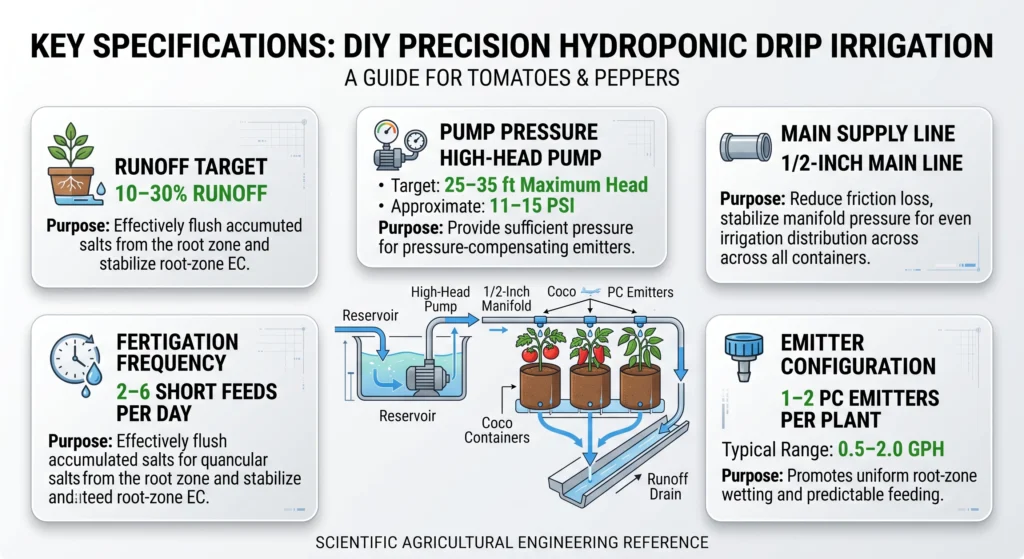
| System Metric | Standard Spec | Safety Margin & Why It Matters |
|---|---|---|
| Pump Head Lift | 25 to 35 Feet | Must generate >10 PSI at the table to force open internal silicone diaphragms inside pressure-compensating emitters. |
| Manifold Diameter | 1/2-Inch | Serves as a pressurized equalization chamber, eliminating line friction loss and balancing flow to the far end. |
| Runoff Target | 10% to 30% | Mandatory per feed to flush out accumulated, unabsorbed fertilizer salts and prevent osmotic root shock. |
Frequently Asked Questions (FAQ)
How many emitters does a hydroponic tomato plant need?
A mature tomato or pepper plant growing in a 3-gallon to 5-gallon container requires roughly 0.5 to 1 gallon of nutrient solution per feeding event. You should install one or two pressure-compensating (PC) emitters rated at 0.5 to 2.0 GPH per plant. Placing two emitters on opposite sides of the stem ensures uniform saturation of the root zone, preventing dry zones or channeling within the substrate.
How often should I drip irrigate tomatoes in coco coir?
Tomatoes and peppers in coco coir perform best with 2 to 6 short feeds per day. In extremely hot, dry conditions with heavy fruiting loads, this can increase to hourly pulses during daylight. Coco holds moisture efficiently between feeds, so administering frequent, small doses keeps the root zone saturation even and prevents the salt buildup that occurs with one massive daily flood.
Why do I need runoff in a drip system?
Runoff is a non-negotiable requirement for open-loop drip systems. By pushing 10% to 30% extra fluid through the pot during each feed, the runoff flushes accumulated, unabsorbed fertilizer salts out of the coco or perlite. This prevents salt toxicity and EC creep in the root zone. Runoff makes drip-in-media setups incredibly forgiving, as every single feed resets the chemical balance of the root zone.
Do I need a pressure-compensating (PC) emitter?
Yes, for anything beyond 3 or 4 plants, PC emitters are required. PC emitters contain a flexible internal diaphragm that delivers the exact same volume of flow to every plant on the manifold, regardless of the line length or position. Standard non-PC emitters will dump the majority of the water onto the plants nearest the pump and starve the plants at the far end of the row.
How do I size the main supply line for a drip manifold?
For small setups (under 4 plants closely grouped), 1/4-inch tubing can work. However, any standard DIY build with multiple large plants requires a 1/2-inch main supply line. The larger 1/2-inch pipe reduces friction loss, allowing the submersible pump to successfully build the static pressure needed to activate the diaphragms inside the PC emitters across the entire manifold.
Visual Build Companion & Video Walkthrough
If you want to see these plumbing connections, manifold pressurization sequences, and emitter activations in real-time, we have put together two comprehensive video guides. Below, you will find our deep-dive wide-format masterclass alongside a rapid-fire vertical reel summarizing the entire high-head pump setup.
DIY Drip Irrigation Hydroponics: Build a Pressurized Manifold
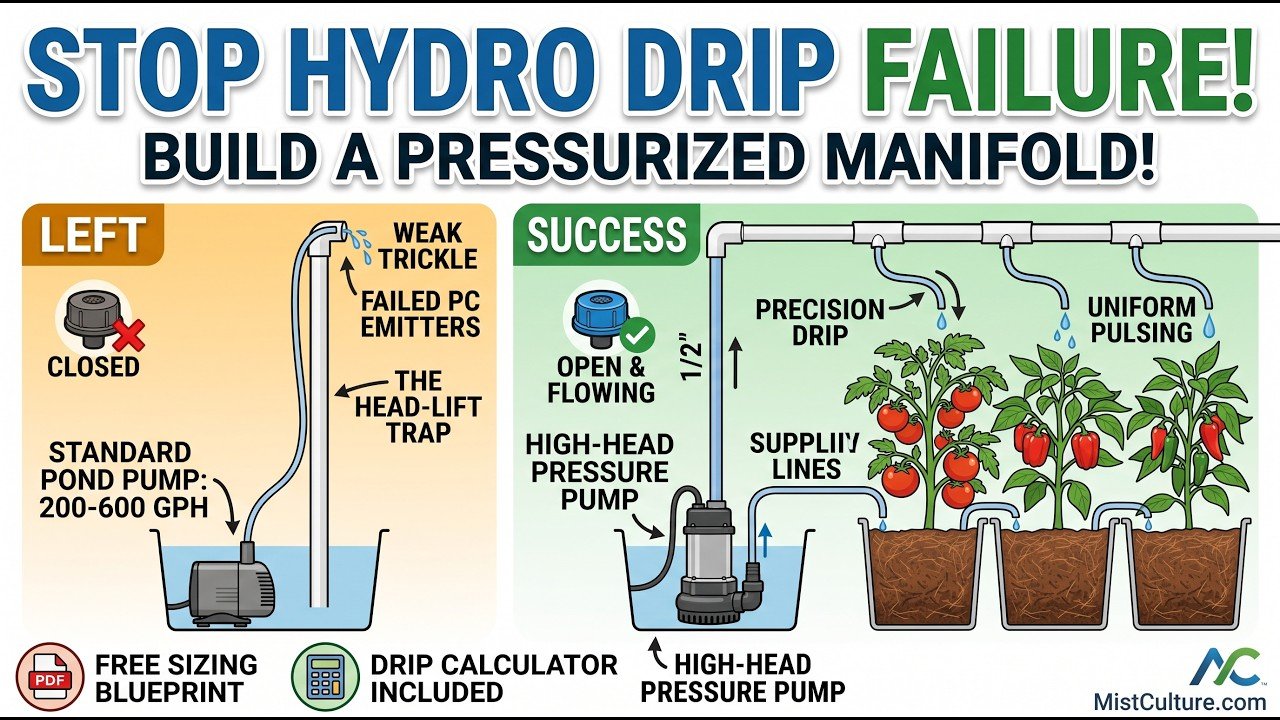
A comprehensive walk-through highlighting the physical assembly of PVC pipes, pressure verification, and pipe gluing steps.
The Head-Lift Trap & Aquarium Pump Failures Excluded
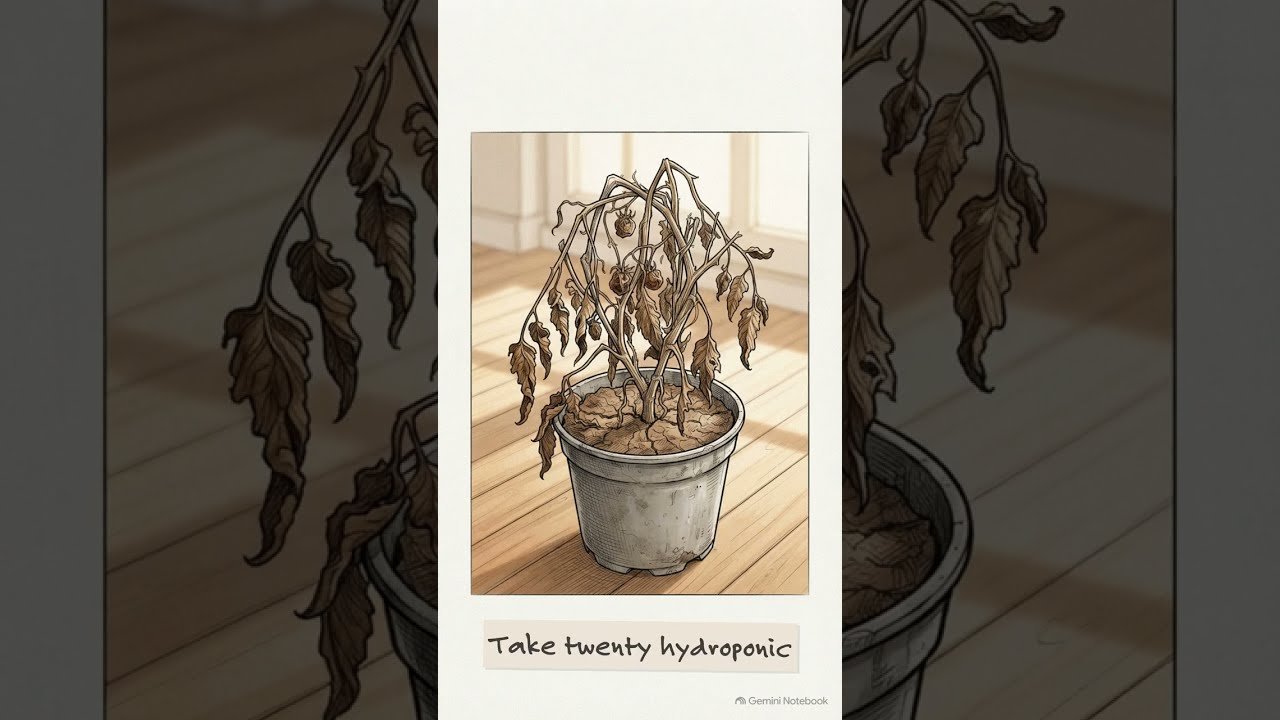
Exposing the crucial difference between simple GPH flow ratings and the vertical head lift pressure needed for PC emitters.
Conclusion
Constructing a DIY drip irrigation system for hydroponic tomatoes and peppers gives you commercial-grade crop steering capabilities at a fraction of the cost. By pairing the correct high-head submersible pump with a 1/2-inch PVC or polytube manifold, you guarantee adequate static pressure to fire your pressure-compensating emitters uniformly across the system. Dialing in your programmable timer to pulse nutrients 2 to 6 times a day—while managing your 10% to 30% runoff—will keep your root zone flushed, oxygenated, and perfectly balanced.
💡 Next Steps
If you are expanding your build and want to refine your fertiliser mix for this specific setup, calculating your parts‑per‑million exactly will ensure your runoff EC stays in check.

Continue Your Learning Journey