DIY Ebb and Flow Table: Build a Flood-and-Drain System for Under $100 (With Sizing Calculator)

Table of Contents
- Component Sizing and Selection: Engineering the Blueprint
- Pump Sizing Math and Timer Wiring: Engineering the Flow Cycle
- Building and Leveling the Table: Mechanical Assembly
- Media Sizing and Planting Strategy: Root Anchorage and Substrate Hydrology
- First-Cycle Tuning and System Verification: The Calibration SOP
- Frequently Asked Questions (FAQ)
- Visual Build Companion & Video Walkthrough
- Conclusion: Precision Automation on a Budget
Soilless culture offers unparalleled growth rates and precise control over plant development, but removing soil strips away the natural buffer capacity that protects roots from environmental and chemical volatility. In soil, organic matter, clay particles, and microbial networks buffer temperature swings, absorb excess mineral salts, and maintain chemical equilibrium around root systems. In hydroponic culture, plant roots are directly exposed to the nutrient solution and substrate environment. A minor calculation error in fertilizer concentration, a two-degree rise in water temperature, or an unchecked pH shift can cause severe crop stress or plant death within forty-eight hours.
Most crop failures in home setups, greenhouses, and commercial vertical farms stem from a predictable set of mistakes. Understanding the underlying physics, chemistry, and plant physiology behind these operational errors makes every problem predictable, measurable, and straightforward to correct..
Component Sizing and Selection: Engineering the Blueprint
A reliable DIY flood-and-drain system is governed by a precise relationship between the upper grow tray and the lower nutrient reservoir. Unlike static water cultures, an ebb and flow table operates on active, high-volume fluid displacement. If any single component, from your water pump to your drain lines—is mismatched or improperly sized, you risk catastrophic grow room overflows, dry-running pumps, or root suffocation. Every piece of hardware must be intentionally chosen and sized to complete a rapid, uniform flood and drain cycle.
The Volumetric Safety Ratio (The 1.5x Reservoir Rule)
The physical footprint of your grow table dictates your entire hardware configuration. For home hobbyists and small indoor spaces, a rigid, food-safe plastic storage container or a heavy-duty boot tray with a 2×3 foot footprint provides an outstanding starting bed. This upper container, known as the grow tray, holds your root blocks and growing media.
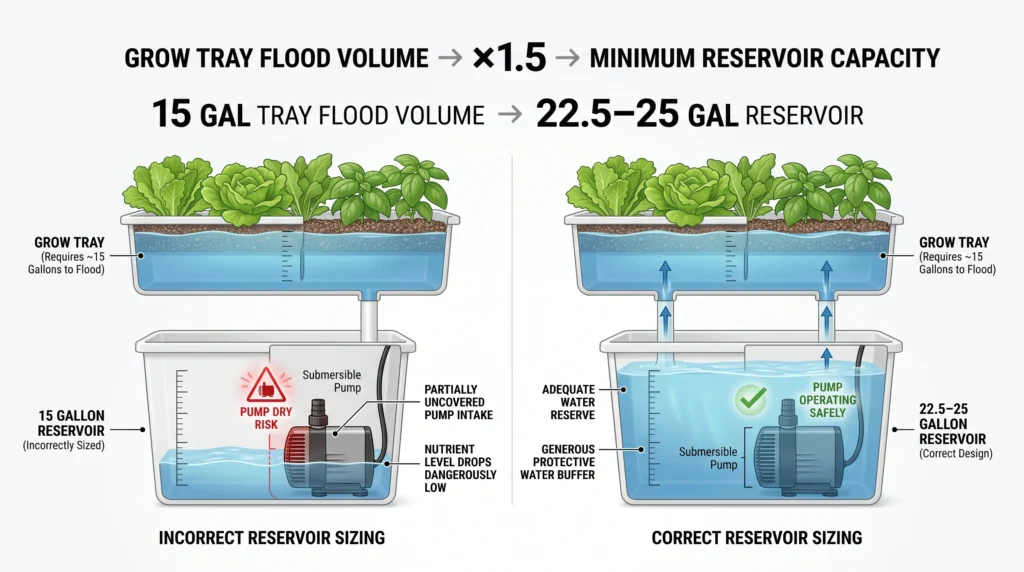
Directly beneath this tray sits the nutrient reservoir. This lower tub holds your blended water and mineral solutions. A common engineering mistake in DIY builds is sizing the reservoir to hold only the exact volume of water needed to flood the upper tray. During the flood cycle, as water fills the upper bed, the fluid level in the reservoir drops rapidly. If your reservoir is too small, the water level will drop below the intake of your submersible pump halfway through the flood cycle. The pump will immediately suck air, lose its prime, run dry, and burn its motor out within days.
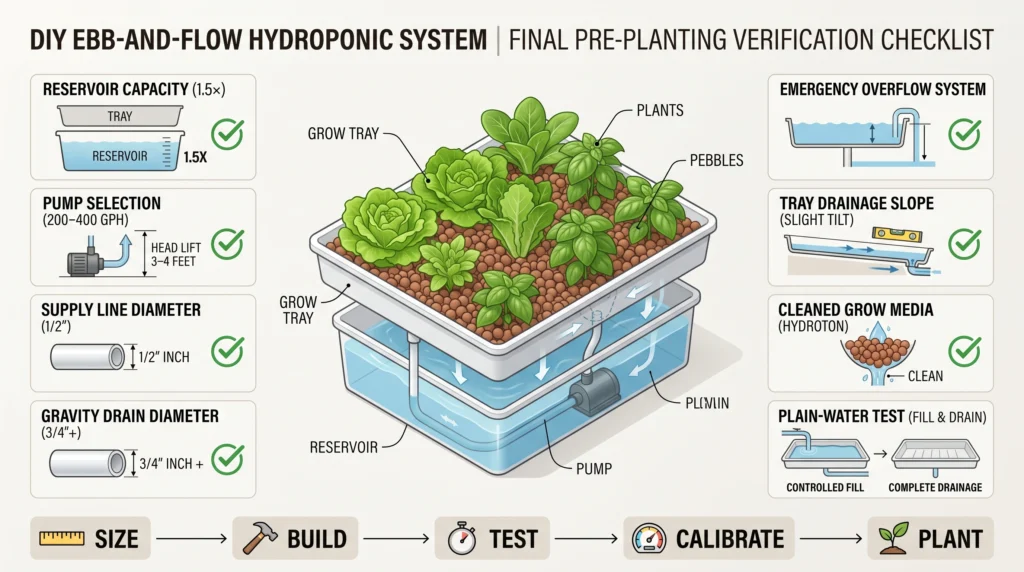
To eliminate this failure point, you must enforce the 1.5x Volumetric Safety Rule: the total physical capacity of your lower reservoir must be at least 1.5 times the gross flooding volume of your upper tray. For example, if your 2×3 foot tray requires 15 gallons of solution to reach its maximum flood height, your reservoir must have a capacity of at least 22.5 to 25 gallons. This safety margin guarantees that the pump remains fully submerged under a minimum level of protective head-water even at the peak of the flood cycle.
💧 Ebb & Flow Sizer PRO v2.0
Precision volumetric calculator – tray capacity, pump sizing, and reservoir volume.
🔗 Embed This Tool
Embed just the calculator (no extra page elements) on your own site. The iframe auto‑adjusts its height.
Powered by MistCulture
Plumbing Diameter Ratios: Preventing Grow Room Floods
To move water into the elevated grow bed, your system requires a reliable submersible water pump resting on the floor of the reservoir. The pump pushes nutrient-rich water up through a pressurized 1/2-inch inlet feed line.
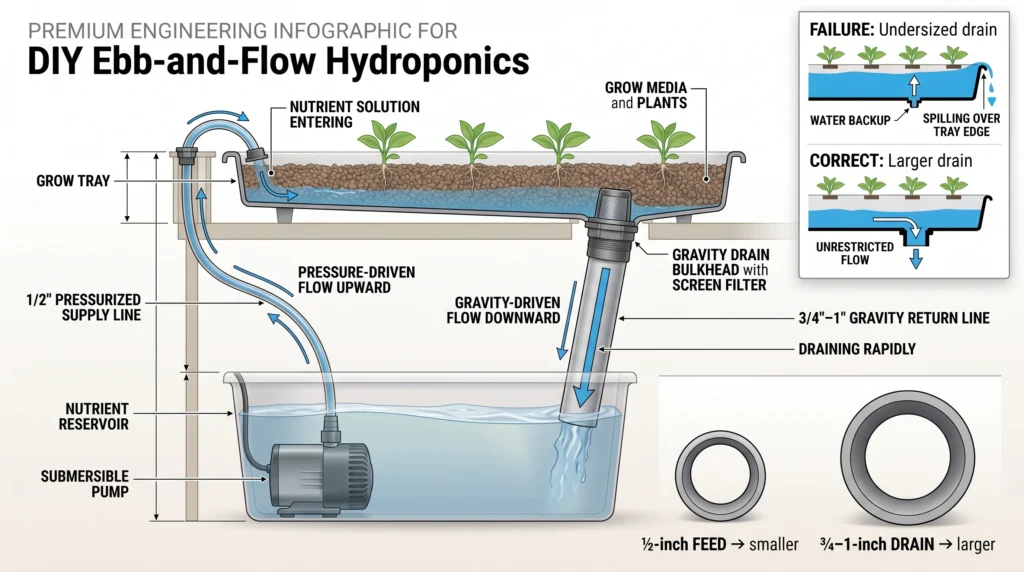
When gravity pulls the nutrient solution back down, the return plumbing must drain the system effortlessly. This is where standard DIY builds fall victim to plumbing blockages. Because the return line relies entirely on passive gravity, it lacks the raw force of a pressurized pump. To prevent your tray from backing up and overflowing, your gravity-fed return line must always have a larger physical diameter than your feed line.
Standardize on a 3/4-inch to 1-inch return bulkhead fitting. This size ratio ensures the water can drain away faster than the 1/2-inch line can supply it, keeping the water line stable. Additionally, sourcing individual bulkheads, screen filters, and uniseals with matching threads can stall a build. We highly recommend utilizing a specialized Ebb & Flow Table Kit. These pre-packaged kits bundle the custom threaded 1/2-inch fill and 3/4-inch drain bulkheads, washers, and screen fittings designed specifically to fit standard plastic tub thicknesses without leaking.
Submersible Pumps and Head Lift Considerations
The submersible water pump serves as the engine of your flood cycle. To trigger a proper flood, the pump must overcome the physical resistance of gravity to push water from the low-lying reservoir up to the elevated grow tray. Submersible pumps are rated by two primary metrics: flow rate in Gallons Per Hour (GPH) and Maximum Head Lift (the maximum vertical height a pump can push fluid before its flow rate drops to zero).
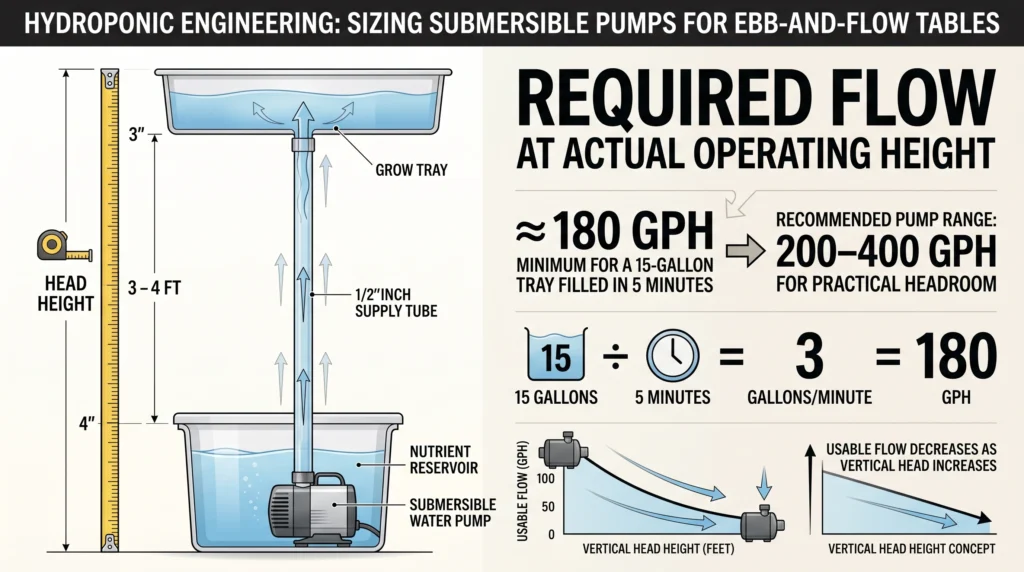
Sizing your pump requires checking its performance curve. Pushing water through vertical 1/2-inch tubing to reach a grow bench sitting 3 to 4 feet in the air creates immediate friction and gravity resistance. Standardize on a pump rated for 200 to 400 GPH to ensure you maintain adequate flow headroom to flood the upper tray within a highly optimized 5 to 10 minute window.
Interval Timers & Rapid-Drain Aggregates
Precision water intervals are the heart of automated root zone oxygenation. Traditional mechanical pin-timers only adjust schedules in rigid 30-minute or 1-hour blocks. Flooding an ebb and flow table for 30 straight minutes will drown your root zones, rob the plants of oxygen, and slow down vegetative development.
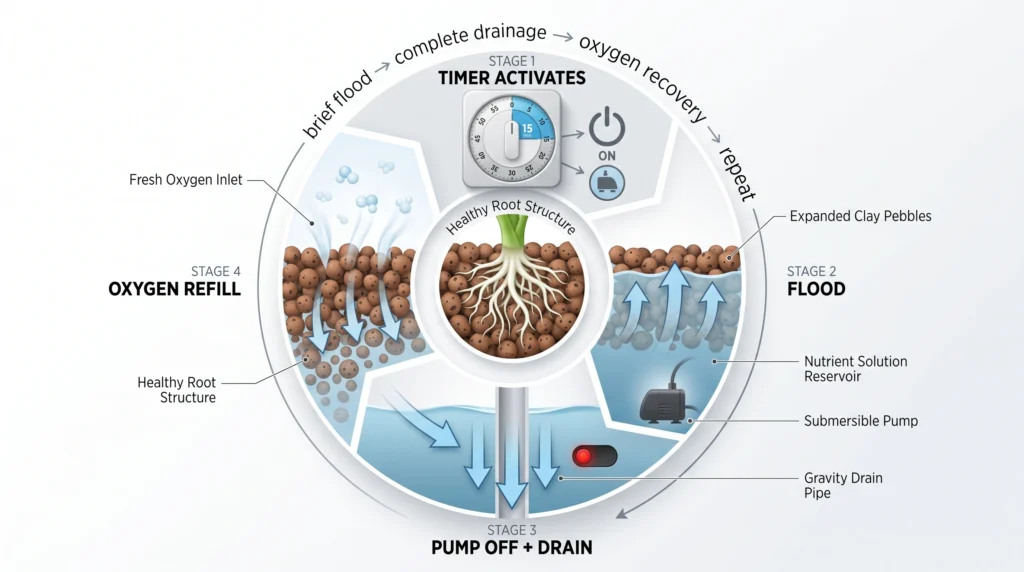
To execute precise grow schedules, you must implement a 15-minute mechanical interval timer (configured with 15-minute physical pins) or integrate a programmable smart home outlet app. This allows you to set the short, repeatable 10-to-20 minute runtimes needed to submerge the roots briefly before letting them drain.
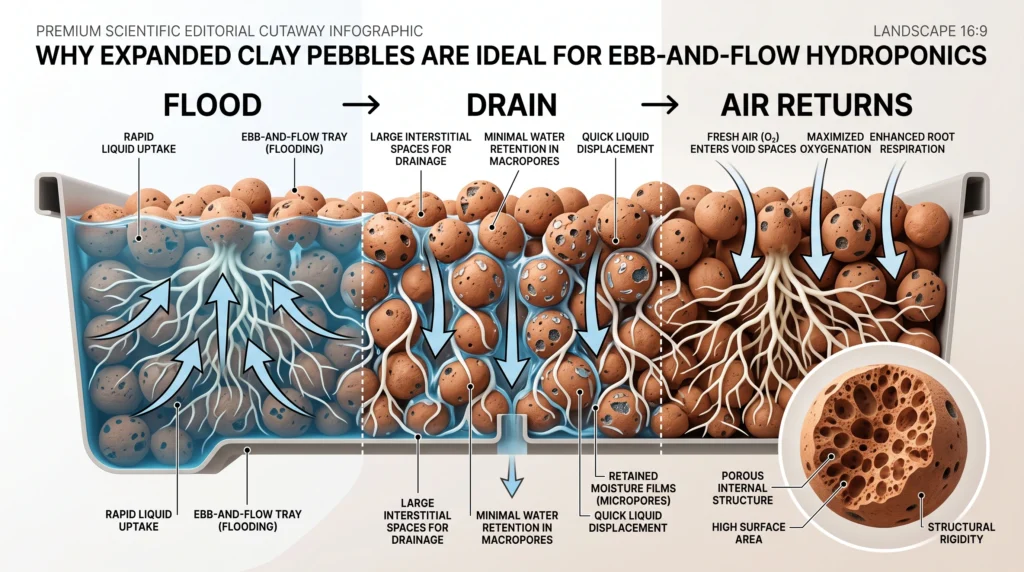
To anchor your plants and allow fast drainage, fill the grow tray with reusable, pH-neutral expanded clay pebbles (Hydroton). Unlike dense growing substrates, clay pebbles display total structural porosity, allowing solutions to drain away almost instantly while trapping tiny pockets of air and moisture in their rough surfaces. This rapid fluid displacement forces old, stagnant root-zone gases out and pulls fresh, oxygen-rich atmospheric air down in its wake.
Under‑$100 Hardware Checklist
Check off items as you source them to track your exact project costs.

Why it's necessary: Sourcing individual bulkheads, uniseals, and screen fittings with matching threads can stall a project. A complete hardware kit bundles the specific inlet and overflow fittings designed for standard plastic tub thicknesses.nKey Spec: Includes both 1/2-inch fill and 3/4-inch drain hardware.
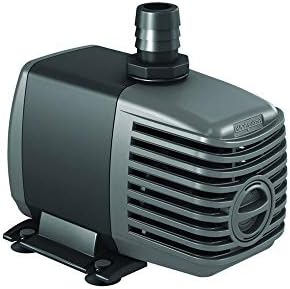
Why it's necessary: The pump serves as the engine of the flood cycle. It must generate enough vertical lift (head pressure) to overcome gravity and push water into the elevated tray within the required 5-10 minute window.nKey Spec: 200-400 gallons per hour (GPH) flow rate capacity.
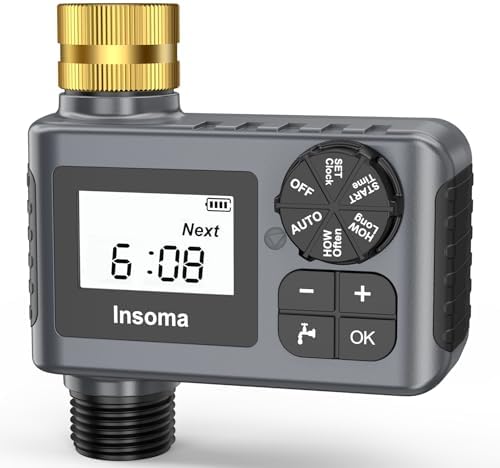
Why it's necessary: Standard mechanical outlet timers trigger power in 30-minute blocks, which drowns root zones in an ebb-and-flow setup. A specialized interval timer allows the short, repeatable 10-20 minute power bursts necessary for flood cycles.nKey Spec: 15-minute mechanical pins or programmable smart app integration.

Why it's necessary: Flood-and-drain mechanics rely on rapid liquid displacement. Clay pebbles drain faster than any other aggregate, preventing waterlogged roots while trapping tiny pockets of air and moisture in their porous surfaces.nKey Spec: Reusable, pH-neutral expanded clay aggregate.
Pump Sizing Math and Timer Wiring: Engineering the Flow Cycle
To run a highly automated, self-regulating flood-and-drain table, you cannot rely on guesswork. Sizing your water pump and coordinating your electrical timer schedule is a precise exercise in fluid dynamics and substrate hydrology. If your pump underperforms, the nutrient solution will rise too slowly, failing to saturate the root zone evenly before draining. Conversely, if your plumbing lacks proper vacuum breaks or overflow safety loops, you risk creating a permanent siphon that will drown your roots and flood your growing area. Achieving complete, set-and-forget reliability requires calculating your tray's physical volume, overcoming line friction, and isolating electrical safety runs.
Calculating Gross Tray Volume and Flow Dynamics
The core mathematical foundation of an ebb and flow system begins with the physical dimensions of your upper grow tray. Let us analyze a standard DIY residential footprint utilizing a rigid 2x3 foot plastic storage table with a target media flooding depth of 4 inches.
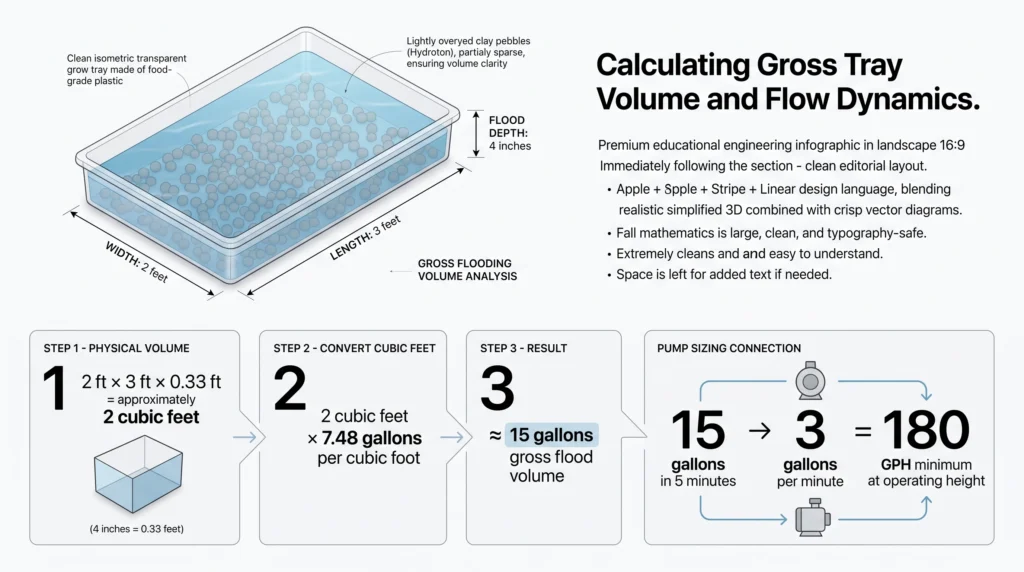
To calculate the gross capacity of this tray, we must convert cubic feet into liquid gallons:
- Calculate Cubic Foot Footprint: 2 feet (Width) × 3 feet (Length) × 0.33 feet (4-inch depth converted to feet) = 2 cubic feet of total volume.
- Convert to Liquid Gallons: Since 1 cubic foot of volume is equivalent to exactly 7.48 gallons, we multiply: 2 cubic feet × 7.48 = 14.96 gallons of gross capacity.
To execute a proper ebb-and-flow cycle, your water pump must be capable of filling this gross 15-gallon space in a tight, optimized window of 5 to 10 minutes. If the filling process takes longer than 10 minutes, the roots sitting near the top of the tray will dry out while the bottom roots sit submerged for too long, leading to uneven development and nutrient stress.
To fill a gross volume of 15 gallons in exactly 5 minutes, your pump must deliver a flow rate of 3 gallons per minute. Multiplying this by 60 minutes establishes a required flow rate of 180 gallons per hour (GPH) at the actual vertical height of your grow table. Because pushing water upwards through vertical pipe runs creates mechanical gravity resistance and friction, standardizing on a 200 to 400 GPH submersible pump provides the necessary overhead power to overcome static head-room losses and complete the cycle on time. If you want to calculate the raw electrical operating costs of running a pump at this size over a full harvest cycle, run your pump's wattage through our interactive Hydroponic Cost and ROI Calculator.
Passive vs. Pressurized Flow Cycle
The 200–400 GPH pump forces water up the 1/2″ feed line. Oxygen‑starved pocket gases are physically pushed out of the porous Hydroton clay pebble bed as the solution rises.
The pump shuts off. Solution drains back down through the larger 3/4″ drain line. This downward pull acts as a bellows, sucking fresh oxygen‑rich atmospheric air deep into the root zone.
Plumbing Pipe Diameters and the Anti-Siphon Check
To maintain constant hydraulic stability, your inlet and outlet pipe diameters must remain balanced at a specific ratio. The pressurized inlet feed line utilizes a standard 1/2-inch tubing assembly, which matches the physical output nozzle of most home-scale submersible pumps. However, the gravity-fed return drain line lacks the mechanical push of a motorized impeller. It relies entirely on the passive pull of gravity to empty the tray.
To guarantee that the solution empties freely and never backs up onto your grow room floor, the gravity return pipe must be physically larger than the supply line. Always utilize a 3/4-inch to 1-inch plumbing line for your return drain. If you're unfamiliar with these plumbing terms, refer to our comprehensive Hydroponics A-to-Z Technical Glossary to map out standard hose and adapter thread sizes.
In addition to sizing your lines correctly, you must isolate your plumbing against backward siphoning. If your submersible water pump is turned off, but your feed line terminates below the high-water line of your flooded tray, a reverse gravity siphon will naturally form. This siphon will continuously draw water backward through your pump's impeller blades, preventing the tray from draining completely.
To break this vacuum, you have two physical engineering choices: you can install a spring-loaded anti-siphon check valve inline on your 1/2-inch feed hose, or you can elevate your feed inlet pipe so that it discharges nutrient solution safely above the tray's maximum flood line, introducing a natural air gap.
Timer Configuration and Interval Calibration
The timing schedule of your flood-and-drain pump dictates the rate of cellular root respiration. In an ebb and flow environment, roots thrive when exposed to brief, intense moisture pulses followed by prolonged drying cycles. Standard mechanical pin-timers are highly limiting, only allowing growers to adjust power intervals in rigid 30-minute blocks. Running your pump for 30 minutes straight will keep the roots submerged far too long, leading to waterlogging and cell death. You must implement a dedicated 15-minute mechanical interval timer or integrate a smart plug programmed down to the precise minute.
Your physical watering frequency must be calibrated to match the environmental conditions of your room and the specific water-holding characteristics of your media. Expanded clay pebbles (Hydroton) drain almost instantly, requiring more frequent watering runs. Conversely, dense media blends retain moisture for several hours, requiring fewer pulses to prevent overwatering. Review our guide on troubleshooting waterlogged root systems and the 10 most common beginner hydroponic mistakes to see how incorrect irrigation schedules can lead to dissolved oxygen crashes.
Moisture Retention: Very Low. Clay pebbles drain almost instantly, holding minimal water.
Recommended Timer Schedule: 4 to 6 flood cycles per day. Run the pump for 10 minutes per cycle during daylight hours.
Moisture Retention: Moderate‑High. Retains significant moisture within the capillary spaces.
Recommended Timer Schedule: 2 to 3 flood cycles per day. Run the pump for 5 to 10 minutes per cycle. Keep cycles spaced far apart to allow drying.
Integrating Emergency Overflow Loops
No matter how clean you keep your grow room, mechanical failures will eventually occur. In a flood-and-drain setup, loose root masses, salt crusting, or shifting clay pebbles can easily find their way into your primary return bulkhead, blocking the drain hole. When your timer next activates the pump, the water level will rise past your target flood height and spill over the sides of the tray.
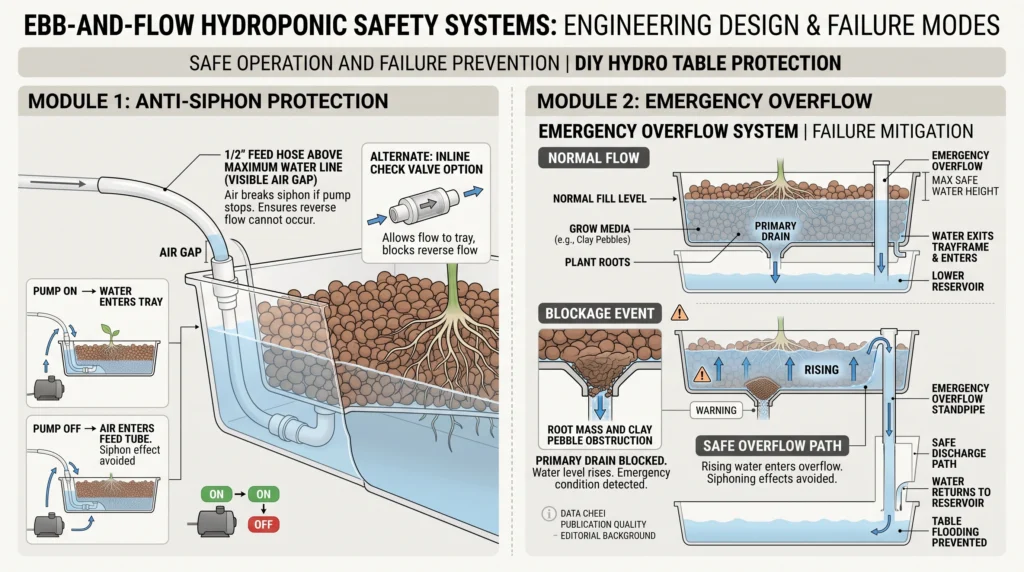
To eliminate this threat, you must install an emergency overflow standpipe. This consists of a secondary return bulkhead installed at the absolute highest point of your tray's target water level. Attach an open-ended vertical extension pipe to this bulkhead. If your primary drain becomes blocked, the rising water will reach the lip of this standpipe and spill safely down into the lower reservoir, bypassing the blockage and keeping your grow room completely dry.
Building and Leveling the Table: Mechanical Assembly
While ebb-and-flow systems are mechanically forgiving, their success depends entirely on physical geometry and gravitational hydraulics. Unlike high-pressure aeroponics or active water-circulating gullies, your grow tray relies on passive, low-velocity drainage. A minor structural sag, an uneven leg, or an improperly seated bulkhead gasket will quickly turn your grow room into an anaerobic breeding ground. By understanding how to properly drill high-density plastics, anchor plumbing gaskets, and calibrate structural tilt, you can build a stable grow space that drains clean every single run.
Frame Construction and Vertical Clearance
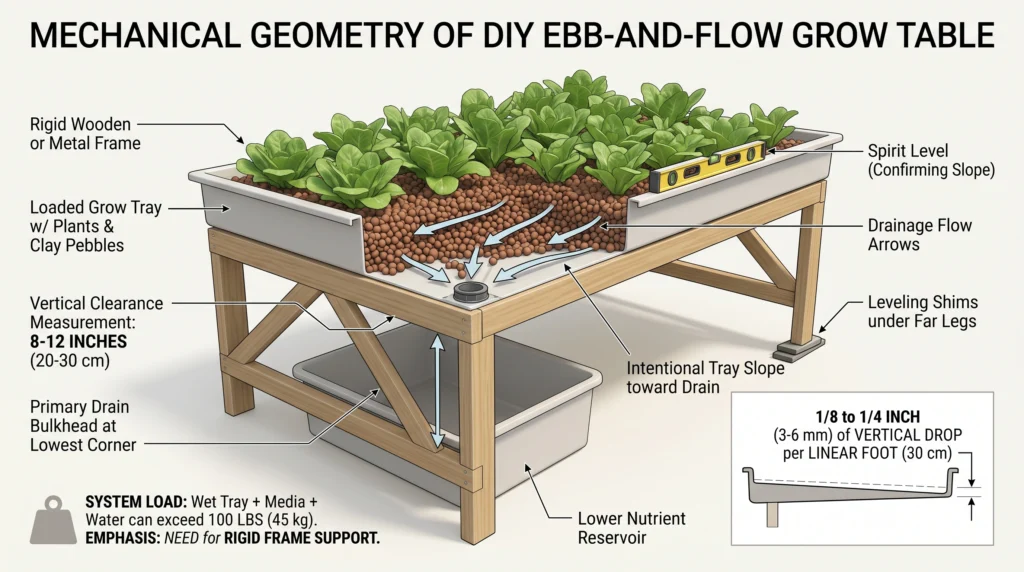
Assemble a rigid, heavy-duty stand or frame to support the primary weight of your upper grow tray. When fully flooded and loaded with wet expanded clay pebbles, a 2x3 foot tray can easily weigh in excess of 100 pounds. Using flimsy wire racking or weak shelving will lead to eventual bowing, which creates internal low spots where stagnant water pools. If you are building a custom timber frame or sourcing framing materials, see How Much Does a Hydroponic System Cost? Budget Breakdowns for Every Setup to evaluate cost-effective, heavy-duty structural options.
The stand must provide at least 8 to 12 inches of vertical clearance between the bottom of your upper tray and the top rim of your lower reservoir. This gap is vital for two reasons: it provides sufficient physical drop for your passive 3/4-inch drain pipe to empty by gravity without backing up, and it allows you to easily slide the reservoir lid out to add fresh water, clean lines, or take routine chemical measurements. To see how custom frame structures scale up across other home-built hydroponic setups, review our comprehensive index of Hydroponic Growing Systems.
Ebb & Flow Assembly & Leveling Guide
Click through the tabs or use the navigation buttons to follow the mechanical construction sequence.
Select the absolute lowest end of your grow tray to host the drain. Using a standard hole saw matched to your bulkhead size, drill your drain hole. Use a medium‑low drill torque speed; pushing too fast or hard with high pressure will heat the plastic, causing brittle storage tubs to violently fracture. Buff away raw burrs with sandpaper before installing hardware.
Plumbing Connections: Drilling and Bulkhead Physics
To mount your primary gravity drain line, identify the lowest point or corner of your upper tray. Drill the drainage hole using a standard bi-metal hole saw matched precisely to the outer diameter of your bulkhead fitting. When drilling plastics, utilize a medium-low drill speed with minimal downward force. Pushing too aggressively with a high-speed drill will bind the teeth of the hole saw in melting plastic, creating violent kickback that can easily shatter brittle polypropylene storage tubs.
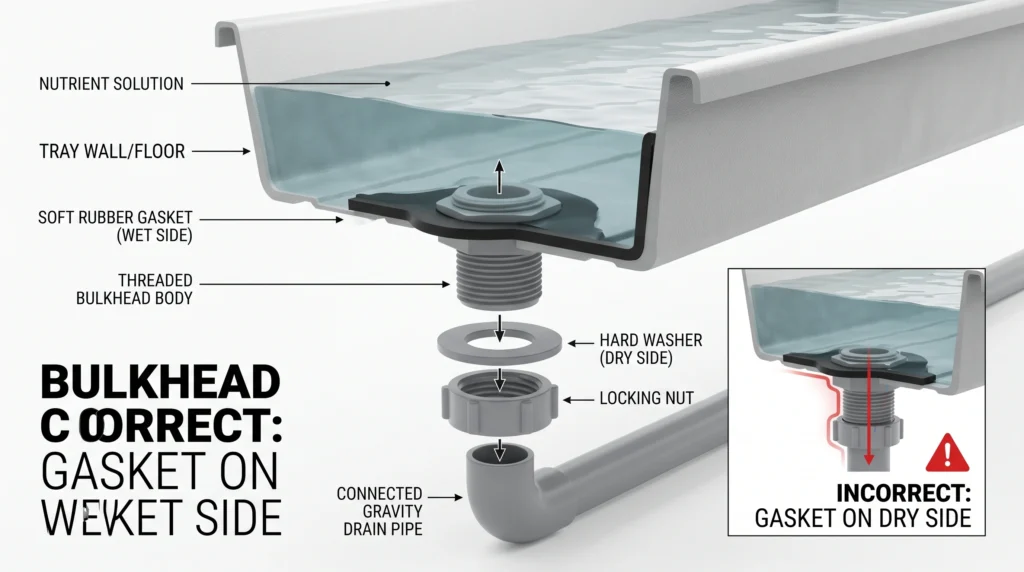
Once your hole is deburred, you must adhere to the Wet-Side Gasket Rule. When assembling a threaded bulkhead, the soft rubber sealing gasket must always sit on the inside floor of the tray (the wet side of the plastic barrier), with the hard plastic sliding washer and locking nut positioned on the dry side underneath. Placing the rubber gasket on the dry side bottom is a critical assembly error; it allows water to follow the spiral path of the bulkhead threads directly past the barrier, resulting in a continuous, slow drip leak that will warp your stand.
Leveling and Tilt Calibration
After your plumbing fittings are secured, level the frame. Rest a physical spirit level along the long and short axes of the grow tray. The entire biological cycle of an ebb-and-flow table depends on complete, rapid, and absolute drainage between pump runs. If your table sits perfectly flat, small variances in your home's flooring or a slight warp in your plastic container will create localized pools of stagnant water.
Stagnant water left standing in flat spots cuts off oxygen to the root tips, breeds anaerobic pathogens, and invites systemic root rot (Pythium). If you notice root discolouration or slow plant growth during subsequent cycles, you can diagnose symptoms step-by-step using the MistCulture Hydro Doctor Deficiencies Tool.
To prevent this, you must calibrate a purposeful, slight tilt directed straight at the drain bulkhead. Use thin wooden shims or plastic leveling blocks under the frame legs furthest from the drain hole. Aim to create a subtle slope of roughly 1/8 to 1/4 inch of vertical drop per linear foot of tray length. This slope is steep enough to force every drop of standing water to empty back down through your 3/4-inch return line, yet shallow enough to keep your Hydroton clay pebble bed structurally stable and prevent media slide.
Pump Plumbing and Electrical Isolation
Position your 200–400 GPH water pump flat on the reservoir floor, utilizing its suction cups to prevent the motor's vibration from shifting the pump or rattling the plumbing lines. Run your 1/2-inch flexible poly hose from the pump outlet up into the grow tray, routing it either through a secondary bulkhead or simply securing it over the top rim with a hose guide.
Finally, protect your grow room with clean electrical runs. Secure your 15-minute mechanical interval timer on an elevated wall mount positioned far above your reservoir. Always form a drip loop in your pump's power cord. A drip loop is a simple, downward U-shaped bend in your wire right before it plugs into your wall outlet. If condensation or a slow plumbing leak drips onto the wire, the liquid will pool and fall off the bottom of the bend rather than following the copper cable directly into your electrical socket. Keeping your power blocks dry is the single most important safety rule of grow room automation.
Media Sizing and Planting Strategy: Root Anchorage and Substrate Hydrology
In an ebb-and-flow environment, the growing medium does not just act as a physical anchor for your plants; it serves as a dynamic hydraulic valve that dictates how fast moisture is delivered and how much oxygen is pulled back down into the root zone. Selecting the wrong aggregate density or skipping simple substrate pre-treatment SOPs will quickly ruin your plumbing, strip your water pump's mechanical seals, and drown your roots. By matching your crop's biological profile to a compatible media depth and understanding substrate-specific dry-back profiles, you can maximize nutrient absorption while maintaining an ultra-oxygenated root zone.
Hydroton Expanded Clay Pebbles: The Standard for Flood Systems
Standardize on expanded clay pebbles (Hydroton) as the baseline medium for your flood-and-drain table. Clay pebbles are kiln-fired at extreme temperatures, causing them to expand into highly porous, lightweight spheres. These pebbles drain almost instantly, ensuring that the receding water level forcefully pulls fresh atmospheric oxygen down to the root tips. They do not compact over time, they resist algae growth on their top surface, and they are indefinitely reusable across multiple harvest cycles after basic chemical sterilization.
However, clay pebbles require rigorous pre-treatment before they are loaded into your grow tray. During manufacturing and shipping, the constant friction of the pebbles rubbing together generates a heavy layer of fine, red clay dust. If you pour dry pebbles directly into your tray, this dust will wash down your 3/4-inch return line and pool inside your lower reservoir. Once in the reservoir, the clay dust acts as a highly abrasive grinding paste that will physically strip the stainless steel impeller shaft of your submersible water pump, causing the motor to seize and fail. Always wash your pebbles thoroughly in a separate mesh colander or bulk bucket with clean water until the runoff runs completely clear before introducing them to your grow system.
Hydrology: Zero water retention with immediate gravity drainage. Excellent root anchorage.
Dosing: High‑frequency, short‑duration floods (4–6 runs/day). Pre‑rinsing mandatory.
Hydrology: High capillary water retention. Holds moisture inside fibre structures for hours.
Dosing: Low‑frequency, targeted floods (2–3 runs/day). Avoid waterlogging.
Hydrology: Total structural porosity. Basalt glass fibres hold water with zero ion retention.
Dosing: Aggressive multi‑pulse schedule. Highly vulnerable to crop collapse if emitters clog.
The Mechanics of Planting in an Ebb and Flow Tray
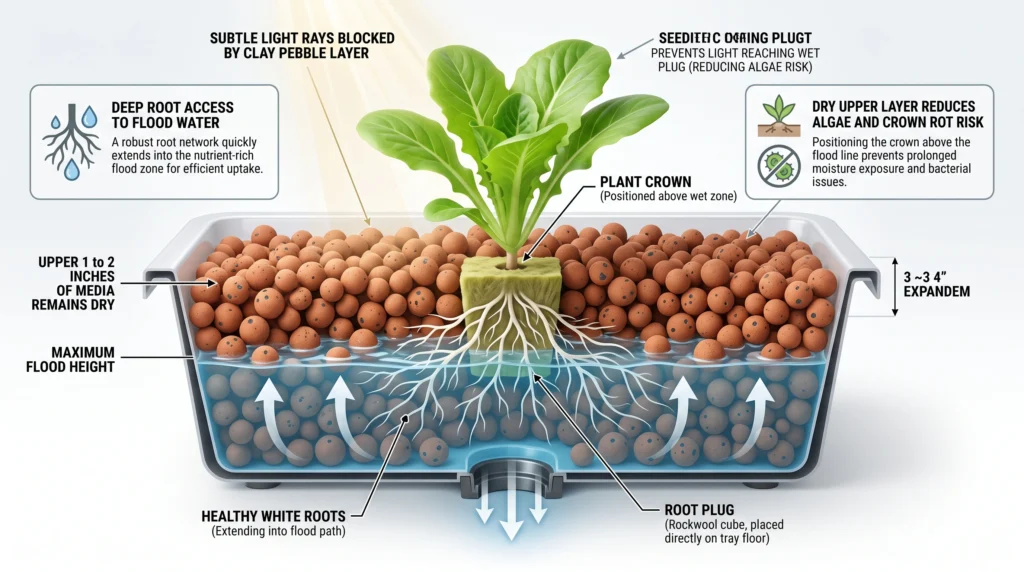
To plant, fill your grow tray with 3 to 4 inches of washed expanded clay pebbles. Brush the loose pebbles aside to form a small pocket, exposing the bare plastic floor of the tray. Settle the root plug of each seedling or vegetative clone directly onto the floor of the tray, then gently backfill the surrounding pebbles around the plant's main stem to anchor it in place. If you are working with delicate vegetative cuttings or young rooted plugs, read our expert propagation guide on Cloning in Hydroponics: The Engineer's Guide to Vegetative Propagation to ensure clean, pathogen-free root transfers.
This physical layering provides a double biological advantage:
- The Oxygenated Sub-Surface: The roots sit deep on the tray floor, directly in the flood path where they receive immediate exposure to incoming nutrient solution and optimal oxygenation as the water recedes.
- The Algae-Blocking Crown: The top 1 to 2 inches of clay pebbles remain dry. This dry barrier shields your wet root plugs from light, preventing the development of green algae on your media and minimizing water evaporation. It also anchors the plant's crown securely, protecting it from rot-inducing moisture buildup.
Alternative Substrates: Perlite vs. Coco Coir Blends
While clay pebbles are the gold standard for mechanical simplicity, alternative substrates like perlite, vermiculite, and coco coir blends can be utilized inside an ebb-and-flow table. However, transitioning away from clay pebbles significantly alters your system's water retention profile. Perlite and coco coir hold massive amounts of capillary water within their structures, taking several hours to dry out.
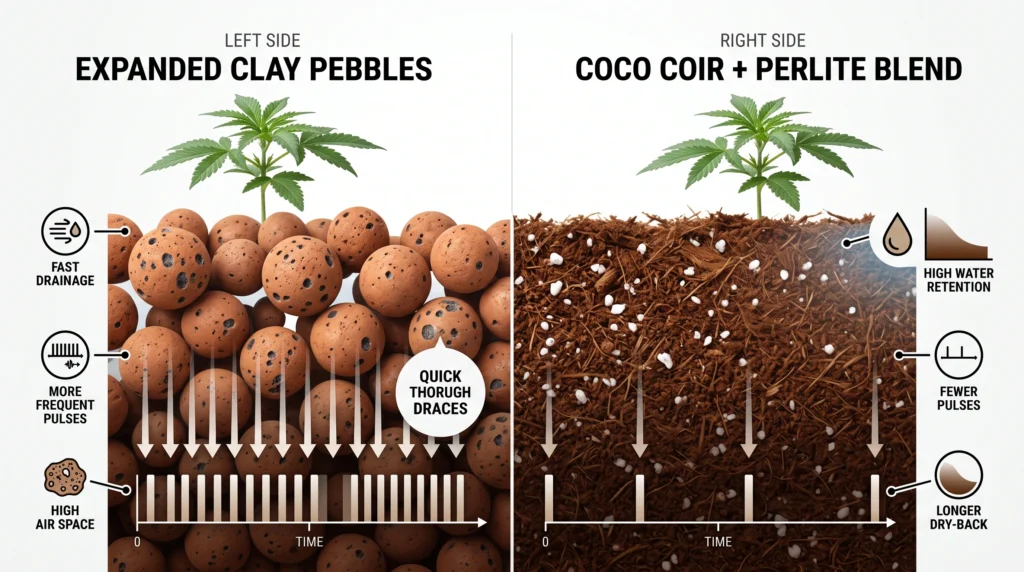
If you run a standard clay-pebble watering schedule (flooding every 1 to 2 hours) on a perlite-coco blend, your roots will remain constantly saturated. This deprives them of oxygen, stalls growth, and causes root rot. When growing in dense, high-retention media, you must drastically reduce your watering frequency to 2 or 3 short runs per day. This ensures the media has sufficient dry-back time to pull fresh oxygen back into the root zone between floods.
Matching Crop Profiles to Tray Depth
Your target crop profile dictates the required depth of your grow table. A shallow 3-to-4 inch media bed is exceptionally suited for cultivating short, fast-cycle leafy greens, lettuce, basil, and low-profile culinary herbs. These shallow-rooted crops do not require deep structural anchorage to remain upright and stable.
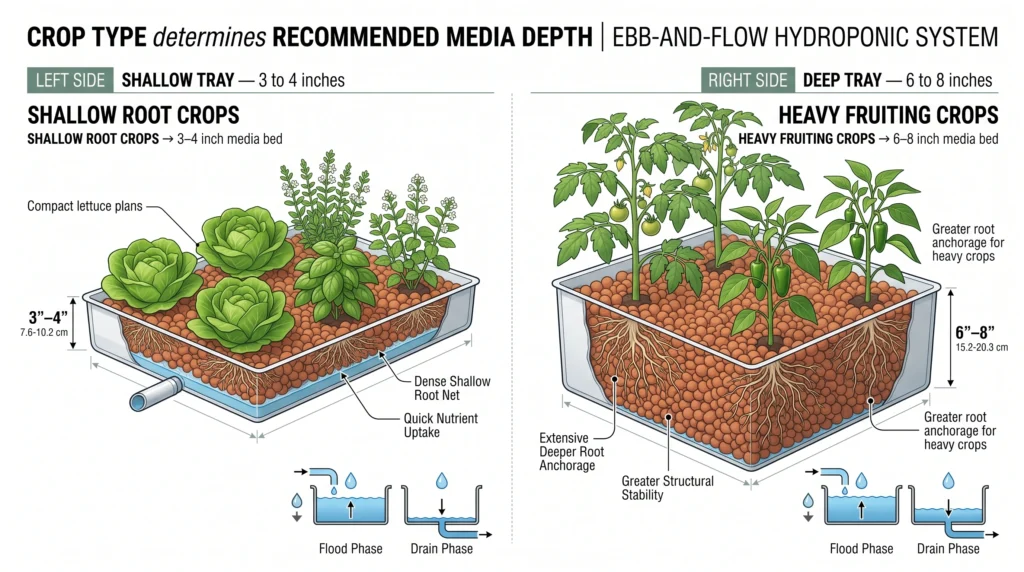
However, heavy-fruiting crops like tomatoes and peppers require deeper media beds of at least 6 to 8 inches to support their massive upper canopies and fruit loads. Without adequate bed depth, heavy plants will lean and uproot as they mature. To select the perfect system, media, and canopy anchorage for your specific crop choice, review our master system matchmaking guide: Greens vs Fruit: Best Hydroponic System Match Guide.
First-Cycle Tuning and System Verification: The Calibration SOP
Tuning your ebb-and-flow table is the critical bridge where mechanical assembly meets biological execution. Slicing raw tubing and leveling plastic frames is only half the battle; before you introduce fragile root plugs to the media bed, you must run timed calibration cycles using plain water. Skipping this physical verification stage is one of the most common ways to lose an entire crop. A minor plumbing blockage, an uncalibrated water pump flow rate, or an incorrect timer interval can drown or starve your plants before they even have a chance to anchor. By executing a structured, plain-water baseline run, you can dial in your flow velocities and establish an automated feeding schedule optimized for peak root zone transpiration.
The Plain-Water Dry Run: Establishing Hydraulic Boundaries
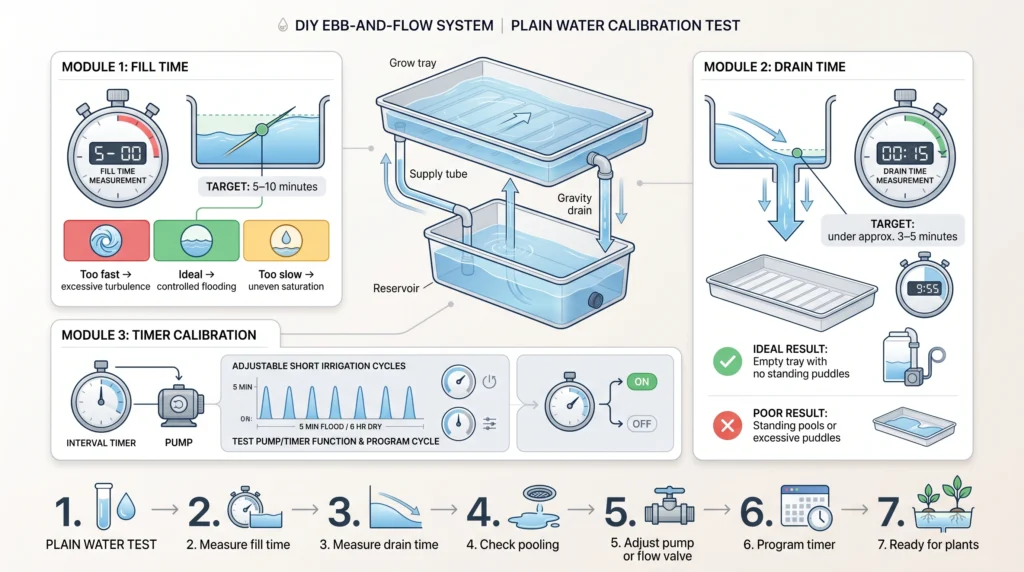
To begin calibration, fill your lower reservoir with clean, plain water—do not add mineral fertilizers or adjust pH yet. Manually override your 15-minute mechanical interval timer to turn your submersible pump on, and closely watch your grow tray fill. Your primary engineering goal is to have the water level rise from the bottom bulkhead to the top layer of your Hydroton clay pebbles in a tight, optimized window of 5 to 10 minutes.
If the tray floods in under 5 minutes, the water is moving too violently, which will dislodge unanchored seedlings, float your clay pebbles, and prevent the root zone from soaking up moisture evenly. If it takes longer than 10 minutes, your pump is underpowered or experiencing excessive vertical friction line loss, meaning roots at the far end of the manifold will remain starved of water. To compress or stretch your fill times to hit the perfect 5-to-10 minute window, adjust the physical flow dial on your pump's intake shroud, or install a manual 1/2-inch ball valve inline on your supply line to physically throttle back the pressurized flow.
Ebb & Flow Dry‑Run Calibration
Simulate a dry‑run test by selecting your physical parameters. Verify your fill and drain times to unlock diagnostic alerts.
Verifying Gravity Drainage and Eradicating Pooling
Once the pump cuts off, observe the receding water line. The entire volume of water must drain completely from the upper tray back down into the lower reservoir in under 3 to 5 minutes. Check the bare floor of your tray for any signs of standing water or sluggish drainage paths.
If you discover pooling or slow-receding puddles, do not proceed with planting. Standing puddles are highly destructive, sealing off the lower root tips from atmospheric air and inviting pathogenic decay. Go back and check your gravity tilt—add shims under the far stand legs to establish a precise 1/8 to 1/4 inch vertical drop per foot aiming directly at your 3/4-inch return bulkhead. Ensure your drain screens are completely clear of broken clay pebbles or plastic drilling burrs that might restrict passive gravity flow. If drainage problems persist, refer to our structured guide on troubleshooting plumbing blockages and avoiding the 10 biggest crop-killing hydroponic mistakes.
Timing Calibration: Matching Crop Stages and Room Climate
Once your physical water flow runs flawlessly, program your 15-minute interval timer. Because your grow room's temperature and humidity dictate how fast your plants transpire, your watering schedule must be calibrated to match both plant development and room climate.
- Seedlings and Young Clones: Young plants have shallow, underdeveloped root networks and struggle to process high volumes of water. To prevent waterlogging, schedule short, occasional floods spaced every 2 to 4 hours. This interval keeps the seedling plugs moist without keeping the roots continuously submerged.
- Established Vegetative & Flowering Canopies: Mature plants feature dense root networks that process water rapidly. To support aggressive fruit development and heavy transpiration, schedule more frequent flood runs every 1 to 2 hours during daylight hours.
The easiest way to check if your schedule is correct is by checking the top layer of your media bed. If the clay pebbles on the top layer are dry, dusty, and hot to the touch, your timer intervals are too far apart, meaning the roots are drying out. To balance your water pulses against grow room humidity and temperature, enter your environmental metrics into our free, browser-based Vapor Pressure Deficit (VPD) Calculator to maintain perfect transpiration speeds.
Chemical Integration and Reservoir Maintenance
Once your plain-water timing trials run perfectly, you can prepare your system for plant nutrition. Drain your reservoir entirely and refill it with clean, filtered water. Using a trusted liquid fertilizer line, mix your nutrient concentrates exactly to target EC levels based on your crop stage. Check your dilution targets and convert your EC metrics to PPM with precision using our free Hydroponic Nutrient Calculator. Balance your final reservoir pH strictly between 5.5 and 6.5 using a quality pH-down buffer before turning the timer schedule back on.
Once plants are actively growing, monitor your reservoir daily. In warm climates under heavy light, plants will transpire pure water out of the substrate much faster than they absorb mineral fertilizer salts. This causes the salt concentration in your lower reservoir to climb rapidly. To prevent osmotic root shock (nutrient burn), top up your reservoir daily with fresh, plain water to restore your target volume and stabilize your EC between weekly system flushes.
Get All 5 Tools in One Place
Access the complete Ebb & Flow Tools Suite — a standalone page with the Budget Checklist, Assembly SOP, Substrate Selector, Timer Matrix, and Calibration Panel all in one interactive hub.
- Under‑$100 Budget Tracker
- Step‑by‑Step Assembly Guide
- Substrate Compatibility Matrix
- Timer Configuration
- Dry‑Run Calibration
Frequently Asked Questions (FAQ)
How much does a DIY ebb and flow system cost?
Building the system costs well under $100 assuming you own basic tools like a drill and hole saw. The material breakdown consists of a rigid plastic storage tray ($15-25), a 200-400 GPH submersible pump ($15-30), a 15-minute interval timer ($10-15), standard PVC fittings and tubing ($10), and a bulk bag of clay pebbles ($15-25). Pre-packaged hardware kits bundle the specific threaded bulkheads and screen fittings for slightly more money, bypassing the time spent hunting for matching thread pitches in hardware store plumbing aisles.
How often should an ebb and flow system flood?
Flood frequency depends entirely on the crop's root mass, the ambient air temperature, and the specific drainage properties of the media. In warm conditions, established plants in fast-draining clay pebbles require floods every 1-2 hours. Seedlings and plants in cooler rooms transpire less water, extending the requirement to every 2-4 hours. The mechanical action of the pump must flood the tray long enough to reach the top layer of media (typically 5-10 minutes) and then shut off, allowing gravity to drain the liquid completely before the next cycle triggers.
What is the best growing medium for ebb and flow?
Hydroton (expanded clay pebbles) serves as the standard baseline medium. Clay pebbles drain almost instantly, ensuring the receding water level forcefully pulls fresh atmospheric oxygen down into the root zone. They do not compact, they resist algae growth on their top surface, and they are indefinitely reusable after sterilization. While 50/50 blends of perlite and coco-coir function in u003ca href=u0022https://mistculture.com/hydroponic-systems/ebb-and-flow/u0022 target=u0022_blanku0022 rel=u0022noreferrer noopeneru0022u003eebb and flow hydroponicsu003c/au003e, they retain massive amounts of water. Using these dense blends requires the grower to drastically reduce the flood duration and frequency to avoid suffocating the roots.
Why is my ebb and flow tray not draining?
Drainage failures stem from three mechanical faults: poor leveling, undersized return plumbing, or physical blockages. Verify the tray structure physically tilts toward the drain bulkhead. Confirm the return line diameter measures 3/4-inch to 1-inch; feed lines use 1/2-inch tubing, but gravity drains require larger diameters to move the same volume of water. Inspect the internal drain screen for aggressive root growth or shattered clay pebbles blocking the holes. If the primary drain frequently backs up, install a bell siphon or a dedicated emergency overflow standpipe.
Visual Build Companion & Video Walkthrough
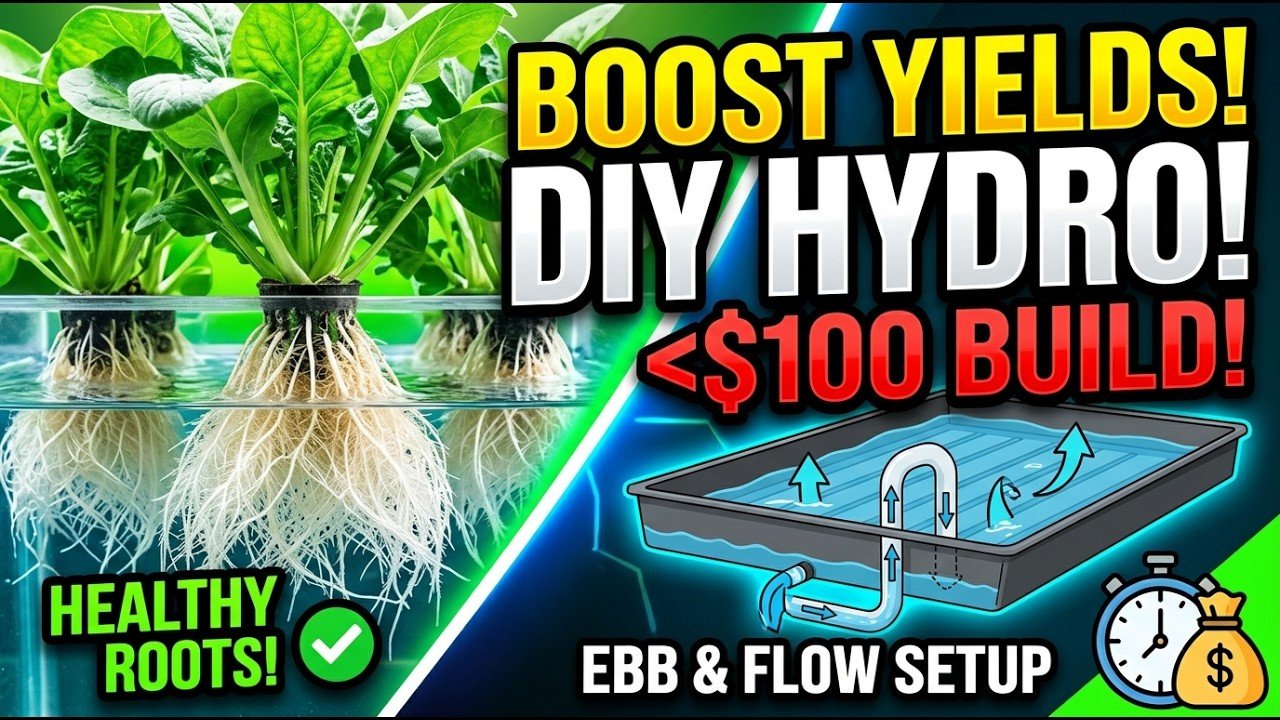
If you want to see these plumbing connections, manifold leveling, gasket fittings, and pump runs in real-time, we have put together a comprehensive companion video guide. Below, you will find our step-by-step masterclass demonstrating exactly how to assemble the table from scratch, alongside a link to our rapid-fire vertical reel summarizing the entire high-oxygen setup.
Conclusion: Precision Automation on a Budget
Constructing an automated DIY ebb-and-flow table is the single most cost-effective hardware upgrade you can make to elevate your home grows. By combining the natural physics of gravity drainage with a rigid, leveled frame and matched pipe-to-pump sizing, you eliminate the risks of stagnant water pooling and create an ultra-oxygenated, highly resilient root environment. Calibrating your watering schedules to match your growing media's water retention and keeping your reservoir volumes optimized ensures your system operates flawlessly on auto-pilot.
Before mixing your first batch of liquid fertilizers, make sure to double-check your dilution targets and baseline water values. Use our free, browser-based Hydroponic Nutrient mixing Calculator to balance your EC and PPM targets with precision. To keep your grow room's transpiration and humidity levels running inside the sweet spot, calibrate your environment step-by-step using our interactive Vapor Pressure Deficit (VPD) Calculator. Keep your drains clear, monitor your daily reservoir water lines, and let gravity drive your yields!

Continue Your Learning Journey