Home Assistant Hydroponics: Advanced Smart-Garden Automation Deep-Dive

Table of Contents
Disclosure: MistCulture summarizes verified product specs, engineering data, and community feedback. We may earn an affiliate commission if you purchase through our links. Regulations vary by location; this content is for educational purposes only.
Home Assistant is the DIY grower’s superpower. Imagine having one single, unified dashboard that turns your standard hydroponic system into a smart, monitored, and alerting machine using accessible, off-the-shelf hardware. The best part of building a smart-garden ecosystem on this platform is the complete independence it offers: no cloud dependency, no monthly subscription fees, and fully local control. This guide breaks down exactly what you should automate, what gear actually works in a high-humidity environment, and how to wire everything together safely without risking your crop or your home.
What Home Assistant Does for Hydroponics
Home Assistant consolidates all environmental and mechanical monitoring into a single, locally hosted dashboard, executing automated schedules and critical fail-safes without relying on an external cloud connection.
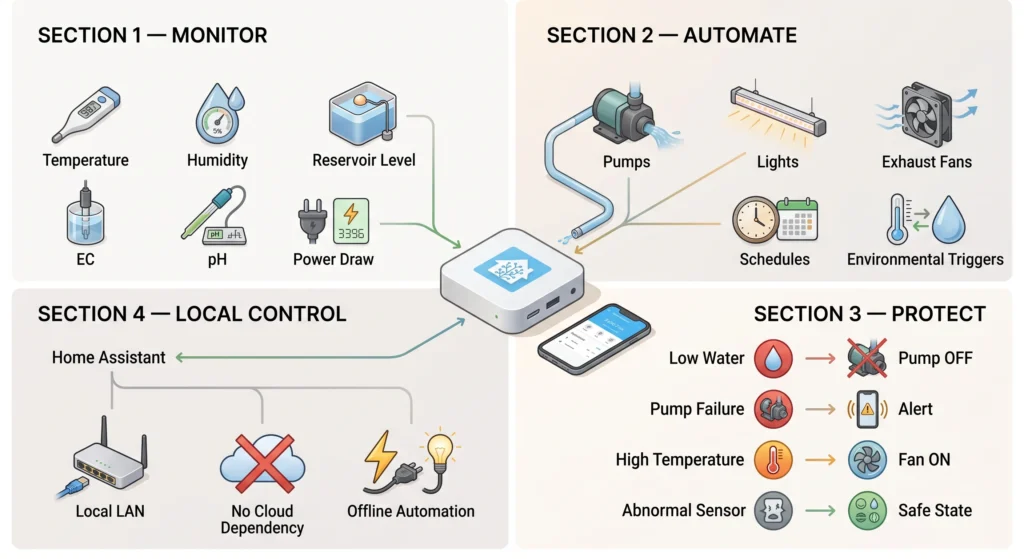
When you bring a hydroponic setup into a smart ecosystem, you transform passive hardware into an active, responsive machine. Home Assistant acts as the central brain for your grow space, handling four primary functions:
ESPHome DS18B20 & Zigbee Smart Plugs
Zigbee 3.0 & Offline Wi-Fi (LAN)
Home Assistant on Raspberry Pi 4
Dose Cutoffs, Safety Alarms & Light Ramps
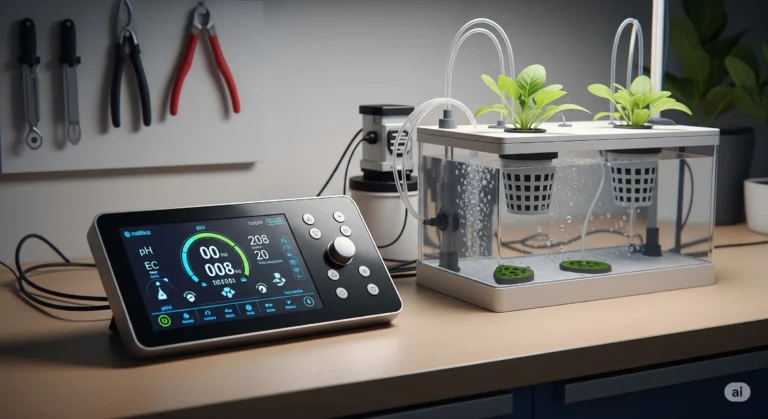
Monitor Everything in One Place: Instead of checking five different physical meters, Home Assistant aggregates temperature, humidity, reservoir level, EC/pH, and power draw into one interface. You can view this dashboard on your phone from anywhere, getting a real-time snapshot of your system’s health.
Automate the Boring Stuff: Manual crop management is prone to human error. Home Assistant allows you to put pumps on precise schedules, trigger lights on natural sunrise-style ramps, and activate exhaust fans the moment the room hits a specific target humidity. Alerts can be generated automatically when any parameter drifts out of your defined safe zone.
Fail-Safes for Crop Protection: An alarm that triggers when the reservoir is low, the pH is drifting off target, or a pump stops drawing power represents the difference between a saved crop and a ruined one. Home Assistant constantly watches these thresholds, reacting faster than any human operator could.
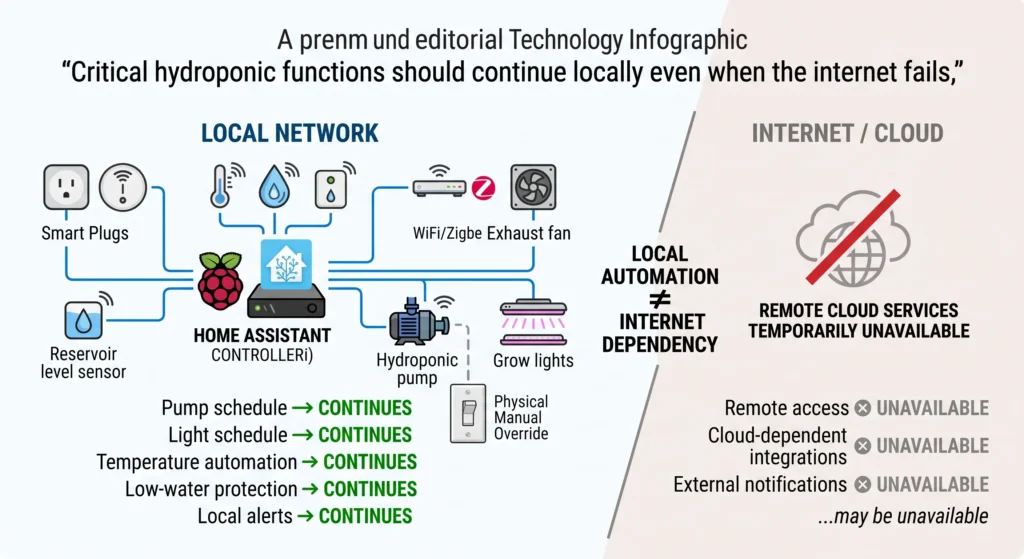
Local and Private Execution: Because everything runs on your own hardware, no data leaves your local network. This means if your internet service provider goes down, your pump timers and lighting schedules continue to run without interruption.
What to Automate First (Highest ROI)
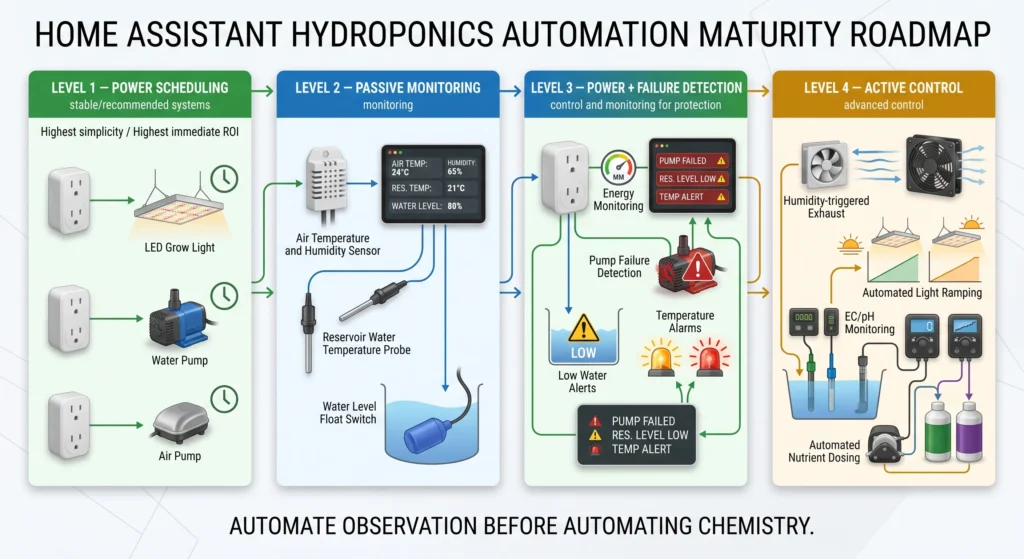
When building an automated garden, it is easy to get overwhelmed. Focusing on the highest return-on-investment (ROI) upgrades ensures your system becomes stable before it becomes complex.
| Automation Target | Hardware Required | Protocol Target | Difficulty / ROI |
|---|---|---|---|
| Power Schedules (Pumps/Lights) | Zigbee Smart Plugs with Power Metering | Zigbee 3.0 (Local Only) | Easy / Maximum ROI |
| Reservoir Temperature | DS18B20 Submersible Probe + ESP32 | ESPHome / 1-Wire | Moderate / High ROI |
| Dry-Run Safety Cutoffs | Digital Float Switch or Optical Level Sensor | Dry Contacts on ESP32 GPIO | Moderate / Critical ROI |
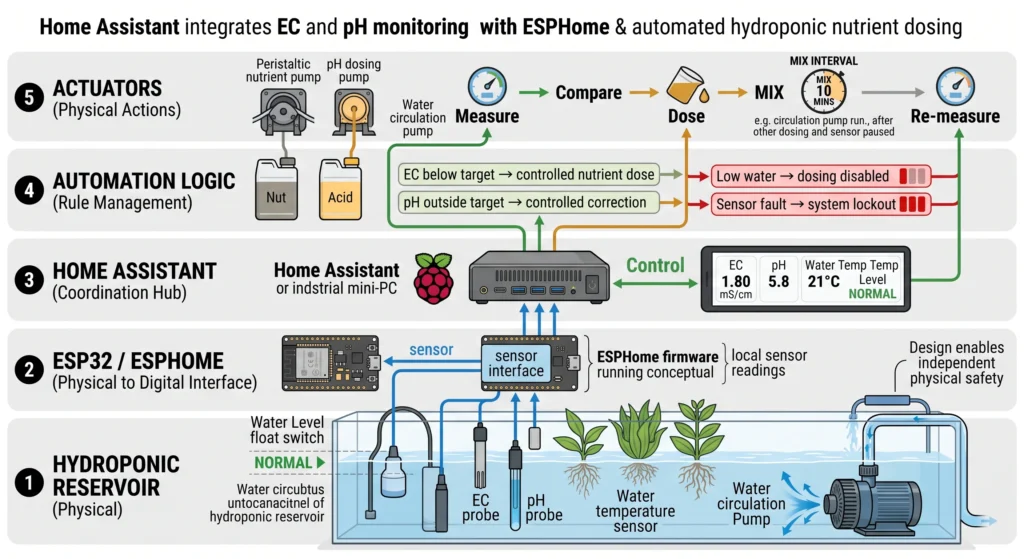
| Active EC/pH Dosing | Isolated Sensor Boards + Peristaltic Pumps | ESPHome via I2C Bus | Advanced / Niche ROI |
Smart Plugs on Pumps & Lights
Provides offline on/off scheduling, precise digital timers, and instant remote control. It is the simplest and most reliable upgrade you can make before attempting complex sensor coding.
Reservoir Level Monitoring
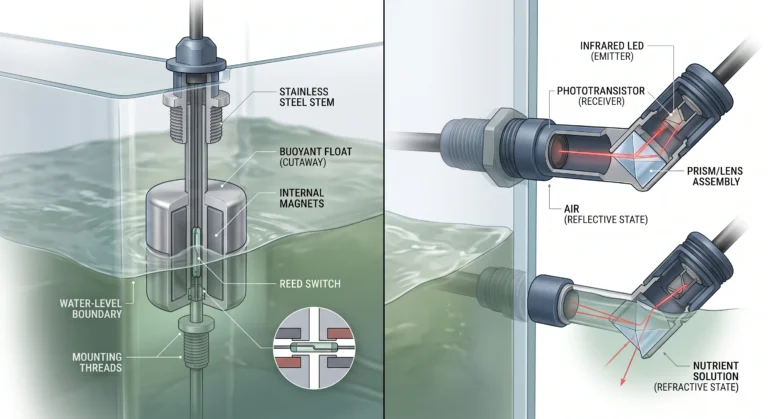
Installing a physical float switch or an optical sensor alerts you well before the reservoir runs dry. This prevents pump burnout and catches system leaks before an auto top-off empties onto your floor.
Temp & Humidity Telemetry
Integrating cheap local Wi-Fi or Zigbee sensors allows you to track air and water temperatures side-by-side, giving you the real-time environmental data required to dial in your transpiration rates.
Power Draw Diagnostics
Energy-monitoring smart plugs tell you exactly what each pump is drawing. Trigger an alert when a pump draws 0W (dead motor) or when spikes indicate a clogged line or failing pump impeller.
Gentle Light Sunrise & Sunset Automation
Instead of a harsh on/off cycle that shocks tender leaf tissues and spikes transpiration, program your dimmable grow lights to ramp up and down gradually, perfectly mimicking natural solar curves.
The Gear That Works
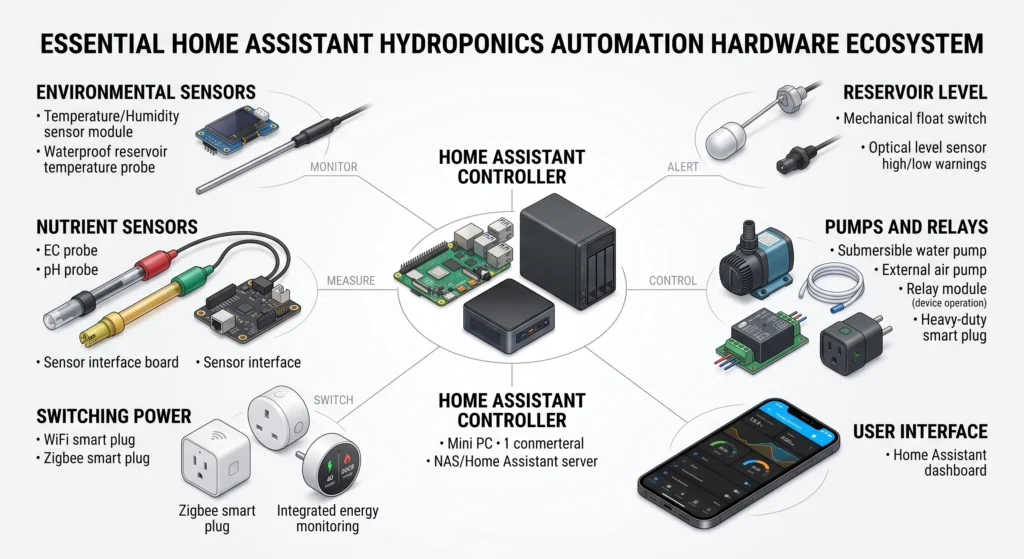
Selecting the right hardware is essential. A hydroponic environment mixes high humidity with continuous electrical loads, meaning consumer-grade electronics must be chosen carefully.
Switching Power (Smart Plugs)
WiFi or Zigbee smart plugs equipped with energy metering are the backbone of the system. You must check the current rating of the plug against your pump or light draw. A standard 15-amp smart plug can handle 1,800 watts at 120 volts (Amps = Watts / Volts). Never plug a 1,000W heater and a 500W light into the same basic smart strip if it exceeds the rated capacity.
Air and Water Temperature Sensors
Combined temperature and humidity sensors are required. Get one for the canopy level to measure the air the plants are breathing, and one waterproof probe for the reservoir. For a complete breakdown of sensor types, see our hydroponic sensors guide.
Reservoir Level Sensors
Float switches wired to a controller act as your primary defense against dry-running. Adding a dry-run alert to your pumps ensures the power cuts off before the motor burns out if the water level drops below the intake. You can compare mechanical and optical options in our guide to sump tank float switches.
Pumps and Relays
Use dedicated relay modules or heavy-duty smart plugs sized specifically to the load of the pump. Never daisy-chain big pumps on cheap, unrated plugs. Always verify the startup surge current, which can be significantly higher than the continuous running wattage.
EC/pH Sensor Boards
Integrating I2C or analog EC and pH sensor boards (or using a smart probe) brings nutrient data directly into Home Assistant. This requires regular calibration but is highly doable. You can map these readings against your target metrics using a hydroponic nutrient calculator.
The Brain
A Raspberry Pi, mini-PC, or Network Attached Storage (NAS) running Home Assistant OS serves as the controller that everything talks to. This device must be kept in a dry area outside of the immediate grow tent or splash zone.
Getting Started: The Practical Path
Begin automation by moving power scheduling to Home Assistant via smart plugs, then introduce passive monitoring sensors before finally combining the two with active trigger rules.
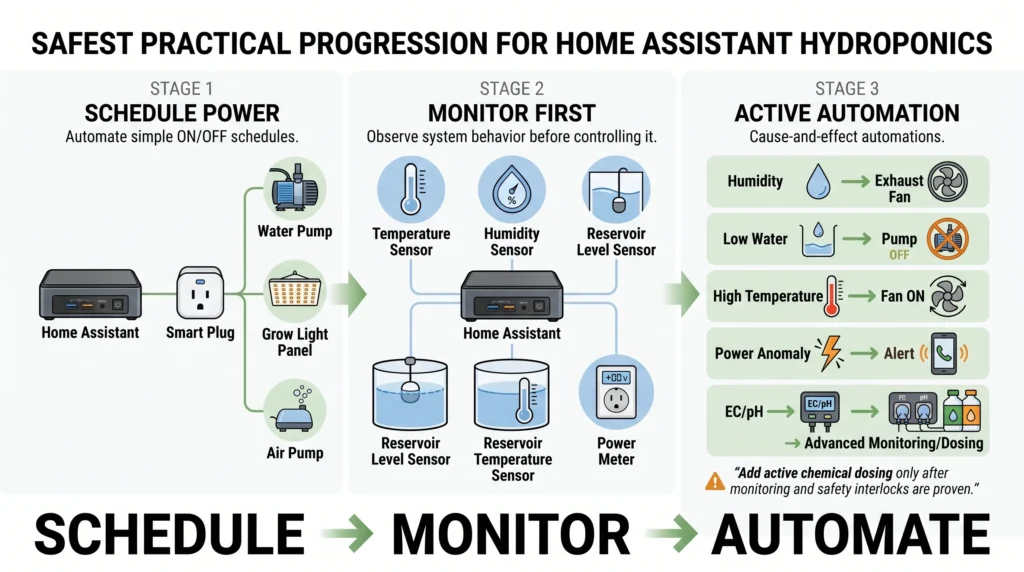
⚠️ Automation Warning: Attempting to automate nutrient dosing and climate control on day one is a recipe for cascading hardware failures. Follow this proven, local-first path to scale your grow room safely.
Install the Brain
InfrastructureInstall Home Assistant on a Raspberry Pi, mini-PC, or run it in a virtual machine on a spare computer.
Official Installation Guide →Add Smart Plugs
ControlConnect your water pumps and lights to smart plugs. Integrate them directly into the Home Assistant UI and build a clean, local schedule to completely replace mechanical wall timers.
Recommended Zigbee Smart Plugs →Deploy Environmental Sensors
TelemetryDeploy sensors for air temperature, relative humidity, and water temperatures. Always position your air sensors directly at plant canopy level rather than hanging them near the exhaust fan.
Water Chemistry Sensor Calibration Guide →Set Up Notifications & Alerts
AlertingCreate a “reservoir level low” and “temperature limit out of range” trigger to instantly ping your smartphone. This single step will save your crop when mechanical parts eventually wear out.
Hydroponic Troubleshooting Blueprint →Expand Gradually
AutomationOnce your baseline telemetry is fully stable, expand into advanced level monitoring, power metrics tracking, and dynamic rules—like turning on exhaust venting only when humidity exceeds target limits.
Advanced Automation Logic Examples
Once your hardware is reliably reporting data to Home Assistant, you can build logic blocks to handle complex scenarios.
⚡ HA YAML Builder v2.0
Generate production‑ready Home Assistant automations for your hydroponic system – customise, copy, or download.
Embed just the YAML generator (no extra page elements) on your own website. The iframe auto‑adjusts to the tool’s height.
Powered by MistCulture
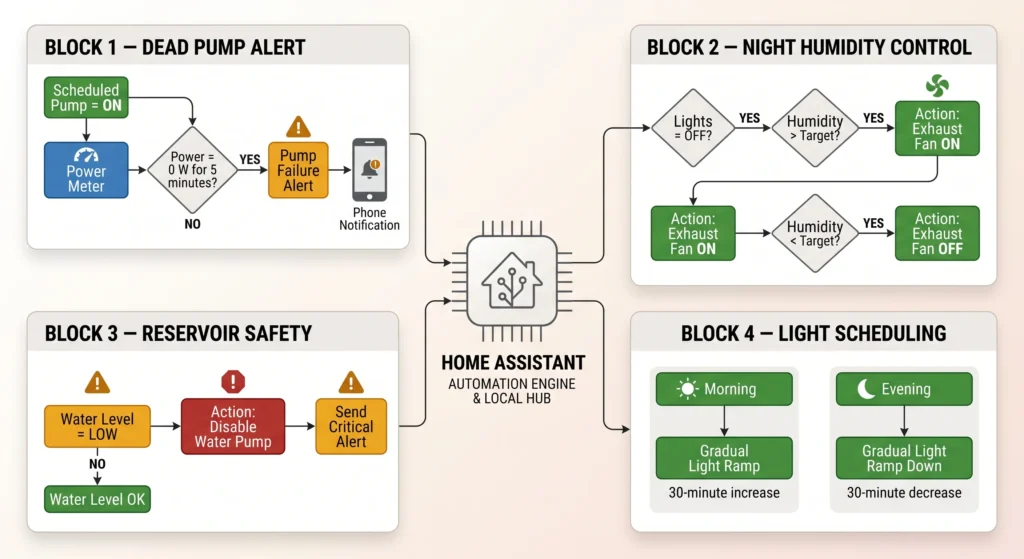
Dead-Pump Alert:
By using a smart plug with power metering, you can write an automation that watches the wattage. If the power meter on the water pump reports 0 W for 5 minutes during a scheduled "ON" cycle, Home Assistant sends a critical notification to your phone. This catches a pump failure while the plants' roots are still wet, giving you time to intervene.
alias: "Hydroponics: Dead-Pump Alert"

description: "Triggers a critical notification if the water pump power draw collapses to 0W during active scheduled runs."

trigger:

  - platform: numeric_state

    entity_id: sensor.water_pump_power

    below: 1

    for:

      minutes: 5

condition:

  - condition: state

    entity_id: switch.water_pump

    state: "on"

action:

  - service: notify.notify

    data:

      title: "🚨 CRITICAL: Water Pump Failure Detected!"

      message: "The reservoir pump is switched ON but drawing 0 Watts. Root zones are drying out. Intervene immediately!"

mode: single
Night Humidity Control:
When the grow lights turn off, temperatures drop, which causes relative humidity to spike. You can set an automation that says: When humidity exceeds target AND light state is OFF, run the exhaust fan until humidity drops below target.
Reservoir Safety:
If your physical level sensor reads "dry," Home Assistant immediately shuts off the smart plug controlling the water pump and sends an alert. This protects the pump from burning out and prevents the system from pumping air into the root zone.
alias: "Hydroponics: Dry-Run Safety Cutoff"

description: "Instantly shuts off the water pump if the reservoir level float switch drops below safe limits."

trigger:

  - platform: state

    entity_id: binary_sensor.reservoir_low_float

    to: "on"

action:

  - service: switch.turn_off

    target:

      entity_id: switch.water_pump

  - service: notify.notify

    data:

      title: "⚠️ ALARM: Reservoir Low - Pump Cutoff"

      message: "Reservoir water dropped below the safe minimum. Pump has been disabled to prevent dry-running motor burnout."

mode: single
Light Scheduling:
Instead of a harsh switch that shocks the plants and spikes the room temperature, program your dimmable LED drivers to ramp the lights up over 30 minutes in the morning and ramp them down over 30 minutes in the evening.
For more advanced automation, such as full pH/EC dosing integration and reservoirs that self-manage, review our Arduino and Raspberry Pi automated dosing system blueprint.
Safety Rules for Automated Hydroponics
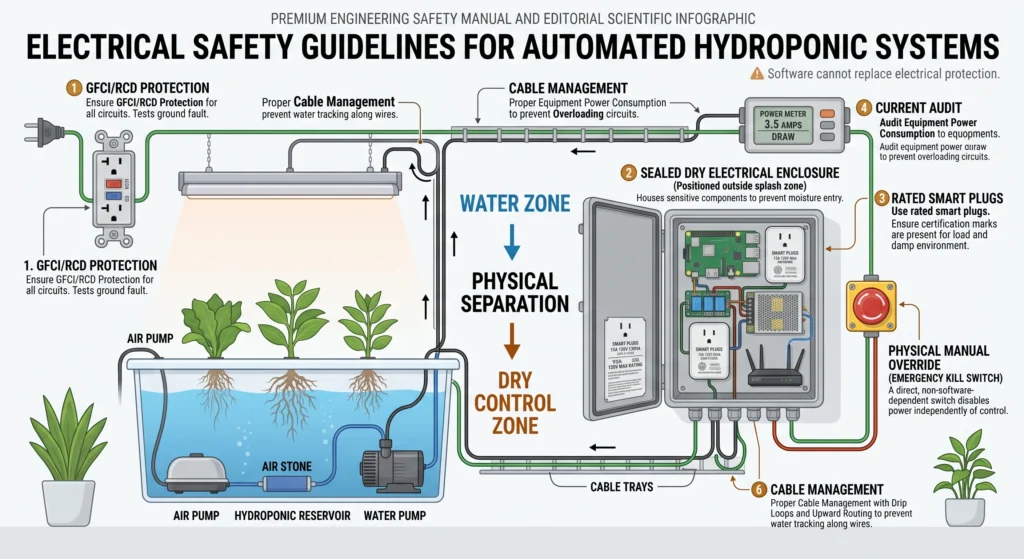
Automated systems must fail to a safe state. Electrical components near water require GFCI protection, strict current-draw auditing, and physical manual overrides.
Electricity & Water Separation
Use GFCI-protected outlets for all equipment. Utilize weatherproof enclosures for connections, and ensure strain reliefs and "drip loops" are present on every single cable near water so condensation cannot run down the cord into a plug [1].
Do Not Overload Smart Plugs
Always check continuous current ratings. Big pumps, water chillers, and reservoir heaters need appropriately rated devices [1]. A 15-amp smart plug is not designed to hold a continuous 15-amp load 24/7 [1].
Fail-Safe by Default
Automation must fail to a safe state if a controller crashes or network drops [2]. This means mechanical dosing pumps default to **OFF** and critical exhaust fans default to **ON** if they lose communication [2].
Keep a Manual Override
Every automated device must work with a physical switch [2]. Bypassing the smart relay is critical to test a pump or turn on a light manually [2]. Never rely entirely on a digital controller for core water flow [2].
Recommended Gear
Home Assistant automation needs smart hardware that communicates locally without cloud interference.

Why it's necessary: Zigbee protocols run entirely locally, meaning your pump and light schedules execute even if your internet goes down. The built-in power monitoring allows you to track wattage to detect clogged or dead pumps instantly.nKey Spec: 15A continuous load rating / Zigbee 3.0 local control

Why it's necessary: Accurate nutrient solution temperature tracking is critical for preventing root rot and managing dissolved oxygen levels. A waterproof digital probe wired to an ESP board easily feeds real-time liquid metrics directly into your Home Assistant dashboard.nKey Spec: IP68 waterproof rating / DS18B20 digital 1-Wire interface

- App Control:This bluetooth digital hygrometer helps you easily monitor temp and humidity changes from up to 260FT away (...
- Data Storage and Export: This humidity temperature sensor features a 2-year data storage and export function; with the d...
- High Accuracy: Designed with an advanced NTC temperature and humidity sensor, this Bluetooth room thermometer features h...

Why it's necessary: You need a dedicated, low-power, always-on machine to process automation rules and host the Home Assistant operating system. A Raspberry Pi offers the perfect balance of GPIO pin expandability for custom sensors and low energy draw for 24/7 reliability.nnKey Spec: 4GB+ RAM / MicroSD or SSD boot drive configuration
Frequently Asked Questions
Do I need Home Assistant to automate my grow?
No. Basic scheduling works perfectly fine with standalone smart plugs and their native apps. However, Home Assistant is worth the effort when you want comprehensive monitoring, critical alerts, and cross-device automation (e.g., having a specific brand of humidity sensor trigger a completely different brand of exhaust fan) inside one unified, local system. Start with plugs, then add Home Assistant when you outgrow basic app timers.
Is Home Assistant safe for water-adjacent setups?
Yes, provided you practice strict electrical hygiene. The software itself is incredibly stable; the safety risk in any automated garden is strictly electrical. You must use GFCI protection, properly rated smart plugs, dry enclosure connections, and a fail-safe mechanical design. Treat the physical wiring seriously, and the software will manage the rest safely.
Can Home Assistant control EC and pH automatically?
Yes, by using sensor boards (like those from Atlas Scientific or DFRobot) integrated via ESPHome alongside peristaltic dosing pumps. This is the advanced tier of DIY automation. It is entirely doable but requires meticulous calibration and very careful dosing logic (e.g., pausing to let nutrients mix before reading the sensor again). Always master passive monitoring before you attempt active chemical dosing.
What happens to my hydroponic system if the internet goes down?
If designed correctly, nothing critical should depend on the external internet. Keep your core timers on smart plugs that hold their schedules locally on the device. Design your Home Assistant automations to execute over your local area network (LAN), and always retain manual physical overrides. A cloud failure should never stop your water pumps from running.
Conclusion
Automating your hydroponic garden with Home Assistant bridges the gap between commercial-grade agricultural monitoring and residential DIY budgets. By starting with simple smart plugs and expanding into power-monitoring fail-safes and environmental sensor logic, you protect your crop from sudden hardware failures while optimizing growth. Remember to scale your system gradually, prioritize local control over cloud dependency, and always default your logic to a fail-safe state. To optimize the power draw of your newly automated devices, check out our hydroponic power savings guide.

Continue Your Learning Journey