Inter-Canopy Lighting for Vertical Hydroponic Towers: A Design Guide

Table of Contents
- The Shadow Problem in Vertical Farming
- Modeling Light Attenuation: The Beer-Lambert Law
- What Inter-Canopy Lighting Changes, and What It Doesn't
- Common Problems and How to Avoid Them
- Mounting and Wiring: Practical Hardware Approaches
- Gear That Matters for Inter-Canopy Setups
- Design Choices Worth Getting Right From the Start
- Frequently Asked Questions on Inter-Canopy Lighting
- Canopy Light Attenuation Calculator
- Maximize Your Vertical Tower Yields
The Shadow Problem in Vertical Farming
Overhead lighting in a vertical farm runs into a basic physical limit fast. As a plant canopy fills in, upper leaves intercept most of the light before it can reach anything below them. Inter-canopy lighting works around this by placing light sources parallel to the vertical growing axis, so the sides of the tower get illuminated directly instead of relying on light punching through several feet of foliage from above.
Anyone who scales into vertical farming towers for the first time usually hits the same wall. The plan looks great on paper: stack crops vertically, maximize cubic volume, get a much bigger harvest out of the same floor space. Then a few weeks into the vegetative cycle, a pattern shows up. The top of the tower looks fantastic, soaking up all the overhead light. The middle is doing alright, stretching a bit to compete for photons. The bottom is pale, leggy, and clearly starving.
This happens because dense canopies block their own light. It doesn’t matter how much wattage you throw at the top of a tower if the plants near the bottom are sitting under several layers of leaf coverage. Overhead brute force runs into a wall that more wattage alone can’t solve, since more light hitting the top of an already-saturated canopy doesn’t help leaves three feet down that are barely getting any light at all.
Inter-canopy lighting is the standard fix for this in commercial vertical farming. Instead of fighting the shadow effect from above, LED bars are mounted vertically between towers, so light strikes plants from the side at every tier, bypassing the shading problem entirely rather than trying to punch through it.
Modeling Light Attenuation: The Beer-Lambert Law
The reason overhead-only lighting fails in a dense vertical canopy comes down to basic light attenuation physics. As light passes through layers of leaf tissue, it’s absorbed at each layer, and the total effect compounds the deeper it has to travel. The Beer-Lambert Law gives a reasonably good model for how steep that drop-off actually is.
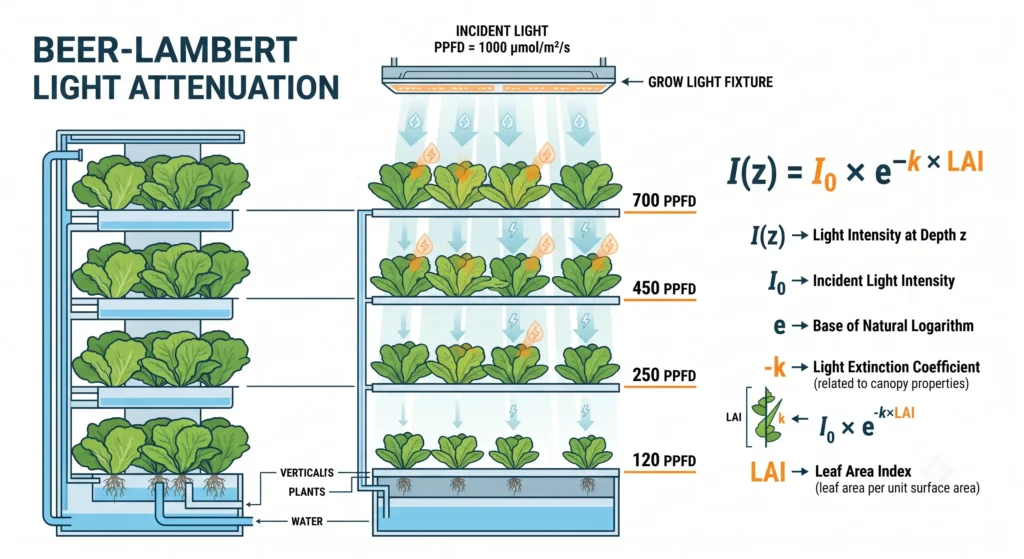
The relevant formula, commonly used to model canopy light interception:
I_z = I_0 × e^(-k × LAI)
Where I_z is the light intensity at some depth into the canopy, I_0 is the light intensity at the top, k is the light extinction coefficient (which depends on leaf angle and how the canopy is arranged), and LAI is the Leaf Area Index, essentially a measure of how much total leaf area is stacked above that point.
The important thing to understand here isn’t the exact math, it’s the shape of the curve. This is an exponential decay, not a linear one. That means the drop-off isn’t gradual and even, it’s steep near the top and gets dramatically worse the deeper you go. A canopy with a moderate leaf area index can easily cut incoming light by 70 to 90% before it reaches the lower third of a tower, which is exactly the starved-bottom-tier problem described above. This is also why simply adding more overhead wattage has diminishing returns fast: you’re not fighting a small linear loss, you’re fighting an exponential one, and no reasonable amount of extra top-down light fixes that on its own.
The calculator at the end of this guide lets you plug in your own extinction coefficient and LAI estimate to see how steep this drop-off looks for your specific setup, rather than relying on a generic number.
What Inter-Canopy Lighting Changes, and What It Doesn’t
Moving from overhead-only to inter-canopy lighting doesn’t eliminate the physics above, it works around it by putting light sources at the depth where the shading problem actually happens, instead of trying to force light through leaf layers that have already absorbed most of it.
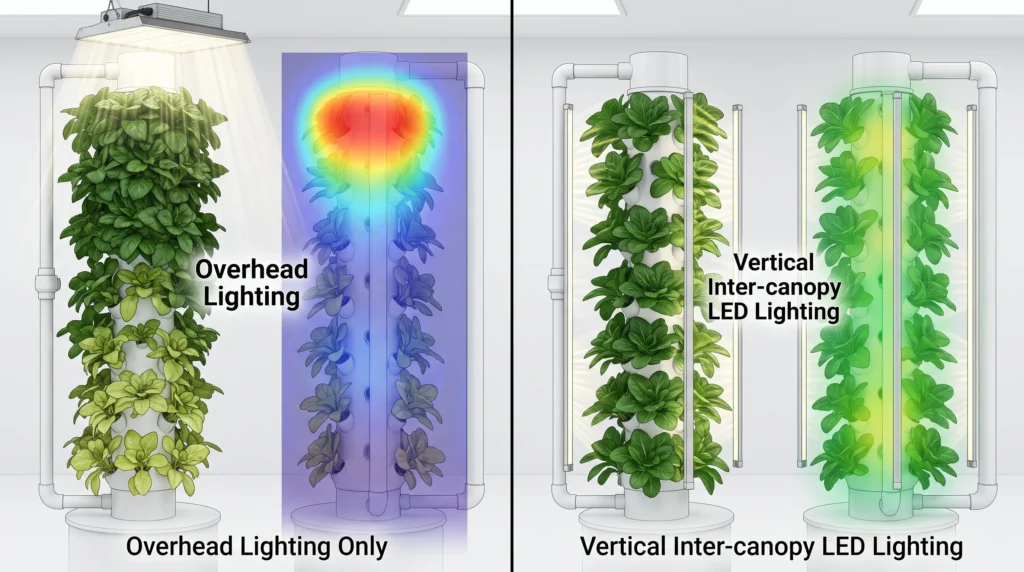
Because inter-canopy bars are mounted at the height of the middle and lower tiers, the light they emit doesn’t have to fight through the dense upper canopy at all. It hits the sides of the plants directly, which is exactly why growers who switch to this setup commonly report the biggest improvement showing up in the tiers that were previously the weakest, not the top tier, which was already well lit.
It’s worth being upfront about the tradeoff too. Adding inter-canopy lighting is adding real electrical load, real heat, and real hardware complexity to a space that’s already tight. It isn’t a pure win with no cost. The rest of this guide covers the failure modes that commonly show up when growers make this switch, and how to design around them from the start rather than learning them the hard way.
For a deeper technical read on the general photobiology at play here, see our guide on LED distance and PPFD.
Common Problems and How to Avoid Them
Hanging LED bars directly inside a dense, growing canopy introduces failure modes that don’t come up with simple overhead lighting: localized heat damage, light bleaching, and trapped humidity chief among them. These are all predictable and preventable if you plan for them upfront.
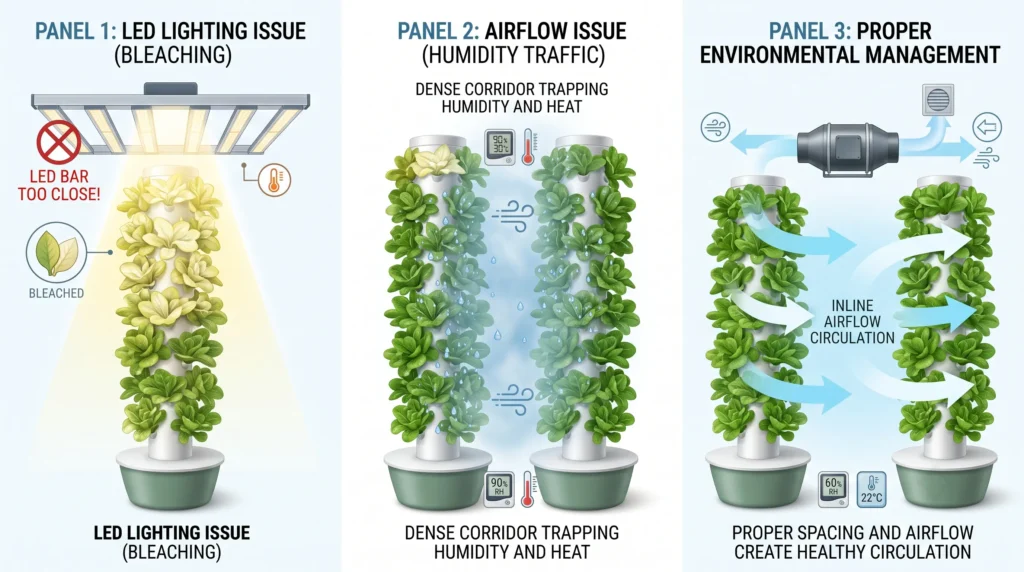
Problem: Leaf Burn and Light Bleach From Proximity
Plants in a tower reaching toward a nearby light source will grow horizontally, right toward it, faster than most growers expect. If a light bar is mounted at a fixed, close distance from the towers, there’s a real risk that fast-growing leaves eventually make physical contact with the diodes. Even though LEDs run much cooler than older HID lighting, the diodes still put off real heat at close range, and leaves touching the bar can suffer localized thermal damage. Leaves an inch or two away from actual contact can also suffer light bleaching (phototoxicity) if the local PPFD right next to the bar is extremely high, often well over 1,000 µmol/m²/s at very close range.
How to avoid it: Don’t mount inter-canopy bars at a fixed, static distance. Use an adjustable mounting system (see the sliding trolley approach below) so the gap between the light and the plants can be widened as the canopy fills in, and check growth daily during the first few weeks after installing a new light corridor, since this is when unexpected fast growth is easiest to miss.
Problem: Trapped Heat and Humidity in the Light Corridor
Sandwiching hot LED bars between dense walls of foliage effectively creates a narrow, enclosed column with limited airflow. Moisture transpiring off the plants gets trapped in that corridor along with heat from the fixtures, and localized humidity in that space can spike well above what your main room sensor reads, since a wall-mounted or ceiling-mounted humidity sensor won’t necessarily reflect conditions deep inside a dense canopy corridor. That combination is a strong setup for powdery mildew, especially on interior-facing leaves that get the least airflow.
How to avoid it: Standard oscillating fans generally can’t penetrate a dense vertical wall of foliage effectively. A high-velocity inline duct fan mounted at the top of the light corridor, pointed straight down, is a more effective way to force a column of moving air down through the center of the array, carrying heat and excess humidity out the bottom rather than letting it pool in place. For more on managing microclimates like this, see our hydroponic troubleshooting guide.
Mounting and Wiring: Practical Hardware Approaches
Vertical light corridors involve water, gravity, and electricity in close proximity, which calls for a bit more care in the mounting and wiring than a standard overhead fixture needs.
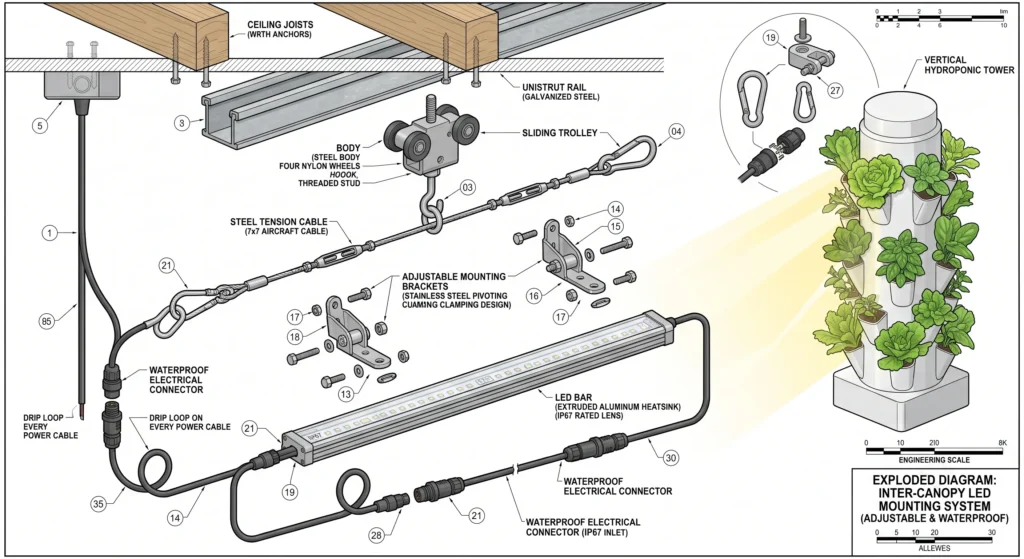
Adjustable mounting with unistrut and trolleys. Rather than fixed hanging cables, mounting a length of standard 1-5/8 inch unistrut track to the ceiling, with the LED bar attached to a wheeled trolley inside the track, lets you literally slide the light closer to young seedlings and push it outward as the canopy fills in. This kind of adjustable gap control is one of the more effective ways to prevent the proximity burn problem described above.
Tensioned cable for stability. A light bar hanging from a single point will sway like a pendulum every time it’s brushed during harvest or pruning, and a swinging bar can damage nearby plants. Running a tensioned steel cable from the ceiling mount down to a weighted anchor point on the floor, then clipping the light bar to that cable with carabiners at top and bottom, lets the bar slide up and down for height adjustment while staying laterally stable.
Drip loops on every power cord. In a vertical system, any water leak runs straight down. If a power cord touches a wet tower surface, water can travel down the outside of the cord directly into the plug. Building a deliberate U-shaped dip into every power cable before it rises to the outlet gives stray water droplets somewhere to drip off harmlessly instead of following the cord into an electrical connection.
Pruning for light penetration, not just canopy shape. With overhead lighting, pruning tends to focus on opening up the top of the canopy. With inter-canopy lighting, the more useful habit is trimming interior-facing leaves that block the light corridor itself, so photons can travel further into the tower rather than being absorbed by the first layer of leaf they hit. This ties into general hydroponic lettuce yield practices around structural, sturdier growth.
Gear That Matters for Inter-Canopy Setups
Vertical lighting corridors need different tools than a standard overhead setup, both for the lighting itself and for monitoring the more chaotic microclimate it creates.
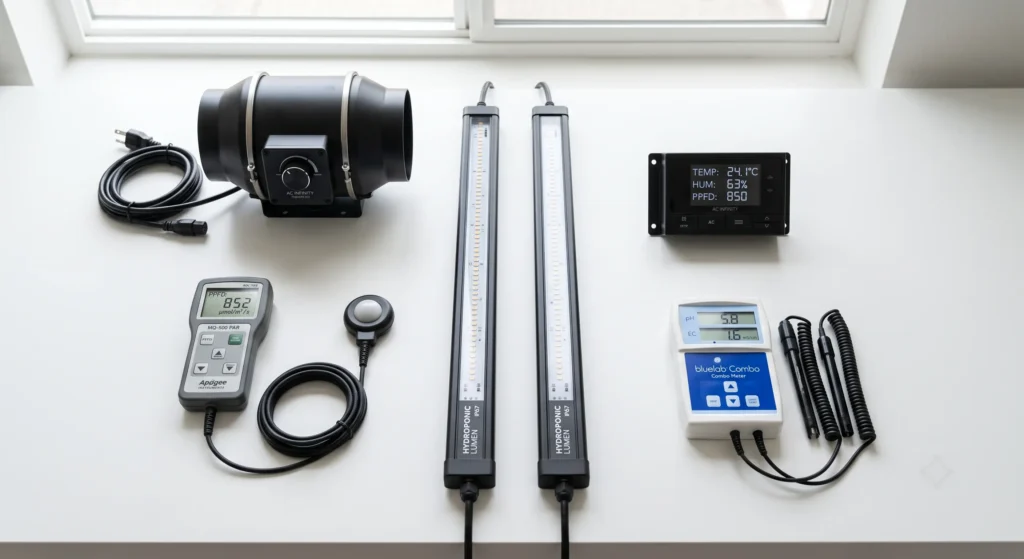

Smartphone light meter apps generally need a flat, diffused surface to work properly, which makes them awkward for reaching into a vertical canopy corridor. A dedicated meter with a wand attachment lets you get the sensor deep into the tower at multiple heights for a real reading.

Purpose-built linear light bars (rather than repurposed square quantum boards) are the right form factor here, since they’re light enough to daisy-chain vertically without overloading a ceiling mount, and they generally run cooler to the touch than bulkier fixtures, which matters a lot in a tight corridor.
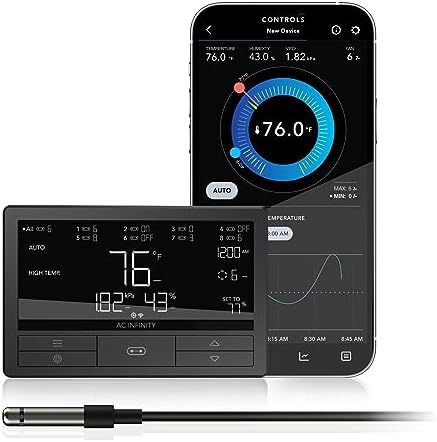
The tool that solves the trapped-heat-and-humidity problem described above. A fan with a digital controller that reacts to temperature and humidity thresholds automatically is much more reliable than manually adjusting airflow as conditions change.
Illuminating previously shaded lower tiers activates a lot of stomata that were mostly dormant before, which increases transpiration and nutrient uptake meaningfully. Daily reservoir monitoring becomes more important once a tower’s lower tiers are actually productive rather than an afterthought. See our pH and EC meter showdown for more on this category.
“,”description_forced”:true,”ready”:true} /–>Design Choices Worth Getting Right From the Start
A few design decisions are much easier to build in from day one than to retrofit later, particularly spectrum choice and driver placement.
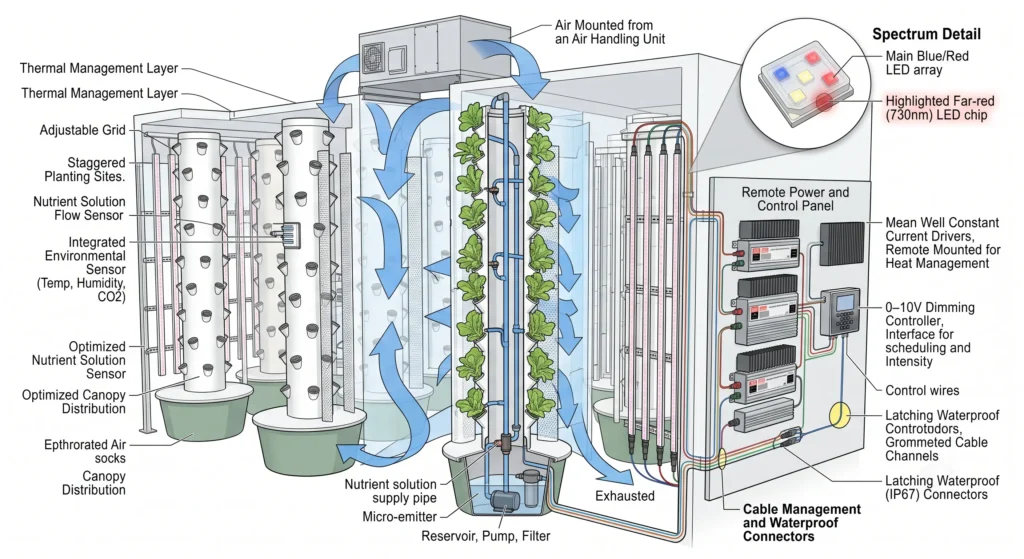
Consider far-red enrichment for the inter-canopy bars specifically. Standard full-spectrum white LEDs (commonly around 4000K) are a solid general choice, but far-red light (around 730nm) has a real physical advantage for this application: leaves absorb red and blue light readily but reflect and transmit a larger share of far-red, letting it travel further into the leaf and further into a dense corridor. Sourcing inter-canopy bars with a dedicated far-red component is worth considering specifically because this is the one place in the whole system where deep penetration into shaded tissue is the entire point.
Use remote, dimmable drivers rather than built-in ones. A light bar with its driver built directly into the fixture puts that heat source right in the middle of your plant corridor, which works directly against the airflow and heat management challenges covered above. Sourcing bars that run off a remote driver lets you mount the heat-generating component on a wall outside the grow space entirely. It also typically means the fixture supports 0-10V dimming, which lets you start light intensity low during the seedling stage and ramp it up gradually as the canopy matures, reducing both electricity use early on and the risk of the light-bleach problem described in Section 4. For more on remote driver setups generally, see our guide on managing driver heat.
Frequently Asked Questions on Inter-Canopy Lighting
How far away should inter-canopy LED bars be from the plants?
It depends on the wattage and lens angle of the specific bar, but 8 to 12 inches from the outer edge of the foliage is a reasonable starting point. Since plants in vertical towers tend to grow horizontally toward a nearby light source, check growth daily early on to make sure leaves aren’t growing directly into the diodes.
Can inter-canopy lighting completely replace overhead lighting?
In densely packed towers, yes, and a number of commercial vertical farms do exactly this. If the canopy is dense enough that overhead light barely reaches the lower tiers anyway, running LED bars on all sides of the tower can deliver more uniform coverage across the whole vertical axis than overhead lighting alone ever could, while also saving on electricity that would otherwise be largely wasted on an already-saturated top layer.
Do inter-canopy lights need to be waterproof?
Yes. Vertical towers splash and produce high ambient humidity, and lights mounted directly in that environment need at least an IP65 water-resistant rating, with IP67 being a safer bet for anything mounted especially close to the towers.
Does inter-canopy lighting change how much nutrient solution plants use?
Generally yes, and by a meaningful amount. Properly lighting previously shaded lower tiers activates stomata that were mostly inactive before, which increases both transpiration and nutrient uptake. Expect to top off your reservoir more often and keep a closer eye on EC to avoid nutrient lockout as demand rises. See our u003ca href=u0022https://mistculture.com/hydroponic-ph-ec-guide-2026/u0022u003ehydroponic pH and EC guideu003c/au003e for more on managing this.
Can I use T5 fluorescent tubes instead of LEDs for this?
Technically yes, but LEDs are the better choice for inter-canopy work specifically. T5 tubes emit light in all directions, so a meaningful share ends up pointed away from the plants unless you have very good reflectors. LEDs are directional by nature, putting light exactly where it’s aimed, while also running cooler and using less electricity for a comparable output.
Canopy Light Attenuation Calculator
Use the Beer-Lambert model from Section 2 to see how steeply light actually drops off through your own canopy, based on your top-of-canopy PPFD, your estimated leaf area index, and a light extinction coefficient. This lets you model the shading problem for your specific setup instead of relying on generic numbers.
Model how light intensity drops off as it passes through your canopy, using the Beer-Lambert law: I_z = I0 x e^(-k x LAI). Adjust the values below to match your own setup.
This models canopy light attenuation using the standard Beer-Lambert approach. Real canopies vary by species, leaf angle, and arrangement, treat this as a planning estimate, not a substitute for measuring your own tower with a real PAR meter.

Continue Your Learning Journey