DIY Hydroponic Chiller: Thermoelectric Peltier Modules vs Compressor Chillers

Table of Contents
- The Science of Hydroponic Water Cooling
- Thermoelectric Peltier Modules vs Compressor Chillers
- Blueprint 1: The Ice Chest Reservoir Chiller (High Capacity)
- Blueprint 2: The DIY Peltier Chiller (Micro Capacity)
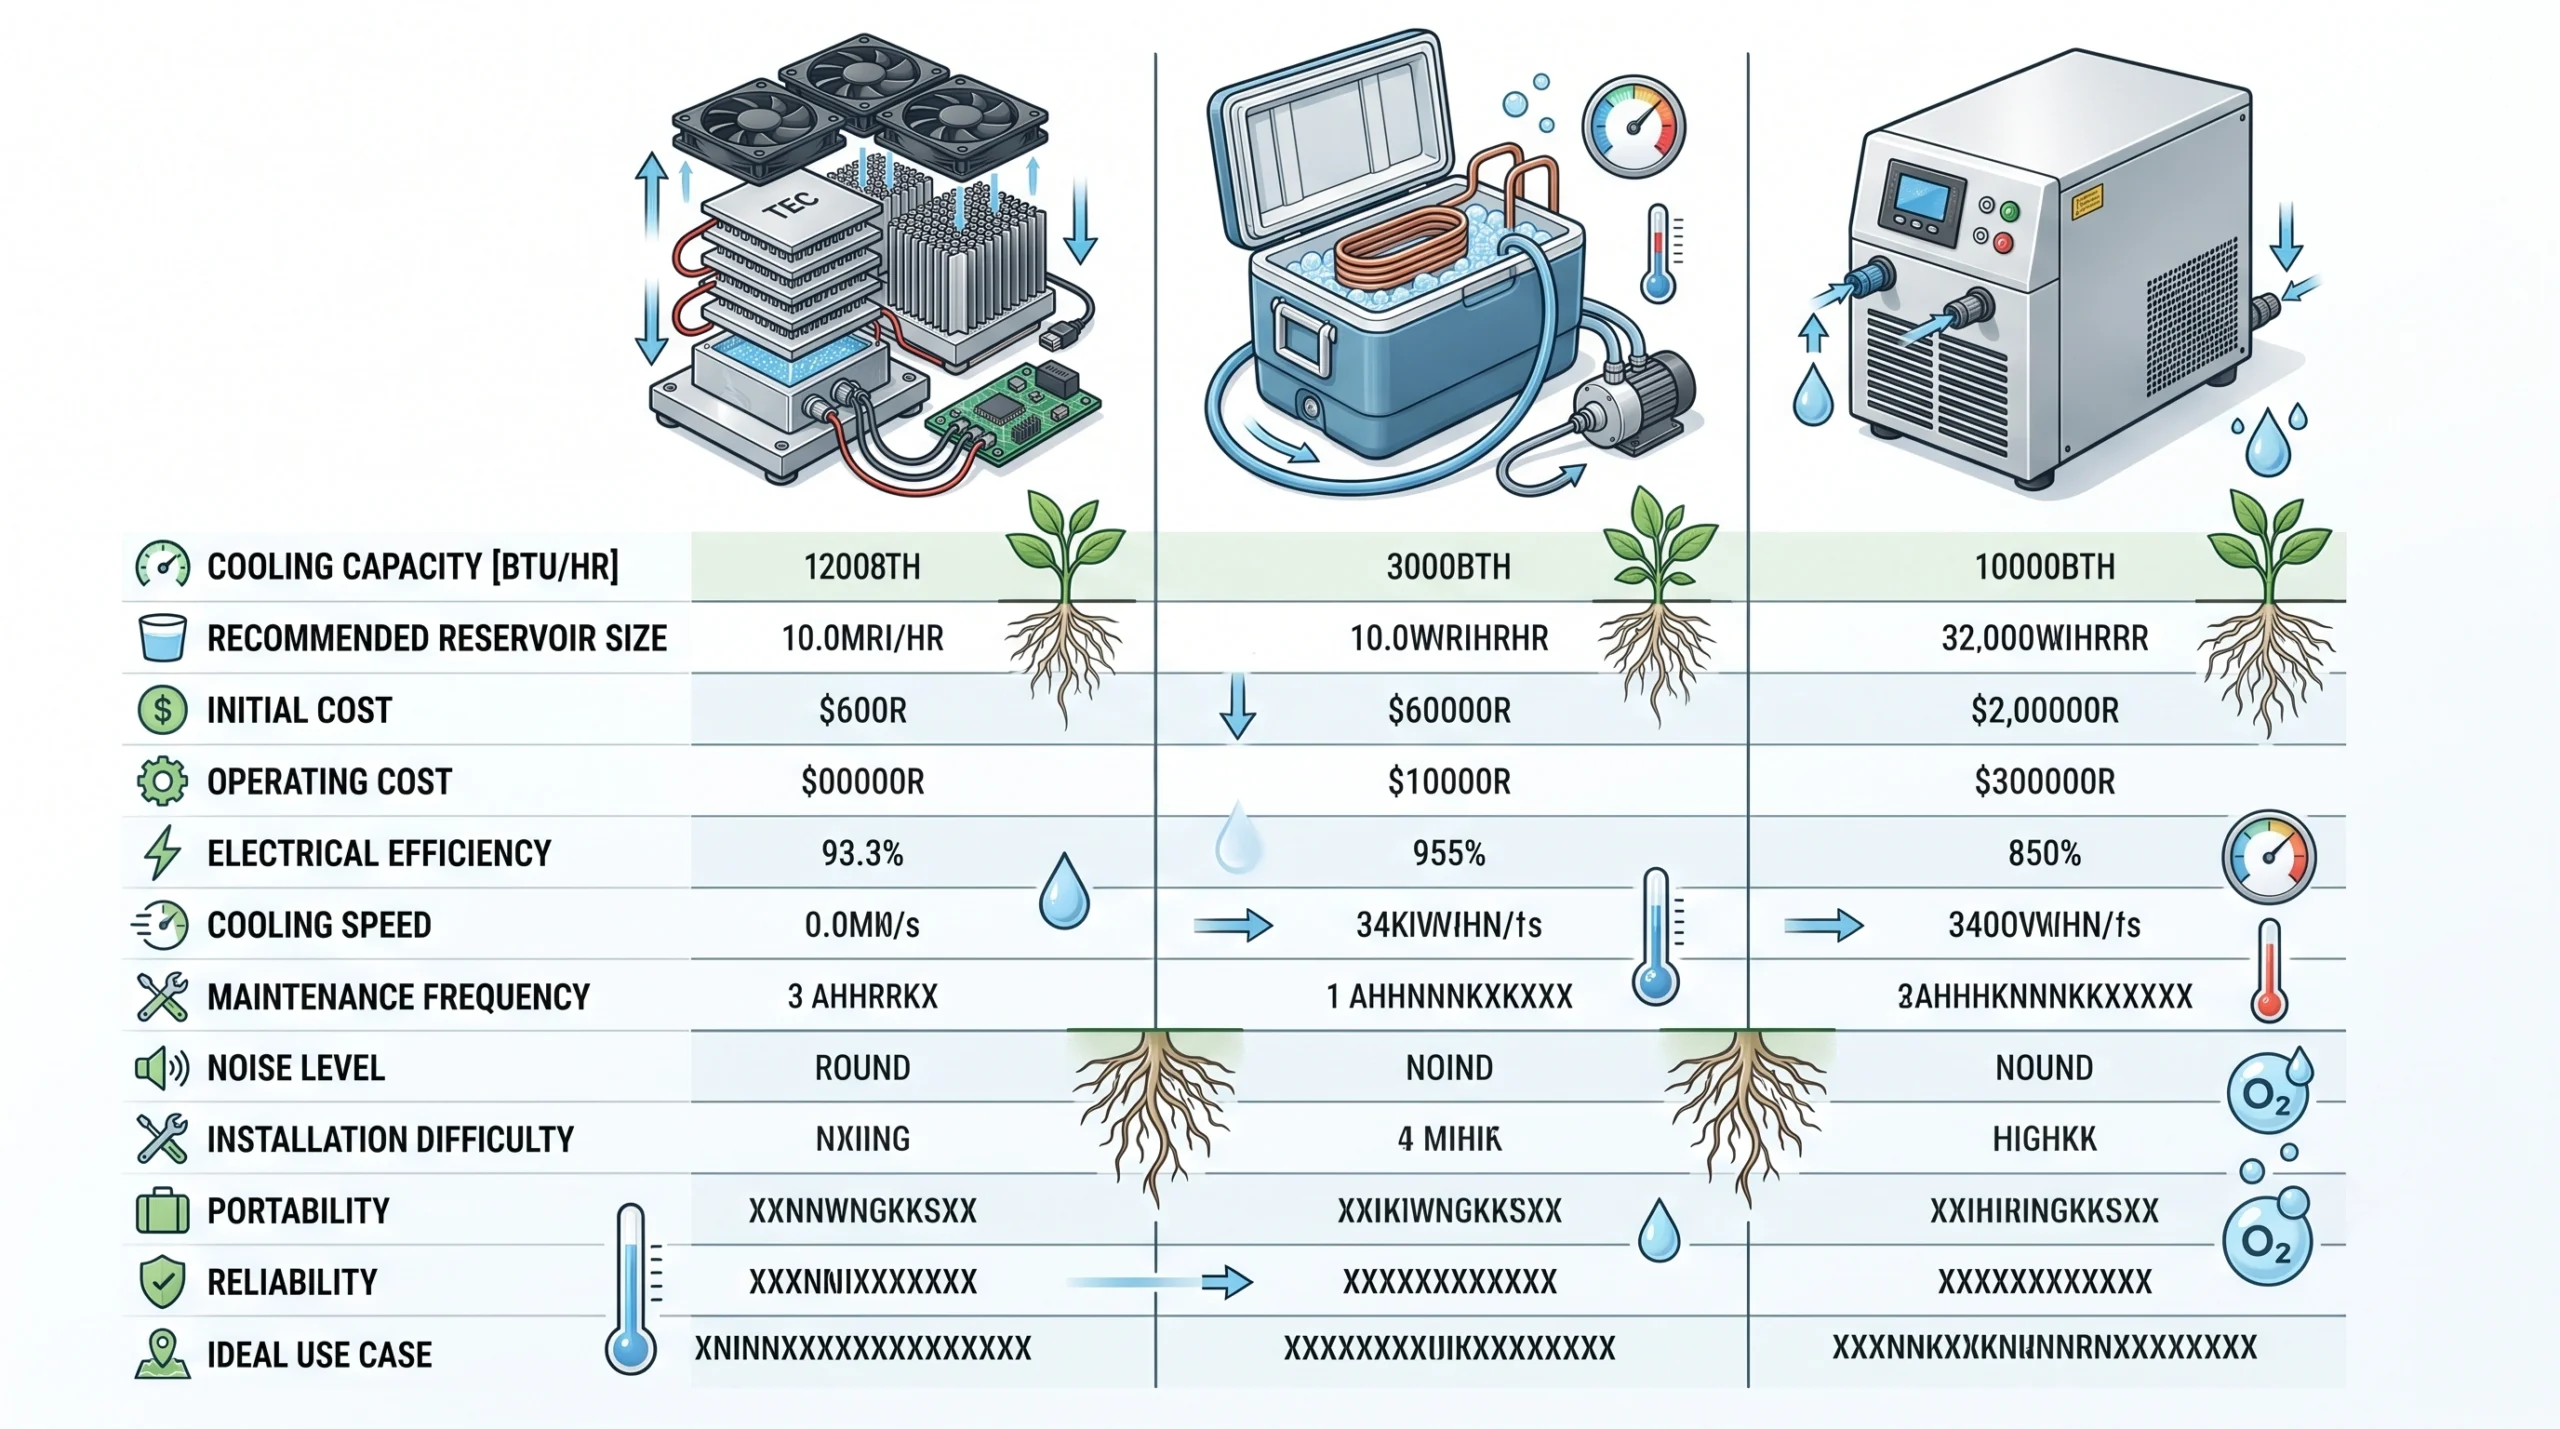
- Cooling Capacity & Application Table
- Essential DIY Chilling Equipment
- Frequently Asked Questions
- Chiller Sizing Tool
- Watch the Complete DIY Build & Setup
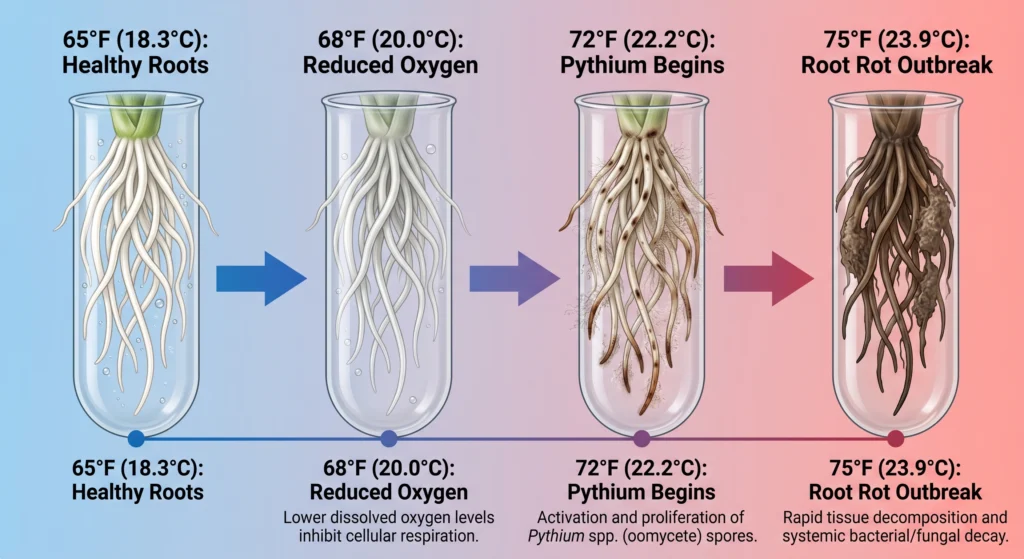
Hot water is the silent killer of indoor hydroponic gardens. High-intensity LEDs can be dialed in perfectly, nutrient ratios balanced, airflow pristine, but if reservoir water crosses roughly 72°F (22°C), the whole crop is at real risk. Warm water simply can’t hold as much dissolved oxygen, and it creates ideal conditions for Pythium, the pathogen behind most hydroponic root rot.
Commercial chillers solve this cleanly, but a reliable 1/10 HP compressor unit runs several hundred dollars, a real cost for a hobbyist running a few DWC buckets or a small NFT rail. That price gap is what drives most growers toward a DIY cooling solution instead.
Building a DIY hydroponic chiller generally means choosing between two paths: solid-state thermoelectric Peltier modules, or an ice chest heat exchanger. This guide covers the real physics of water cooling, compares Peltier efficiency honestly against compressor performance, and walks through building either one on a budget.
The Science of Hydroponic Water Cooling
Water temperature sets the ceiling on how much dissolved oxygen (DO) a reservoir can hold. Chilling to the 65-68°F (18-20°C) range maximizes DO saturation while thermally slowing the reproduction of water molds and other pathogens.
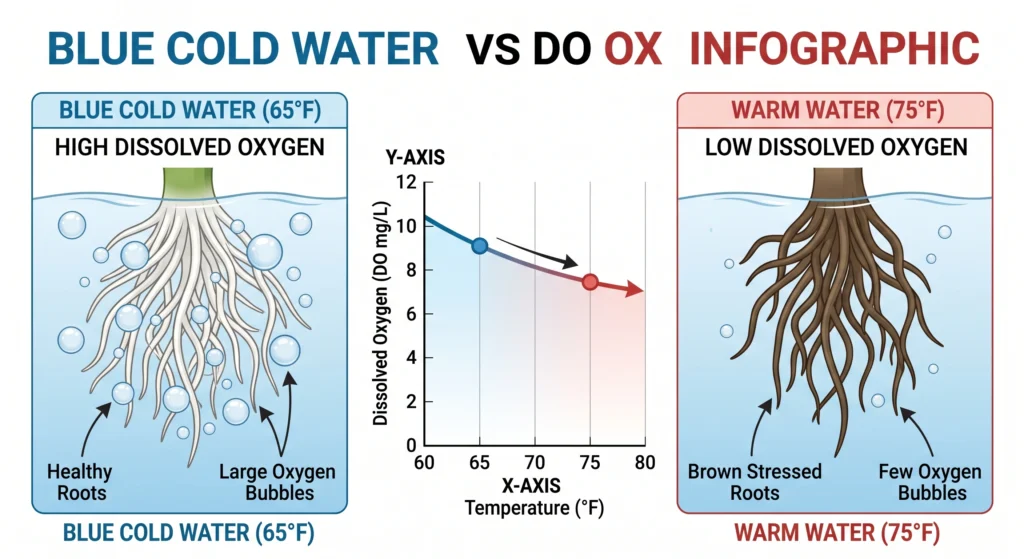
Cold water holds meaningfully more oxygen than warm water. Around 65°F, water can hold roughly 9.5 mg/L of dissolved oxygen. Let ambient grow tent heat push that up to 75°F and the oxygen-carrying capacity drops off, roots start to suffocate, and their metabolic rate slows.
At the same time, opportunistic pathogens thrive in that same warmth. Pythium zoospores reproduce fast in warm, oxygen-depleted water, seeking out stressed roots to colonize. Our root rot prevention guide covers that pathology in more depth.
The goal of a DIY chiller isn’t freezing the reservoir, it’s simply counteracting the ambient heat load from grow lights and room temperature to hold that 65°F-ish sweet spot.
Thermoelectric Peltier Modules vs Compressor Chillers
Peltier modules are solid-state devices that move heat using electrical current across a ceramic plate, cheap and compact but genuinely inefficient. Compressor chillers use a real refrigerant cycle, offering far more cooling power for larger reservoirs at a meaningfully higher cost.
The Thermoelectric Peltier Cooler
A Peltier module works through the thermoelectric effect, applying DC current across two different conductive materials creates a heat flux, one side gets cold, the other gets hot. Attaching a water-cooling block to the cold side and a heat sink with a fan to the hot side lets you actively pull heat out of water pumped through the block.
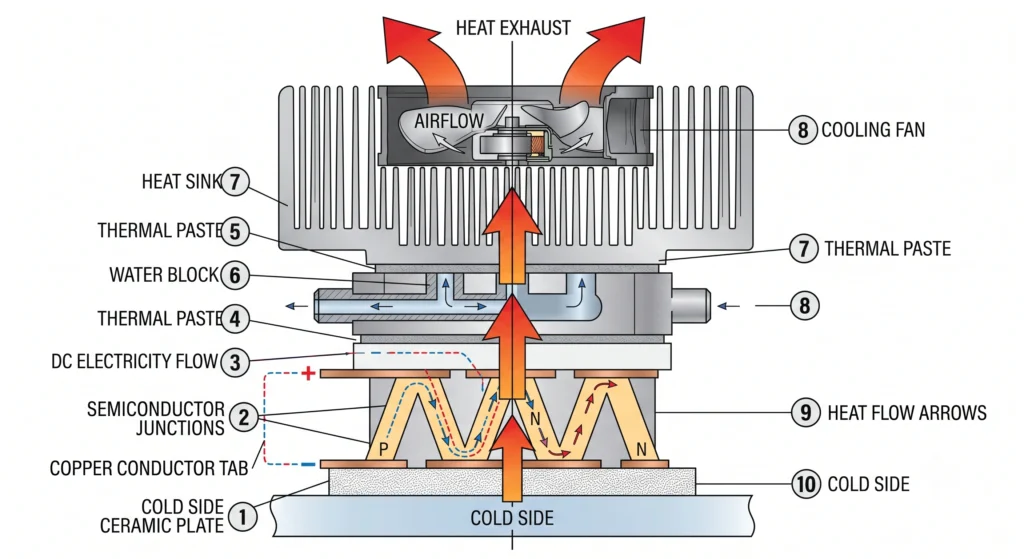
Pros: Raw 12V TEC1-12706 modules cost under $10, they’re solid-state and flat (about 40mm by 40mm), and with no moving parts besides the fan, they run close to silent.
Cons: Peltiers are genuinely inefficient. A standard 60W module might only actually move somewhere in the 20 to 30W range of real heat (roughly 70 to 100 BTU/hr), and a single DIY Peltier unit will struggle against the ambient heat load of anything larger than a 3 to 5 gallon reservoir.
The Compressor Chiller
Compressor chillers work like a kitchen refrigerator: a compressor circulates refrigerant (commonly R-134a) through an evaporator coil submerged in the water, absorbing heat, then pumps it to a condenser coil where a fan disperses that heat into the air.
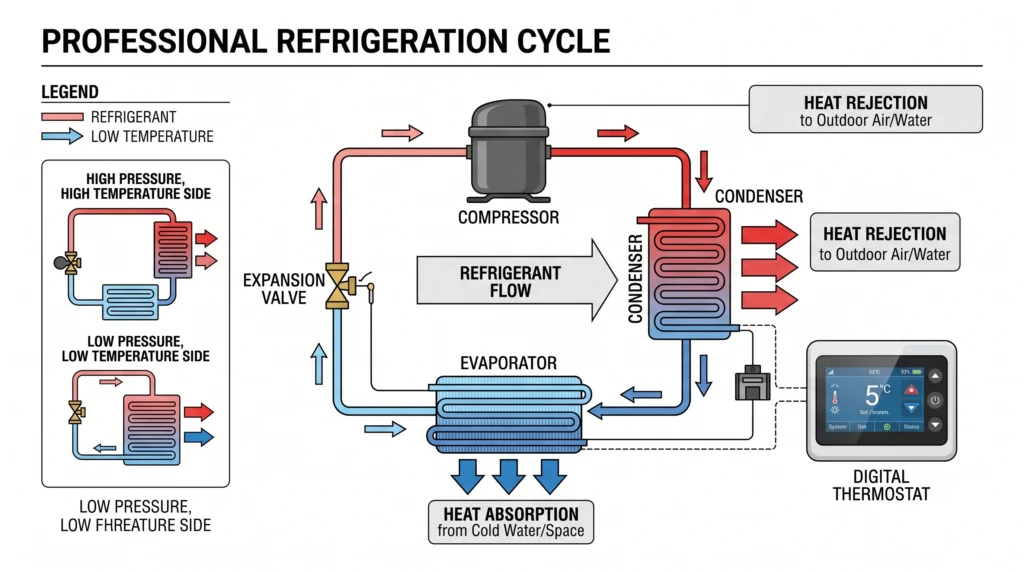
Pros: Even a small 1/10 HP compressor chiller is commonly rated around 960 to 1,020 BTU/hr, comfortably handling 10 to 40 gallons of water, and built-in thermostats hold your set point precisely.
Cons: Real cost, real weight, and a noticeable hum and vibration during operation.
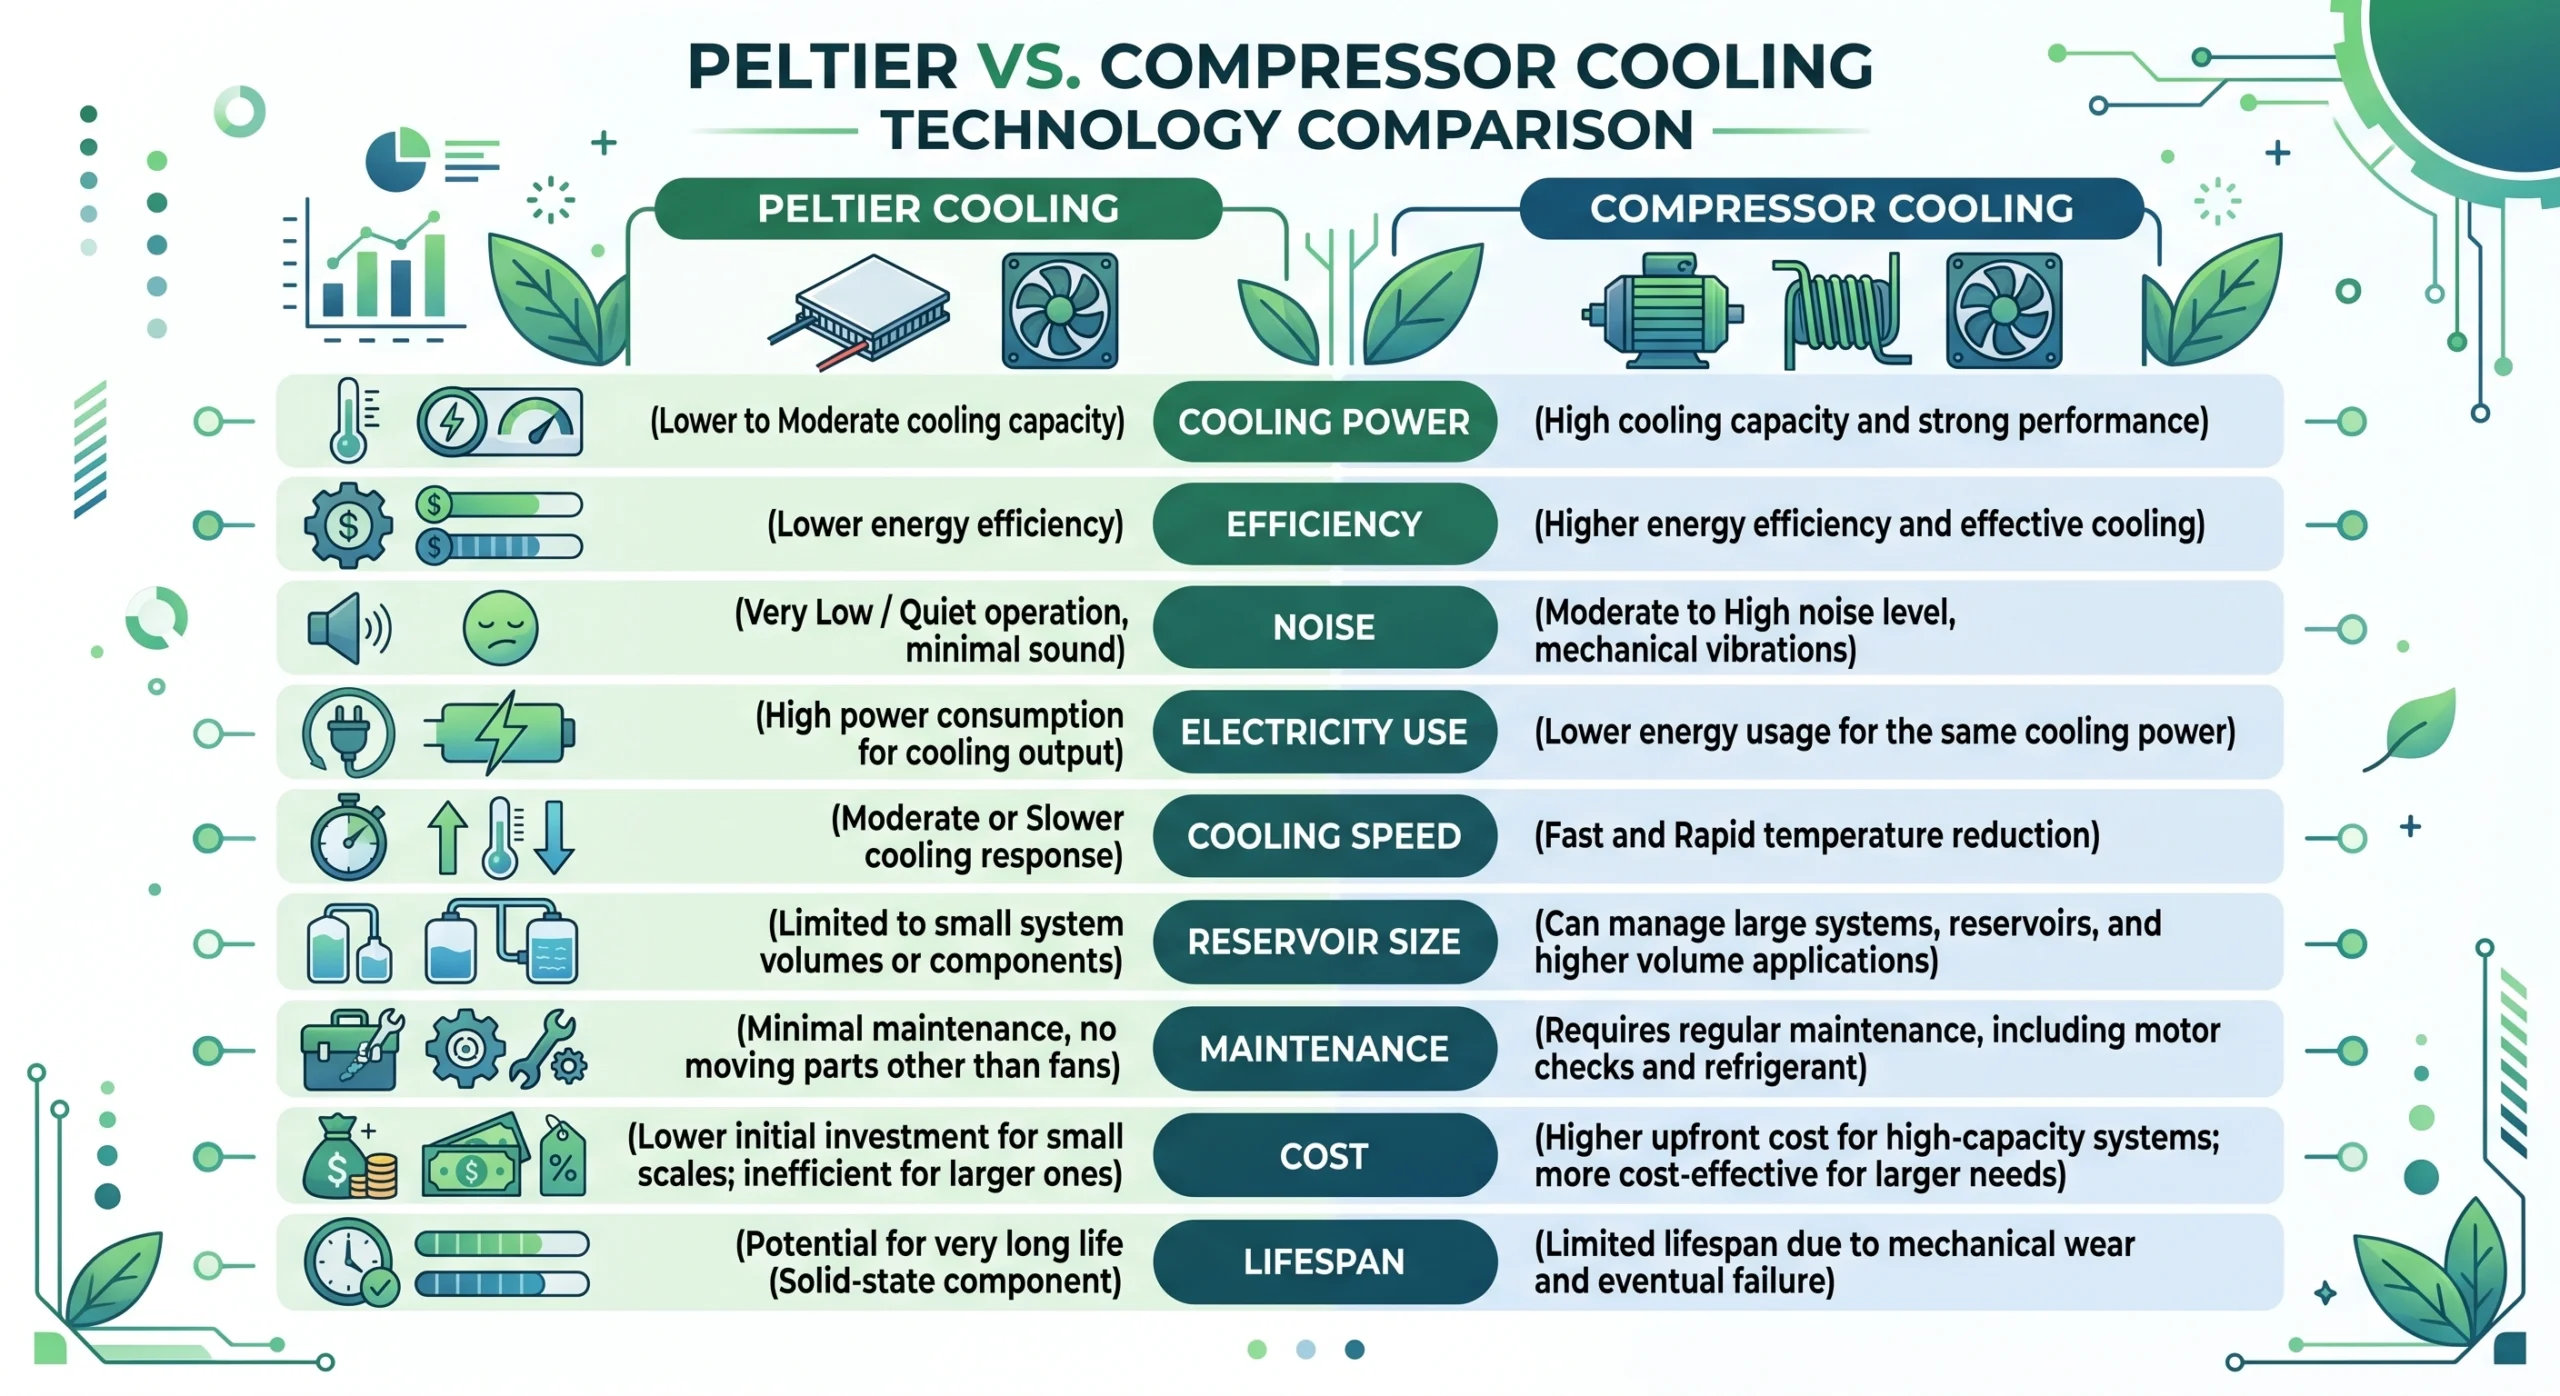
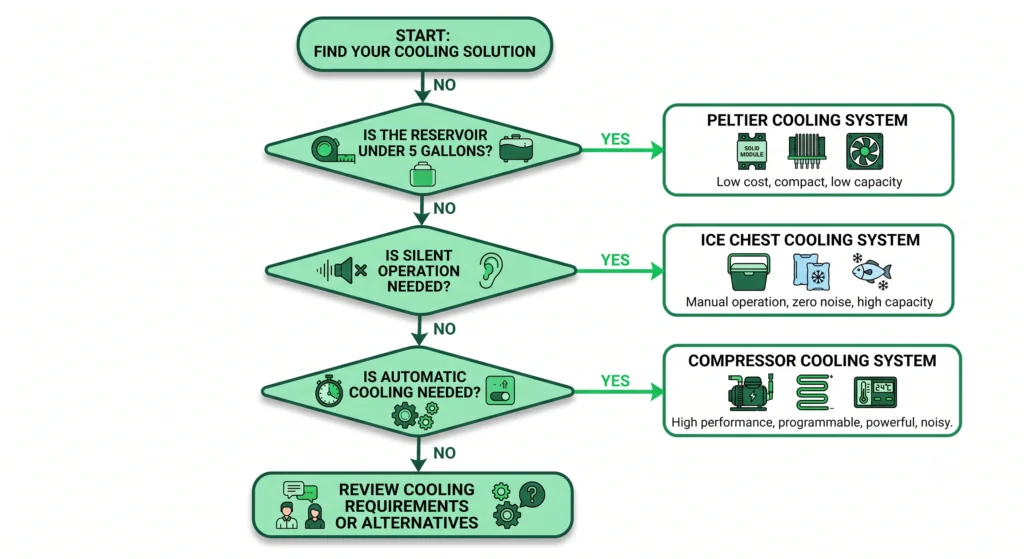
The verdict: For a single DIY DWC kit under 5 gallons, a Peltier build is a fun, genuinely viable project. Past that, especially at 20+ gallons, Peltiers won’t keep up, a compressor chiller or ice chest heat exchanger is the real path forward.
Blueprint 1: The Ice Chest Reservoir Chiller (High Capacity)
This method circulates water through a submerged stainless or titanium coil inside the main reservoir, connected to a secondary insulated cooler filled with frozen water bottles, safely chilling mid-to-large setups without touching the nutrient profile.
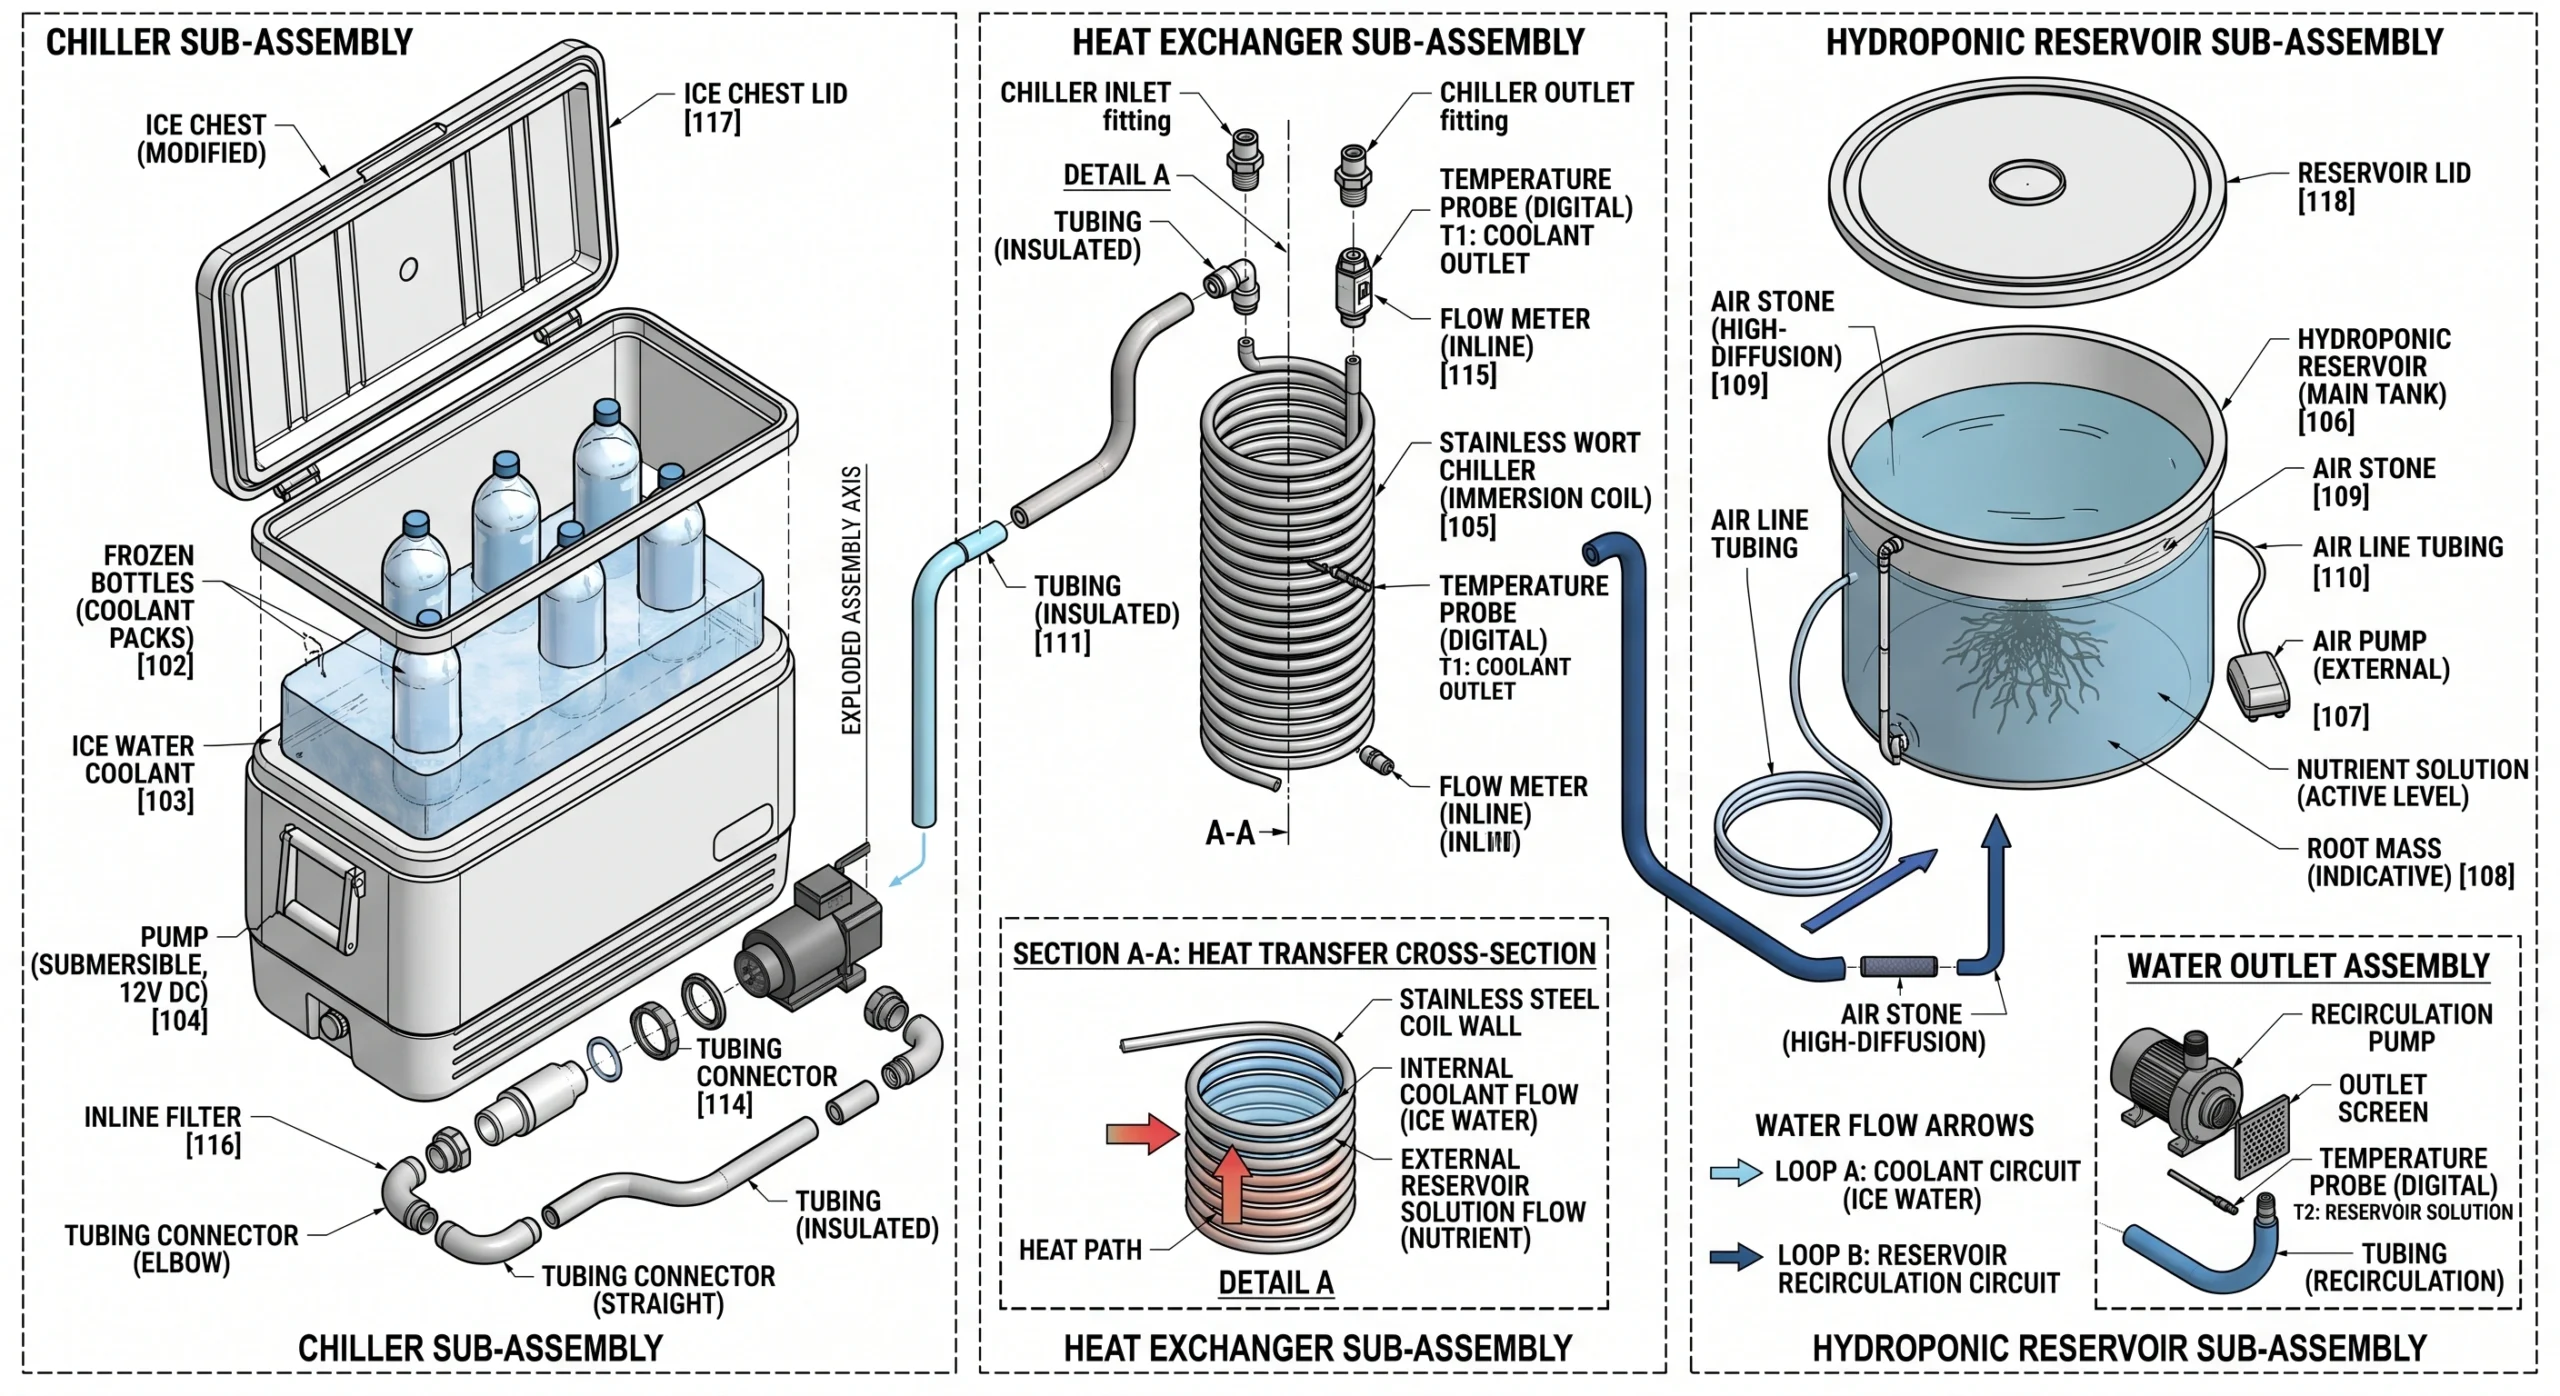
This is the most effective budget option for 10 to 30 gallons. Never drop ice directly into the main reservoir, melting ice dilutes your carefully balanced nutrient concentration, and if it’s made from tap water, it introduces chlorine straight into the root zone. Our pH and EC mastery guide covers exactly how disruptive that dilution is to your targets.
Step-by-Step Assembly
- Source the heat exchanger. You need a coiled metal tube for the reservoir. Never use copper, it reacts with hydroponic salts and is genuinely toxic to plant roots. A stainless steel or titanium “wort chiller” (common in homebrewing) is the right choice.
- Set up the ice chest. Take a standard insulated cooler and drill two small holes near the top rim, just large enough for 1/2-inch vinyl tubing.
- Connect the plumbing. Place a small submersible pump inside the ice chest. Run tubing from the pump out to the inlet of the stainless coil sitting in your reservoir, and a second line back from the coil’s outlet into the ice chest.
- Run the cycle. Fill the ice chest with water and several frozen 2-liter bottles. The pump pushes ice-cold water through the coil inside the reservoir, which absorbs heat and carries it back to the ice chest.
- Maintain it. Swap thawed bottles for fresh frozen ones roughly every 12 to 24 hours.
Blueprint 2: The DIY Peltier Chiller (Micro Capacity)
Sandwiching an aluminum water-cooling block against a Peltier module’s cold side, with a high-RPM fan pulling heat off the hot side, works well for micro-reservoirs under 5 gallons, but needs a temperature controller to avoid running continuously.
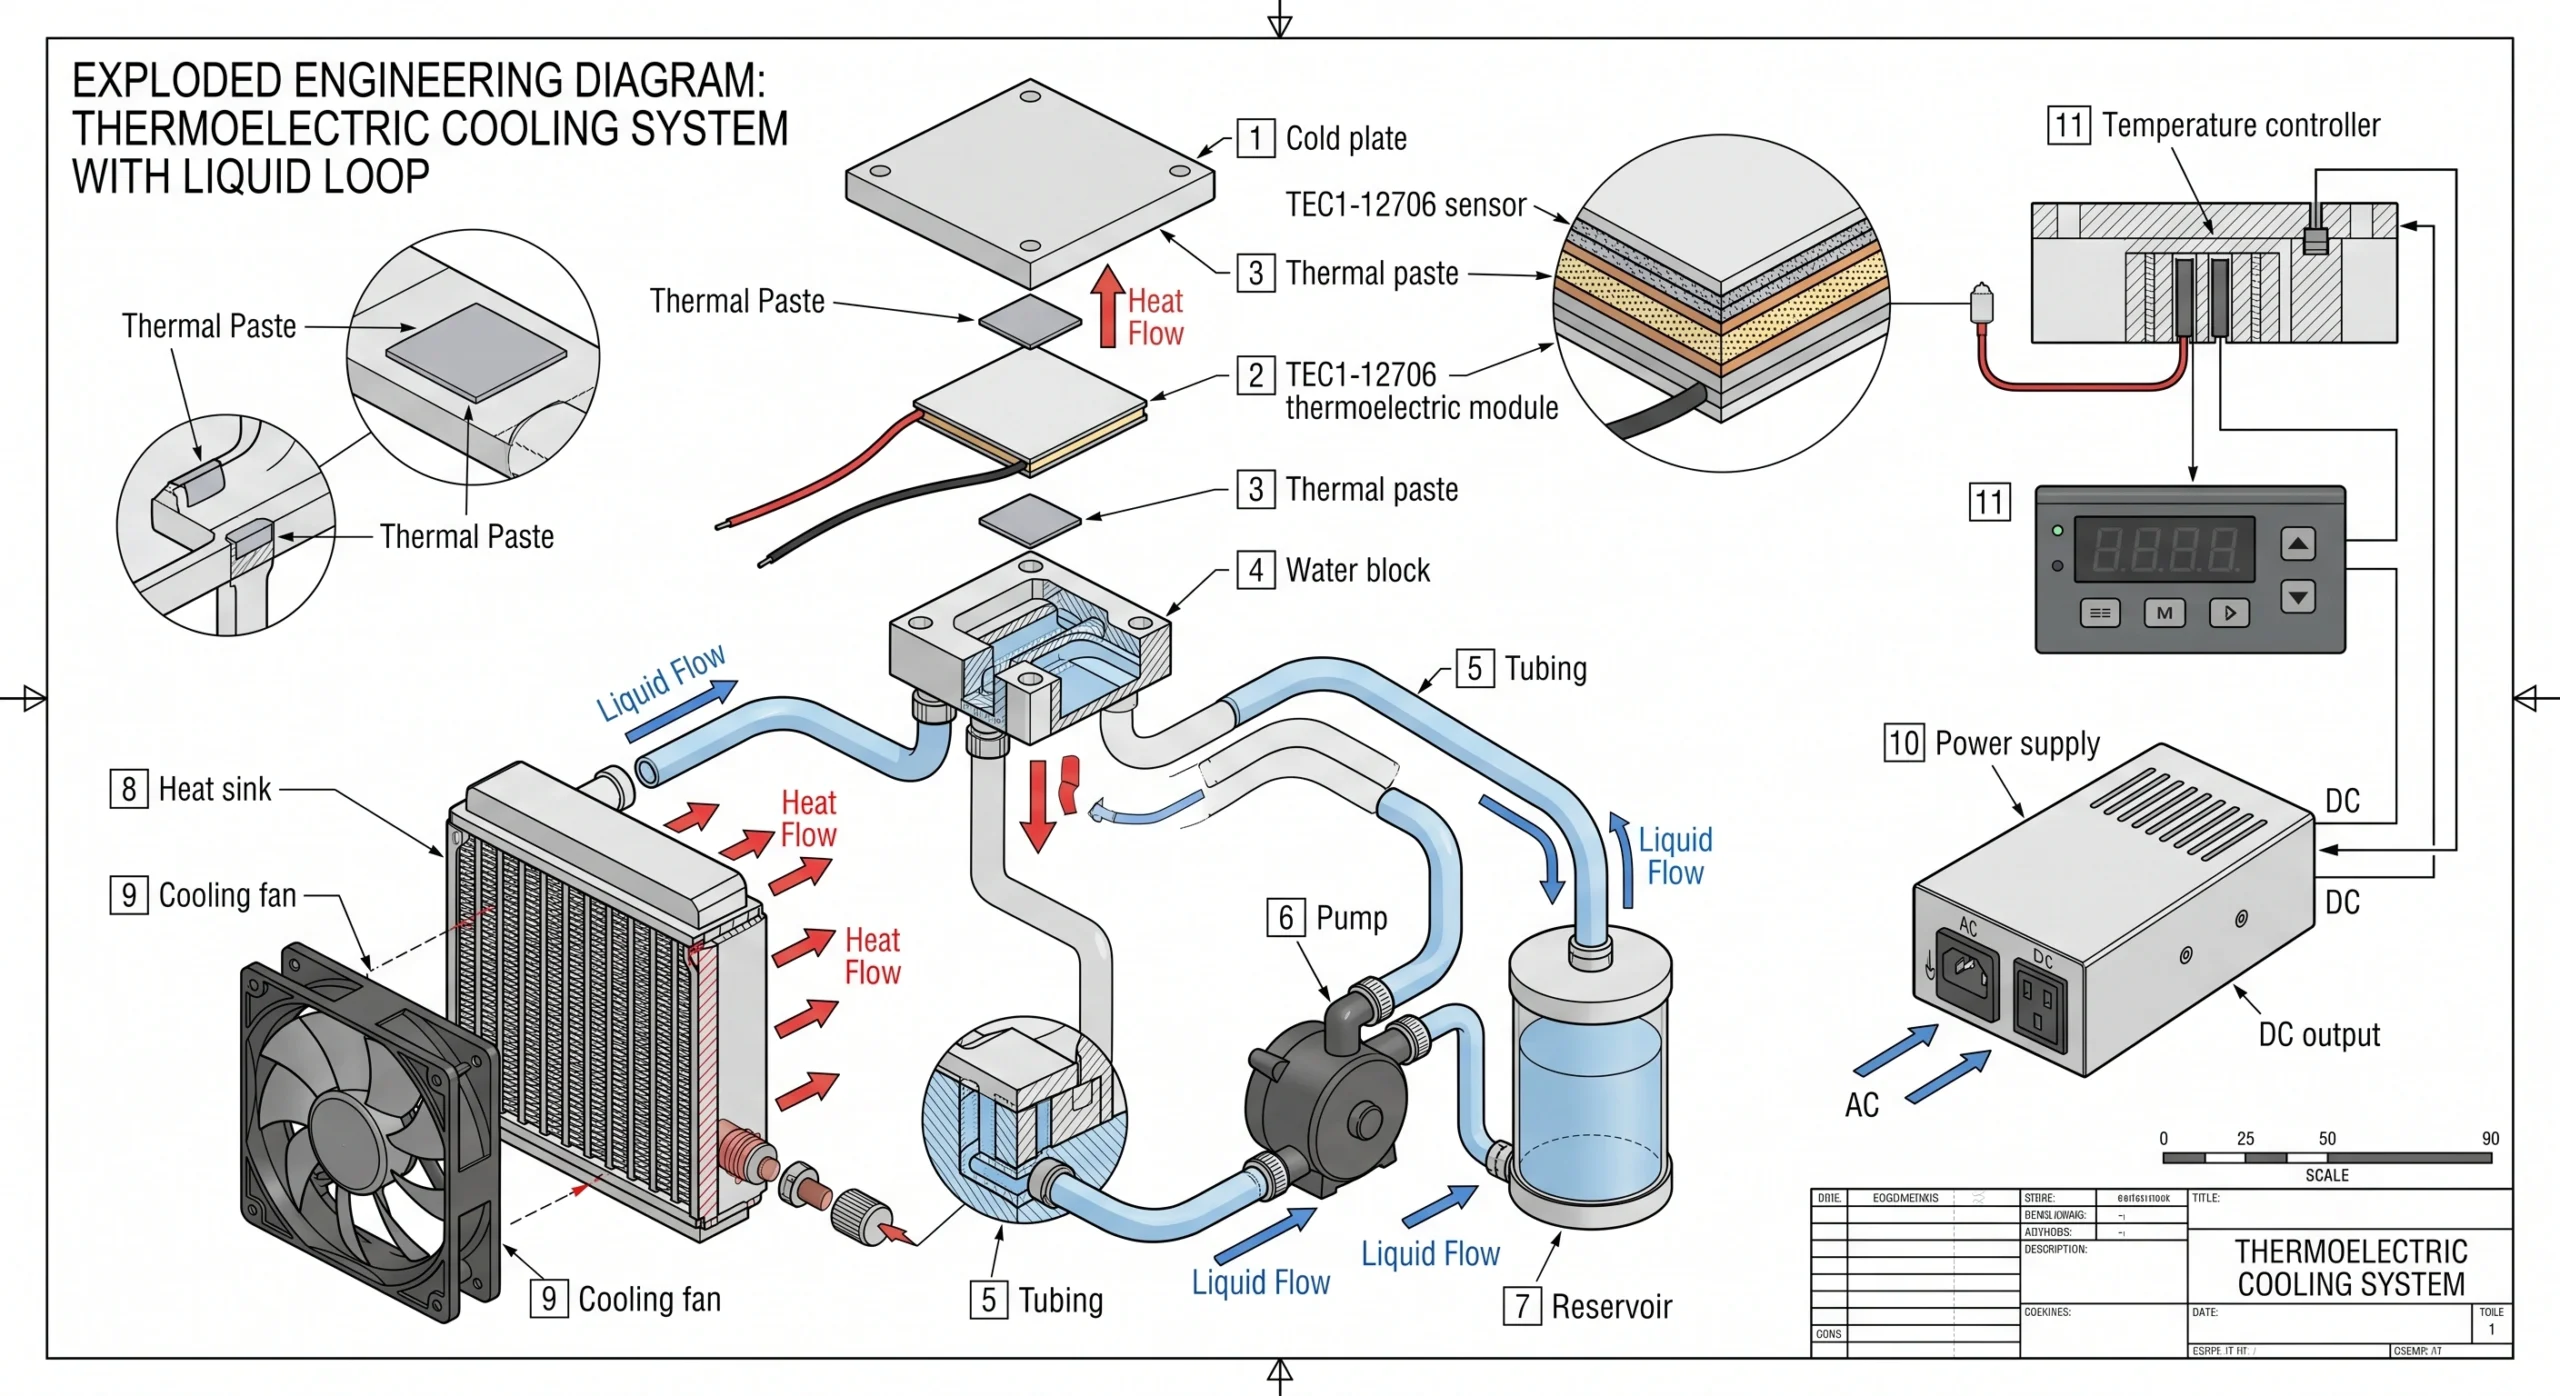
For a small, quiet single-bucket setup, a solid-state build makes sense. Sourcing individual plates and soldering them yourself is tedious, buying a pre-assembled dual-fan Peltier liquid cooler unit is the more practical route.
- Power supply. Peltiers draw real current, plan for a reliable 12V 10A (120W) or higher DC supply.
- Plumb the water block. The Peltier assembly’s small aluminum block has two nipples, connect these with 5/16 or 3/8-inch silicone tubing to a micro-submersible pump inside your DWC bucket.
- Install a temperature controller. Don’t run the Peltier continuously. Plug the power supply into a relay-based temperature controller (an Inkbird ITC-308 is a common choice), drop the probe into the bucket, and set your target around 66°F.
- How it runs. Once water hits roughly 68°F, the controller powers on the Peltier and pump. The pump cycles solution through the cold aluminum block until the bucket reaches 66°F, then it shuts off.
Match your pump’s flow rate to the water block’s capacity, pushing water through too fast doesn’t give it time to actually transfer heat. Our pump sizing guide covers balancing that.
Cooling Capacity & Application Table
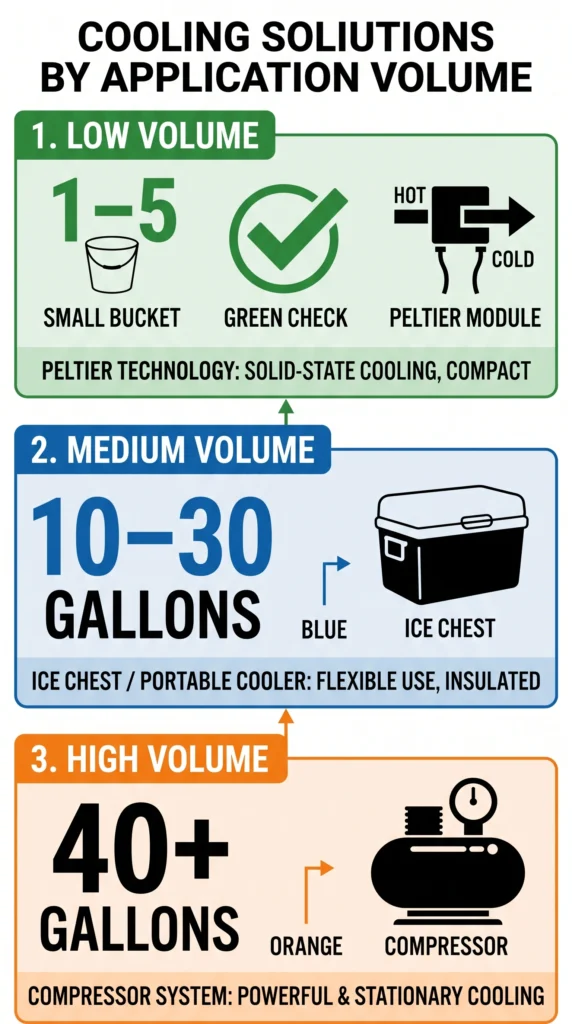
| Chiller Type | Effective Volume Limit | Initial Cost | Ongoing Maintenance | Best Use Case |
|---|---|---|---|---|
| DIY Peltier Module (12706) | 1-5 gallons | ~$40-$70 | Very low, occasional fan dust cleaning | Single DWC buckets, countertop herb gardens, cloning machines |
| Ice Chest Heat Exchanger | 10-30 gallons | ~$80-$120 | High, daily swapping of frozen bottles | Multi-bucket RDWC, mid-sized NFT rails, garage grow tents |
| 1/10 HP Compressor Chiller | 10-40 gallons | $300-$450 | Low, occasional coil cleaning | Commercial setups, large basement RDWC, high-intensity rooms |
Essential DIY Chilling Equipment

Whether running a Peltier build or a modified system, this is the automated brain that switches the chilling pump on and off at a precise set point, preventing both overheating and over-chilling.
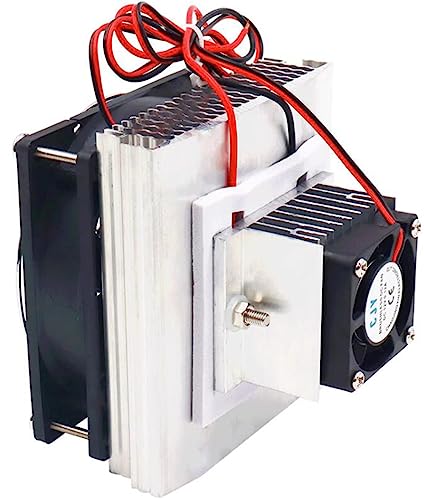
Skips the messy thermal paste and precision mounting of a scratch build, dual modules, heat sinks, fans, and the water block already sandwiched together, just connect hoses and power.

Pushes water through the tight channels of a Peltier block or a long stainless coil without excess wattage or noise, matched well to typical DIY chilling loop flow needs.
Frequently Asked Questions
Can I drop ice directly into my hydroponic reservoir?
No. Melting ice dilutes your nutrient concentration and throws off EC, and if it’s made from u003ca href=u0022https://mistculture.com/reverse-osmosis-vs-tap-water-hydroponics/u0022u003etap wateru003c/au003e, it introduces chlorine and chloramines directly to the root zone, which can harm beneficial microbes and shock the plant.
How many gallons can a standard 12V Peltier cooler chill?
A single TEC1-12706 module is generally only effective for 1 to 3 gallons against typical indoor grow tent heat. Even a dual-module setup will struggle in anything larger than a 5-gallon DWC bucket. Beyond that, a compressor chiller or ice chest heat exchanger is the more realistic option.
Are titanium coils better than stainless steel for hydroponic heat exchangers?
Titanium is fully corrosion-resistant and inert to hydroponic acids and salts, genuinely the top choice. Stainless steel (304 or 316 grade) is highly effective and considerably cheaper, though over years of exposure to low pH and heavy salts, lower-grade stainless can eventually show minor surface pitting. Copper should never be used regardless.
Do Peltier coolers need a temperature controller?
Yes. Wired directly to continuous power, a Peltier will run indefinitely, and in a small reservoir that can drive temperatures down into the 50s, which stunts growth and causes thermal shock. A relay controller keeps the unit active only when water actually crosses your upper threshold.
Chiller Sizing Tool
Enter your reservoir size and estimated heat gain to see which build path actually fits your setup, based on the real BTU ranges covered above.
Estimate which chiller build fits your setup based on reservoir size and how much you need to cool it. Uses the real BTU ranges for each build type from the article above.
A rough planning estimate based on typical build capacities, not a precise thermal engineering calculation. Ambient room temperature, insulation, and how often the lid is open all affect real-world results.
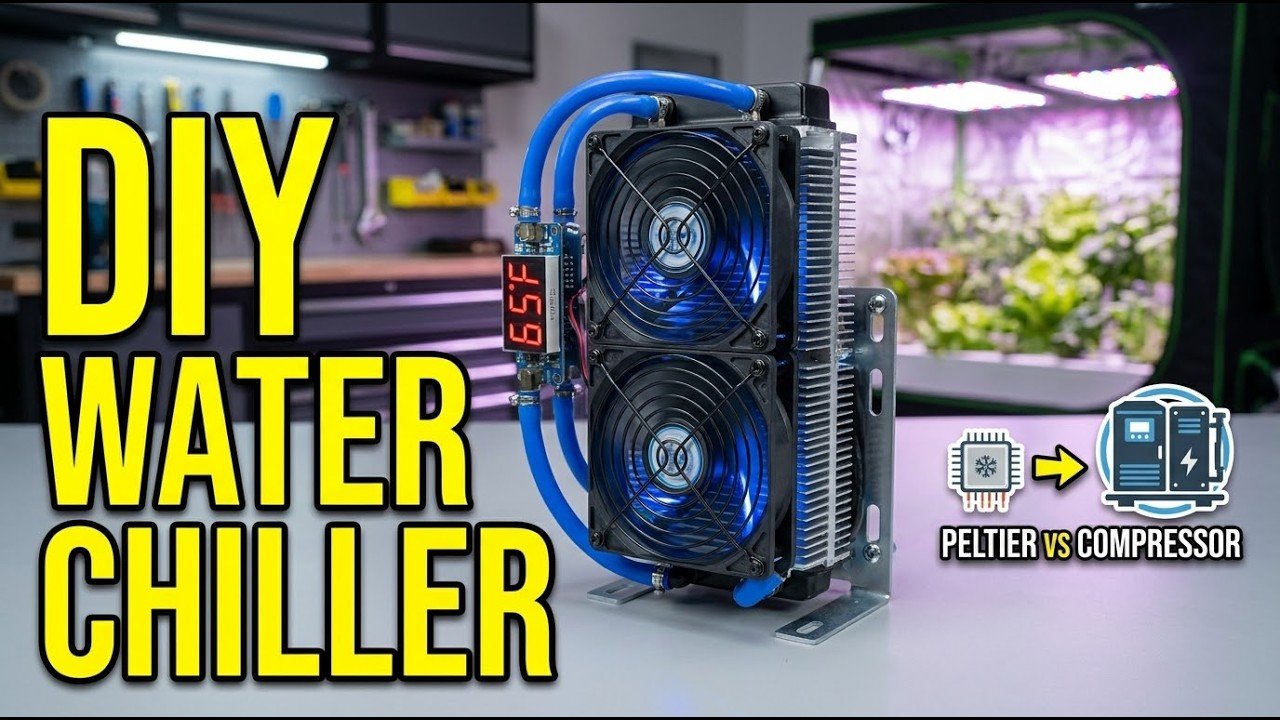
Watch the Complete DIY Build & Setup
If you prefer a visual walkthrough, we’ve documented the entire step-by-step build process in the explainer video below. Follow along to see how dissolved oxygen levels drop at higher temperatures, compare Peltier modules versus closed-loop ice chest exchangers, and learn how to wire an automated temp controller to prevent root rot.

Continue Your Learning Journey