DIY Gravity-Fed Auto-Top Off (ATO) Reservoirs for DWC and Kratky

Table of Contents
- The Fluid Dynamics and Science of Gravity-Fed ATO Systems
- Essential Components for a DIY Hydroponic Float Valve Setup
- Building Your System: Step-by-Step
- System Parameters: Tuning Your ATO for DWC and Kratky
- Equipment: Best Float Valves and Tubing for the Job
- Frequently Asked Questions
- Reservoir Sizing Calculator
The appeal of Deep Water Culture and the Kratky method is their simplicity. No high-pressure pumps to fail, no misting manifolds to clog, no constant hum of circulating water. You place a plant in a nutrient bath and let it grow. That simplicity breaks down fast once plants mature, a flowering tomato or a mature fruiting plant can drink well over a gallon of water a day, turning a “set and forget” bucket into a daily manual refill chore.
Miss a refill and the water level drops, exposing roots to dry air while the remaining solution’s EC spikes, risking nutrient lockout and salt burn. Overcorrect on a Kratky bucket and you drown the plant’s air roots, suffocating it within hours.
A gravity-fed Auto-Top Off (ATO) system solves both problems. Using hydrostatic pressure and mechanical float valves, you can link any number of independent buckets to a single elevated master reservoir. As plants drink, float valves drop and let in a slow, calibrated trickle of fresh solution. This guide covers the fluid dynamics, hardware, and plumbing to build one.
The Fluid Dynamics and Science of Gravity-Fed ATO Systems
A gravity-fed ATO system relies on hydrostatic pressure, the force a fluid exerts due to gravity, to push solution from an elevated master tank into individual plant containers. Float valves regulate flow, opening as transpiration lowers the water level and sealing once the target depth returns.
Gravity-fed systems run on no electricity, relying entirely on the elevation of the master reservoir relative to the plant buckets. That elevation creates “head pressure.” For every foot of vertical elevation above the float valve, gravity generates approximately 0.43 PSI of static pressure, a standard fluid mechanics constant.
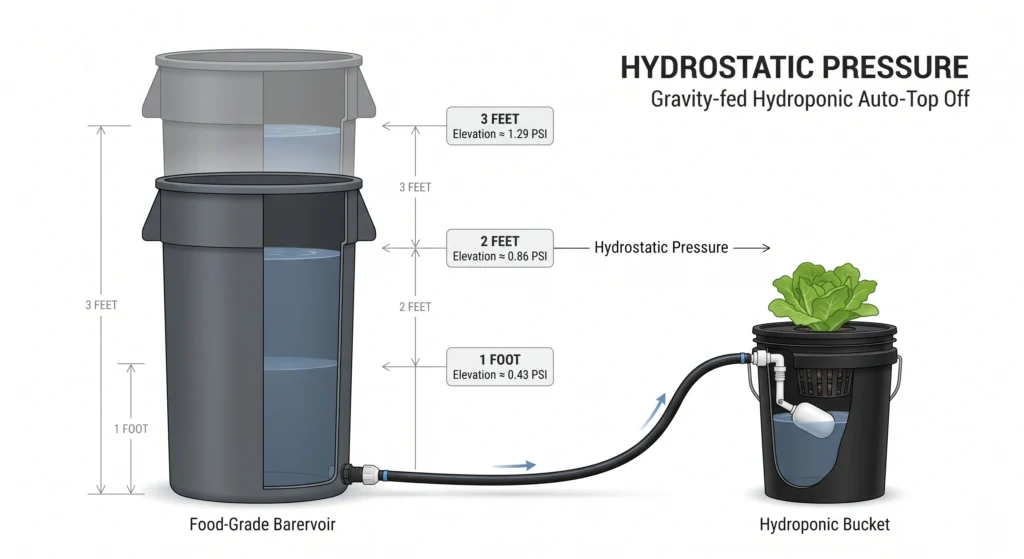
Float valves are simple mechanical devices: a buoyant float on an articulated arm pulls a rubber gasket away from an orifice as water drops, letting flow in, then reseats it as the float rises. Because that seal is delicate, these valves are rated for specific pressure ranges. Standard mini-float valves handle gravity pressure (roughly 0.5 to 5 PSI) fine but will fail if connected directly to a high-pressure municipal line (commonly 40 to 60+ PSI).
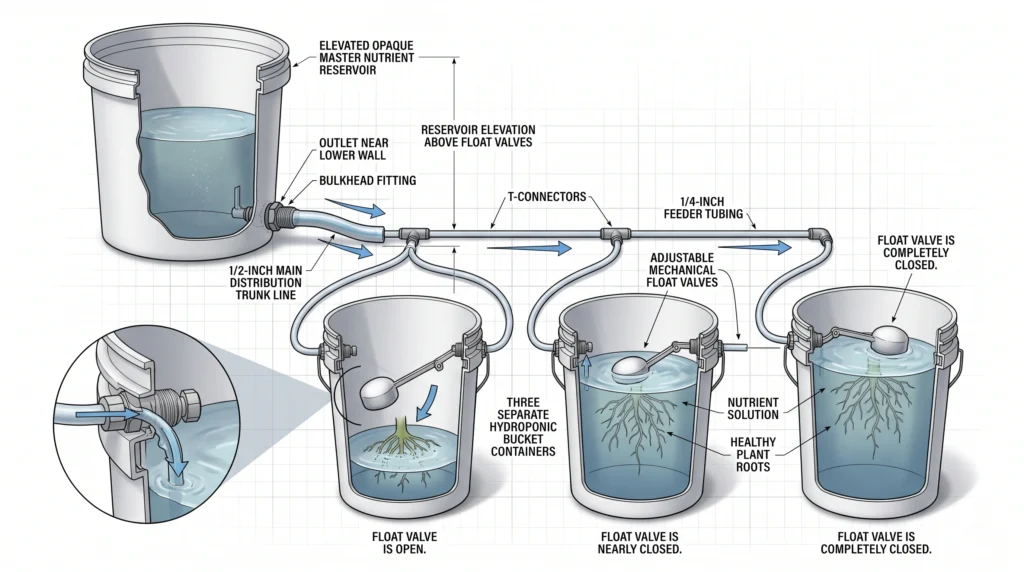
The biological benefit goes beyond saved labor. In a static bucket, as a plant drinks, it leaves heavier nutrient salts behind, spiking EC in the remaining water. A slow, continuous top-off with balanced solution acts as a buffer, holding EC and pH closer to constant and preventing the osmotic stress that comes with concentration spikes. See our DWC vs NFT vs aeroponics guide for how this compares to active circulation systems.
Essential Components for a DIY Hydroponic Float Valve Setup
A resilient system needs opaque, food-grade materials throughout: a bulk master reservoir, watertight bulkhead fittings, distribution tubing, and adjustable float valves at each plant site.
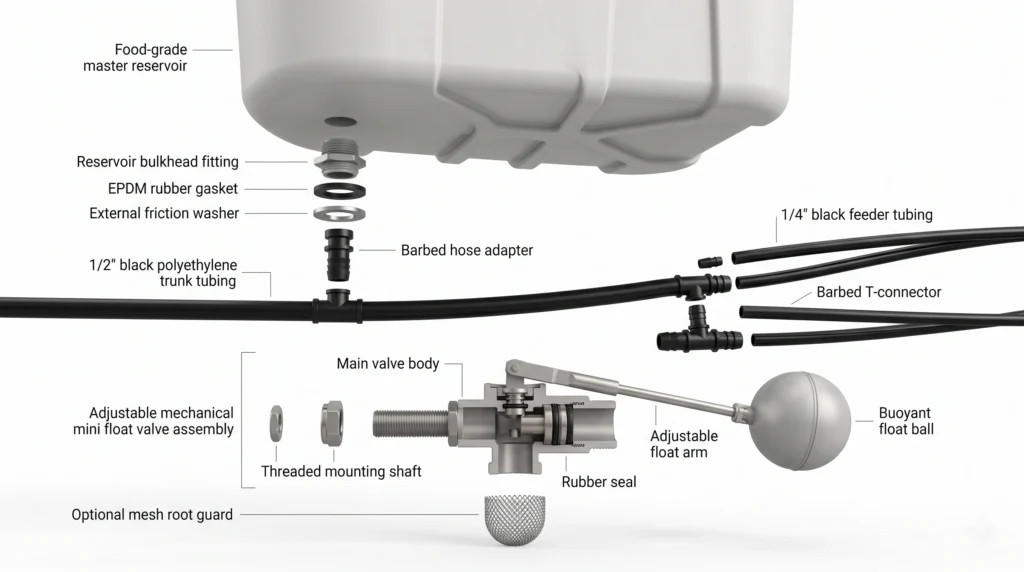
The bulk master reservoir. Anywhere from a 5-gallon bucket to a 55-gallon food-grade drum depending on plant count, and it needs to be fully opaque, light penetration fuels algae that will clog your micro-tubing fast.
Bulkhead fittings. A threaded, watertight seal through the reservoir wall. Keep the rubber gasket on the inside (wet side) and the hard nylon friction washer on the outside.
Distribution tubing. Standard 1/4-inch or 1/2-inch black polyethylene irrigation tubing is the industry standard. For more than four buckets, run a 1/2-inch main trunk line and step down to 1/4-inch micro-tubing at each bucket via barbed T-connectors, keeping pressure distribution even across the array.
Mechanical float valves. One per plant container. Adjustable mini-float valves let you fine-tune shut-off depth without physically repositioning the valve.
See our pH and EC guide for the baseline chemistry this plumbing is built to protect.
Building Your System: Step-by-Step
Precise drilling for watertight seals and strategic elevation of the master reservoir are what generate reliable head pressure and a leak-free array.
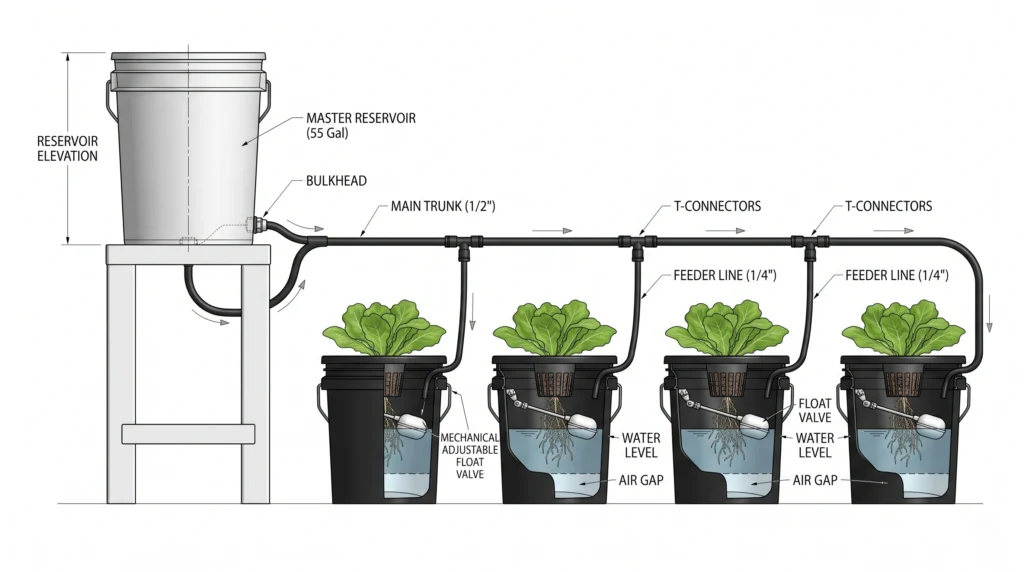
Step 1: Elevate and tap the master reservoir. Place it on a sturdy stand, at least 12 to 18 inches higher than the top of your plant buckets. Drill a hole near the bottom edge (leaving about an inch of clearance so sediment settles below the output line), install the bulkhead fitting with the gasket on the wet side, hand-tighten then add a quarter-turn with a wrench, and thread on a barbed hose adapter.
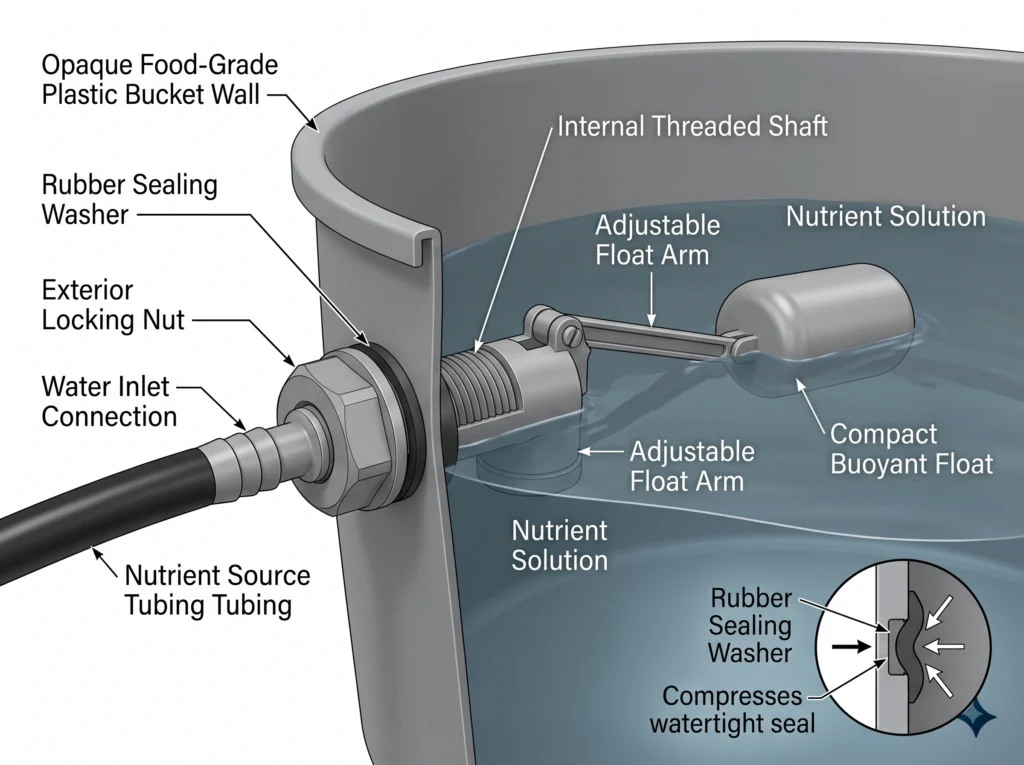
Step 2: Drill and seat the float valves. At each bucket, drill a hole matching your float valve’s threaded shank size (commonly 5/8-inch) at your desired water line. Insert from inside, secure with the exterior nut. Wrapping the threads in two layers of Teflon tape before securing helps seal against the bucket’s curved wall.
Step 3: Run trunk and feeder lines. Connect 1/2-inch tubing to the master reservoir’s fitting and run it along the floor behind your bucket row, capped at the end. At each bucket, punch the trunk line, insert a 1/4-inch barbed connector, and run a short length of micro-tubing to the float valve’s barb.
Step 4: Calibrate and leak test. Fill with plain tap water (no nutrients yet) and watch the buckets fill. Floats should snap the valves shut as water rises. Check for zero dripping at every bulkhead, punch point, and mounting nut before trusting the system with a real crop.
System Parameters: Tuning Your ATO for DWC and Kratky
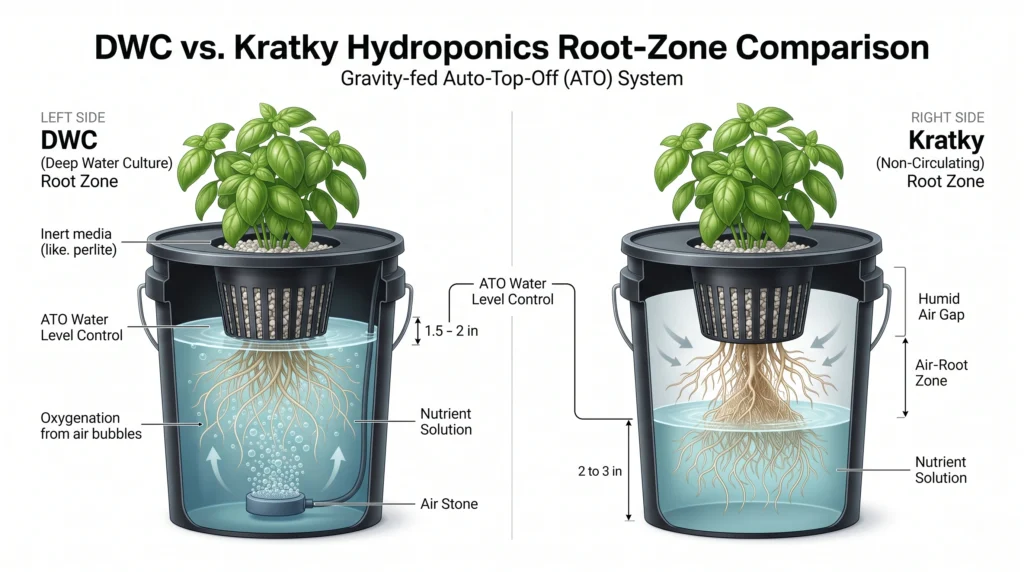
DWC and Kratky need fundamentally different float depths because of how each method handles oxygen. DWC sets high since an air pump handles oxygenation directly; Kratky sets low to preserve the humid air gap its root system depends on.
Calibrating for DWC
An air pump and stone inject dissolved oxygen directly into DWC water, so roots can be almost fully submerged without drowning. Setting the float valve roughly 1.5 to 2 inches below the net pot bottom gives a large nutrient volume for pH and thermal stability while leaving enough air gap to keep the net pot medium from waterlogging and inviting stem rot. See our root rot prevention guide if reservoir temperature is a factor here too.
Calibrating for Kratky
Kratky is entirely passive, no air pump, so the water holds little dissolved oxygen. The plant compensates by developing two root types: water roots that dive down to drink, and air roots that develop micro-hairs in the humid gap above the water line to breathe. This is well documented in Kratky’s own published research. Refill an established bucket to the top and you drown those air roots, the plant can wilt and suffocate within about two days.
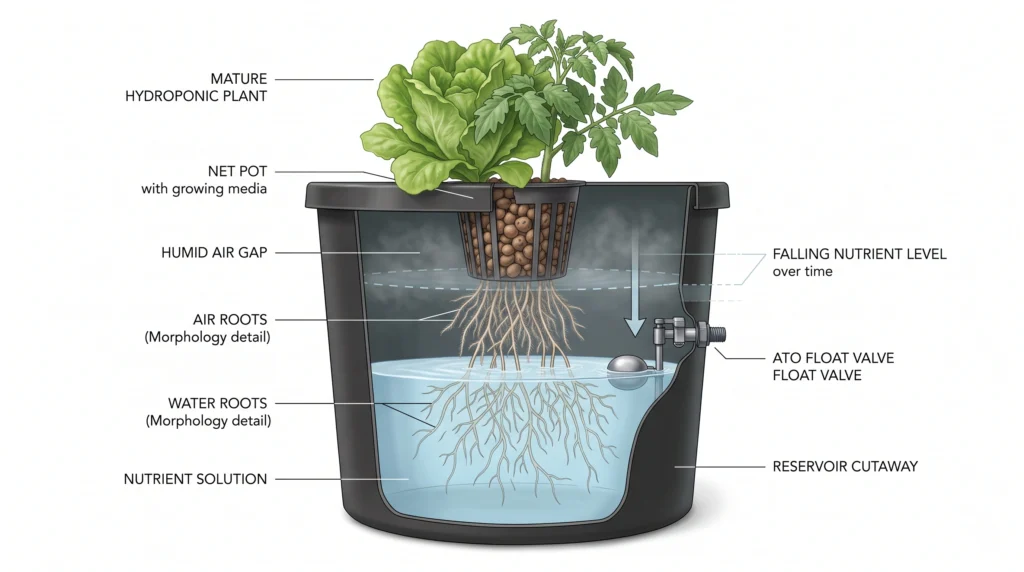
Set the float valve to hold water at roughly the bottom 2 to 3 inches of the bucket. Early on, manually fill so water touches the net pot, then let the plant drink the level down naturally over the first few weeks, exposing upper roots to air as it goes. Once the level reaches that bottom 2 to 3 inches, let the ATO take over and hold it there for the rest of the crop cycle.
Reference table for gravity-fed dynamics:
| Elevation Above Float Valve | Static Pressure | Trunk Line | Feeder Line | Max Linked Buckets |
|---|---|---|---|---|
| 1 foot | 0.43 PSI | 1/4-inch micro-tubing | 1/4-inch micro-tubing | 2-4 buckets |
| 2 feet | 0.86 PSI | 1/2-inch poly tubing | 1/4-inch micro-tubing | 8-12 buckets |
| 3 feet | 1.29 PSI | 1/2-inch poly tubing | 1/4-inch micro-tubing | 15-20 buckets |
| 4+ feet | 1.72+ PSI | 3/4-inch PVC or poly | 1/4-inch micro-tubing | 20+ buckets |
Equipment: Best Float Valves and Tubing for the Job

A compact, low-pressure float valve that fits easily inside a 5-gallon bucket without interfering with root mass, with an adjustable arm covering both high-level DWC and low-level Kratky settings.
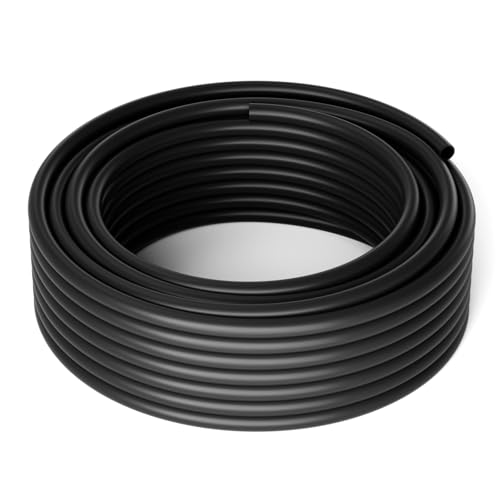
Standard vinyl degrades under intense grow lights. Fully opaque polyethylene tubing is the safer choice, light hitting solution inside the lines is a fast track to algae that clogs float valve orifices.

A quality bulkhead with durable threading and an EPDM gasket that molds to the slight curve of plastic drums and totes for a genuinely leak-proof reservoir exit point.

Avoid clear or light-colored buckets, they let light through and often aren’t food safe. Thick black buckets block light fully and hold up to drilling and float valve mounting without flexing.
For how this fits into a larger room build, see our DIY hydroponic systems guide.
Frequently Asked Questions
How do I stop plant roots from tangling in the float valve?
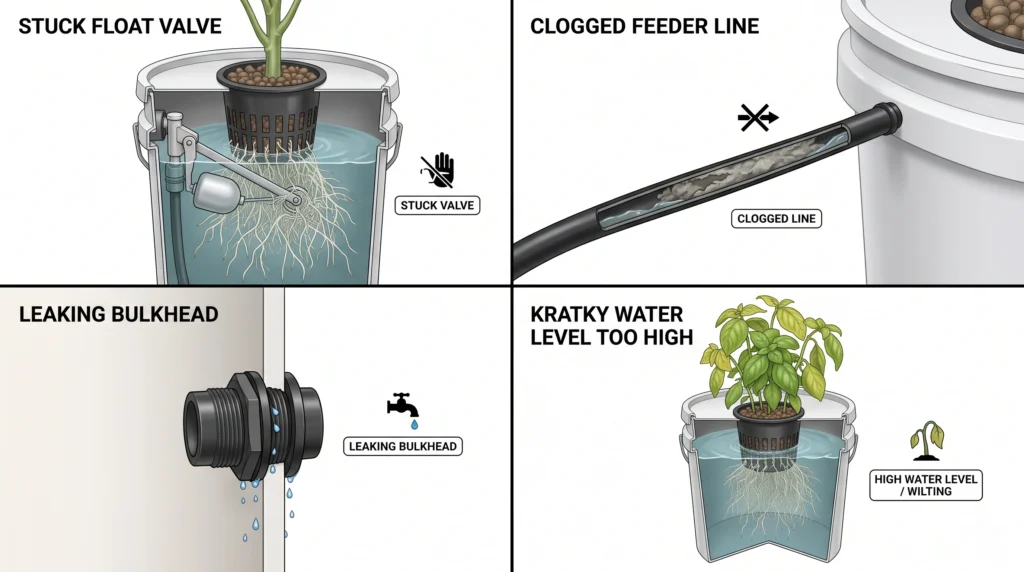
Roots actively seek out incoming fresh water, and a tangled mass can pin the float arm open, flooding your floor. A simple physical barrier, slotted PVC pipe or a plastic mesh cage around the valve inside the bucket, keeps roots from reaching it directly.
Will hydroponic nutrients precipitate and clog my gravity lines?
Yes, if flow is too slow or lines see big temperature swings, salts like calcium nitrate and magnesium sulfate can fall out of solution. Keeping the master reservoir circulating with a small pump or air stone, and flushing trunk lines with plain pH-balanced water between crop cycles, keeps this from becoming a real problem.
Can I mix Part A and Part B nutrients directly in the master ATO reservoir?
Yes. The master reservoir works just like a standard holding tank, mix Part A thoroughly, then Part B, then balance pH, and the ATO delivers that balanced solution downstream.
Why does my Kratky plant look wilted after installing the ATO?
Most likely the float valve is set too high, drowning the air roots. Lower it, drain the bucket back down to the bottom 2 to 3 inches, and give the upper roots room to breathe again.
How big should my master reservoir be?
A reasonable target is enough volume for roughly a week of your crop’s total water use. A flowering plant might drink 1 to 1.5 gallons a day, so four plants could use around 6 gallons daily, meaning a 50-gallon reservoir gives just over a week of hands-free buffer, useful for travel or busy stretches.
Do I need an air stone in the master ATO reservoir?
Not strictly required for the gravity feed itself, but a small air stone or circulation pump keeps salts homogenized and prevents stagnation, so the solution reaching your float valves stays fresh and balanced.
Reservoir Sizing Calculator
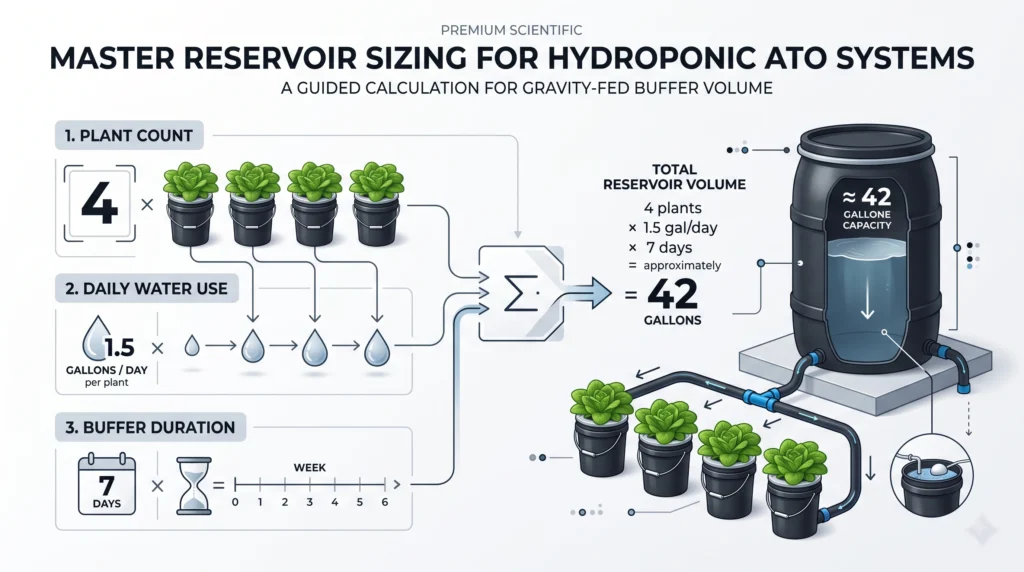
Use the tool below to calculate the master reservoir size you need for your actual plant count and desired buffer window.
Calculate the master reservoir size you need to give your ATO system a real hands-free buffer window.
Water use varies a lot by crop, growth stage, and environment. Track your actual consumption for a week once running and adjust your real reservoir sizing accordingly.

Continue Your Learning Journey