Solar Battery Backup Sizing for Hydroponics: The Complete Off-Grid Sizing Masterclass (With Interactive Calculators)

Table of Contents
- Load Inventory Math & Energy Auditing
- Battery Capacity (Ah/Wh) Sizing & Chemistry Selection
- Solar Panel Sizing & MPPT Controller Sizing Math
- Runtime and Duty-Cycle Planning: Optimising Battery Reserves
- Baseline Benchmarks for Hydroponic Backup Sizing
- Drop‑In Power Stations vs. DIY Solar Builds
- Frequently Asked Questions (FAQ)
- Take Action: Secure Your Grow Room Today
- Conclusion
Disclosure: MistCulture summarizes verified product specs, engineering data, and community feedback. We may earn an affiliate commission if you purchase through our links. Regulations vary by location; this content is for educational purposes only.
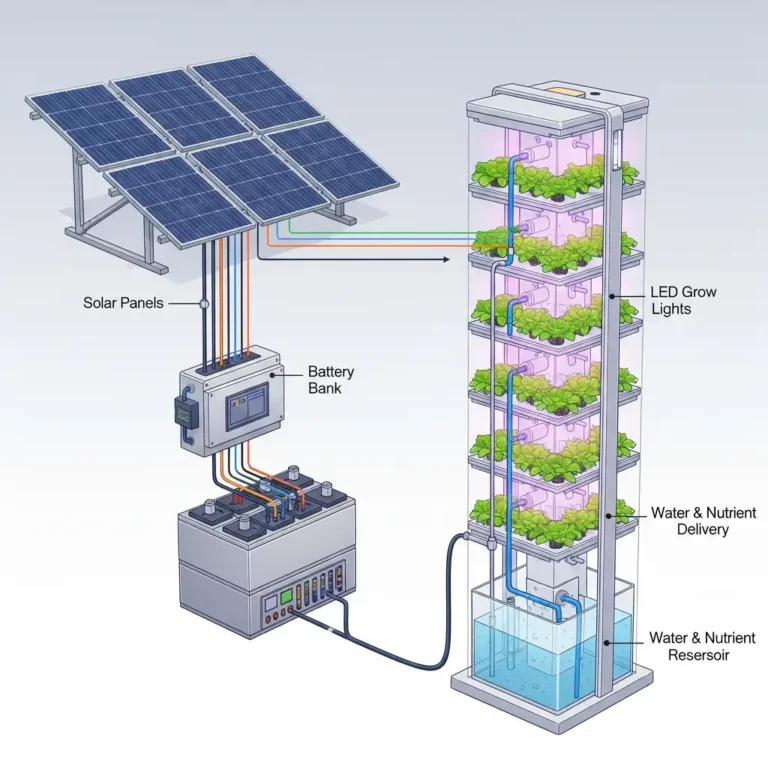
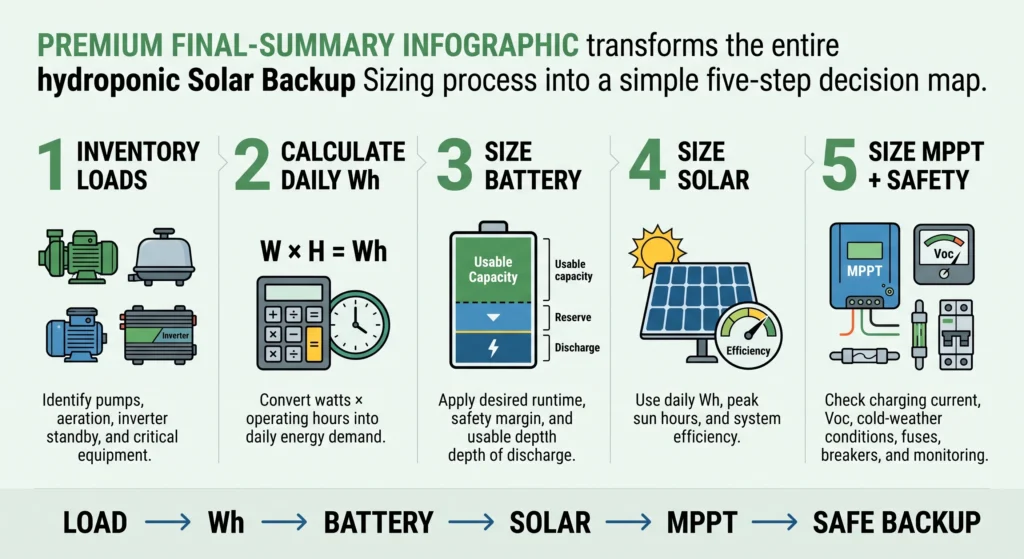
Solar backup for hydroponics comes down to a single question: how long must the pumps run if the grid dies? Answer that specific variable, and the battery and solar panel math writes itself. Most growers over-buy wildly or under-buy dangerously. A tiny battery that dies after two hours is worse than having no backup at all because the failure remains silent until the crop is lost. This guide walks through the exact load inventory, battery capacity sizing, panel configuration, MPPT controller selection, and duty-cycle planning with worked examples to keep your system running.
Load Inventory Math & Energy Auditing
Designing an off-grid solar and battery backup system to protect a hydroponic crop requires transitioning from grower to electrical systems engineer. In a controlled environment agriculture (CEA) facility, electricity is the life-support system. If a power outage cuts off your water pumps, air stones, or climate controls, a biological countdown begins. Deep Water Culture (DWC) reservoirs will exhaust their dissolved oxygen in under four hours, leading to immediate root suffocation. Even a highly forgiving DIY ebb and flow table setup will quickly dry out once the automated flood cycles fail.
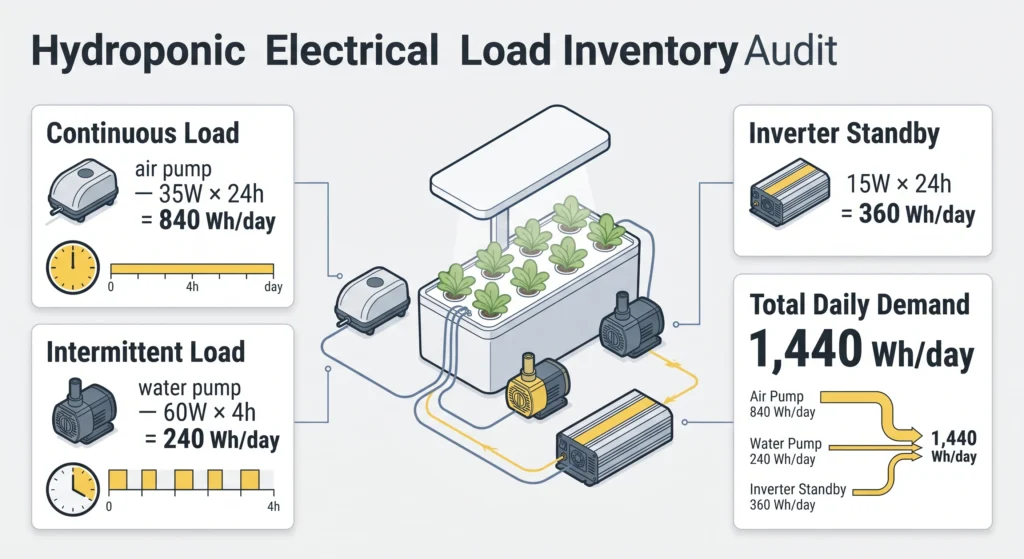
To build a system that guarantees 100% crop survival, you cannot rely on guess-and-check hardware choices. You must execute a meticulous Load Inventory Audit. This mathematical process maps out your constant wattage, accounts for startup electrical surges, exposes inverter idle drains, and establishes the exact daily energy footprint your battery bank must support.
Solar Power System Topology
Photovoltaic panels harvest solar energy, generating DC voltage. Sized to fully recharge the system in 1 peak sun day.
⚡ DC GenerationMaximum Power Point Tracking charger dynamically converts variable solar voltage into the optimal battery charging current.
📈 98% EfficiencyStores DC energy. Lithium iron phosphate chosen for its deep 80% discharge limits and 10‑year lifespan.
🔋 DC StorageConverts DC battery power into 120V AC. Runs continuously to support water pumps, aerators, and timers.
⚡ 120V AC OutExposing the “Ghost Load”: Inverter Standby Parasitics
To calculate the total energy demand of your grow room, you must first list every essential piece of electrical hardware. However, a major engineering trap that causes DIY backup systems to fail prematurely is ignoring the Inverter Standby Draw (or Ghost Load).
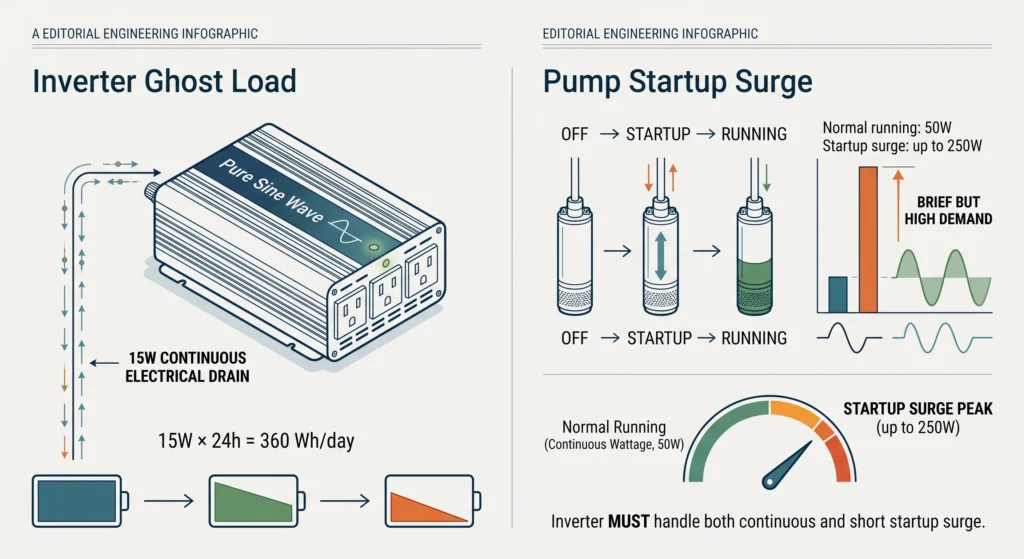
An inverter’s primary job is to convert DC battery current into standard 120V AC household electricity. To perform this conversion, the internal circuitry of the inverter must remain energized even when your hydroponic equipment is not drawing power. A typical 12V or 24V pure sine wave inverter consumes between 10W to 25W of continuous power just by being switched on.
While a 15W standby draw sounds insignificant, let us look at the cumulative daily drain over 24 hours: 15 Watts × 24 Hours = 360 Watt-hours (Wh) of daily parasitic loss. If you are backing up a low-power system, such as a single 25W submersible pump, this ghost load represents a massive 60% increase in your overall daily power consumption, easily depleting an undersized battery bank overnight. To see how these operational efficiencies factor into your overall return on investment, review our detailed guide on Hydroponic System Costs & Budget Breakdowns.
Inductive Startup Surge Math: Locked Rotor Amps (LRA)
Your load inventory calculations must distinguish between two different types of electrical loads: **resistive loads** (such as seedling heat mats) and **inductive motor loads** (such as submersible water pumps and diaphragm air compressors).
Inductive loads utilize electromagnetic fields to turn an internal motor shaft. When a water pump first switches on, the rotor is physically stationary. Pushing the motor from a standstill up to its full operating speed requires a massive, instantaneous burst of electrical energy. This brief, high-amperage draw is known as Locked Rotor Amps (LRA) or Startup Surge Wattage.
A standard 50W water pump has a Rated Load Amperage (RLA) of roughly 0.4 Amps under continuous operation. However, during the initial half-second of startup, its LRA can easily surge 3 to 5 times higher, drawing up to 250W of power. If your off-grid inverter is sized only to handle the continuous running load of your equipment, a startup surge will trigger the inverter’s over-current protection, causing the system to automatically shut down and leave your grow room completely dark. When purchasing an inverter, you must ensure its “Peak” or “Surge” wattage rating is capable of supporting the combined startup demands of your entire equipment stack.
The Daily Energy Consumption Formula
To establish your target battery capacity, you must calculate your total daily energy footprint in Watt-hours (Wh). The daily energy equation is defined as:
To calculate your system’s total daily energy consumption, sum the watt‑hour (Wh) usage of all active devices over a 24‑hour period, including the inverter’s standby power draw:
This formula accounts for both the active power draw of your hydroponic equipment (pumps, lights, aerators) and the standby power consumption of the inverter, which runs continuously 24/7.
Let us calculate a realistic, automated home hydroponic setup consisting of one continuous 35W air pump, a 60W water pump running for 10 minutes every hour (4 hours total daily run-time), and a 15W inverter standby draw:
- Continuous Air Pump Load: 35W × 24 Hours = 840 Wh/day
- Intermittent Water Pump Load: 60W × 4 Hours = 240 Wh/day
- Inverter Standby Parasitic Load: 15W × 24 Hours = 360 Wh/day
- Total Combined Daily Power Demand: 840 Wh + 240 Wh + 360 Wh = 1,440 Watt-hours (Wh) per day
In this scenario, the cumulative daily demand is 1,440 Wh (1.44 kWh). Because the backup system must deliver this energy reliably, your battery bank and solar panels must be sized to meet this 1.44 kWh footprint under worst-case weather conditions. If you are looking to calculate the raw power costs of running your grow room under normal grid conditions, enter your equipment specs into our free Hydroponic Cost & ROI Calculator.
Solar & Battery Backup Sizer v2.0
Calculate exact battery capacity (Ah/Wh) and solar array size for your off‑grid hydroponic system.
Battery Capacity (Ah/Wh) Sizing & Chemistry Selection
Once you have mapped out your exact daily load inventory, the next engineering phase is sizing your battery storage bank. In an off-grid or emergency backup configuration, your battery bank is the physical reservoir that bridges the gap between solar generation hours and continuous night-time consumption. Sizing this storage medium requires analyzing more than just simple raw capacity. You must calculate depth-of-discharge boundaries, adjust for environmental temperature derating, and select an operating voltage that keeps system currents low and your wiring runs safe.
Usable vs. Gross Capacity: The Depth of Discharge (DOD) Limit
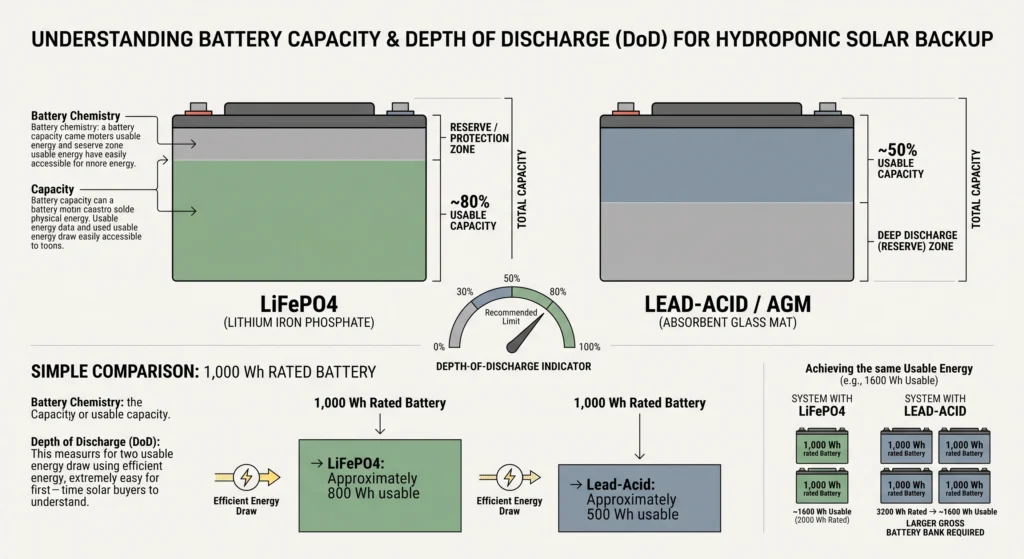
A common mistake in DIY solar setups is assuming that a battery’s rated capacity is fully usable. Every battery chemistry is bound by a strict physical limit known as Depth of Discharge (DOD). Drawing too much energy out of a battery will chemically stress its internal structures, rapidly degrading its lifespan or causing immediate cell failure.
- Lithium Iron Phosphate (LiFePO4): Modern lithium chemistry is highly resilient, allowing a continuous 80% to 90% Depth of Discharge without damaging the cells. If you purchase a 1,000 Wh LiFePO4 battery, you can safely pull 800 to 900 Wh of usable energy out of it day after day.
- Lead-Acid (AGM, Gel, or Sealed Lead-Acid): Traditional lead-acid chemistry is highly sensitive to deep drains. To prevent structural damage and maintain a reasonable lifespan, lead-acid batteries must never be discharged past 50% Depth of Discharge. This means to get 1,000 Wh of usable power, you must purchase a massive, heavy 2,000 Wh lead-acid bank.
Because backing up a crop life-support system requires continuous daily cycling, standardizing on LiFePO4 chemistry is highly recommended. While the initial retail cost is higher, lithium’s ability to withstand over 3,000 to 5,000 charge cycles, compared to lead-acid’s meager 300 to 500 cycles, makes it the most cost-effective solution over a multi-year grow room lifespan. To see how battery selections affect overall startup and long-term operating budgets, explore our Hydroponic System Cost & Budget Breakdowns.
The Mathematics of Amp-Hours (Ah) and Watt-Hours (Wh)
Battery capacity is commonly listed in two metrics:
- Watt‑hours (Wh) – total energy stored
- Amp‑hours (Ah) – current capacity
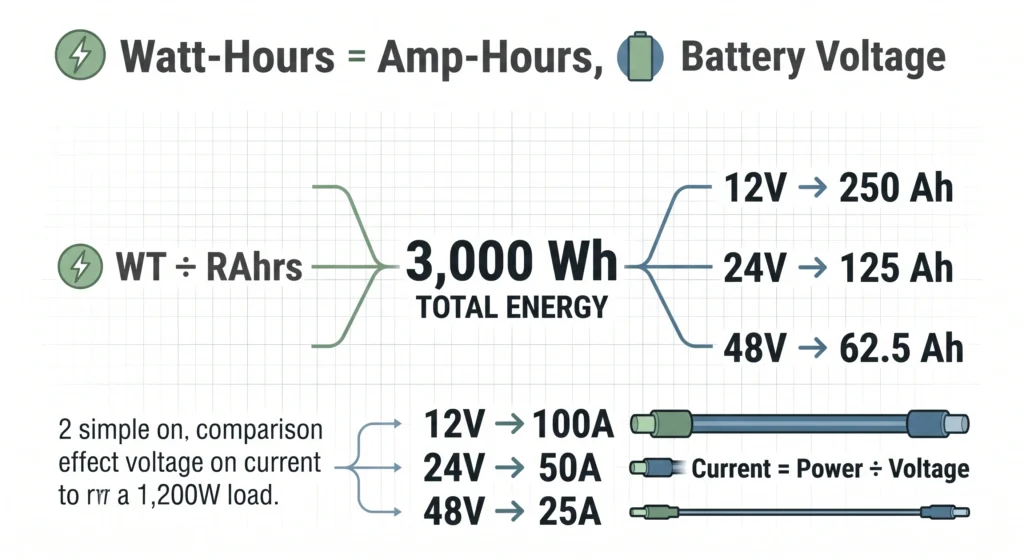
The conversion between them depends on your battery bank’s nominal voltage:
Example: A daily load audit demands 2,400 Wh of usable backup capacity.
With an 80% DoD limit for LiFePO4, the gross battery size must be:
Here is how the same 3,000 Wh translates across different system voltages:
| System Voltage | Amp‑hours (Ah) |
|---|---|
| 12V | 250 Ah |
| 24V | 125 Ah |
| 48V | 62.5 Ah |
Key takeaway: All three configurations store the exact same amount of total energy (3,000 Wh). However, increasing your system voltage reduces the current (amps) flowing through your wiring, allowing you to use thinner, more affordable cables.
System Voltage & Wiring: The Ohm’s Law Trade‑off
Selecting your system voltage dictates the thickness, weight, safety, and cost of your DC wiring. Ohm’s Law tells us:
Current (Amps) = Power (Watts) ÷ Voltage (Volts)
Consider a 1,200W load (e.g., heater + fans + pumps):
| System Voltage | Current | Recommended Wire |
|---|---|---|
| 12V | 100 A | 2/0 AWG (thick & expensive) |
| 24V | 50 A | 6 AWG |
| 48V | 25 A | 10 AWG |
Higher voltage drastically reduces current, allowing you to use thinner, more affordable wiring.
Safety & Budget Guidelines (CEA Recommendations):
- Under 500W: 12V system – simple and acceptable.
- 500W – 1,500W: 24V system – balances component availability and safety.
- Over 1,500W: 48V system – mandatory to avoid high‑amperage heat hazards and fire risk.
Temperature Derating & Environmental Protection
Hydroponic reservoirs and backup systems are often placed in cold basements, garages, or outdoor sheds. Extreme temperatures have a severe effect on battery capacity and chemical health.
⚠️ The Critical Lithium Rule:
Attempting to charge a freezing lithium cell causes lithium plating – a physical process that permanently destroys the anode and creates an immediate fire hazard.
While lead‑acid batteries can discharge in sub‑freezing temperatures, they suffer a 20% to 30% drop in active capacity.
If your backup system sits in an uninsulated space, you have two safe options:
- Insulated enclosure: House the battery inside a temperature‑controlled box.
- Self‑heating battery: Choose LiFePO4 with internal heating pads that use solar power to warm the cells before charging.
💡 Environmental monitoring: If you’re experiencing temperature or humidity swings, keep your VPD levels calibrated. Run your space values through our Vapor Pressure Deficit (VPD) Calculator to maintain optimal conditions.
ng temperature or humidity swings, keep your VPD levels calibrated. Run your space values through our Vapor Pressure Deficit (VPD) Calculator to maintain optimal conditions.
Solar Panel Sizing & MPPT Controller Sizing Math
Once your daily energy consumption footprint and battery bank operating voltage are locked in, you must engineer the charging side of the loop. In an emergency backup or off-grid grow room configuration, solar panels are your primary generator. You cannot simply prop random solar panels against a wall and expect them to charge a deep-cycle battery bank. You must calculate local solar irradiance limits, size your panel array to fully replenish your energy deficit during a restricted window of daylight, and select a charge controller capable of translating variable solar voltages into safe, high-current charging profiles without frying its circuitry.
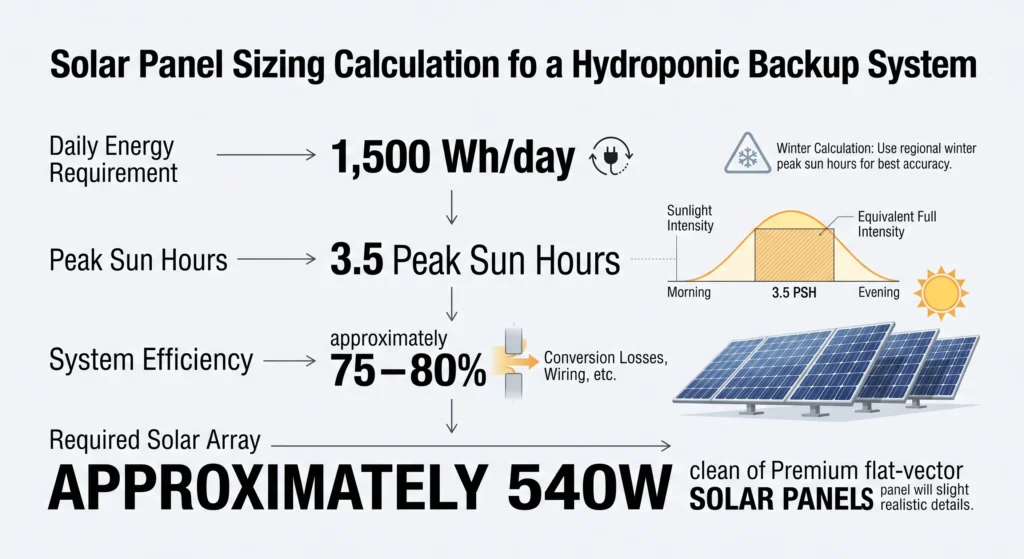
Calculating Solar Array Wattage: The “Peak Sun Hours” Constraint
The single biggest environmental constraint of solar engineering is Peak Sun Hours (PSH). A peak sun hour is defined as any hour where solar irradiance reaches 1,000 W/m². It is not the raw duration of daylight, but a cumulative metric that compresses variable morning and afternoon sun into a few concentrated hours of peak charging potential.
To calculate the required wattage of your solar panel array, divide your total daily energy footprint by your regional winter peak sun hours, factoring in standard system inefficiencies (wire resistance, panel dust, and thermal losses).
Core formula:
ηsystem = 0.75–0.80 (losses from dirty panels, heat, and wire resistance)
Example: A system must replenish 1,500 Wh of daily backup power in an area with 3.5 Peak Sun Hours (winter average):
You must install at least 540 Watts of solar panels to safely charge this system.
💡 For precise indoor lighting calculations, use our Grow Light PPFD and DLI Calculator.
📊 Compare DIY and pre‑packaged kit costs in How Much Does a Hydroponic System Cost? Budget Breakdowns for Every Setup.
Solar Array & MPPT Controller Sizer v2.0
Calculate required panel wattage, charge controller amperage, and cold‑weather voltage safety buffers.
Controller Technology: PWM vs. MPPT Efficiencies
To safely route solar power into your battery bank, you must install a charge controller. Directly connecting solar panels to a battery will overcharge it, boil the electrolyte, or trigger thermal runaway.
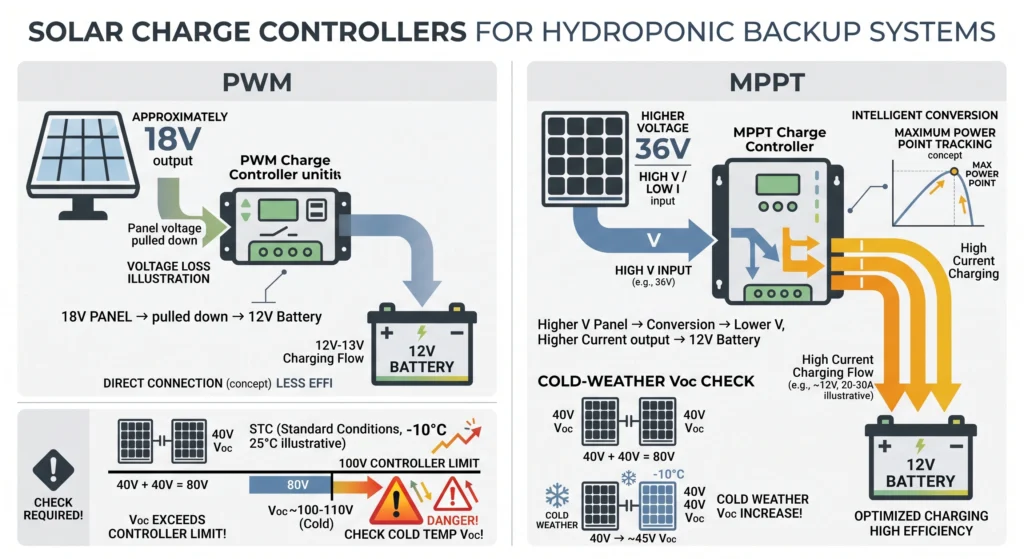
Charge controllers fall into two distinct tiers:
- Pulse Width Modulation (PWM) – basic electronic switch
- Maximum Power Point Tracking (MPPT) – advanced DC‑to‑DC converter
PWM Controllers
A PWM controller forces the solar panel to operate at the battery’s voltage. For example, a 100W panel rated at 18V (Vmp) connected to a 12V battery will be dragged down to 12V.
MPPT Controllers
An MPPT controller constantly tracks the panel’s Maximum Power Point and converts high‑voltage, low‑current power into low‑voltage, high‑current power matched to your battery’s charging needs.
| Feature | PWM | MPPT |
|---|---|---|
| Efficiency | ~70% | ~95% |
| Energy harvest | Low | 30% more |
| Best for | Small, budget builds | All grow-room backups |
Recommended: For any grow room safety backup where winter charging time is limited, an MPPT controller is mandatory.
📖 Learn more about PV components and solar engineering terms in our Hydroponics A‑to‑Z Technical Glossary.
Sizing MPPT Safety Thresholds: Voc Cold‑Weather Calculations
Sizing an MPPT charge controller requires verifying two critical safety boundaries:
- Maximum Output Current (Amps) – how hard the controller can push electricity into your battery
- Maximum Input Voltage (Voc) – the maximum voltage the controller can handle
Sizing Current (Amps)
Divide your total solar array wattage by your battery’s nominal voltage:
Example: A 600W panel array on a 24V battery bank requires at least a 25A charge controller (600W ÷ 24V).
Sizing Voltage (Voc) – The Critical Trap
Every solar panel has an Open‑Circuit Voltage (Voc) rated at 25°C (77°F). This is the maximum voltage when disconnected from any load.
In freezing conditions (e.g., ‑15°C / 5°F), panels produce voltage spikes 10% to 15% higher than their STC rating.
Example:
- Two 40V Voc panels in series = 80V (STC)
- Your MPPT controller has a 100V max input limit – seems safe.
- On a freezing winter morning, that 80V string surges past 105V.
- Result: The controller’s input transistors fry instantly.
🔍 See how incorrect wiring can lead to grow room hazards in our 10 Most Common Beginner Hydroponic Mistakes.
Runtime and Duty-Cycle Planning: Optimising Battery Reserves
When engineering an off-grid or emergency solar backup system, many growers assume that the only way to survive a prolonged multi-day power outage is to purchase an enormous, expensive battery bank. However, the most elegant engineering solutions do not rely on throwing unlimited capital at physical hardware; they rely on intelligent software coordination and biological resource management. By implementing a strategic Duty-Cycle and Irrigation Interval Schedule, you can artificially stretch your battery’s operational runtime by 200% to 500% without buying a single extra Amp-hour of storage.
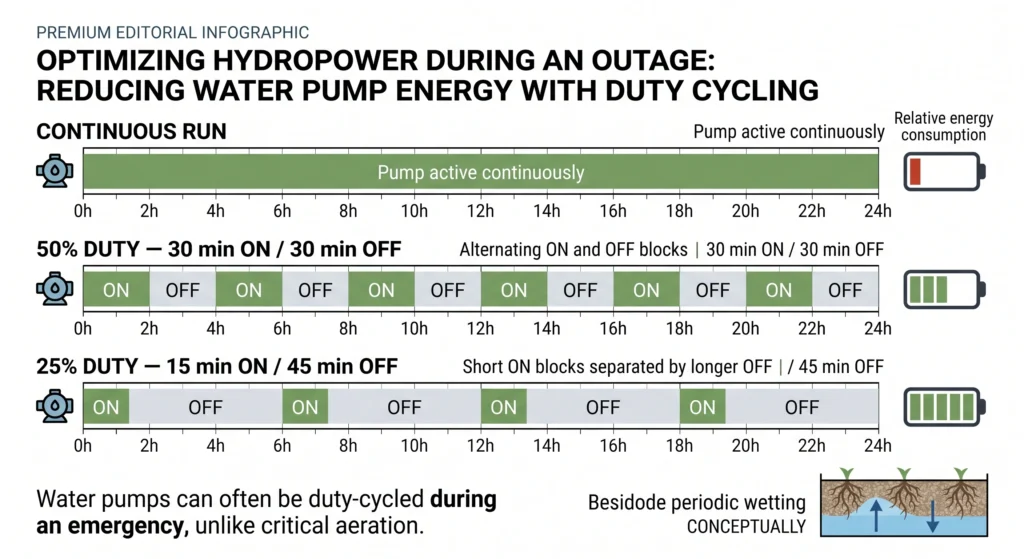
The Power of Intermittent Irrigation: Duty‑Cycling the Water Pump
Unlike indoor grow lights, which must run continuously during daylight hours, hydroponic water pumps do not need to run 24/7 to keep plants alive. In fact, continuous submersion often leads to over‑saturation and a drop in localized dissolved oxygen.
This is especially true in a DIY ebb and flow table setup, where roots thrive on cyclic wetting and drying intervals.
Under standard grid‑connected conditions, you might flood your Hydroton clay pebble bed for 10 minutes every hour. During an emergency power outage, however, you can safely widen this interval.
Because expanded clay pebbles retain a high‑humidity boundary layer around the roots for long periods, you can stretch your timing schedule to:
- Daytime: One 10‑minute flood every 2 to 3 hours
- Nighttime: One 10‑minute flood every 4 hours (transpiration drops significantly)
💡 Fine‑tune your crop’s exact wetting cycles based on your active media choices with our Aeroponic Mist & Interval Timer Calculator.
Duty-Cycle Runtime Extender v2.0
See how duty‑cycling your water pumps dramatically extends battery runtime during an emergency power outage.
The Dissolved Oxygen Cliff: Air Pump Constraints
While water pumps can be duty‑cycled aggressively, air pumps are governed by entirely different biological limits. In recirculating systems (especially DWC or NFT), the water volume is compact and the root mass is dense.
Roots absorb dissolved oxygen (DO) directly from the solution. Water holds a limited amount of dissolved gas — rarely exceeding 8 to 10 PPM. An active root mass can exhaust DO in a stagnant reservoir in under 2 to 4 hours.
Because of this biological constraint, air pumps must be treated as critical continuous loads:
- Best practice: Run air pumps 24/7 during an outage.
- Minimum acceptable: 30 minutes ON / 30 minutes OFF schedule.
- Never: Leave aerators unpowered for multiple consecutive hours.
Emergency Priority Load Shedding SOP
If you experience a prolonged power outage during winter or peak summer, you will face an immediate conflict between crop life support and temperature management. In a closed‑loop grow room, heavy‑draw components (extraction fans, heaters, AC units) consume thousands of watts, far exceeding what any budget‑friendly solar battery bank can support.
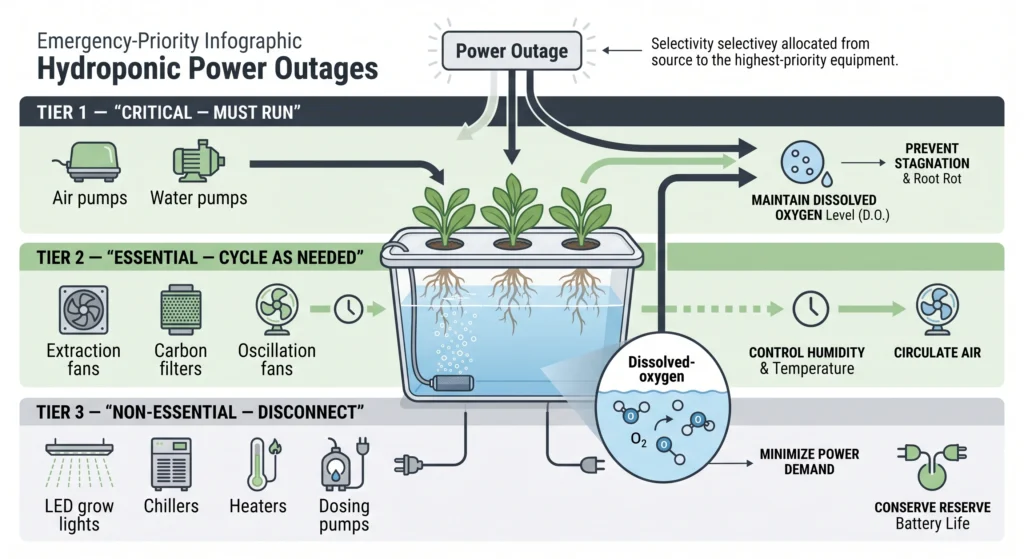
To survive, you must execute a strict Emergency Load Shedding Standard Operating Procedure (SOP). Group your equipment into three distinct priority tiers and cut power to non‑essential loads immediately:
| Priority | Equipment | Action |
|---|---|---|
| Tier 1 Critical | Water pumps (intermittent) & air pumps | ✅ Must run |
| Tier 2 Essential | Extraction fans, carbon filters, oscillation fans | 🔄 Cycle as needed |
| Tier 3 Non‑Essential | LED grow lights, chillers, heaters, dosing pumps | ❌ Disconnect immediately |
📖 See how ventilation and environmental factors interact in our 10 Most Common Beginner Hydroponic Mistakes guide.
Baseline Benchmarks for Hydroponic Backup Sizing
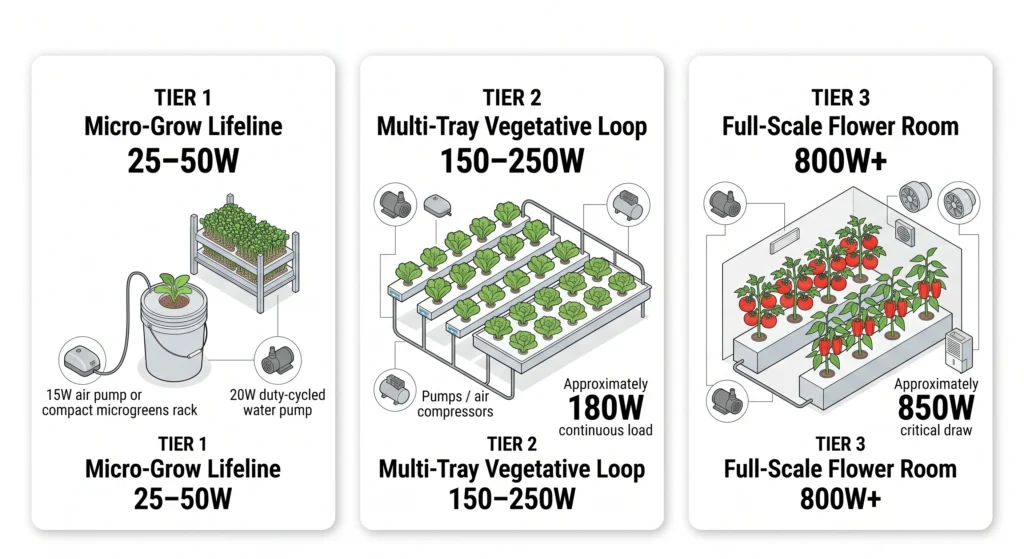
While mastering electrical formulas is crucial, translating theoretical mathematics into physical hardware requires checking your numbers against proven engineering baselines. In a controlled environment agriculture (CEA) facility, backup demands scale based on the complexity of your irrigation loops, plant canopy transpiration rates, and automation profiles. A single, low-power home hobbyist setup sits at an entirely different scale than a multi-bench commercial nursery. By examining three standardized, real-world grower benchmarks, you can choose a physical hardware footprint that balances cost, safety, and operational reliability.
Hydro Backup System Tier Selector v2.0
Select your grow room scale below to instantly load engineered solar battery specs, wiring profiles, and safety configurations.
Tier 1: The Micro‑Grow Lifeline (25W – 50W)
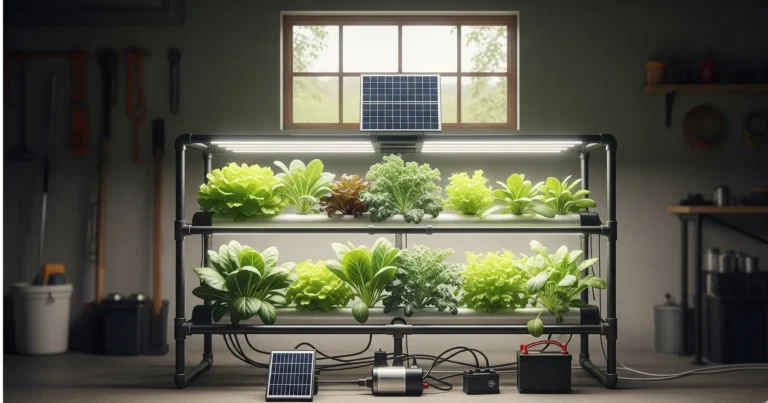
The Micro‑Grow Lifeline represents the standard home hobbyist setup — a small, single‑reservoir growing space such as a single DWC bucket or a small vertical microgreens rack.
Typical equipment:
- 15W dual‑diaphragm air pump
- 20W low‑head submersible pump (duty‑cycled)
- Voltage: 12V
- Battery: 12V 100Ah LiFePO4
- Runtime: Easily powers life‑support loop for a full 24‑hour grid outage
📊 Compare budget options for this tier in our Hydroponic System Cost Guide.
Tier 2: The Multi‑Tray Vegetative Loop (150W – 250W)
The Multi‑Tray Vegetative Loop supports commercial‑scale nurseries, multi‑channel leafy greens NFT systems, or multiple Ebb & Flow tables.
Typical equipment:
- Multiple water pumps with high‑head lift (vertical clearance)
- Multiple air compressors
- Continuous running load: ~180 Watts
- Voltage: 24V battery bank
- Benefit: Slashes DC current draw in half (< 8 Amps)
- Result: Thinner, cheaper wiring and improved safety
🔧 Experiencing electrical noise or slow water movement? Run your configuration through our troubleshooting logs to avoid the 10 biggest crop‑killing beginner mistakes.
Tier 3: The Full‑Scale Flower Room (800W+)
The Full‑Scale Flower Room benchmark represents a heavy‑duty, commercial‑grade indoor CEA setup — mature, heavy‑canopy fruiting crops like tomatoes and peppers.
Critical equipment during outage:
- Water pumps (life‑support)
- Extraction fans (prevent mold)
- Small dehumidifier (control humidity)
- Continuous critical draw: ~850 Watts
- Voltage: 48V DC bus with heavy‑duty, high‑capacity lithium storage
- Why: An 850W load on 12V draws 70+ Amps — a massive fire hazard
- Result: 48V keeps operating currents incredibly low and safe
🌱 Select the perfect growing methodology and canopy support frames for this size crop in our Greens vs Fruit: Best Hydroponic System Match Guide.
Drop‑In Power Stations vs. DIY Solar Builds
When finalizing your off‑grid hydroponic backup system, you must choose between two distinct engineering paths:
- Drop‑In Solar Power Station – all‑in‑one units (EcoFlow, Bluetti, Jackery)
- Custom DIY Solar Build – separate components (batteries, MPPT, inverter, busbars, fuses)
Both are capable of keeping your pumps active during a power crisis, but they present significant trade‑offs in installation complexity, upfront cost, serviceability, and transfer speed.
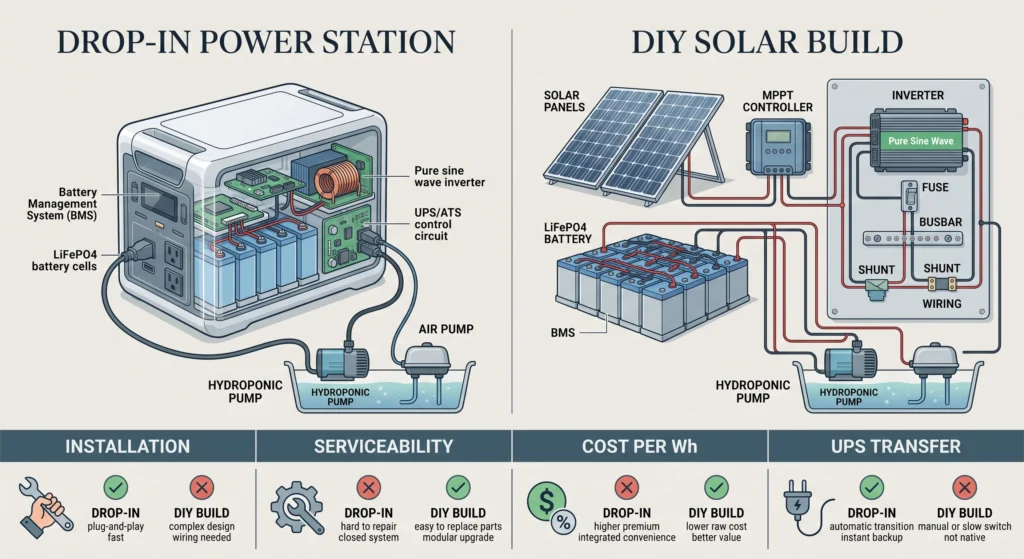
The Power Station Path: Plug‑and‑Play Simplicity & UPS Latency
Drop‑in power stations pack a high‑capacity lithium battery, BMS, MPPT solar charge controller, and pure sine inverter into a single, portable chassis.
Key advantage: Integrated Uninterruptible Power Supply (UPS) / Automatic Transfer Switch (ATS) function. When grid power fails, the unit switches to battery in under 20 milliseconds.
🔌 Evaluate high‑end automation platforms that benefit from this seamless UPS protection in our DIY Automated Hydroponics Systems masterguide.
The DIY Component Path: Maximum Serviceability & Sizing Economics
While power stations excel in simplicity, they suffer from two major limitations:
- Poor serviceability – a single failed component renders the entire unit useless, requiring return to the manufacturer
- High cost‑per‑watt‑hour – proprietary expansion modules are expensive
- Serviceable: Swap out any failed component in minutes
- Scalable: Raw LiFePO4 batteries wired in parallel/series are significantly cheaper per Watt‑hour than proprietary expansions
- Resilient: No single point of failure — if the MPPT dies, the battery and inverter keep working
Quick Comparison
| Feature | Power Station | DIY Build |
|---|---|---|
| Installation | ✅ Plug & play | Requires wiring knowledge |
| Serviceability | ❌ Proprietary, hard to repair | ✅ Fully modular |
| Cost per Wh | 💰 Higher | 💰 Lower |
| UPS Transfer Speed | ✅ <20ms | Varies (requires additional ATS) |
📊 Compare the exact cost differences between ready‑made systems and custom home builds in How Much Does a Hydroponic System Cost? Budget Breakdowns for Every Setup.
Off‑Grid Sourcing & Budget Tracker v2.0
Toggle your preferred backup architecture path below, then check off components as you source them to dynamically calculate your project build costs.
Mandatory DIY Safety Infrastructure: DC Overcurrent Fuses
If you execute a custom DIY solar build, you must construct it with rigorous electrical safety protocols. Deep‑cycle lithium batteries store massive amounts of chemical energy. If a raw, unfused wire from your battery anode touches your steel stand, the battery will dump its entire current potential instantly.
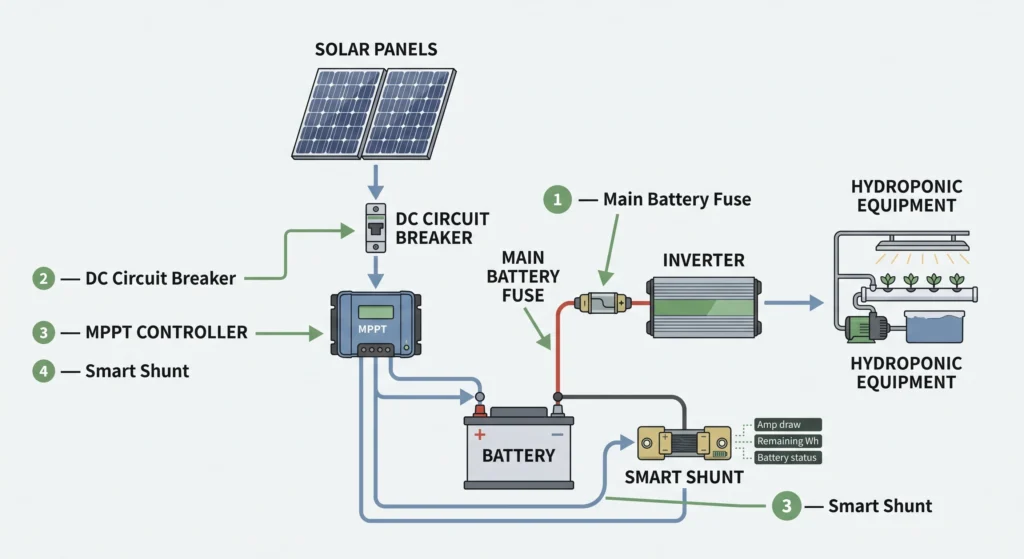
To secure your DIY build against overcurrent hazards, follow these standard off‑grid installation rules:
1. Install a Main Battery Fuse
Mount a heavy‑duty, high‑amperage ANL or MRBF fuse block directly on your battery's positive terminal post. The fuse must be rated to match your wire's maximum ampacity (typically 100A – 150A for standard 12V or 24V systems).
2. Incorporate a DC Circuit Breaker
Install a manual reset DC circuit breaker on the positive PV line between your outdoor solar panels and your indoor MPPT charge controller.
3. Implement a Smart Shunt Monitor
Wire a high‑precision digital shunt inline on the negative cable of your battery bank. A shunt measures the voltage drop across a calibrated resistor, allowing you to monitor:
- Real‑time Amp‑draw
- Remaining Watt‑hours
- Battery chemistry balance
📊 Run automated calculations on how long your current battery levels will hold under standard grow room conditions using our free Hydroponic Operating Cost and ROI Calculator.

Why it's necessary: A lithium backup featuring a built-in inverter serves as the drop-in heart of a home hydroponic backup. It eliminates complex wiring while providing deep-discharge resilience for prolonged outages.nnKey Spec: LiFePO4 chemistry with integrated inverter.
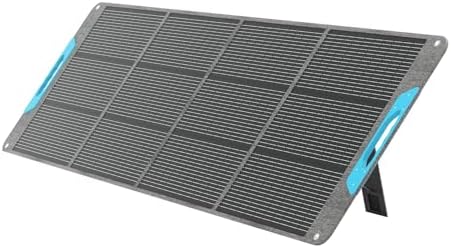
Why it's necessary: These panels provide the exact generation capacity needed to meet the 4.5 effective sun hours formula. They allow the battery to recover fully in one sun day after an overnight drain.nKey Spec: 200W output capacity per panel.

Why it's necessary: This controller extracts the maximum possible power from your panel array. It outperforms PWM controllers by adjusting voltage dynamically, which speeds up recovery during limited winter sun hours.nKey Spec: Maximum Power Point Tracking (MPPT) efficiency.
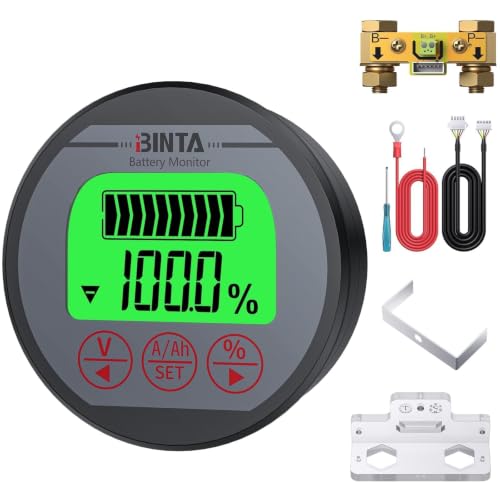
Why it's necessary: A shunt measures the exact current flowing in and out of the battery, providing a true state of charge. This ensures the backup system never fails silently by giving you exact data on remaining runtime.nKey Spec: Real-time current tracking.
Get All 7 Solar Backup Tools in One Place
Access the complete Solar & Hydroponic Backup Tools Suite — a standalone page with the Solar Sizer, MPPT Calculator, Runtime Extender, Tier Selector, Budget Tracker, Topology, and Battery Chemistry all in one interactive hub.
- Solar & Battery Sizing
- MPPT & Panel Sizing
- Runtime Extender
- System Tier Selector
- Budget Tracker
- Solar Topology
- Battery Chemistry
Frequently Asked Questions (FAQ)
How big a solar battery do I need for hydroponics?
u003ca href=u0022https://mistculture.com/hydroponic-pump-sizing-guide/u0022u003eSize the battery directly from your constant pumpu003c/au003e load. Calculate the watt-hours by multiplying the load in watts by the desired runtime hours. Add a 25 percent safety margin, then divide by the usable capacity of your chosen chemistry (roughly 80 percent for lithium and 50 percent for lead-acid). For example, an 80W pump running for 24 hours requires about 2400 Wh of usable lithium capacity.
How many solar panels do I need to run hydroponics?
You need enough wattage to recharge your daily battery draw in one single sun day. Divide the daily watt-hours by the product of your local sun hours and a 0.8 efficiency rating. A 2400 Wh daily draw receiving 4.5 sun hours needs roughly 670W of panels. Always oversize slightly to compensate for weaker winter sun.
What should run during a hydroponic power outage?
Pumps and aeration stand as the top priorities because roots die rapidly without oxygen and flow. Grow lights can pause. A recirculation pump can often be duty-cycled (30 minutes on, 30 minutes off) to stretch the battery reserve. Size your backup strictly for the must-run list, not the entire grow room.
Can I use a solar generator instead of DIY solar batteries?
Yes. A LiFePO4 solar generator, also known as a power station, contains a rechargeable battery and an inverter, making it the simplest reliable backup. You can plug it in immediately and add solar panels later. It costs more per watt-hour than building a DIY battery bank, but it saves wiring time and eliminates construction risk.
Take Action: Secure Your Grow Room Today
Do not wait for a catastrophic winter storm or summer grid failure to test your crop's resilience. Use our interactive resources, watch our step-by-step build breakdowns, and configure your off-grid backup today before a sudden power drop puts your entire investment at risk.
Never Lose a Crop to a Power Outage Again
Subscribe to our YouTube channel for weekly, high-authority agritech builds, and access our interactive grow room calculations.
Conclusion
Sizing a solar battery backup for your hydroponics system requires exact mathematics, not guesswork. By inventorying your constant and periodic loads, applying the correct safety margins, and understanding the depth-of-discharge limits of your chosen battery chemistry, you ensure your pumps keep running when the grid fails. Pairing that battery with an appropriately sized panel array and an MPPT controller guarantees daily recovery, while duty-cycling stretches your runtime even further. Ensure you review the master workbook data to align these power requirements with your specific plant needs. Have you run a simulated power outage test on your current hydroponic setup yet?

Continue Your Learning Journey