Hydroponic Hops for Homebrewing: Trellis, Photoperiod, and Nutrient Demands

Table of Contents
- Photoperiod Manipulation and Lighting for Hop Flowering
- Trellis Engineering and Structural Dynamics
- Hydroponic Hop EC Chart and Fertility Schedule
- Hydroponic System Selection and Irrigation Engineering
- Integrated Pest and Disease Management
- Harvest, Drying, and Post-Harvest Processing
- Commercial Economics vs. Residential DIY Hydroponic Hops
- Frequently Asked Questions
- Conclusion
Disclosure: MistCulture summarizes verified product specs, engineering data, and community feedback. We may earn an affiliate commission if you purchase through our links. Regulations vary by location; this content is for educational purposes only.
Hops (Humulus lupulus) are one of the most technically demanding perennial crops in controlled environment agriculture. Growing them hydroponically gives homebrewers and craft operations unprecedented control over alpha-acid synthesis, essential oil accumulation, and bine vigor, but turning a vine that climbs 20 feet in a single season into a recirculating or drain-to-waste system takes real engineering.
Without soil acting as a chemical buffer, hydroponic hops react fast to root-zone imbalances. Too much nitrogen late in bloom suppresses lupulin gland development; an under-built trellis collapses under a fully hydrated canopy. This guide covers the lighting schedules, structural physics, fertility programs, and drying protocols needed to take hop bines from dormant rhizome to a high-alpha harvest ready for the brew kettle.
Photoperiod Manipulation and Lighting for Hop Flowering
Quick summary: Hops need a strict shift from an 18-hour vegetative light cycle to 12 hours of uninterrupted darkness to trigger flowering. Target a Daily Light Integral (DLI) of 35–50 mol/m²/day during bloom for dense cones and high resin output.
| Stage | Photoperiod | PPFD | Target DLI | Focus |
|---|---|---|---|---|
| Vegetative (Weeks 1–8) | 18L / 6D | 400–600 µmol/m²/s | 25–35 mol/m²/day | Bine extension & node development |
| Flowering (Weeks 9–18+) | 12L / 12D (14+ consecutive days) | 600–900 µmol/m²/s | 35–50 mol/m²/day | Burring, cone mass, lupulin glands |
Hops are short-day, obligate photoperiodic plants. Outdoors, bines climb through the lengthening days of spring and flower only after the summer solstice as nights lengthen. Indoors or in a sealed greenhouse, you have to engineer that transition yourself.
During the vegetative phase, bines need at least 18 hours of continuous light to sustain apical growth. Dropping below 6 hours of darkness triggers premature flowering and stunted plants with few cone sites. Once bines reach about 75% of your trellis height, switch to 12 hours light / 12 hours uninterrupted darkness. Hold that dark period strictly for at least 14 consecutive days, even minor light leaks can stall flowering or trigger hermaphroditism.
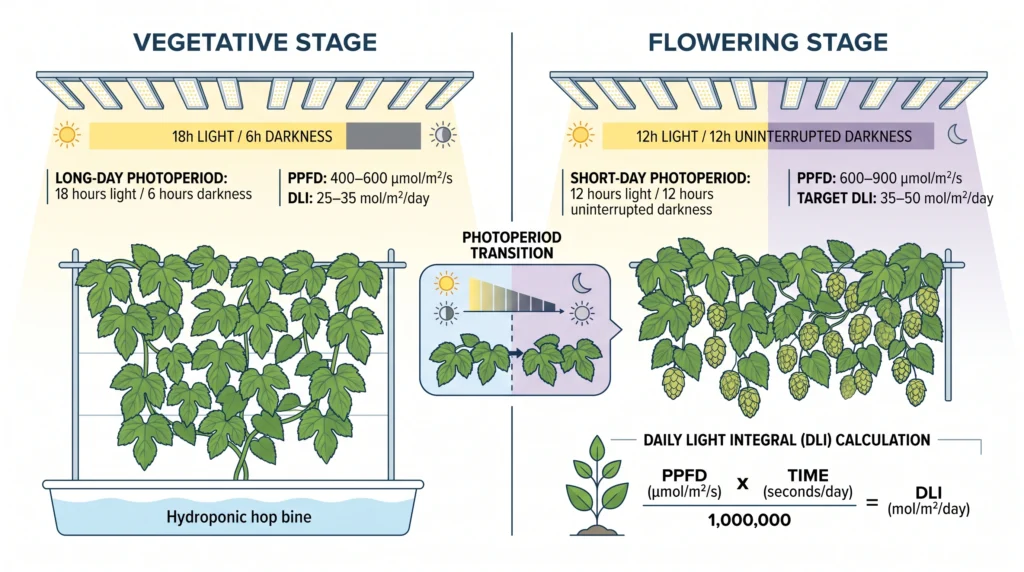
Lighting intensity has to match the plant’s high photosynthetic capacity. Target 400–600 µmol/m²/s PPFD during veg, scaling to 600–900 µmol/m²/s in flower. Use the standard photobiology formula to calculate DLI:
DLI = PPFD × Photoperiod (hours) × 3600 ÷ 1,000,000
Example: a flowering canopy averaging 800 µmol/m²/s under a 12-hour photoperiod yields a DLI of 800 × 12 × 3600 ÷ 1,000,000 = 34.56 mol/m²/day.
For peak lupulin production, aim for 35–50 mol/m²/day total. In tall or vertical setups, inter-canopy light bars alongside overhead fixtures help lower lateral branches get adequate PAR. See our LED distance and PPFD guide for fixture placement math.
Trellis Engineering and Structural Dynamics
Quick summary: Hop bines generate heavy vertical loads and wind resistance, so support structures need to handle 100+ lbs per plant site. Train 2–3 dominant bines clockwise around coir or sisal twine for the best light distribution and stability.
Hops don’t climb with tendrils or adhesive roots, they use stiff hairs along hexagonal stems to wind around physical supports, which is why they’re called “bines,” not vines. A mature, fully hydrated hydroponic hop plant can weigh 25–40 lbs and exerts serious leverage in full leaf, so trellis design can’t be an afterthought.
Cable tension and load physics
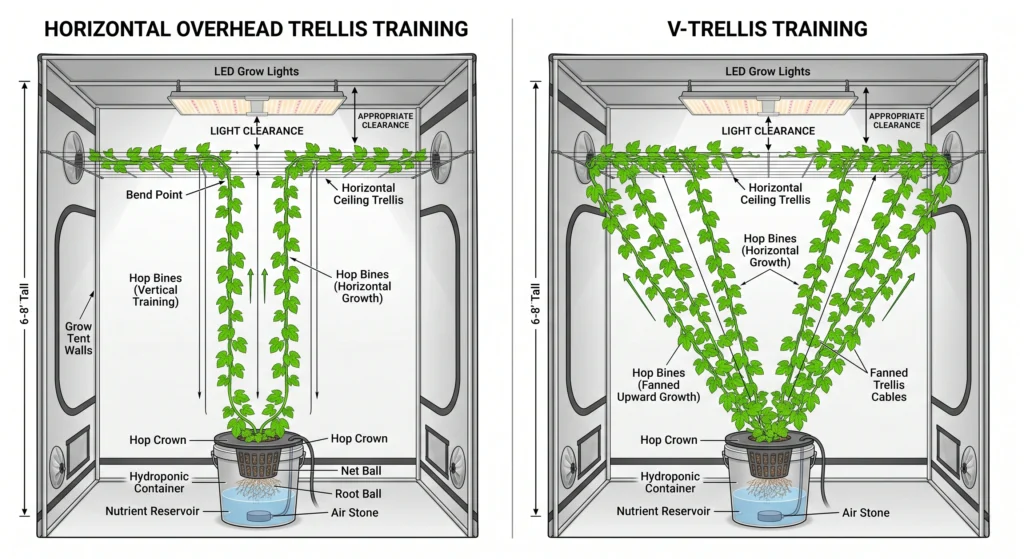
Commercial outdoor hop yards use 18–20 foot overhead wire systems. Indoors, ceiling height is usually limited to 12–15 feet, compensate by training bines horizontally along overhead wires once they hit the ceiling, or use a V-trellis where two strings run upward from a single crown at a 30-degree angle to double the effective growing length.
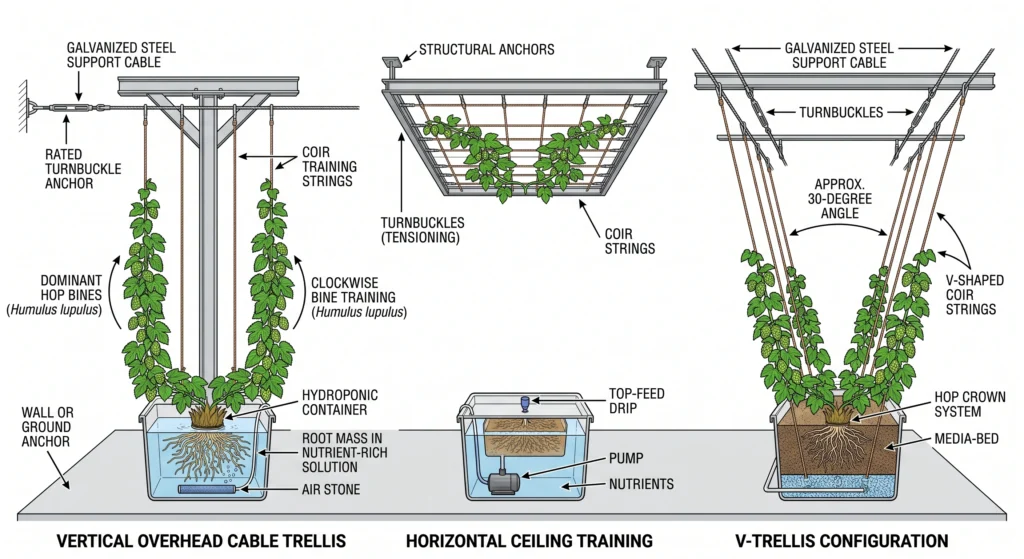
Use a minimum 3/16-inch aircraft-grade galvanized steel cable anchored with rated turnbuckles to structural members or heavy-duty posts. Avoid standard copper or light-gauge aluminum wire, cyclic loading from air-circulation fans will fatigue and fail it over time.
Stringing and training protocol
- Media anchor: Anchor 100+ lb tensile coir or sisal twine to the base of the container or a weighted bottom cable. Coir’s rough texture gives the bine hairs a better grip than synthetic polypropylene.
- Bine selection: Once shoots reach 12–18 inches, select the 2–3 thickest, most vigorous bines per site and train them clockwise, Northern Hemisphere hops naturally follow the sun this way, and forcing them counter-clockwise causes them to uncoil and fall.
- Basal pruning: Remove weak shoots at the base to focus growth into the selected bines. Strip the bottom 2 feet of leaves once the plant hits 8 feet to improve airflow and cut down on splash-zone pathogens.
For multi-tier or space-constrained setups, see our DIY vertical hydroponic tower guide.
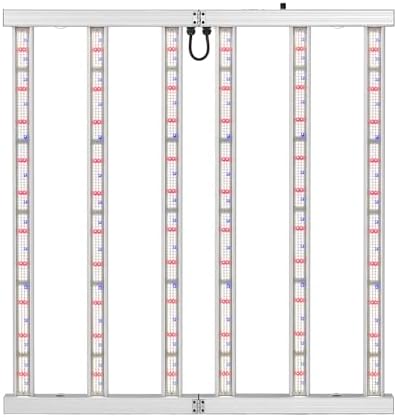
- 【High-Efficiency LED Grow Light】33.5 inch LED grow light has 6 unique elongated light bar that provides more uniform and…
- 【Dimming Daisy-Chain】Easier and more effective dimmer switch, can adjust brightness from 0% to 100% to adapt the needs o…
- 【Superior Heat Dissipation and No Noise】Our grow lights are made of 6 lightweight aluminum bars, which has efficient hea…
- Why it’s necessary: High-canopy crops like hops need intense PAR penetration to lower lateral branches for strong flower site development and alpha-acid synthesis.
- Key spec: 600W draw / 2.7 µmol/J efficiency / full-spectrum with far-red
Hydroponic Hop EC Chart and Fertility Schedule
Quick summary: Nutrient needs shift from high-nitrogen during bine extension to high-potassium, moderate-phosphorus during bloom. System EC should peak between 2.2–2.6 mS/cm during cone expansion, then taper off for the final flush.
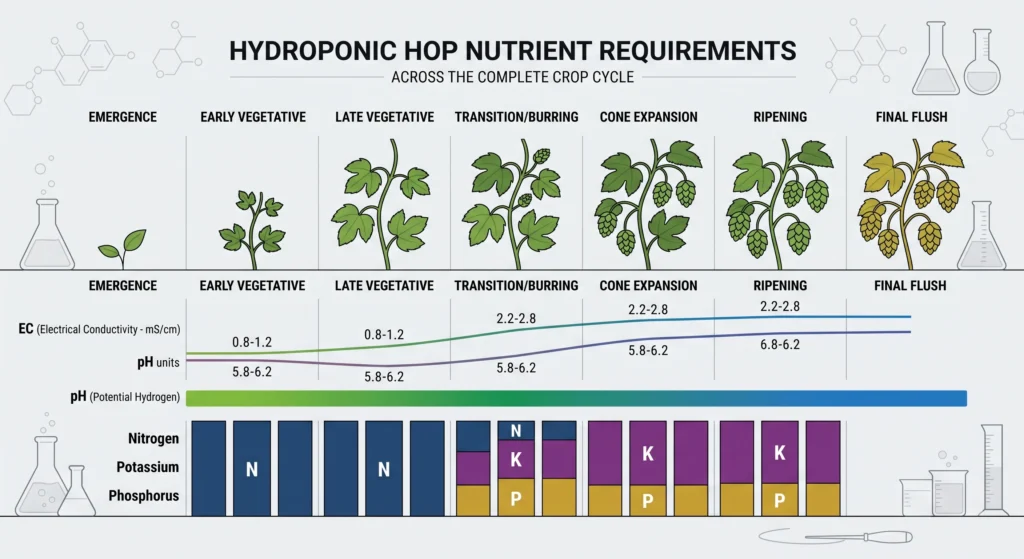
Excess nitrogen late in flowering produces airy, low-density cones with weak alpha-acid content and a grassy aroma. Potassium deficiency during burring suppresses lupulin gland formation and hurts brewing value directly.
| Stage | Duration | EC (mS/cm) | pH | N (ppm) | P (ppm) | K (ppm) | Ca (ppm) | Mg (ppm) |
|---|---|---|---|---|---|---|---|---|
| Emergence | Wks 1–2 | 1.2–1.6 | 5.8–6.2 | 100 | 40 | 120 | 90 | 40 |
| Early Veg | Wks 3–5 | 1.8–2.2 | 5.8–6.2 | 180 | 50 | 180 | 120 | 50 |
| Late Veg | Wks 6–8 | 2.0–2.4 | 5.8–6.2 | 220 | 60 | 220 | 140 | 60 |
| Transition / Burring | Wks 9–10 | 2.0–2.4 | 5.8–6.2 | 150 | 80 | 250 | 120 | 60 |
| Cone Expansion | Wks 11–15 | 2.2–2.6 | 5.8–6.2 | 110 | 90 | 280 | 100 | 60 |
| Ripening | Wks 16–17 | 1.4–1.8 | 6.0–6.4 | 60 | 50 | 180 | 80 | 40 |
| Final Flush | Final 3–5 days | 0.2–0.4 | 6.2–6.5 | 0 | 0 | 0 | 0 | 0 |
Use our free hydroponic nutrient calculator to convert these elemental targets into batching amounts for your reservoir volume.
Phase-specific nutrient dynamics
- Vegetative phase: High nitrate-nitrogen drives internodal elongation and foliage. Keep an N:K ratio near 1:1, and keep calcium elevated to prevent stem-tip dieback during rapid growth spurts of up to 12 inches per day.
- Burring & cone expansion: Once photoperiod shifts to 12/12 and white pistillate “burrs” appear, cut nitrogen by about 50% and raise potassium and phosphorus to drive alpha-acid (humulone, cohumulone, adhumulone) and essential oil (myrcene, caryophyllene, humulene) synthesis.
- Maturation & ripening: Lower overall EC. High root-zone salts during final drying cause marginal leaf scorch and interfere with terpene oxidation.
For lockout or pH-drift troubleshooting during stage transitions, see our hydroponic pH and EC mastery guide.
Recommended: Precision Handheld EC/pH Dual Meter
- Why it’s necessary: Daily EC and pH tracking is critical during the high-potassium cone expansion phase to avoid nutrient lockout.
- Key spec: IP67 waterproof / automatic temperature compensation / 0.01 pH resolution
- Check current pricing on Amazon: [Insert Amazon Link Here]
Hydroponic System Selection and Irrigation Engineering
Quick summary: Substrate drip systems (coco coir or perlite) and Recirculating Deep Water Culture (RDWC) are the two main architectures for hydroponic hops. Supply 1.5–3.0 gallons of nutrient solution per mature plant, per day, during peak transpiration.
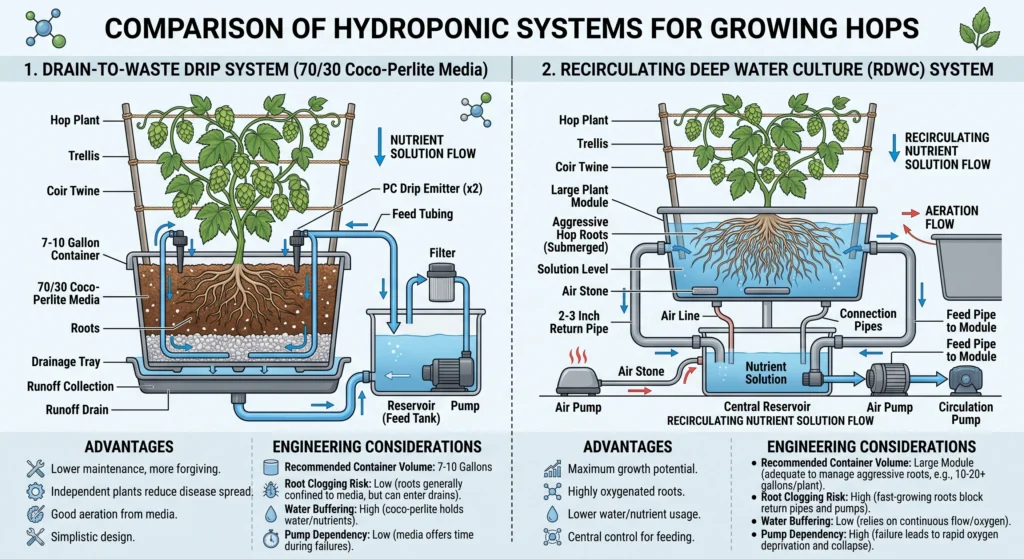
Hop root systems are aggressive, a mature crown can fill a 5-gallon bucket with root mass in a single season, clogging narrow NFT channels or small aeroponic drain ports.
| Feature | Coco/Perlite Drip | Recirculating DWC |
|---|---|---|
| Root clogging risk | Very low | Moderate–high (needs filters) |
| Water buffer safety | High (media holds water) | Low (pump failure = fast wilting) |
| Peak flow capability | High | Extreme |
| Recommended volume | 7–10 gal/plant | 10–15 gal/plant |
| Best for | Homebrew & commercial | Experienced high-yield growers |
Option A: Drain-to-waste drip in coco/perlite (recommended)
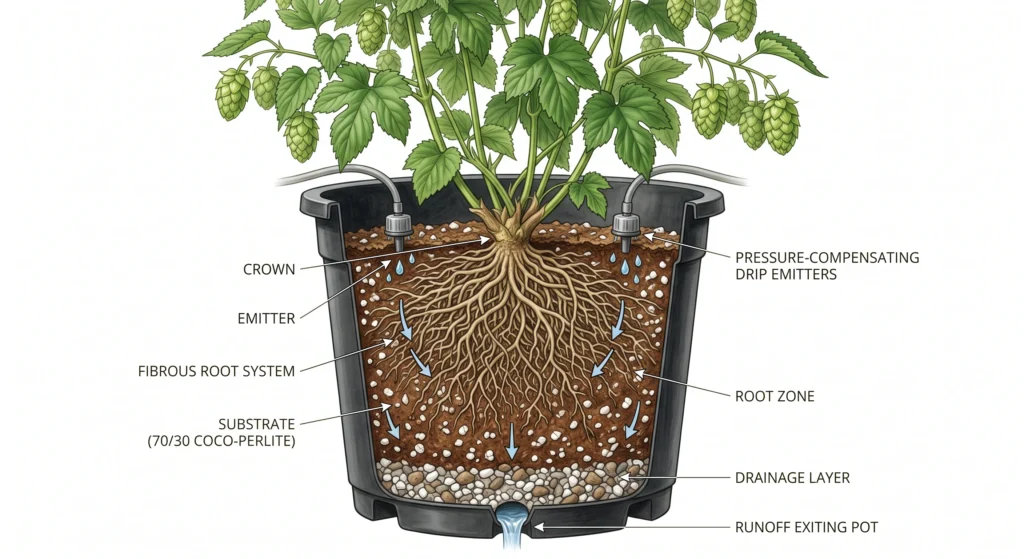
A top-drip system with a 70/30 coarse coco/perlite blend in 7–10 gallon fabric pots or Dutch buckets offers the best margin of safety, coco holds a good 30:70 air-to-water ratio and buffers against pump failure.
- Drip delivery: Two 0.5 GPH pressure-compensating emitters per container, on opposite sides of the stalk base.
- Irrigation frequency: 3–6 short fertigation events per day at peak bloom, aiming for 15–20% run-off to prevent salt buildup.
- Drainage: Elevated drainage trays or a sloped 1.5-inch PVC manifold to route run-off away from the grow space.
Option B: Recirculating Deep Water Culture (RDWC)
RDWC delivers continuous dissolved oxygen directly to bare roots for faster growth, but a mature hop root system can choke standard 1.5-inch fittings, use 2- to 3-inch return plumbing between plant modules and the main reservoir.
For pump sizing and head-pressure calculations, see our hydroponic pump sizing guide.
Integrated Pest and Disease Management
Quick summary: Dense hop canopies attract two-spotted spider mites and hop aphids. Keep airflow high, hold relative humidity at 40–50% during bloom, and use biological controls like Phytoseiulus persimilis for clean, resinous cones.
Primary pests
- Two-spotted spider mites (Tetranychus urticae): Feed on leaf undersides, causing bronze stippling, and web over cones in late bloom, destroying lupulin glands. Introduce predatory mites (Phytoseiulus persimilis or Neoseiulus californicus) at first sign of stippling; keep humidity at 55–60% during veg to suppress reproduction.
- Hop aphids (Phorodon humuli): Vector viruses and secrete honeydew that leads to sooty mold. Deploy green lacewing larvae or Aphidius colemani wasps. Insecticidal soaps/oils are fine in early veg only, never spray oils on developing cones, as it ruins the essential oils.
Fungal pathogen prevention
Downy mildew (Pseudoperonospora humuli) and powdery mildew (Podosphaera macularis) are the biggest fungal threats. Prevent both with:
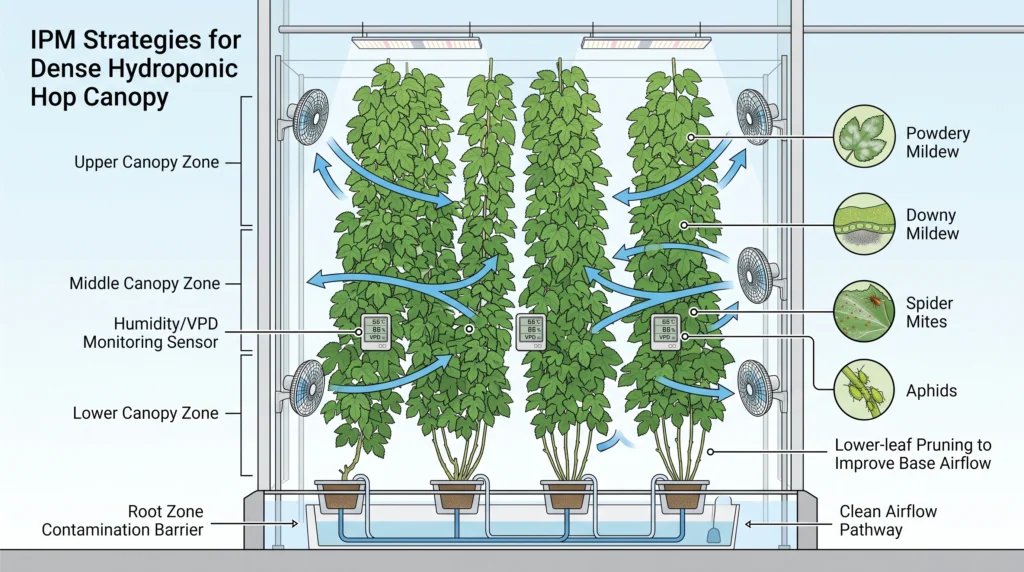
- Air circulation: Continuous, multi-directional airflow across upper, middle, and lower canopy with oscillating fans.
- VPD control: 0.8–1.1 kPa during veg, 1.2–1.5 kPa during flowering, to encourage transpiration while discouraging spore germination.
- Basal pruning: Strip leaves and laterals from the bottom 24 inches of the main bines to keep foliage away from drain trays and reduce spore transmission.
For full biological control schedules, see our hydroponic IPM guide.

- Designed to ventilate hydroponic grow rooms, transfer heating/cooling, cool AV closets, and exhaust odors.
- Dynamic temperature and humidity programming, with timers, grow cycles, scheduling, minimum speed.
- Remotely connect to our WiFi app to access advance programs, view climate data, and set automation.
- Why it’s necessary: Automatically ramps speed to hold strict VPD thresholds and purge excess moisture from dense canopies.
- Key spec: 402 CFM / EC motor / PWM controller with sensor probe
Harvest, Drying, and Post-Harvest Processing
Quick summary: Harvest when moisture drops to 75–80% and lupulin turns golden-yellow with a pungent citrus-resin aroma. Dry at 120–140°F to 8–10% moisture, then vacuum-seal in Mylar and freeze at 0°F to preserve alpha acids.
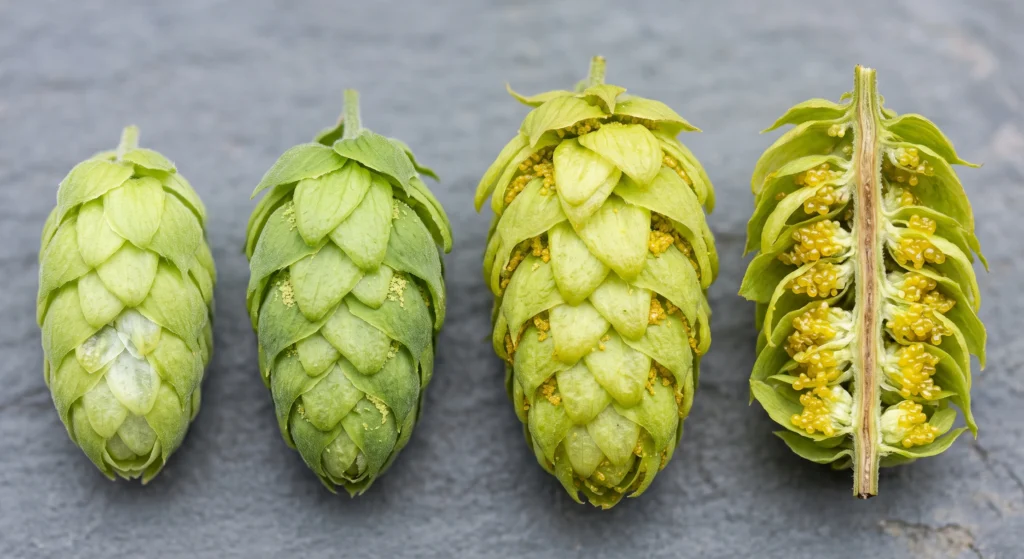
| Parameter | Immature cone | Harvest-ready cone |
|---|---|---|
| Feel | Soft, damp, sponge-like | Paper-dry, springy, rustles |
| Lupulin | Pale yellow, moist, odorless | Deep golden-yellow, sticky |
| Aroma | Fresh-cut grass | Pungent resin, citrus, pine |
| Dry matter | 15–18% | 20–25% |
Harvest determination
- Squeeze test: Mature cones feel dry, springy, and rustle when squeezed; immature ones stay compressed and damp.
- Lupulin inspection: Split a cone along the strig. Peak maturity shows rich, golden-yellow, sticky resin glands that stain your fingers.
- Moisture testing: Weigh a fresh sample (Wwet), dry it fully, and weigh again (Wdry). Dry Matter % = (Wdry ÷ Wwet) × 100. Target 20–25% dry matter (75–80% moisture) before harvest.
Drying and packaging
Fresh cones run 75–80% moisture and need to come down to 8–10% for safe storage. Dry on mesh screens at 120–140°F, never higher, as heat destroys aromatic terpenes and degrades alpha acids. Cones are ready when the central strig snaps cleanly while the outer bracts stay papery and pliable.
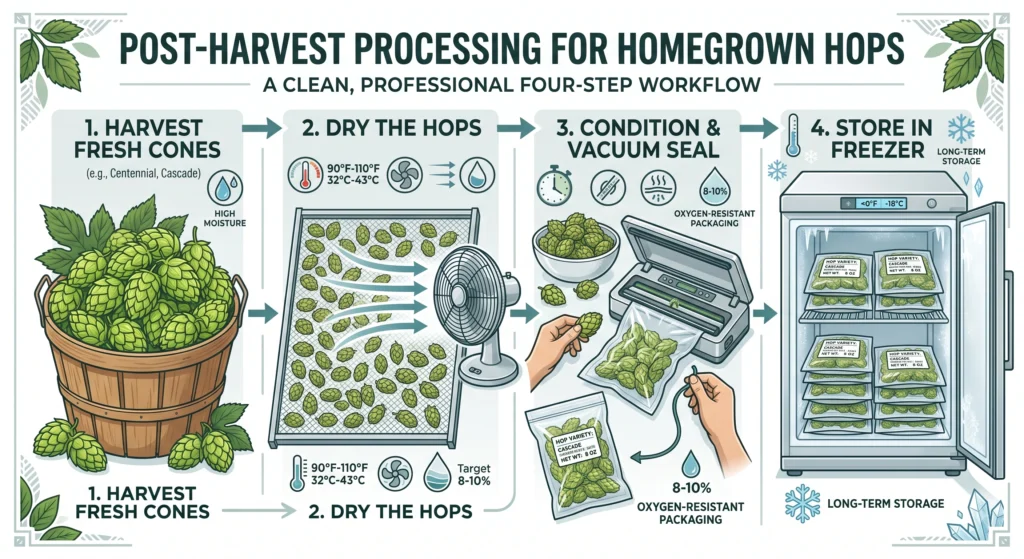
Let dried cones condition at room temperature for 2–4 hours, then vacuum-seal in food-grade Mylar with an oxygen absorber or nitrogen flush. Store at 0°F (-18°C) or lower, hops retain 80–90% of their brewing potency for 2–3 years under these conditions.

- 【3-YEAR WARRANTY,HIGH EFFICIENCY TECHNOLOGY UPGRADE】Cercker 12 trays food dehydrator madchine adopts a rear 2 row drying…
- 【STAINLESS STEEL DESIGN】This food dehydrator is made of 100% BPA-free food-grade stainless steel. It’s corrosion-resista…
- 【DEHYDRATOR 12 TRAYS】Commercial food dehydrator have 12 layer food grade stainless steel trays 11.5 in, with a wrapped d…
- Why it’s necessary: Precise low-temperature drying below 140°F reduces moisture to 8–10% without burning off aromatics.
- Key spec: 95°F–165°F range / digital timer / horizontal airflow
Commercial Economics vs. Residential DIY Hydroponic Hops
Quick summary: A 10-plant indoor or greenhouse setup yields 10–20 lbs of dried, specialty aroma hops annually, breaking even on equipment within 2–4 seasons, mainly through avoided ingredient costs rather than wholesale sales.
| Item | Estimated cost |
|---|---|
| Dutch buckets & irrigation plumbing | $250–$400 |
| High-tension trellis cable & coir | $100–$200 |
| Full-spectrum LED lighting | $600–$1,200 |
| Nutrients, pH buffers, & IPM (annual) | $100–$180 |
| Certified rhizomes (10 plants) | $80–$150 |
| Total initial capex | $1,130–$2,130 |
| Annual yield value (15 lbs @ $25/lb) | $375/year |
| Estimated payback period | 3–5 years |
Outdoor hop yards produce at $3–$6/lb wholesale, selling for $8–$15/lb depending on variety. High electrical costs for lighting, HVAC, and fertigation make it hard for indoor hydroponic setups to compete on commodity pricing alone.
Where hydroponics wins is the homebrew and craft niche: two to three harvests per year instead of one, cleaner lupulin free of environmental contamination, and access to specialty aroma varieties retailing at $2–$4 per ounce ($32–$64/lb). A compact residential system producing 15–20 lbs a year can meaningfully offset ingredient costs.
Use our hydroponic power savings guide to project your facility’s operating costs.
Frequently Asked Questions
Can I grow hydroponic hops in a low-ceiling grow tent?
Yes, but adapt your training method. In a 6–8 foot tent, use horizontal trellis netting (ScrOG-style) or a multi-angle V-trellis, training bines horizontally along overhead wires once they reach the ceiling to maximize canopy length under your lights.
What’s the difference between hop vines and bines?
Vines use tendrils or adhesive suckers to attach to surfaces. Bines, like hops, use stiff hairs along hexagonal stems to wind around structures through friction, so they need a rough, high-tensile material like coir or sisal rather than smooth plastic or wire.
Why do my hydroponic hop cones smell grassy or garlicky?
A grassy smell means the hops were harvested too early, before essential oils matured. A garlic or rancid onion smell means they were harvested too late and alpha acids/myrcene have started oxidizing. Track dry matter percentage (target 20–25%) and lupulin color (golden-yellow) to hit peak maturity.
Can I use organic nutrients in a recirculating DWC system for hops?
Not recommended, organic inputs like fish hydrolysate or kelp meal cause bacterial slime, foam, and biofilm buildup in DWC reservoirs and drip lines. Use refined, water-soluble mineral salts for DWC, or apply organics in a dedicated drain-to-waste coco system. See our u003ca href=u0022https://mistculture.com/hydroponic-nutrients-guide/u0022u003eorganic hydroponic nutrients guideu003c/au003e.
How do I break dormancy on hydroponic hop crowns for multi-year cropping?
Hops need a cold vernalization period to reset and trigger vigorous spring growth. After harvest, cut bines back to 2 inches above the media, then chill the crown at 35–42°F (2–5°C) for 6–8 weeks. Afterward, return it to your grow room under an 18-hour light cycle and 70°F temperatures to break dormancy.
Conclusion
Mastering hydroponic hops means bridging precision horticultural engineering with the art of craft brewing. Controlling root-zone mineral ratios, DLI targets, and canopy microclimates eliminates the seasonal limitations and soil-borne diseases that plague outdoor hop yards. Success comes down to balance: massive vertical canopy growth backed by heavy-duty structural support, and fertility that shifts from high nitrogen during vine extension to elevated potassium and phosphorus during cone maturation.
Whether you’re building a multi-bucket drip system in a home greenhouse or optimizing an indoor vertical room for continuous wet-hop harvests, track your EC, pH, and light delivery daily.
Ready to design your fertigation manifold or balance your system’s water footprint? Try our interactive Hydroponic Yield Calculator, or explore the full collection of blueprinted systems in our Growing Systems Hub.

Continue Your Learning Journey