Seed Starting for Hydroponics: Germination Media, Domes, and Seedling Care

Table of Contents
- The Physics of Germination: Warmth, Moisture, and Oxygen
- Germination Media: Choosing the Right Substrate
- Humidity Domes and the Emergence Window
- Seedling Nutrition: The Transition to Liquid Fertilizer
- Defeating Damping-Off and Diagnosing Failures
- Frequently Asked Questions
- Conclusion
- Prefer Visual Learning? Watch the Complete Video Guide
Disclosure: MistCulture summarizes verified product specs, engineering data, and community feedback. We may earn an affiliate commission if you purchase through our links. Regulations vary by location; this content is for educational purposes only.
Germinating seeds for a hydroponic system is a completely different mechanical process than dropping seeds into topsoil. In traditional dirt gardening, the surrounding earth acts as a biological buffer, regulating moisture and shielding the fragile emerging root from rapid environmental swings. In a hydroponic environment, the grower assumes absolute responsibility for the physical and chemical parameters surrounding the seed. A seed requires a precise triad of conditions to initiate the biological process of germination: warmth, moisture, and oxygen. Mismanaging just one of these variables is the leading cause of early crop failure, usually manifesting as rotting seeds or collapsed stems.
Mastering the early propagation stage allows a grower to build a predictable, repeatable pipeline of healthy transplants. Every large-scale growing operation relies on uniform emergence. Seedlings that struggle during the first ten days of life rarely catch up to their healthy counterparts, leading to uneven canopies and inefficient nutrient uptake later in the crop cycle.
The Physics of Germination: Warmth, Moisture, and Oxygen
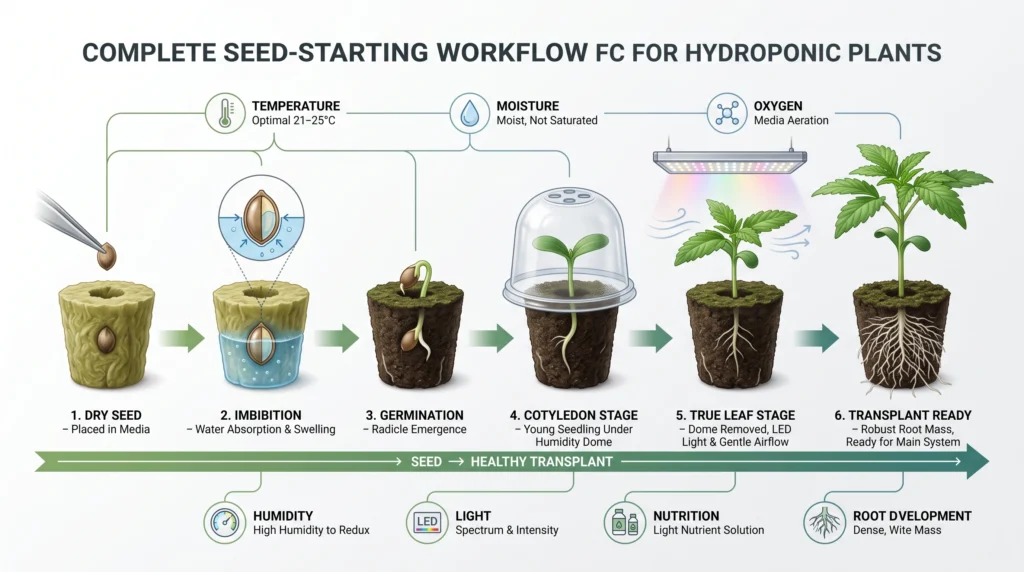
Warmth, moisture, and oxygen dictate the speed and success of seed germination. Calibrating these three variables correctly forces the seed out of dormancy and triggers the enzymatic breakdown of stored starches needed for initial growth.
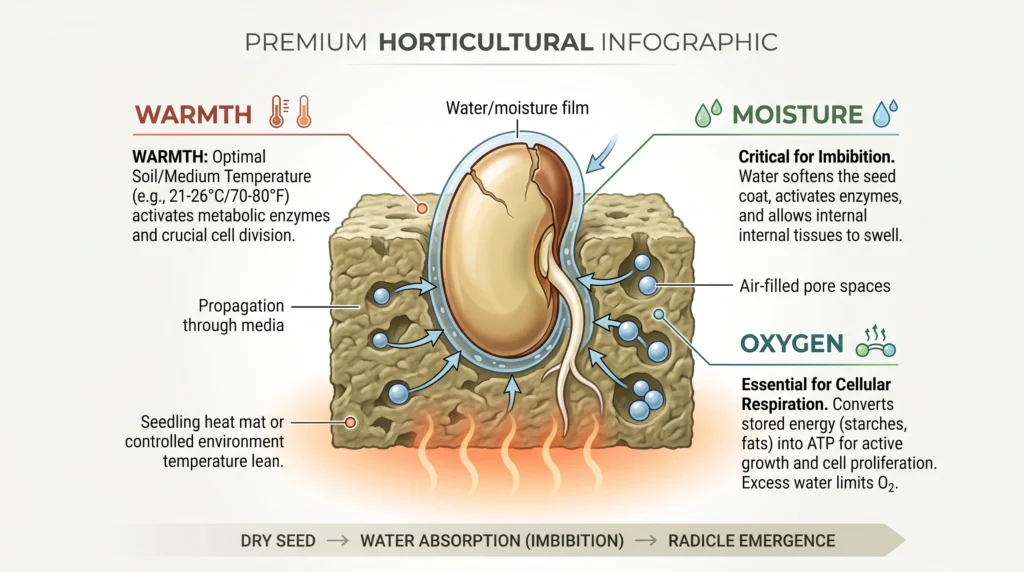
Seeds are essentially dormant energy reserves encapsulated in a protective shell. They are waiting for specific environmental triggers to signal that outside conditions are favorable for survival. When a dry seed is exposed to water, a physical process called imbibition occurs. The seed absorbs water, swells, and breaches its outer coat. This water uptake triggers the synthesis of gibberellic acid inside the seed, which then commands the production of amylase enzymes. These enzymes convert the seed’s stored complex starches into simple, usable sugars, providing the raw energy needed to push the primary root (the radicle) out into the world.
Temperature Requirements for Emergence
Temperature directly controls the speed of the enzymatic reactions happening inside the imbibed seed. Cold media slows metabolism to a crawl. Sowing seeds in an unheated room with cold water is the most common reason seeds sit dormant and eventually rot. Most hydroponic crops prefer a germination media temperature between 20 degrees C and 26 degrees C (68 degrees F to 79 degrees F).
Certain cool-weather crops, like lettuce and spinach, prefer the lower end of this spectrum and can experience secondary dormancy (refusing to sprout) if media temperatures exceed 24 degrees C. Hot-weather fruiting crops like tomatoes and peppers demand higher temperatures closer to 26 degrees C for rapid, uniform emergence. Using a seedling heat mat connected to a digital thermostat is the most reliable way to achieve this precise thermal control. Place the thermostat probe directly into the germination media, not just hanging in the air above the tray, to get an accurate reading of what the seed is experiencing.
Moisture and Oxygen Balance
The interaction between moisture and oxygen is a delicate balancing act. Seeds need consistent moisture to soften the seed coat and sustain the initial cellular expansion. If the media dries out for even a few hours during the early stages of germination, the newly formed root cells will desiccate and die.
Conversely, waterlogged media is just as destructive. When media is saturated to the point of holding standing water, it displaces all the available oxygen within the pore spaces. The germinating seed needs a continuous supply of oxygen to fuel respiration and convert its stored starches into energy. Without oxygen, the seed suffocates, switches to anaerobic respiration, and rapidly ferments and rots. The media must remain damp like a wrung-out sponge, never soaked.

Why it’s necessary: Ambient room temperature fluctuates, causing uneven and delayed germination. A thermostat-controlled heat mat delivers consistent, targeted warmth directly to the root zone, keeping media in the exact 20-26 degree C range required to trigger rapid enzymatic breakdown of seed starches.
Key Spec: Waterproof construction with a dedicated soil probe thermostat for exact degree control.
Germination Media: Choosing the Right Substrate
Your choice of propagation substrate determines the water-holding capacity and air-filled porosity the seedling will experience. Selecting a stable, inert media ensures a clean transition from the propagation tray to the main hydroponic system.
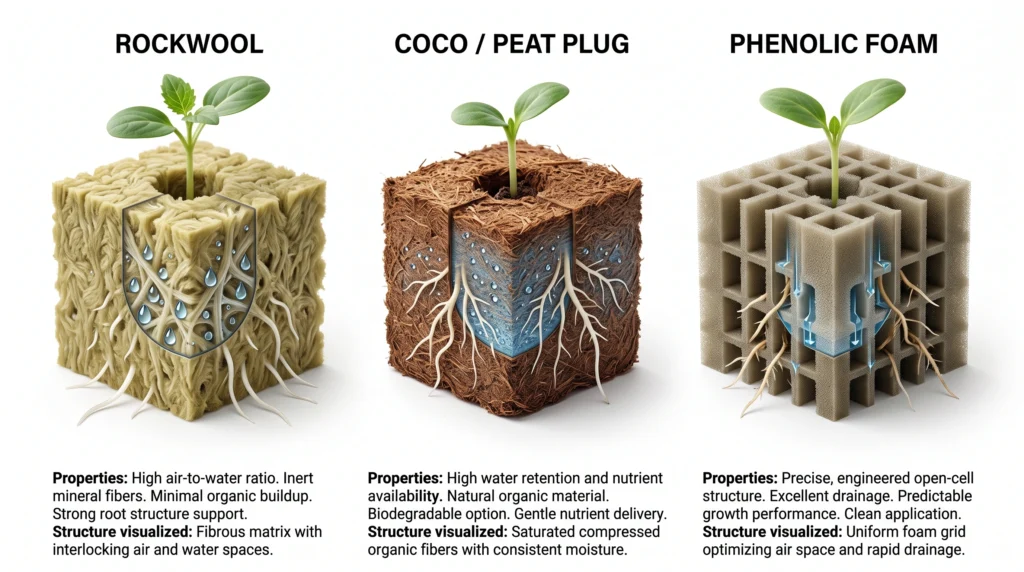
In soil gardening, seeds are planted directly into dirt. In hydroponics, the germination media serves as the physical anchor for the plant for its entire life cycle. The substrate chosen must offer excellent capillary action to draw water up to the seed, while maintaining high Air-Filled Porosity (AFP) to allow oxygen exchange.
Rockwool Cubes
Rockwool is the undisputed standard in commercial hydroponic propagation. It is manufactured by melting basalt rock at temperatures exceeding 1600 degrees C and spinning the molten liquid into fine, cotton-candy-like fibers. These fibers are compressed into highly uniform cubes that offer a near-perfect ratio of water retention to air space.
Because rockwool is spun from raw stone, it contains residual lime and possesses a naturally alkaline pH, often measuring around 8.0 straight out of the wrapper. Seeds and young seedlings struggle in alkaline conditions because high pH restricts the solubility of essential trace minerals. You must buffer rockwool before use. To buffer the cubes, fill a clean bucket with water and use phosphoric acid (pH Down) to lower the water’s pH to 5.5. Submerge the rockwool cubes completely in this acidic solution and allow them to soak for one to two hours. The acid neutralizes the lime residues.
After soaking, lift the cubes out and allow them to drain via gravity. Never squeeze rockwool. Squeezing crushes the internal fibrous structure, permanently destroying the macro-pores that hold oxygen. Once compromised, a squeezed rockwool cube will hold too much water and suffocate the seedling. Ensure you refer to our detailed hydroponic pH and EC mastery guide for exact buffering protocols.
Peat and Coco Coir Plugs
Compressed plugs made of peat moss or coco coir bound together by a biodegradable polymer mesh are excellent organic alternatives to rockwool. These plugs hold moisture exceptionally well and have a high Cation Exchange Capacity (CEC), meaning they can hold onto positively charged nutrient ions and release them to the root zone as needed.
Coco coir plugs should be pre-washed and buffered by the manufacturer. Raw coco coir naturally binds to calcium and magnesium, removing these elements from the nutrient solution and starving the seedling. Quality hydroponic coco plugs are pre-treated with a calcium-magnesium solution to satisfy the media’s CEC before the seed is ever planted. These soft plugs are highly adaptable and transition beautifully into deep water culture systems. You can explore the mechanics of transitioning these plugs in our DIY hydroponic systems guide.
Phenolic Foam Plugs
Phenolic foam, commonly sold under brand names like Oasis cubes, resembles the brittle green foam used in floral arrangements, though it is engineered specifically for agriculture. Foam is completely inert, meaning it has zero impact on the pH of the water and contains no background nutrients. Its rigid, highly uniform structure makes it an excellent choice for growers using automated seeding machines or transitioning plants into precise hydroponic microgreens trays. Foam drains faster than rockwool, requiring more frequent irrigation intervals to keep the seeds adequately moist.

Why it’s necessary: Rockwool provides an exact, repeatable ratio of water to oxygen, ensuring uniform emergence across a tray. Starting seeds in rockwool allows for a seamless, sterile transplant into Net Pots, NFT channels, or Aeroponic towers without introducing soil-borne pathogens.
Key Spec: 1.5-inch standard sizing with pre-drilled dibble holes for easy seed placement.
Humidity Domes and the Emergence Window
A humidity dome traps evaporated water to maintain 100% relative humidity around the seed coat, preventing desiccation. The dome must be vented and removed immediately upon emergence to prevent fungal pathogens from destroying the fragile stem.
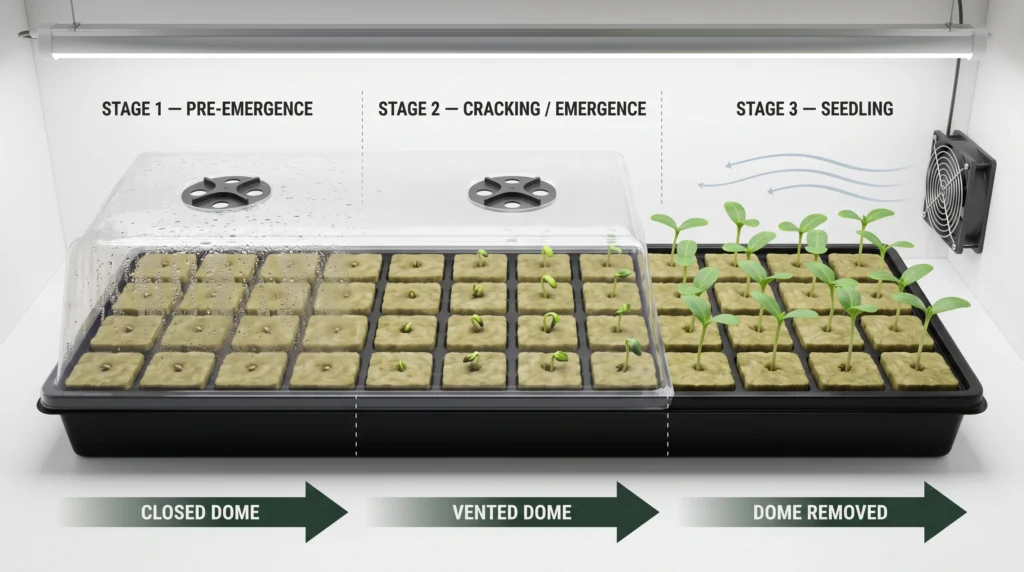
Seeds require high ambient moisture to soften their outer hulls. In a dry room, the surface of a rockwool cube or peat plug will evaporate water rapidly into the air. A clear plastic humidity dome placed over the propagation tray solves this by trapping the evaporated moisture, creating a microclimate with 90% to 100% relative humidity. This prevents the surface of the media from crusting over and ensures the seed remains fully hydrated.
Daily Dome Management
Managing the humidity dome requires careful observation. The dome is not a permanent fixture; it is a temporary tool used only for the first few days.
- Days 1 to 3 (Pre-Emergence): Keep the dome securely in place with all vents closed. Check the tray daily to ensure the media remains damp. Condensation should be visible on the inside walls of the dome.
- Day 4 (Cracking): As soon as you see the seeds splitting open and tiny green shoots breaking the surface, open the vents on the top of the dome. This begins the acclimation process, slowly introducing the seedlings to the ambient humidity of the room.
- Day 5 (Emergence): Once the majority of the seedlings stand up and expose their first set of seed leaves (the cotyledons), remove the dome entirely.
Leaving a dome on after the seedlings have emerged is a guaranteed way to kill the crop. High humidity combined with stagnant air creates the exact environmental conditions required by fungal pathogens to thrive. The seedlings need air circulation to transpire water and pull nutrients up through their newly formed root systems.
Light Requirements for New Seedlings
Many growers make the mistake of keeping their seed trays in the dark until the plants are an inch tall. While most seeds do not require light to trigger the initial sprouting phase, they require intense light the absolute second they emerge from the media.
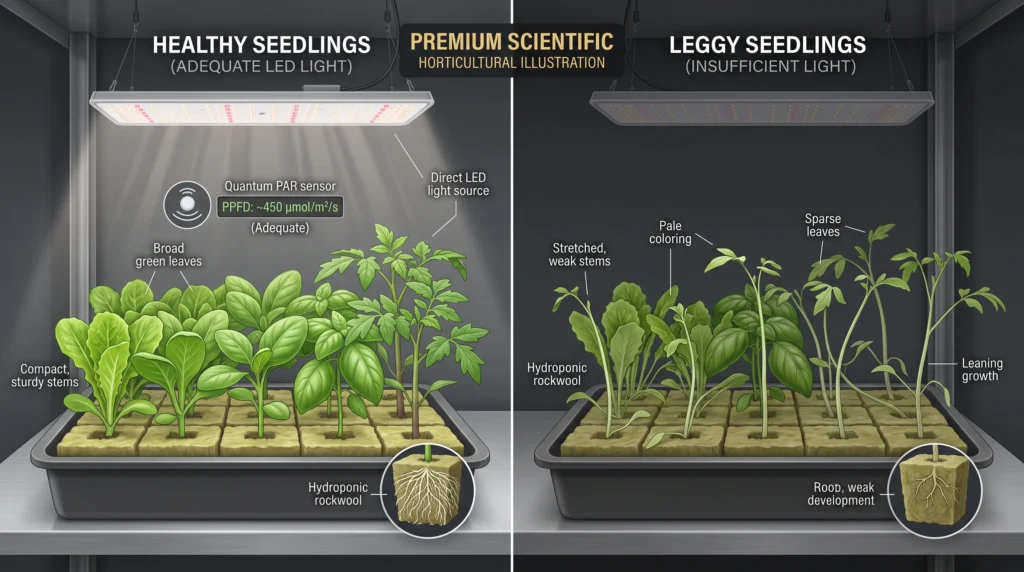
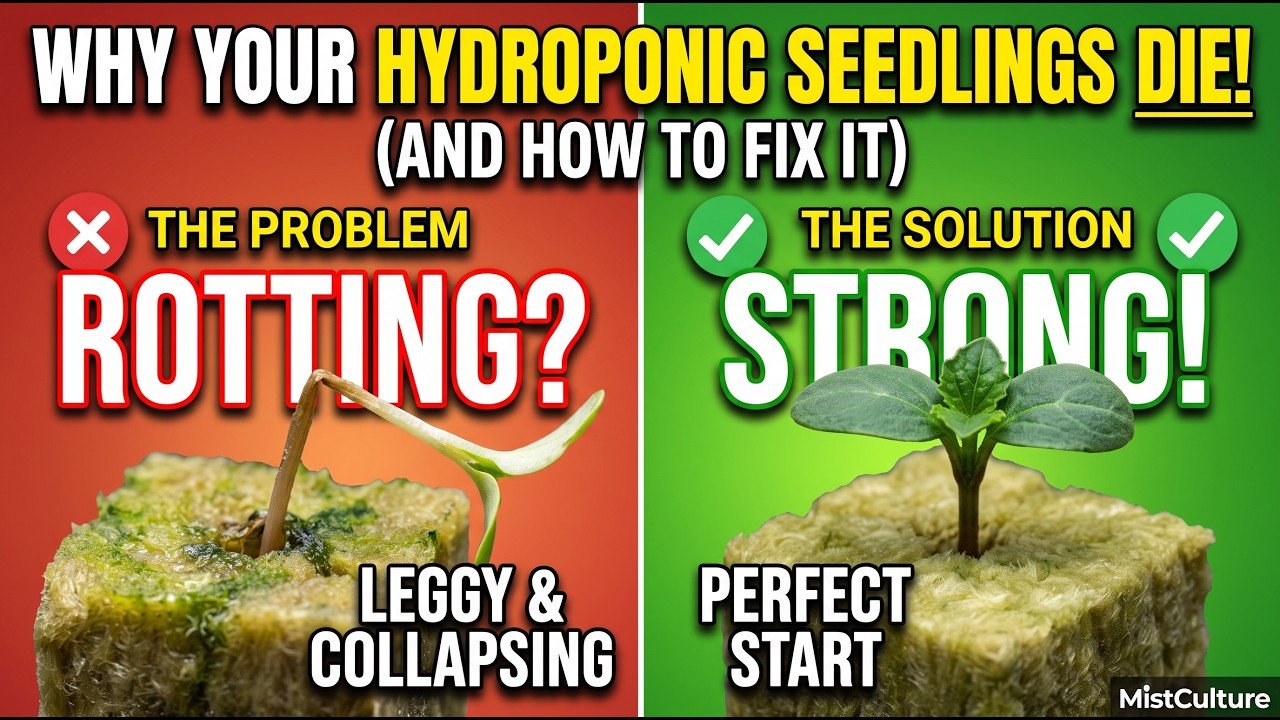
If a seedling emerges in a dark environment, it will initiate a shade-avoidance response. The plant assumes it is buried under a canopy of competing plants and rapidly directs all of its stored energy into elongating its stem to search for the sun. This results in “leggy” seedlings with pale, stretched, thread-like stems that cannot support their own weight. A leggy seedling will eventually fall over and rarely recovers its structural integrity.
To prevent stretching, place your grow lights directly over the humidity dome from the day you sow the seeds. Once the dome is removed, lower the lights to provide intense, direct illumination. Young seedlings require a Photosynthetic Photon Flux Density (PPFD) of 100 to 200 umol/m2/s. Adjust the hanging height of your LED fixtures to hit this metric. For detailed calibration, check our comprehensive LED distance and PPFD guide.

Why it’s necessary: Captures moisture to soften hard seed coats and ensures consistent hydration across the entire tray without requiring constant manual misting. Built-in adjustable vents allow the grower to slowly acclimate emerging seedlings to lower room humidity levels.
Key Spec: 7-inch height to accommodate taller sprouts before removal, heavy-duty 1020 tray base.
Seedling Nutrition: The Transition to Liquid Fertilizer
The seed provides its own food reserves for the first few days of life. Only introduce liquid hydroponic nutrients at a heavily diluted quarter-strength once the plant has exhausted its internal starches and developed its first true leaves.
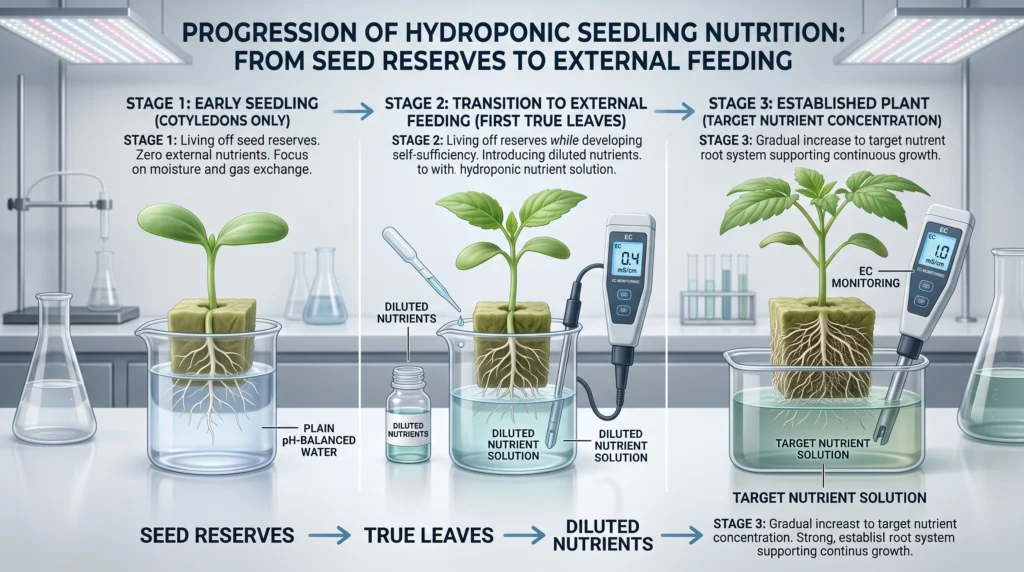
The anatomy of a seed dictates the feeding schedule. The first pair of leaves that emerge from the seed are not actually leaves; they are cotyledons. The cotyledons are part of the seed embryo itself and serve as the initial energy reserves. During this early cotyledon stage, the seedling requires absolutely zero fertilizer. Administering hydroponic nutrients at this stage will cause osmotic stress. High salt concentrations in the media will physically draw water out of the delicate seedling tissues, causing the plant to shrivel and burn. Plain, pH-balanced water (buffered to 5.8) is all that is required for the first week.
The True Leaf Stage
Around day seven to ten, the seedling will generate a new set of leaves growing from the center of the cotyledons. These are the “true leaves.” True leaves possess full photosynthetic capabilities and signal that the plant has exhausted the internal energy reserves of the seed. The plant is now entirely dependent on the grower to provide external nutrition.
Hydroponic nutrient solutions are highly concentrated mineral salts. Full-strength vegetative formulas are designed for mature plants with thick, established root systems. Seedling roots possess very thin epidermal layers and will suffer severe chemical burns if exposed to full-strength formulas.
Begin feeding with a quarter-strength nutrient solution. If your specific fertilizer schedule calls for 10 milliliters of nutrient per gallon for vegetative growth, use only 2.5 milliliters per gallon for seedlings.
Measuring Seedling EC Parameters
Relying on volume measurements (milliliters per gallon) can be inaccurate due to varying water sources. A technical grower manages seedling nutrition using an Electrical Conductivity (EC) meter. EC measures the total concentration of dissolved mineral salts in the water.
A safe target EC for young seedlings is between 0.5 and 0.8 mS/cm.
To achieve this accurately, you must account for the baseline EC of your tap water. Tap water contains dissolved minerals (calcium carbonate, iron, magnesium) before you add any fertilizer.
- Measure the EC of your plain water. (Example: Baseline is 0.2 mS/cm).
- Add your target nutrient increase to the baseline. (Example: You want to add 0.4 mS/cm of actual fertilizer).
- Your final meter reading should be 0.6 mS/cm.
Maintain this weak-strength feeding schedule for a week. As the seedlings develop multiple sets of true leaves and distinct white root masses protruding from the bottom of the rockwool or peat plug, slowly step up the concentration to half-strength (1.0 to 1.2 mS/cm). Always adjust the pH of the mixed nutrient solution to fall within the 5.8 to 6.3 range before applying it to the plants. You can verify your exact dosing calculations using our hydroponic nutrient calculator.
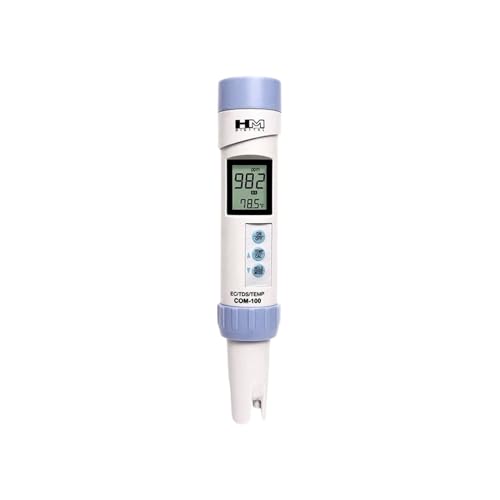
Why it’s necessary: Seedlings are highly sensitive to osmotic shock from excess fertilizer salts. A reliable EC meter allows the grower to mix precise quarter-strength solutions (0.5 to 0.8 mS/cm) by measuring the exact electrical conductivity of the dissolved ions, eliminating the guesswork of liquid volume ratios.
Key Spec: Automatic Temperature Compensation (ATC) with a digital readout calibrated to micro-Siemens (mS/cm).
Defeating Damping-Off and Diagnosing Failures
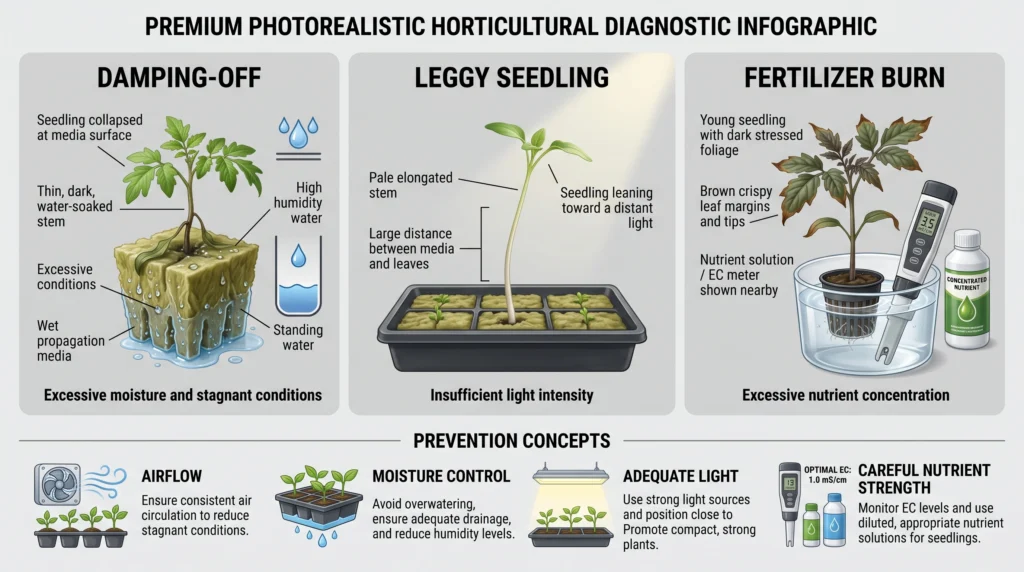
Most seedling failures are entirely preventable through strict environmental control. Damping-off, leggy stems, and fertilizer burn are physical reactions to poor airflow, low light intensity, and aggressive chemical dosing.
Even experienced growers lose trays of seedlings if they neglect environmental parameters. When a tray fails, discarding the media and starting fresh is the only viable protocol. Re-sowing seeds into media that has already experienced a fungal collapse guarantees the new seeds will suffer the same fate.
The Mechanics of Damping-Off
Damping-off is the most devastating issue encountered in propagation. It is a blanket term used to describe the sudden collapse and death of seedlings caused by soil-borne fungi, primarily species of Pythium and Rhizoctonia. These fungal zoospores are opportunistic; they swim through free water in the media and attack the weakest part of the plant, usually the hypocotyl (the stem just at the soil line).
The fungi secrete enzymes that dissolve the plant’s cell walls. The stem becomes water-soaked, pinches inward until it resembles a thin brown thread, and the entire seedling falls over dead. Once damping-off strikes a tray, it spreads rapidly from plug to plug.
Prevention is the only cure. Fungal pathogens require high humidity, saturated stagnant media, and poor airflow to reproduce.
- Remove the Dome: Take the humidity dome off immediately upon emergence.
- Increase Airflow: Place a small oscillating fan near the trays to keep the air moving. Moving air disrupts the high-humidity microclimate at the media surface where fungi breed.
- Control Moisture: Never leave seedling trays sitting in pools of standing water. Bottom-water the tray, allow the rockwool or plugs to absorb what they need for 10 minutes, and then pour off the excess water.
Correcting Leggy Stems
If your seedlings look like pale string beans leaning heavily to one side, they are suffering from etiolation due to insufficient light intensity. A common mistake is placing seed trays on a sunny windowsill. Window glass filters out specific spectrums of light, and the ambient sunlight indoors is rarely intense enough for commercial vegetable varieties.
The fix requires lowering your LED grow lights closer to the tray to increase the physical density of photons hitting the leaves. Place a small fan blowing gently across the tops of the seedlings. The mechanical stress of the breeze forces the plants to synthesize lignin and cellulose, building thicker, more rigid cell walls in the stem to resist the wind.
Fertilizer Burn and Osmotic Stress
Seedlings exhibiting dark green, downward-curling leaves with crispy, necrotic brown tips are suffering from fertilizer burn. The nutrient solution in the media is too strong. High salt concentrations create a powerful osmotic gradient outside the root. Instead of water flowing into the root, the salts physically draw water out of the plant tissue, desiccating the leaf margins. Flush the tray immediately with plain, pH-balanced water to wash the excess salts out of the media matrix, and verify your mixing ratios with a reliable meter. You can review precise meter calibration techniques in our pH and EC meter showdown.
Frequently Asked Questions
Why are my seeds taking so long to germinate?
Delayed germination is nearly always a thermal issue. If the ambient temperature in the room drops below 18 degrees C (64 degrees F), the enzymatic processes inside the seed slow down drastically. Place a seedling heat mat under the tray to maintain a constant media temperature of 20 to 26 degrees C. Old seeds that have lost viability over time will also fail to germinate. Always store unused seeds in a cool, dark, and dry environment.
Should I pre-soak my seeds in water before planting them in rockwool?
Pre-soaking is generally unnecessary for small hydroponic seeds like lettuce, basil, or tomatoes. The rockwool cube itself holds ample moisture to initiate imbibition. Pre-soaking small seeds makes them sticky and incredibly difficult to handle and place accurately into the dibble holes. Large seeds with thick, hard coats, such as spinach or certain varieties of peppers, may benefit from a 4-to-12 hour soak in room-temperature water to accelerate the softening of the hull.
When exactly do I add hydroponic nutrients to the seedlings?
Provide zero nutrients for the first 7 to 10 days. The seedling relies exclusively on the energy stored within the cotyledons (seed leaves). Wait until the plant develops its first set of true leaves, which resemble the shape of the mature plant’s foliage. At that exact point, mix a highly diluted quarter-strength nutrient solution, targeting an EC of 0.5 to 0.8 mS/cm.
How do I stop algae from growing on the top of my rockwool cubes?
Algae requires light, water, and nutrients to survive. Rockwool cubes sitting under bright grow lights provide the perfect environment for algae spores to colonize. While a light dusting of green algae will not harm the seedling, thick mats of algae can deplete oxygen levels at the surface. Prevent algae by blocking the light from hitting the wet rockwool. You can cover the top of the cubes with specialized opaque plastic covers, or sprinkle a thin layer of dry vermiculite over the dibble hole.
Can I reuse rockwool cubes if the seed fails to sprout?
Reusing rockwool cubes after a seed fails is highly discouraged. A failed seed rotting inside the dibble hole acts as a food source for fungal pathogens and bacteria. If you place a new seed into that contaminated cube, the established pathogens will attack the new embryo immediately. Rockwool is inexpensive; discard the failed cube and start with a sterile, fresh piece of media to guarantee a clean environment.
Conclusion
The first fourteen days of a plant’s life dictate its structural integrity and yield potential for the remainder of the crop cycle. By executing precise control over media temperature, air-filled porosity, and the transition from plain water to quarter-strength liquid nutrition, you eliminate the unpredictable variables that plague soil gardening. Master the germination phase, and you secure a continuous, predictable rotation of healthy plants ready to fuel your main systems. To ensure your newly sprouted seedlings have an optimal environment to transition into, utilize our detailed hydroponic lettuce and spinach growing blueprints to configure your primary grow area.
Prefer Visual Learning? Watch the Complete Video Guide
If you want to see these environmental parameters and substrate-buffering procedures in action, check out our companion video guide, “Autopsy of a Failed Crop: Re-engineering Hydroponic Germination.”
In this detailed guide, we walk you through a physical dissection of seedling failure—from Pythium damping-off to root-suffocation in unbuffered rockwool—and show you how to configure your propagation trays to build a highly repeatable, uniform pipeline for your hydroponic systems.

Continue Your Learning Journey