
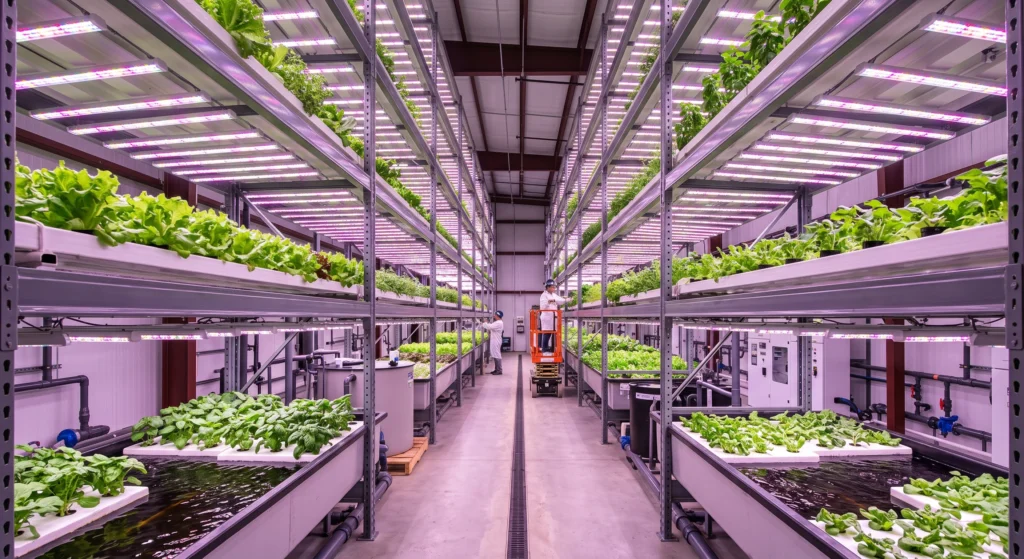
Let me guess: you are tired of buying wilted, flavorless greens from the grocery store. You want crisp, vibrant produce, but you do not want to drag bags of messy potting soil into your living room. Here’s the deal: a DIY hydroponic system is the exact solution you have been looking for. Building an indoor garden from scratch might sound like a project reserved for commercial agricultural engineers, but it is entirely within your grasp. You will need a few basic tools, a solid understanding of fluid mechanics, and the drive to build something incredible.
In my experience, moving away from dirt and stepping into controlled-environment agriculture (CEA) is the single biggest upgrade you can make to your food independence. You will grow faster, yield more, and completely eliminate the need to pull weeds. This guide will walk you through the exact steps, science, and math required to build and maintain high-performance deep water culture and nutrient film technique systems right in your own home.
Legal Note: Regulations vary by location. Always consult local guidelines. This content is for educational purposes only.
The Science of Soilless Growth
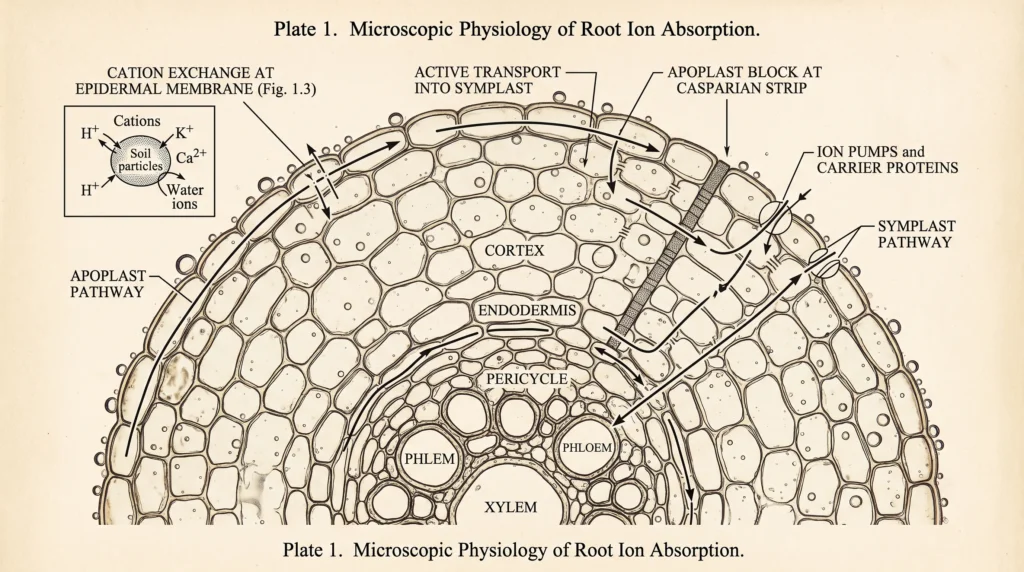
Hydroponic farming bypasses the soil food web by delivering bioavailable mineral salts directly to plant roots in an aqueous solution. This method requires precise management of dissolved oxygen, pH, and electrical conductivity to facilitate active ion transport across root membranes. Without the buffering capacity of soil, the grower must strictly regulate the chemical and physical environment to sustain healthy growth.
Plants do not care if their food comes from a compost pile or a cleanly mixed hydroponic nutrient solution. They simply require specific ions to fuel their biological processes. In traditional soil gardening, complex organic matter must be broken down by bacteria into simple, soluble forms. For instance, organic nitrogen must be converted into ammonium (NH₄⁺) or nitrate (NO₃⁻) before a plant can use it. A DIY hydroponic system skips this middleman. You are providing the exact building blocks required for photosynthesis and cellular respiration.
To understand how this works, we have to look closely at root anatomy. Water and minerals move into the plant root via interconnected cell walls (the apoplast) or through the interconnected protoplasm (the symplast). As ions contact the root membrane, they bind to specific carrier proteins. This process requires energy. The plant expends ATP to actively transport these ions against a chemical gradient. If your root zone lacks dissolved oxygen, the plant cannot perform the respiration required to generate that ATP. This is exactly why poorly aerated systems lead to wilting plants; they literally drown and starve at the same time.
Designing Your Floating Raft (DWC) Garden
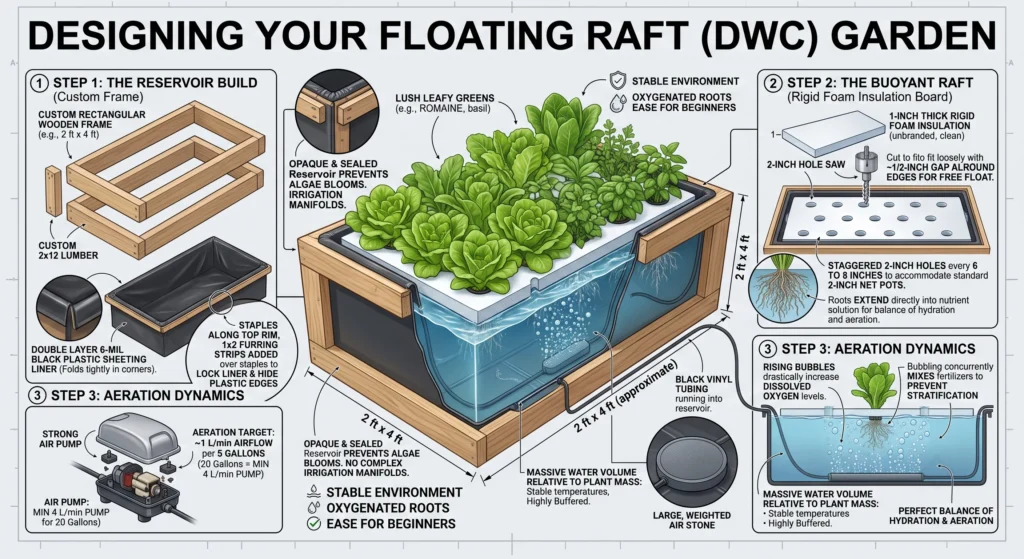
A floating raft garden is a subtype of deep water culture (DWC) that suspends plants on buoyant boards directly over a heavily aerated reservoir. This setup provides a massive volume of water relative to plant mass, ensuring stable temperatures and a highly buffered nutrient environment. It is the most forgiving system for beginners and ideal for leafy greens.
When I build a floating raft system, I focus on structural integrity and light exclusion. Light entering your reservoir will immediately trigger an algae bloom, which robs your roots of oxygen and nutrients. A proper DWC system gives your plants a perfect balance of hydration and aeration without any complex irrigation manifolds.
Step 1: The Reservoir Build
You can use a prefabricated 20-gallon opaque storage tote, but building a custom wooden frame provides a cleaner, permanent aesthetic. Use 2×12 lumber to construct a rectangular frame (e.g., 2 feet by 4 feet). Line the inside of the frame with a double layer of 6-mil black plastic sheeting. Fold the corners tightly and staple the plastic along the top rim. You can add 1×2 furring strips over the stapled edges to lock the liner in place and hide the ugly plastic edges.
Step 2: The Buoyant Raft
Purchase a 1-inch thick rigid foam insulation board (make sure it is unbranded and clean). Cut it to fit loosely inside your reservoir with about a 1/2-inch gap around the edges; this allows the raft to float down freely as the water level drops. Using a 2-inch hole saw, drill staggered holes every 6 to 8 inches to accommodate standard 2-inch net pots.
Step 3: Aeration Dynamics
The target airflow for a DWC system is approximately 1 liter of air per minute for every 5 gallons of nutrient solution. For a 20-gallon reservoir, you need an air pump rated at a minimum of 4 L/min. Attach black vinyl tubing to your pump, run it into the reservoir, and connect it to a large, weighted air stone. The rising bubbles will drastically increase the dissolved oxygen levels while simultaneously mixing your fertilizers to prevent stratification.
Engineering a Nutrient Film Technique (NFT) Setup
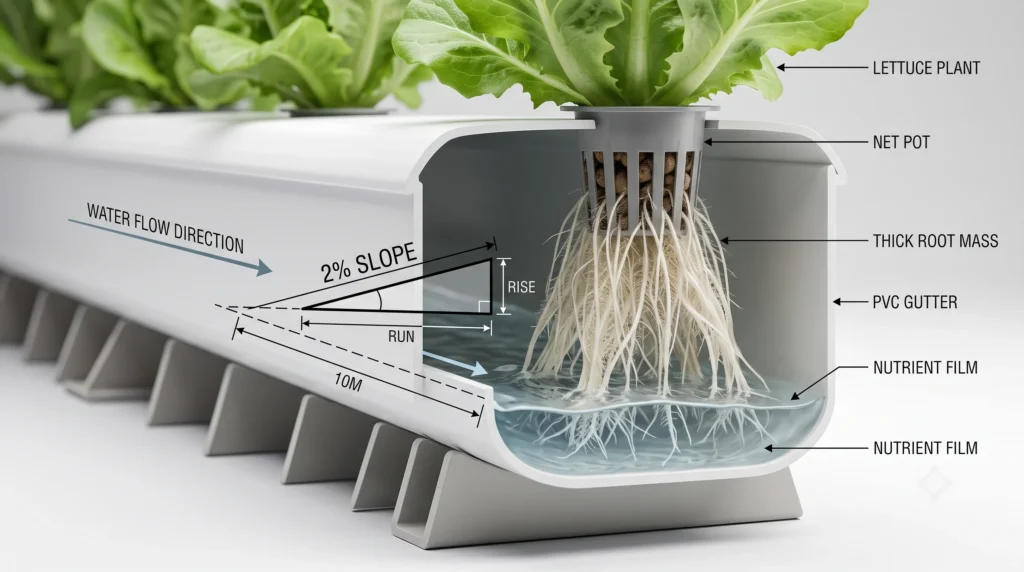
The nutrient film technique uses a shallow stream of water flowing down a sloped channel to deliver nutrients while exposing the upper root mass to ambient air. This technique is favored in commercial indoor vertical farming due to its low water weight and ability to pack dozens of plants into a tight vertical footprint. It requires continuous electricity, as any pump failure will quickly dry out the exposed roots.
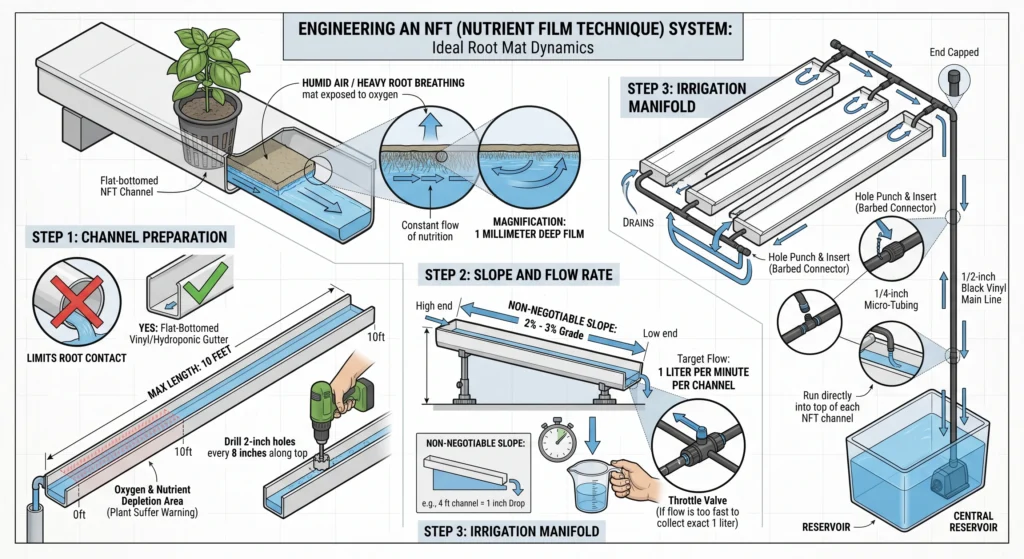
NFT systems are engineering marvels when tuned correctly. The goal is to provide a constant flow of water that is barely 1 millimeter deep. This film bathes the bottom of the roots in nutrition while the top of the root mat breathes heavily in the humid air of the channel.
Step 1: Channel Preparation
Do not use standard round PVC pipes if you can avoid it; round pipes force the water into a narrow stream at the absolute bottom, which limits root contact. Instead, use flat-bottomed vinyl fence posts or specialized hydroponic gutters. Cut your channels to a maximum length of 10 feet. Any longer, and the plants at the end of the line will suffer from oxygen and nutrient depletion. Drill 2-inch holes every 8 inches along the top of the channel for your net pots.
Step 2: Slope and Flow Rate
The channel slope is non-negotiable. You must establish a 2 percent to 3 percent grade. For a 4-foot channel, this translates to roughly a 1-inch drop from the inlet to the drain. The flow rate is equally critical. Target a flow of 1 liter per minute per channel. Measure this manually: place a measuring cup under the drain, turn on the pump, and time how long it takes to collect exactly one liter. If it is too fast, install an inline ball valve on your feed line to throttle the pressure.
Step 3: The Irrigation Manifold
Place a submersible pump inside your main reservoir. Run a 1/2-inch black vinyl main line up to the high end of your channels. Cap the end of the 1/2-inch line, and use a hole punch to insert 1/4-inch barbed connectors. Run 1/4-inch micro-tubing from these connectors directly into the top of each NFT channel. Ensure the drain ends of the channels empty back into your central reservoir.
Mastering the Hydroponic Nutrient Solution
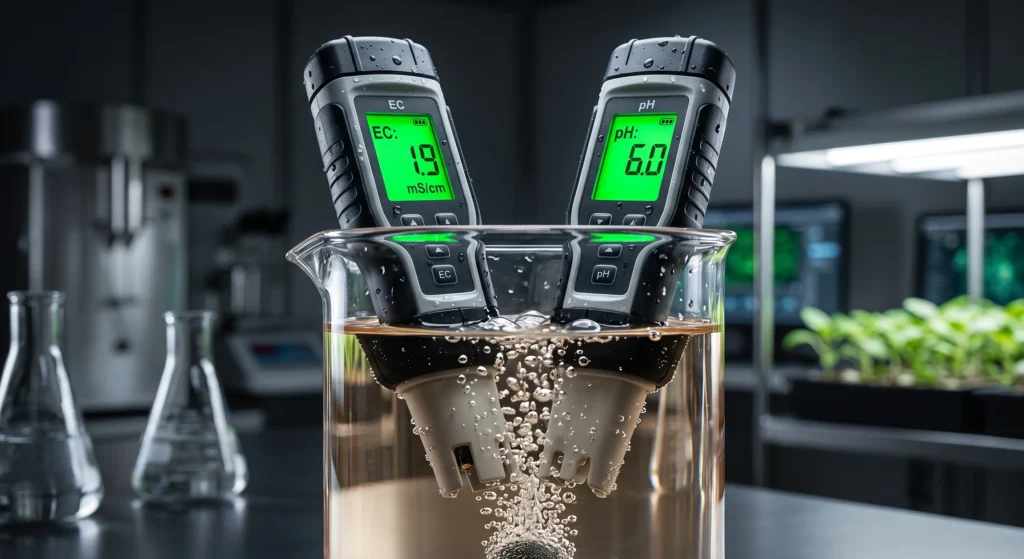
A successful hydroponic nutrient solution must provide all essential macro and microelements in highly soluble, inorganic salt forms. The electrical conductivity (EC) measures the total concentration of these dissolved salts, while the pH determines the chemical bioavailability of individual ions. Proper management of these two metrics prevents nutrient lockout and ensures vigorous vegetative and reproductive growth.
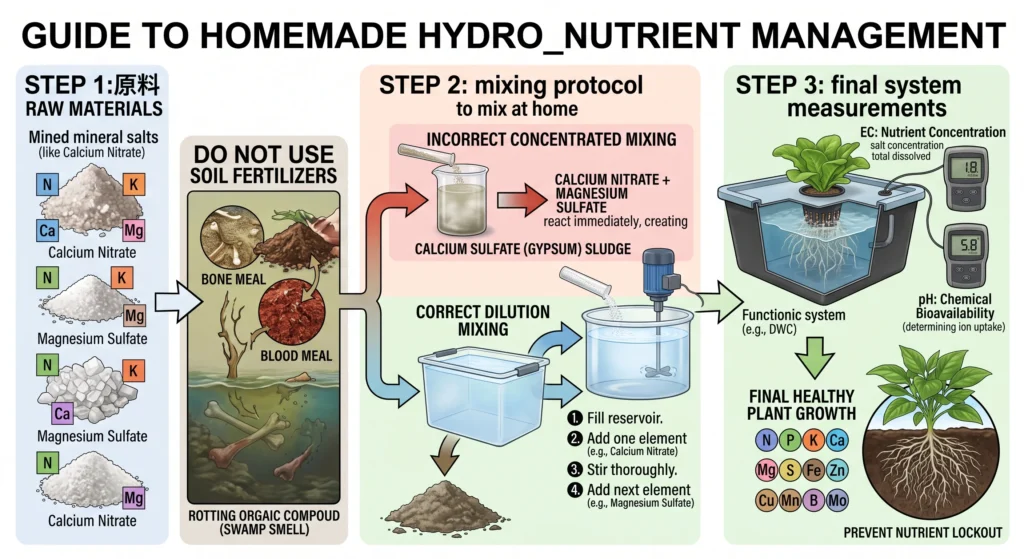
Mixing your own nutrients is where the real fun begins. Pro tip: you cannot just dump soil fertilizer into your reservoir and expect miracles. Soil fertilizers rely on microbial action to break down organic components like bone meal or blood meal. In a sterile water environment, these will just rot and create a foul-smelling swamp. You need clean, mined minerals.
Your plants require distinct elements. The macronutrients are Nitrogen (N), Phosphorus (P), Potassium (K), Calcium (Ca), Magnesium (Mg), and Sulfur (S). The micronutrients include Iron (Fe), Manganese (Mn), Zinc (Zn), Copper (Cu), Boron (B), and Molybdenum (Mo). When you mix these at home, you must keep certain elements separated until they are diluted. If you mix highly concentrated calcium nitrate with magnesium sulfate, they will react and precipitate out as calcium sulfate (gypsum), settling at the bottom of your tank as an unusable white sludge. Always mix your base nutrients into a full reservoir of water one at a time, stirring thoroughly between additions.
The Math of Lighting and DLI
You cannot rely on a sunny window if you want massive yields. To measure light accurately for plant growth, we use Photosynthetic Photon Flux Density (PPFD), measured in $\mu mol/m^{2}/s$. This tells you how many usable photons are hitting your canopy every second.
However, your plants care more about the total amount of light they receive over the entire day, known as the Daily Light Integral (DLI). DLI is measured in mol/m²/day.
To calculate your DLI, use this formula:
DLI = (PPFD × 3600 × Hours) ÷ 1,000,000
If your LED grow light provides a PPFD of 400 µmol/m²/s and you run it for 16 hours per day:
DLI = (400 × 3600 × 16) ÷ 1,000,000 = 23.04 mol/m²/day
A DLI of 23.04 mol/m²/day is ideal for fast-growing leafy greens and herbs. If you’re growing fruiting crops such as tomatoes, peppers, or cucumbers, aim for a DLI closer to 30 mol/m²/day.
Key Parameters Table
Use this reference table to keep your reservoir and environment strictly within the optimal ranges.
| Crop Type | Target pH | Target EC (mS/cm) | Target DLI (mol/m2/day) | Reservoir Temp |
| Leafy Greens (Lettuce, Spinach) | 5.5 – 6.0 | 1.2 – 1.8 | 15 – 20 | 65°F – 68°F |
| Herbs (Basil, Mint, Cilantro) | 5.8 – 6.2 | 1.4 – 2.0 | 18 – 22 | 68°F – 72°F |
| Fruiting (Tomatoes, Peppers) | 5.8 – 6.3 | 2.0 – 3.5 | 25 – 35 | 68°F – 72°F |
| Seedlings / Clones | 5.5 – 6.0 | 0.5 – 1.0 | 10 – 15 | 70°F – 75°F |
Recommended Equipment & Setup
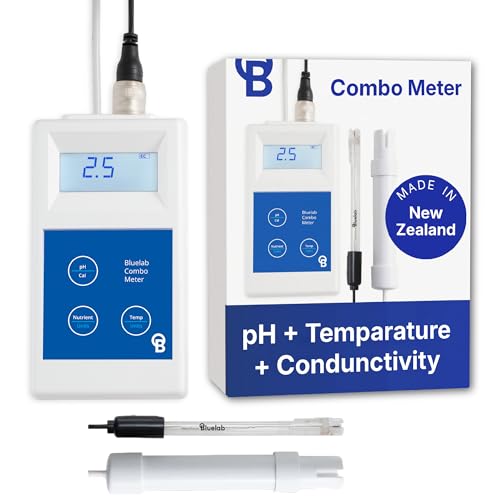
Why I use it: Cheap pH pens break constantly and lose calibration after a week. The Bluelab Combo Meter measures pH, conductivity, and temperature with clinical accuracy. It is an absolute workhorse in my grow room. Without precise readings, you are flying blind and risking nutrient lockout.

Why I use it: This three-part liquid nutrient system (FloraGro, FloraMicro, and FloraBloom) allows you to custom-tailor your exact N-P-K ratios depending on the growth stage of your crop. It mixes incredibly clean, leaves zero residue in my NFT channels, and stabilizes the pH beautifully.

Why I use it: Oxygen is the lifeblood of a DWC system. Flimsy aquarium pumps just do not push enough air through the deep water columns. The Active Aqua commercial series pushes massive volume and features a durable metal manifold to split the air to multiple reservoirs simultaneously.
Managing Pests and Pathogens Indoors
Controlled-environment agriculture drastically reduces pest pressure, but an indoor infestation can devastate a crop rapidly without natural predators. Integrated Pest Management (IPM) in a DIY hydroponic system focuses on strict sanitation, environmental control, and targeted organic applications. High humidity and poor airflow create the perfect breeding ground for fungal pathogens like Pythium (root rot) and Botrytis (gray mold).
Never bring outdoor plants or unsterilized tools into your indoor grow space. If pests do infiltrate, you must identify them immediately and apply precise countermeasures.
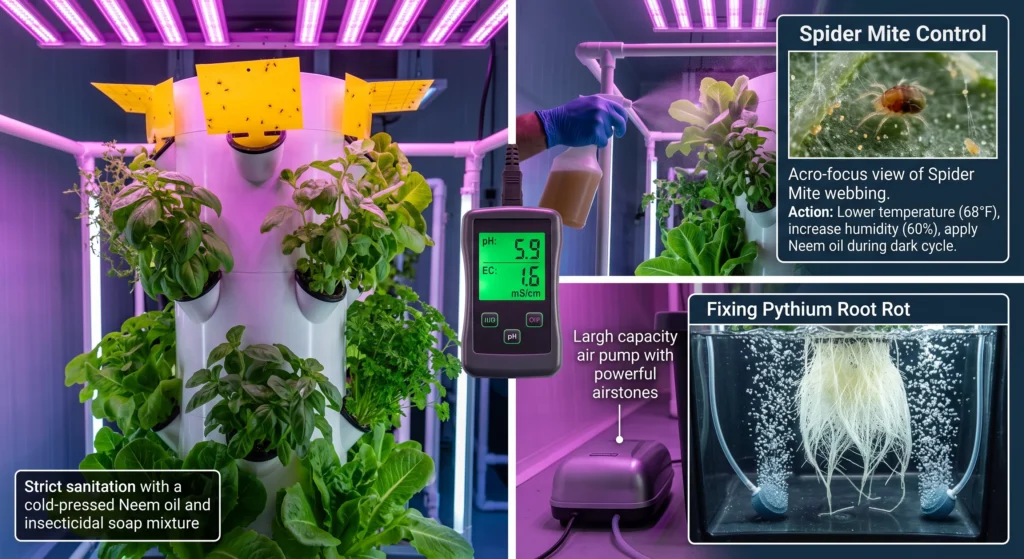
- Fungus Gnats: These annoying flyers lay eggs in moist media (like Rockwool or peat). The larvae feed on delicate root hairs, stunting plant growth. Control them by placing yellow sticky traps just above the canopy and applying Bacillus thuringiensis israelensis (Bti) directly to the reservoir.
- Spider Mites: These microscopic arachnids thrive in hot, dry environments. They pierce cell walls and suck out plant juices, leaving fine webbing and stippled leaves. Combat them by lowering the temperature, increasing humidity slightly, and applying cold-pressed Neem oil mixed with a mild insecticidal soap during the dark cycle.
- Pythium (Root Rot): Root rot turns bright white roots into a brown, slimy, foul-smelling mess. It is caused by high water temperatures and low dissolved oxygen. To fix it, clean your reservoir with a 10% bleach solution, drop your water temperatures below 70°F, and dramatically increase your air pump capacity.
Common Pitfalls & Troubleshooting FAQ
Why are the leaves on my lettuce turning yellow?
Generalized yellowing of older, lower leaves is the classic sign of a nitrogen deficiency. Because nitrogen is a mobile element, the plant pulls it from old growth to support new shoots. Check your EC levels; if they are below 1.2 mS/cm, increase your nutrient feed. If your EC is fine, check your pH. A pH above 6.5 can lock out essential nutrients.
How often should I completely change the water in my reservoir?
In a recirculating system, you should dump, flush, and replace the entire nutrient solution every 14 to 21 days. As plants absorb water and nutrients at different rates, the specific ratio of elements in your tank becomes unbalanced over time. Flushing the system resets the baseline and prevents toxic salt accumulation.
Why do my tomatoes have black, sunken spots on the bottom?
This is blossom-end rot, a physiological disorder caused by a localized calcium deficiency. Even if your reservoir has plenty of calcium, environmental stress like high heat, poor airflow, or dramatic pH swings can prevent the plant from transporting calcium up to the rapidly developing fruit. Ensure your pH is steady at 6.0 and position an oscillating fan to improve transpiration.
What is the best growing medium for an indoor vertical farming setup?
For an NFT system, I heavily favor polymer-bound peat plugs or Rockwool cubes. They have excellent capillary action, meaning they draw water up efficiently while maintaining structural integrity. Avoid loose media like perlite or small clay pebbles in an NFT system; they will inevitably wash out of the net pots and destroy your water pump impeller.
Can I use organic fertilizers in my DWC system?
I strongly advise against it for beginners. True organic fertilizers (like fish emulsion or liquid kelp) rely on complex biological breakdown. In a sterile, highly oxygenated water reservoir, organic inputs will rot, leading to horrific odors, massive bacterial blooms, and severe root suffocation. Stick to refined mineral salts until you have mastered advanced aquaponics or bio-filtration.