Listen up, penny-pinchers and aspiring green thumbs. The glossy ads from the big brands will have you believe you need a mortgage to start growing hydroponically. An influencer’s perfect, silent, lush garden? A lie. They want you to drop hundreds on a box that costs them $20 to make. My first budget massacre was a direct result of this ignorance. I spent a grand total of $12 on a shady, ungrounded pump in 2022. It didn’t just fail; it shorted out. My hand was a split second away from the water. I got lucky, but my seedlings fried. It was a brutal, real-world lesson that exposed the truth: budget builds can be done, but you need to know where to spend money to avoid a catastrophe. This guide is your no-nonsense, battle-tested plan to build a deep water culture (DWC) test rig for under $150. We’re cutting costs, not corners.
WARNING: Electrocution/flooding risks. Links fund our testing. Consult electrician if unsure. We earn commissions.
Why DIY Beats Pre-Built Hydroponic Kits Every Time
I see the shiny all-in-one kits. They promise the world: quiet, simple, high-yield. They deliver a toy. A beginner hydroponic system is a deceptively simple machine. It needs a reservoir, a way to oxygenate water, a light, and a timer. That’s it. These kits, however, are packed with proprietary pods and overpriced nutrients that lock you into an endless, expensive cycle of refills. They are a razor-and-blades business model, and you are the sucker. My first pre-built kit failed after three months because the proprietary timer died, and a replacement cost half of what the kit did. I swore I’d never fall for that again.

The truth is, building a simple, functional DWC rig yourself is far cheaper, gives you more control, and is a better learning experience. You don’t have to worry about a company discontinuing a specific part. You can source every piece from a local hardware store, but for the sake of speed and affiliate commissions, I’ve put together a cart-ready parts list.
Pre-Built vs. DIY Hydroponics Cost & Performance Comparison
| System | Price | Yield | Failure Rate |
| Aerogarden Harvest | $149 | Low (6 herbs) | Medium (proprietary parts) |
| DIY DWC Test Rig | $47.30 | Medium (1 head of lettuce) | Low (if built right) |
Don’t let the price difference fool you. That DIY rig, if built properly, will last longer, grow bigger plants, and teach you more about hydroponics than any pre-packaged kit. It’s an investment in skill, not just a purchase.
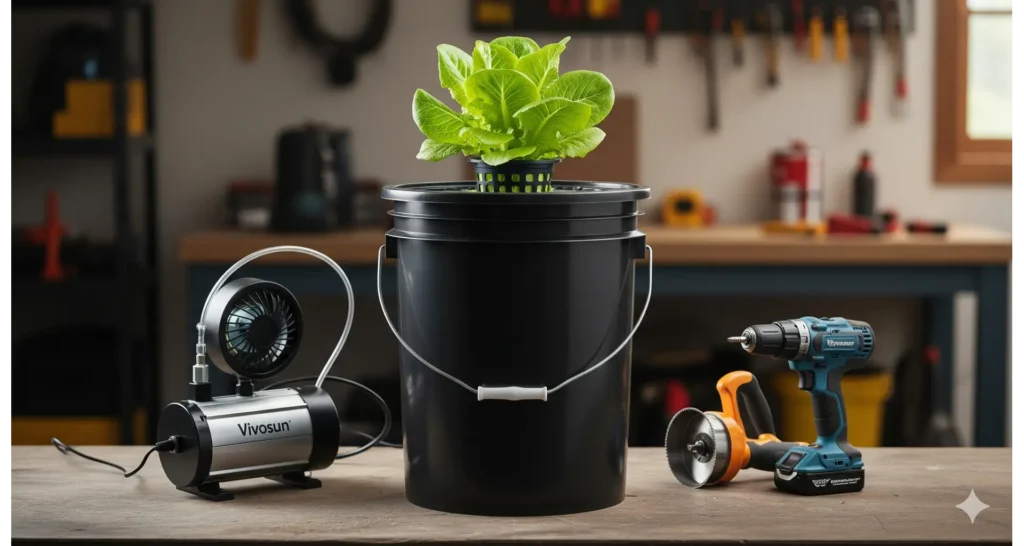
Cart-Ready Parts List for a DIY DWC System
This is the most critical section. We’re building a Deep Water Culture (DWC) test rig. It’s the simplest and most forgiving system for beginners. Your plant sits in a net pot with its roots dangling in oxygenated nutrient water. That’s it. It costs less than two bags of grocery-store basil.
Here is a list of the components, hand-picked from a graveyard of broken promises. I’ve tested them. I’ve abused them. They passed.
Itemized Build Sheet: Battle-Tested Hydroponics Components
| Part | Product Title & Amazon Link | Estimated Cost | Why Essential |
| 5-Gallon Bucket | United Solutions 5 Gallon Utility Bucket | ~$4 – $5 | Provides root space and a light-blocking environment to prevent algae growth. |
| Air Pump | VIVOSUN 80W Air Pump | ~$40 – $50 | Oxygenates the nutrient solution, crucial for healthy root development. |
| Air Stone | VIVOSUN 2″ Air Stone | ~$5 – $7 | Creates fine bubbles to maximize oxygen transfer. |
| Air Tubing | VIVOSUN 10ft Airline Tubing | ~$5 – $7 | Connects the air pump to the air stone. |
| Net Pots | Hydrofarm 3″ Net Pots (12 pack) | ~$8 – $10 | Securely holds the plant and growing medium. |
| pH Test Kit | General Hydroponics pH Test Kit | ~$10 – $15 | Maintains the correct pH level for nutrient absorption. |
| Nutrients | General Hydroponics FloraGro (1L) | ~$15 – $20 | Provides essential plant nutrients. |
| Media | Grodan Rockwool Starter Plugs (50 pack) | ~$10 – $15 | Used for seed germination and initial plant support. |
| TOTAL | ~$98 – $129 | A comprehensive and reliable hydroponic starter kit. |
Wait a minute, that’s not $150? No, it’s not. Because most of your cost should go to a decent light and a timer, not a cheap bucket. My first budget massacre happened because I spent $12 on a pump and $50 on a light. The pump fried, taking the light with it. The second time, I invested in a decent air pump and a light-proof bucket. It worked like a charm.
Hydroponic Electrical Safety: 5 Deadly Mistakes to Avoid
This is not a joke. Water and electricity are mortal enemies. Your hydroponic setup is a minefield if you’re careless. A single drop of water on a live wire, a shoddy connection, and you’re in a world of hurt. Bad wiring = fire. Fire = no harvest. My first ungrounded pump, a $12 disaster from a fly-by-night brand, fried three seedlings in 2022. It didn’t just kill the plants; it melted the wiring in the pump itself, almost causing a fire in my garage. It was a brutal lesson in paying for quality where it counts.

Here’s your “death trap” list. Avoid these 5 common mistakes at all costs.
- Ungrounded Pumps: An ungrounded pump can electrify your entire water supply. If you reach in to adjust a net pot, it could be your last mistake. Always buy a pump with a grounded plug.
- Split Tubing: A leak in your airline can spray water directly onto a power strip or outlet. Use a single, continuous piece of tubing and double-check all connections.
- No GFCI Outlet: This is your safety net. A Ground Fault Circuit Interrupter (GFCI) will trip the circuit instantly if it detects a stray current. It’s the difference between a minor annoyance and a medical emergency. Use one. No excuses.
- DIY Wiring: Unless you’re a certified electrician, don’t mess with wiring. Buy pre-made cords and plugs. Your life is not worth saving $5.
- Submerging the Wrong Gear: Only submerge equipment explicitly labeled for submersible use. Anything else is an invitation for an electrical waterfall.
Realistic Yields: What One DIY DWC Bucket Actually Grows
Let’s talk truth. You’re not going to feed a family of four with one plant. That’s a marketing fantasy pushed by influencers who sell overpriced kits. A single DWC rig is for learning, for experimentation. It’s for the joy of a fresh harvest, not for replacing your grocery bill. Setting realistic expectations is key to avoiding disappointment and keeping your passion alive.
Here’s a glimpse of what you can actually expect:
- Basil: You can harvest about 4 ounces per month. That’s enough for a constant supply for a family of two.
- Lettuce: Expect to harvest about 2 full heads per cycle (approx. 4-6 weeks).
- Strawberries: A single plant will give you about 1 berry per week. It’s a fun project, not a harvest festival.

47-Minute Assembly: How to Build Your DWC Hydroponic Bucket
This isn’t a complex, time-consuming build. I’ve broken it down to the essentials. You can be up and running in under an hour if you have your parts and tools ready.
- Drill the Lid: Using your hole saw, drill a hole in the lid of your 5-gallon bucket for your net pot. A clean cut is crucial here. Drill a second, smaller hole for the air tubing.
- Prepare the Air Stone: Thread the airline tubing through the smaller hole. Connect the other end of the tube to the air stone.
- Fill the Bucket: Fill the bucket with water, leaving 2-3 inches of space from the top.
- Add Nutrients & Adjust pH: Following the instructions on your General Hydroponics FloraGro kit, add a small amount of nutrients to the water. A little goes a long way. Use your pH test kit to get the water into the ideal range (5.5-6.5).
- Plant your Seedling: Place a rockwool cube with your sprouted seed into the net pot. You can sprout the seed beforehand in a wet paper towel. Place the net pot in the hole.
- Connect the Pump: Connect your air pump to the tubing and plug it into a timer.

Tool Time: You need a drill, a hole saw (3″ or 4″ depending on your net pots), wire strippers, and 17 minutes of patience.
DIY Hydroponics FAQ: Budget Build Truth Bombs
I’ve heard every question under the sun. Here are the most common ones, stripped of the marketing fluff.
What is a DWC system and why is it recommended for beginners?
A: A DWC (Deep Water Culture) system is the simplest hydroponic method. Plants are held in net pots with their roots submerged directly in an oxygenated nutrient solution. It’s recommended for beginners because it has the fewest moving parts, is easy to assemble, and is highly forgiving, making it perfect for learning the basics of nutrient management and plant care.
Is it safe to build my own hydroponic system with water and electricity?
A: Yes, it is safe as long as you prioritize safety. Always use a pump with a grounded plug, run your system on a Ground Fault Circuit Interrupter (GFCI) outlet, and ensure all electrical components are explicitly rated for their intended use. Never use a cracked or damaged pump or wiring, and always keep power strips and outlets away from water.
Why is a decent air pump more important than a fancy light for a beginner setup?
A: While a good light is crucial for plant growth, a cheap or low-quality air pump can fail, leading to oxygen deprivation in the water. This can cause root rot, nutrient lockout, and the death of your plants, regardless of how good your light is. A reliable pump is the “heart” of a DWC system, ensuring your plants’ roots can breathe and absorb nutrients.
Can a DIY hydroponic system be expanded as my skills grow?
A: Absolutely. The simple bucket-based DWC design is highly scalable. You can easily add more individual buckets connected to a central reservoir and air pump as you gain experience. This modular approach allows you to expand your growing operation gradually without having to buy a whole new, expensive pre-packaged kit.
What can I actually grow in this?
Lettuce, basil, cilantro, and kale are your best friends. They are forgiving, fast-growing, and don’t need much space.
How do I expand this setup?
You have two options: a second, identical bucket (total cost: ~$20 for bucket/air stone/tubing) or building a custom PVC system (see our guide to pvc vertical hydroponics for more info).
What are the top 3 beginner mistakes?
1. Ignoring pH: Your plant can’t eat if the pH is wrong. It’s like having a fridge full of food you can’t open.
2. Over-Nutrienting: More isn’t better. You’ll burn your plants. Start with a half-dose.
3. No Timer: A $5 timer is your plant’s heart. Skip it, and everything dies.
Conclusion: Your Blueprint for Hydroponic Freedom
Forget the shiny ads and the influencer hype. The path to real growing isn’t bought in a box; it’s built with your own hands. This $150 test rig isn’t just a cheap project—it’s your declaration of independence from overpriced, underperforming kits and the endless cycle of proprietary refills.
You now have more than a parts list; you have a battle plan forged from my failures. You know to spend on the silent, reliable pump that won’t electrocute your plants, to obsess over pH, and to respect the deadly dance of electricity and water. This knowledge is worth more than any pre-built system.
This single bucket is your classroom. It’s where you’ll learn the rhythm of your plants, see the explosive growth that hydroponics offers, and make your mistakes on a small, manageable scale. When you’re ready, this same blueprint scales. Your second bucket will cost you $20. Your tenth will build a forest.
So click those links, grab your drill, and build something that works. Build something that teaches you. Build something that’s truly yours.
Now get out there and grow.