I’ll never forget the Silent pH Crash of 2021. It was a beautiful 200-gallon DWC system, running perfectly. I had a cheap, inline pH probe sending data to a monitor, and every morning, it told me everything was fine. pH 6.1. EC 1.8. Perfect. But three weeks in, the leaves started to cup. The new growth was yellow. What I didn’t know was that my cheap probe had failed. It was reading a ghost signal while my reservoir pH was plummeting toward an acidic death. The silent monitor was a sedative, lulling me into a false sense of security while my roots, my entire crop, were being slowly melted by an acid bath. I lost three full harvests that season because I trusted an unverified signal. Sensors are your crop’s nervous system, but they can’t be trusted without a brain to verify them. This guide is your brain.
WARNING: Cannabis cultivation remains federally illegal. Information for legal jurisdictions only. Product links for ‘novelty research’ purposes.
Showdown: Inline Sensors vs Handheld Meters
Listen up, tech-tamers. This isn’t a debate; it’s a strategic decision. You’re building a nervous system for your grow, and choosing the right components determines how resilient your crop is. Handheld meters are your stethoscopes, giving you spot-checks. Inline sensors are your ICU monitors, providing continuous, real-time data. Both have their place, but they are not interchangeable.
Sensor Technology Comparison Matrix
| Feature | Handheld Meters | Inline Sensors |
| Cost | 💸 (Low upfront, moderate long-term) | 💸💸💸 (High upfront, low long-term) |
| Accuracy | High (Lab-grade) | High (Lab-grade) |
| Data | Spot-checks (2x daily recommended) | Continuous (Every 15 minutes recommended) |
| Reliability | Susceptible to human error, calibration drift | Vulnerable to O-ring failure and bio-fouling |
| Maintenance | Manual cleaning, wet storage | Automated cleaning cycle, in-line calibration |
My Verdict: Handheld meters are essential for verification. You use them to manually confirm that your inline sensors aren’t lying to you. The worst mistake a grower can make is trusting a single data source. The day I stopped spot-checking my inline sensor with a calibrated handheld meter was the day my Silent pH Crash began.
Installation Zen: Sensor Placement That Doesn’t Lie
Placement isn’t just about convenience; it’s about avoiding dead zones. Your reservoir is not a perfectly mixed beaker; it’s a complex hydro-geological system. Your readings lie at reservoir corners where flow is minimal, and they’re skewed near pump outlets where water is highly aerated.
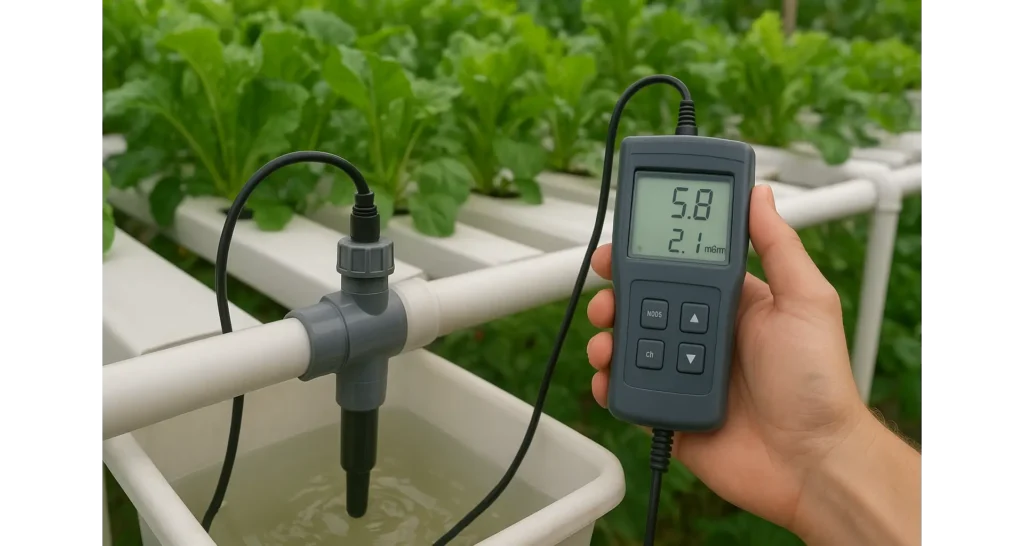
The Golden Rule: Place sensors in a neutral, well-mixed zone. A good rule of thumb is to place the probe’s tip at least 2 inches away from any reservoir wall and away from the direct outflow of a pump [Image Alt: Installing inline pH meter in hydroponic system | Sensor placement optimization]. This ensures a representative sample of your entire reservoir’s nutrient status.

I once installed a temperature sensor directly over a submerged pump. The data showed my water temp was a perfect 72°F. It was a beautiful lie. The rest of the reservoir was a warm 80°F, an ideal breeding ground for pythium. Placement matters. Don’t let a poorly placed sensor give you a false sense of security.
Data Pulse: Sampling Frequency for Healthy Crops
Your plants speak in data. You need to listen at the right rhythm. This isn’t about collecting data for data’s sake; it’s about anticipating their needs.
- Handheld Meters (Twice Daily): With a handheld meter, you must commit to at least two readings a day—one at dawn and one at dusk. Why? Plants’ metabolic cycles shift with the light. At dawn, your pH is at its lowest after a night of respiration. At dusk, it’s at its highest after a day of photosynthesis. These two points give you the full picture of your pH drift pattern, which is the most critical metric for a small-scale grower.
- Inline Sensors (Every 15 Minutes): This is where the power of automation shines. By logging a data point every 15 minutes, you can spot trends in real-time. A rapid drop in pH after a reservoir top-off is a red flag. A slow but steady increase in EC throughout the day tells you your plants are thirsty and eating less. This rhythm is the difference between diagnosing a problem and reacting to a catastrophe.

Game-Changing Insight #1: Don’t just log the numbers. Log the context. The time of day, the temperature, the reservoir level—it’s all part of the story. I learned this the hard way when I couldn’t figure out why my pH was spiking. It turned out to be a subtle temperature increase in my reservoir after a sunny afternoon, a variable I wasn’t logging [Image Alt: Logging hydroponic sensor data for plant health | Data logging for preventative maintenance].
Alert Engineering: Thresholds That Save Crops
Alerts are not alarms; they’re the sentinels guarding your crop. An alarm is what wakes you up to a fire. An alert is what tells you the smoke detector battery is low. My rule: you want to be alerted when a variable is drifting, not when it has already crashed.
Formula for a Stress-Free Grow
I’ve wired hundreds of systems, and every single one is configured to these battle-hardened alert thresholds:
- pH Alert: Set a trigger for a pH change of more than ±0.8 from your target. This gives you a wide enough buffer to handle normal daily drift while catching a catastrophic crash before it can melt your roots2.
- EC Alert: Your plant’s diet. Set your alert for an EC fluctuation of more than ±300 μS/cm from your target. This catches nutrient lockout (EC too high) or starvation (EC too low) before your leaves start to turn yellow.
- Temperature Alert: Root zone temperature is critical. Too cold, roots shut down. Too hot, pythium thrives. An alert should trigger at any reading above 75°F or below 62°F. This simple rule can save a crop from a silent, slow death.
Game-Changing Insight #2: Alerts are useless if you’re not home to hear them. My systems send an SMS message and an email. I’ve even set up a flashing light in my garage for when my phone is on silent. An alert system is only as good as its delivery method. Don’t trust an app.
Automation Arsenal: From Plug-n-Play to DIY
Once you’ve mastered data collection, the next step is automation. This is where you hand off the repetitive tasks of monitoring and adjusting to a machine.
- AC Infinity Controller 69 Pro: The ultimate smart controller for your entire grow. This controller monitors temperature, humidity, and VPD while controlling up to four different devices. It can also integrate with an external EC and pH meter to monitor your solution and automate adjustments.
- Bluelab Connect System: A professional-grade, plug-and-play solution for continuous monitoring. The system continuously measures and logs data for pH, EC, and temperature, and sends alerts directly to your phone.
- Groweew™ System: This is a comprehensive, app-controlled system that automates nutrient dosing and pH adjustments based on your set parameters. It’s a true “set it and forget it” system once you dial it in3.
- Atlas Scientific EZO™ pH Kit: This is a pro-grade, hobbyist-priced inline pH probe with a separate circuit board that makes integration with microcontrollers a breeze.
- Raspberry Pi Starter Kit: The foundation of any DIY automation project. This kit gives you everything you need to start building a custom monitoring system on a budget.
Home Assistant Hacks: $50 Smart Monitoring
I’ve wired entire commercial grow rooms, but I’m a firm believer in the power of DIY. For the hands-on grower, building your own system is an invaluable learning experience.
- The Raspberry Pi Heart: The heart of your DIY system is a Raspberry Pi. It’s a small, cheap computer that can run a program called Home Assistant.
- The Sensors: You can buy affordable, reliable sensors for pH, EC, and temperature from vendors like Atlas Scientific or DF Robot.
- The Code: You’ll need to write a simple script in Python that reads data from your sensors and logs it to a spreadsheet. The beauty of this is that you control the entire system.
- The Alerts: With a Home Assistant setup, you can program alerts for when your pH or EC drifts outside of your specified range. It can send you an email, an SMS, or even an alert to your smart speaker.

This isn’t a complex, intimidating project. It’s an empowering one. There are thousands of step-by-step guides on platforms like Instructables and Reddit that walk you through the entire process. The beauty of it is that you can build a robust, custom monitoring system for a fraction of the cost of a commercial one.
Beginner’s Sensor Kit: Zero to Hero
If you’re just starting, don’t overwhelm yourself with a complex inline system. Start simple. Build your skills.
- Handheld pH/EC Pen Combo: This is your entry-level sensor kit. A simple combo pack of a pH pen and an EC pen is all you need to start. It’s cheap, easy to use, and will give you a feel for how to log and monitor your data.
- Calibration Solutions: A kit of pH 4.0 and 7.0 calibration solutions is non-negotiable. You can’t calibrate a meter without them.
- General Hydroponics pH Up/Down: The industry standard for pH adjustment. It’s cheap, effective, and readily available.
- Daily Logbook: A simple notebook or spreadsheet is all you need to start. Log your readings every day. This is the single most important step you can take.
FAQ
What is the difference between an inline sensor and a handheld meter?
A handheld meter is a tool for spot-checking your nutrient solution, much like a stethoscope gives a doctor a quick reading. An inline sensor, on the other hand, is like an ICU monitor; it provides continuous, real-time data on your pH, EC, and temperature, allowing you to track trends and receive alerts for fluctuations.
Why should I not rely on a single sensor in my grow?
Relying on a single data source is a common and catastrophic mistake. An inline sensor, while useful, can fail or drift over time. You should always use a separate, calibrated handheld meter to spot-check your inline sensor twice a day. This verification process prevents you from trusting a “ghost signal” and avoids a crop-destroying pH crash.
What is the biggest mistake growers make when placing a sensor in a reservoir?
The biggest mistake is placing a sensor in a “dead zone” or a spot with uneven flow, such as a corner or directly over a pump’s outflow. This leads to inaccurate readings that do not represent the true nutrient status of the entire reservoir. A sensor should always be placed in a neutral, well-mixed zone.
What is a “Silent pH Crash”?
A Silent pH Crash occurs when a failed or uncalibrated sensor gives you a stable, but incorrect, reading. The grower believes everything is fine, while the reservoir’s pH is actually plummeting or spiking, leading to nutrient lockout and a slow, silent death for the entire crop. This is why a simple, handheld meter is a vital backup.
How often should I take readings with a handheld meter to avoid problems?
You should take readings with a handheld meter at least twice a day: once at dawn and once at dusk. This is because your plants’ metabolism causes the pH to be at its lowest in the morning and its highest in the evening. Logging these two points gives you a complete picture of your pH drift pattern.
Is it worth it to build a DIY monitoring system with a Raspberry Pi?
Yes, building a DIY monitoring system with a Raspberry Pi is a great option for the hands-on grower. It is an invaluable learning experience and allows you to build a robust, custom system with continuous data logging and alerts for a fraction of the cost of a commercial system.
How can I use a smart alert system to prevent a grow disaster?
A smart alert system is a force multiplier for your grow. By setting custom thresholds, you can receive an email or an SMS message when your pH, EC, or temperature begins to drift outside a safe range, allowing you to react to a problem before it becomes a catastrophe.
Conclusion: The Path to Precision
You are no longer a passive observer. With the right tools and knowledge, you are a data-driven farmer. A smart grower. You can now see the subtle language of your plants in a spreadsheet, predict a problem before it happens, and automate the mundane tasks of a grow room. This isn’t just about growing a plant. It’s about engineering a living system. A system that is now resilient, robust, and protected.
Disclaimer: All product recommendations and technical data are based on our experience and research. Always conduct your own tests before applying any new methods to your crop.