Listen up, because I’m about to share a war story. The year was 2019. I had a beautiful Deep Water Culture (DWC) setup, six stunning White Widow plants just entering flower. I got lazy. Skipped my daily pH check for two days. Two days. On the third day, I walked into a horror show. Drooping, yellowing leaves with angry brown spots. The reservoir pH had crashed to 4.2. My plants were starving in a sea of perfectly good nutrients. That mistake cost me a half-pound harvest and a painful lesson: in hydroponics, pH isn’t just a number—it’s the god of your grow room.
WARNING: Cannabis cultivation remains federally illegal in many places. This content is for educational purposes and intended for audiences in legal jurisdictions only. All product links are for ‘novelty research’ and legal horticultural applications.
This guide is the culmination of a decade spent in labs and grow tents, turning catastrophic failures into repeatable successes. We’re going to dissect the science of pH, master the art of the nutrient schedule, and learn to read your plants like a book. Forget the bro-science. This is the real deal on how to avoid the lockout that kills your crop.
The pH Sweet Spot: Why 5.5-6.5 Isn’t Just a Number
Ever wondered why everyone chants the “5.5 to 6.5” mantra? It’s not an arbitrary rule; it’s the fundamental law of nutrient availability in a soilless medium.
Picture this: your plant’s roots are at a massive nutrient buffet. All the good stuff is there—Nitrogen, Phosphorus, Potassium, Calcium, Magnesium, all of it. But there’s a gatekeeper at the door, and that gatekeeper is pH. If the pH is too low (acidic) or too high (alkaline), the gatekeeper locks the door on specific nutrients. The food is right there, but your plant can’t get in. That, my friends, is nutrient lockout.
Here’s the deal. Different mineral salts become soluble and available for root uptake only within specific pH windows.
- Too Low (Below 5.5): When your hydro reservoir gets too acidic, your plants start absorbing micronutrients like Iron, Manganese, and Copper way too easily, quickly leading to toxicity. At the same time, the big three—Nitrogen, Phosphorus, and Potassium—along with Calcium and Magnesium, get locked out. Your plant is overdosing on trace elements while starving for the main course.
- Too High (Above 6.5): As the solution becomes more alkaline, the opposite happens. Iron, in particular, becomes incredibly difficult for the roots to absorb. This is one of the most common causes of that dreaded yellowing between the leaf veins (interveinal chlorosis) that plagues new growers.
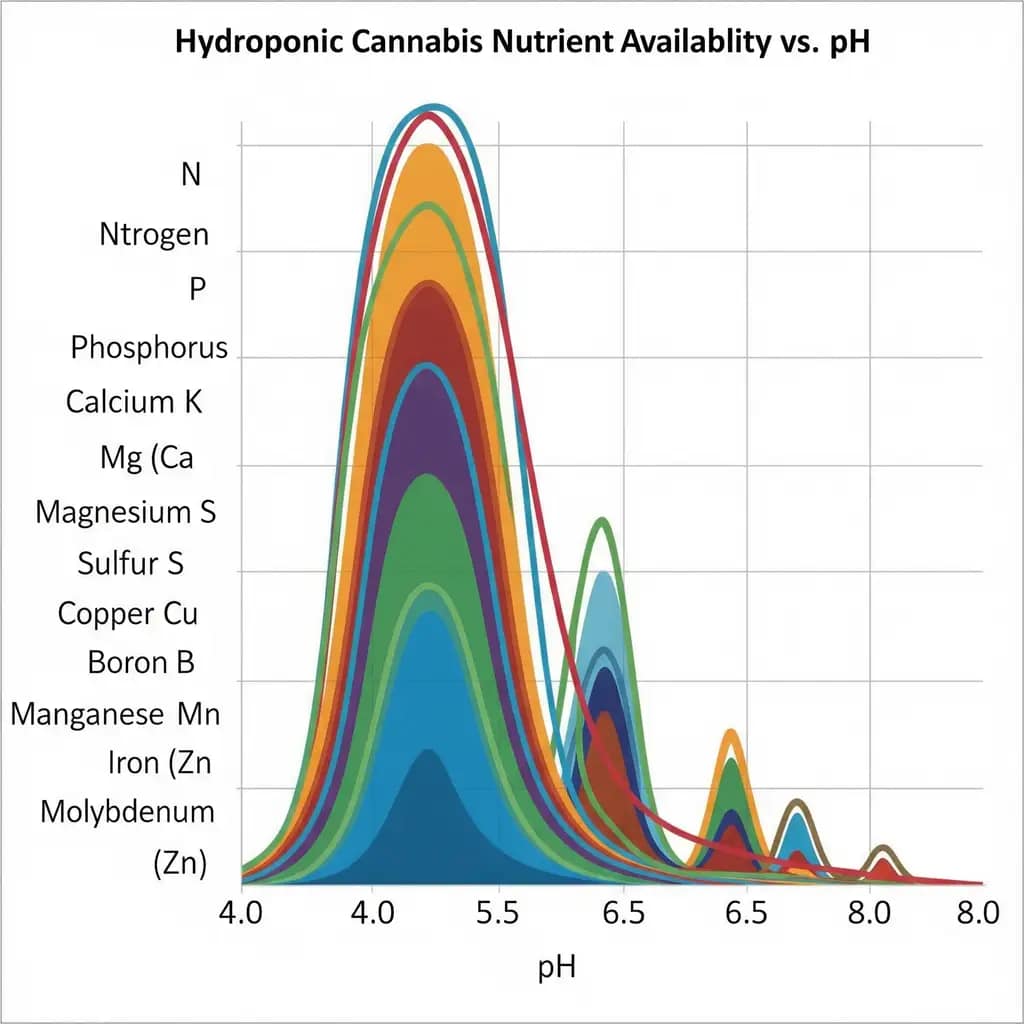
Finding the best pH for hydroponic cannabis isn’t about hitting a single number. It’s about ‘drifting’ within the sweet spot. I like to let my pH drift from 5.6 up to 6.3 over a few days before adjusting it back down. Why? Because different elements have slightly different optimal uptake points within that range. A little drift ensures your plants get a chance to eat everything on the buffet. Sticking rigidly to 6.0 every single day is like only ever letting your plants eat chicken when they also need some steak and broccoli.
Nutrient Cheat Sheet: From Seedling to Sticky Buds
A solid hydroponic cannabis nutrient schedule isn’t about dumping in a random cocktail of chemicals. It’s about feeding your plants what they need, when they need it. A plant in its explosive vegetative stage has a completely different diet than one packing on weight in the middle of flowering.
Here’s an “aha!” moment the nutrient bottles don’t tell you: the N-P-K (Nitrogen-Phosphorus-Potassium) ratio is your roadmap.
- Vegetative Stage: The plant’s goal is to build a strong frame—lots of leaves, thick stems, and a robust root system. The star of the show here is Nitrogen (N). It’s the primary building block for chlorophyll and proteins. A high-N, medium-P, and medium-K formula is the ticket.
- Flowering Stage: Once you flip your lights to a 12/12 cycle, the plant’s mission changes. It’s no longer about getting bigger; it’s about reproduction (making big, resinous flowers). The demand for Nitrogen drops dramatically. Now, Phosphorus (P) and Potassium (K) take center stage. Phosphorus fuels flower formation and energy transfer, while Potassium is vital for sugar production, resin synthesis, and increasing bud density.
Here’s a simplified look at how those ratios shift:
| Growth Stage | N-P-K Ratio (General) | Primary Goal | EC/PPM Range (Approx.) |
| Seedling/Clone | Balanced, low strength | Gentle root and leaf development | 0.4 – 0.8 EC / 200-400 PPM |
| Early Veg | High N, Medium P/K | Building a strong structure, rapid growth | 1.0 – 1.6 EC / 500-800 PPM |
| Late Veg | High N, Medium P/K | Maximize size before flowering | 1.6 – 2.2 EC / 800-1100 PPM |
| Transition/Bloom | Medium N, High P/K | Stimulate flower sites, manage stretch | 1.8 – 2.4 EC / 900-1200 PPM |
| Mid-Late Bloom | Low N, High P/K | Pack on bud weight, density, and resin | 2.0 – 2.8 EC / 1000-1400 PPM |
| Flush | None (Plain Water) | Remove excess mineral salts from plant tissue | 0.0 – 0.4 EC / 0-200 PPM |
Note: These are general guidelines. Always start with a lower concentration and observe your plants. Different strains have different appetites.
A good nutrient schedule is more than just N-P-K. Don’t forget the supporting cast: Calcium and Magnesium (Cal-Mag) are the dynamic duo of hydroponics. You’ll almost always need to supplement them.
Reading Plant SOS Signals: A Guide to Deficiencies and Toxicities
Your plants talk to you. You just need to learn their language. Droopy leaves, yellow spots, burnt tips—these are all distress signals. Understanding cannabis nutrient deficiencies in hydroponics is 90% observation.
Here’s another “aha!” moment: most “deficiencies” in hydro aren’t from a lack of nutrients in the water; they’re from pH-induced lockout. Before you add more of anything, check your pH first.
Common SOS Signals:
Nutrient Burn (Toxicity): This is the easiest one to spot and the most common rookie mistake. The very tips of the leaves will turn yellow, then brown and crispy, looking like they’ve been dipped in fire. It’s a clear sign your nutrient solution is too strong.
The Fix: Dilute your reservoir with fresh, pH’d water to lower the overall EC (Electrical Conductivity) or PPM (Parts Per Million).
Nitrogen (N) Deficiency: The oldest, lowest leaves on the plant will start to turn a uniform pale green, then yellow, and eventually become mushy and fall off. The yellowing will systematically move up the plant.
The Fix: If in veg, slightly increase your base nutrients. If this happens in late flower, it’s normal and a good sign the plant is cannibalizing nitrogen to fuel the buds.

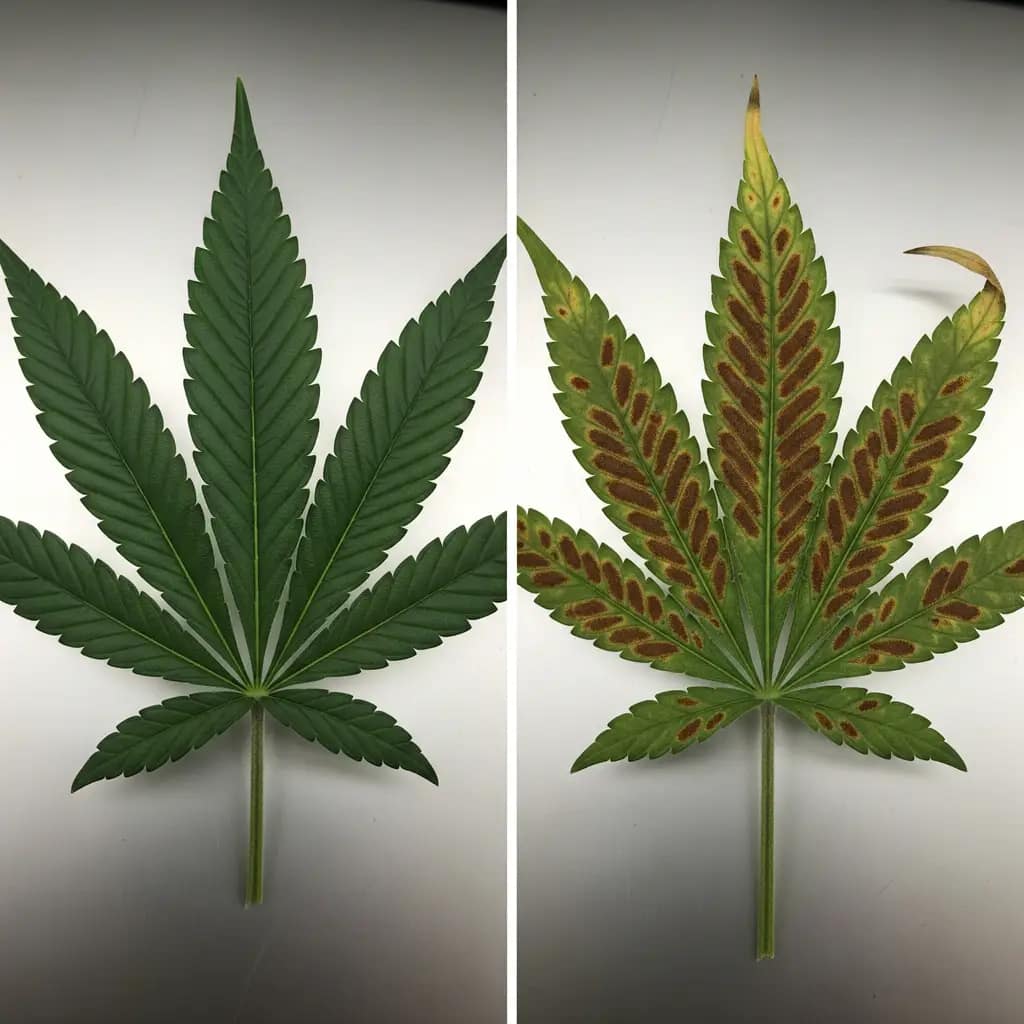
Calcium (Ca) & Magnesium (Mg) Deficiency: This is the bane of many hydro growers. It often appears as yellow or rusty-brown spots between the green veins on the newer, upper leaves (interveinal chlorosis). Magnesium deficiency might look more like yellow “speed racer” stripes.
The Fix: First, check your pH! Cal-Mag lockout is common. If pH is fine, you need to add a Cal-Mag supplement. I add it to every feeding from week two of veg until the final flush.
Iron (Fe) Deficiency: This looks a lot like a magnesium deficiency, but it starts on the newest, youngest growth at the very top of the plant. The new leaves emerge a bright, shocking yellow.
The Fix: Almost always a pH problem. Your pH is likely too high (above 6.5). Lower it to 5.6-5.8 and watch the new growth return to a healthy green.
My Battle Against Root Rot – Winning Strategies
Let me tell you, there’s no smell in the world quite like pythium—root rot. It’s the smell of death. Healthy roots are bright white and smell like fresh earth after a rainstorm. Rotted roots are brown, slimy, and smell like a forgotten swamp cooler. I lost an entire crop to it in my early days because I didn’t respect the two things that prevent it: oxygen and temperature.
Root rot is a water mold, an oomycete, that thrives in low-oxygen, high-temperature environments. Your roots are sitting in water 24/7. If that water is stagnant and warm, you’re not running a hydroponic system; you’re breeding a plague.
Get a Water Chiller (Or DIY It): This was the game-changer. Pythium hates the cold. Keeping my reservoir temperature between 68-72°F (18-20°C) made it incredibly difficult for root rot to get a foothold. A dedicated water chiller is expensive, but it’s cheaper than replacing a dead crop.
DIY Hack: For smaller systems, you can freeze 2-liter soda bottles filled with water and rotate them in your reservoir a few times a day to keep the temps down. It’s a pain, but it works.
More Oxygen Than You Think You Need: Don’t skimp on your air pump and air stones. You want your reservoir to look like a boiling cauldron. Massive amounts of dissolved oxygen create an environment where beneficial, aerobic bacteria thrive and outcompete the nasty, anaerobic pathogens that cause rot.
Pro Tip: Clean your air stones between every cycle. They get clogged with mineral salts, reducing their efficiency. A soak in vinegar and a good rinse does the trick.
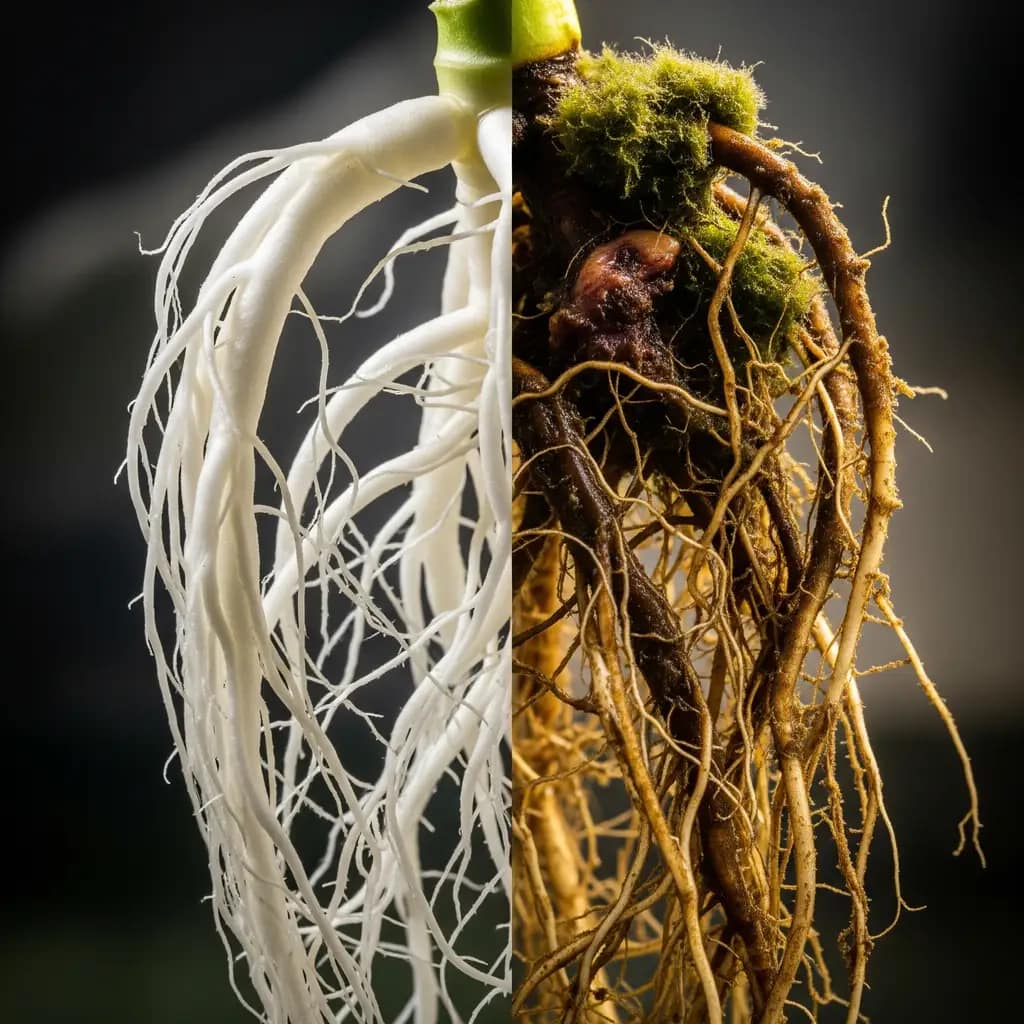
Beneficial Bacteria Are Your Bodyguards: This is the third “aha!” moment. You can add a biological bodyguard to your reservoir. Products containing beneficial microbes like Bacillus amyloliquefaciens (found in products like Hydroguard) colonize the root zone. They form a symbiotic shield around the roots, actively fighting off and consuming pathogenic fungi and bacteria. It’s like having a microscopic army protecting your plants.
No Light Leaks, Period: Algae is the opening act for root rot. It blooms in light, dies, and then becomes food for pythium. Your reservoir and entire root zone must be 100% light-proof. Wrap your buckets in black-and-white poly film if you have to.
Winning the battle against root rot isn’t about a single product; it’s about creating an inhospitable environment for the enemy. Keep it cold, keep it oxygenated, and keep it clean. Do that, and you’ll never have to smell that swampy stench of death again.
Troubleshooting Nightmares: When Good Grows Go Bad
Even with the best gear, things go wrong. Fast. Here’s how to handle the two most common hydroponic emergencies.
Help! My pH Crashed/Spiked Overnight!
You walk in, and your perfectly dialed-in 5.9 pH is now 4.5 or 7.5. Don’t panic. This usually happens for two reasons:
- Bacterial Bloom: You have something (algae, dead roots, a fallen leaf) decaying in your reservoir. Bacteria are feasting on it, and their metabolic processes are causing wild pH swings.
- Plant Uptake: In heavy flower, plants can drink a ton of water and uptake certain nutrients, leaving others behind, which can drastically alter the pH of the remaining solution.
The Recovery Plan:
- Don’t Chase It: Do not dump a ton of pH Up or Down in to fix it instantly. You’ll just shock the roots.
- Drain and Refill: The safest and most effective solution is to drain the reservoir completely.
- Inspect and Clean: Check for any decaying matter. Clean your air stones and pump filter.
- Mix a Fresh Batch: Refill with fresh, pH-balanced nutrient solution at about 75% of your previous strength to give the plants a chance to recover without being overwhelmed.
- Monitor Closely: Check the pH again in 4-6 hours. It should be much more stable.
Recovering from Nutrient Lockout
You’ve got the spotted, yellowing leaves. You’ve confirmed your pH was way out of whack. How do you get your plants eating again?
- Flush the System: Just like with a pH swing, drain the entire system. Don’t try to correct a locked-out solution.
- Refill with a Flushing Agent (or just pH’d water): For 12-24 hours, run either a light flushing agent (like FloraKleen) or just plain, pH-balanced water (5.8-6.0) through your system. This helps dissolve and wash away the excess mineral salts that have built up on the roots.
- Introduce a Mild Nutrient Solution: After the flush, mix a fresh batch of nutrients at half-strength. Your plants’ roots are sensitive after being locked out, and hitting them with a full-strength feed is like force-feeding someone after they’ve had the stomach flu.
- Be Patient: It will take a few days for the plant to recover. The damaged leaves won’t heal, but you should see the new growth coming in healthy and green. That’s your sign that you’ve successfully broken the lockout.
Advanced Nutrient Hacks for the Fearless Grower
Once you’ve mastered the basics of pH and N-P-K, you can start experimenting with some next-level techniques to really push your plants’ potential.
Foliar Feeding: A Quick Fix for Deficiencies
Foliar feeding is the practice of spraying a diluted nutrient solution directly onto your plants’ leaves. The leaves can absorb small amounts of nutrients through their stomata. It’s not a replacement for root feeding, but it’s an incredibly effective emergency tool.
If you spot a new magnesium deficiency, for example, a light spray of a diluted Cal-Mag solution on the leaves can deliver that nutrient directly where it’s needed, much faster than the roots can.
- DIY Hack: The golden rule of foliar feeding: less is more. Use a quarter-strength solution. Always spray right when the lights turn off or just before they turn on. Spraying under intense light can cause water droplets to act like tiny magnifying glasses, burning your leaves.
The Power of Silica and Other Supplements
- Silica: This is my secret weapon. Adding a silica supplement (like Armor Si) strengthens cell walls, making your plants more physically robust. Stems get thicker, and branches become strong enough to hold up heavy flowers without support. It also increases resistance to pests and environmental stress like heat.
- Enzymes: Products containing enzymes (like Hygrozyme or Cannazym) help break down old, dead root matter in your system, turning it into usable sugars for the plant and beneficial microbes. It keeps the root zone clean and efficient.
Gear That Actually Works
Here’s how I won the war:
Over the years, I’ve wasted a ton of money on flimsy gear and snake-oil additives. Here’s the short list of equipment that has survived years of abuse in my grow rooms and saved me from countless disasters.
Legal Note: Cannabis cultivation regulations vary by location. Consult local authorities before proceeding. This content is for educational purposes only. Products are for legal horticultural use.
Vivosun Digital pH Meter and TDS Combo Kit
Dual meters with auto-calibration and LCD screens for tracking pH/PPM in hydroponic reservoirs.
- Application: Great for all home and laboratory TDS & pH testing applications including aquariums, swimming pools
- PH Meter: Full measurement range of pH 0 – 14, reliable and quick readings
- 3-in-1 TDS Meter: Measurement Range 0-9990ppm, 0-9990µs/cm; Accuracy ± 2%, 0.1- 80.0°C, 32.0-176.0°F; Note: This meter c…
Top-Shelf Features:
- Dual-Parameter Logging: Simultaneously records pH and PPM for nutrient consistency.
- Data Hold Function: Freezes readings for easy transcription into journals.
- Storage Solution: Includes protective cases and calibration powders to prolong probe life.
A Word of Caution:
- Calibration Demands: Requires weekly calibration to maintain accuracy.
- Fragile Probes: Glass pH sensors need careful handling to avoid cracks.
Is It Right for Your Garden? Essential for growers quantifying nutrient strength. Export data to digital journals for trend analysis. See Latest Discount.
General Hydroponics pH Control Kit
A complete kit with pH test solution, calibration fluid, and guide for maintaining optimal 5.5-6.5 ranges.
- General Hydroponics pH Control Kit contains everything you need to measure pH levels of your hydroponic grow reservoirs
- RELIABLE RESULTS: The streamlined testing system delivers fast, accurate, and easy-to read results every time
- ALL-IN-ONE KIT: Includes 8 oz. General Hydroponics pH Up Liquid, 8 oz. General Hydroponics pH Down Liquid, 1 oz. Test In…
Root-Level Benefits:
- Precision Tools: Drop-based testing ensures accurate pH readings without electronic drift.
- Educational Guide: Includes cheat sheets for interpreting color results and adjustment calculations.
- Cost-Effective: cheaper than digital meters for growers on a budget.
Not a Perfect Fit For:
- High-Frequency Testing: Manual process becomes tedious for large-scale grows.
- Low-Light Visibility: Color interpretation challenges under LED grow lights.
Our Grow-O-Meter Says: A staple for beginners mastering pH management. Log results daily to identify drift patterns early. Check Price on Amazon.
Advanced Nutrients pH Perfect Base Nutrients
A nutrient system with automated pH stabilization technology, ensuring optimal nutrient uptake without manual adjustments.
- If you want to achieve fast growth high yields and incredible products choose Grow Micro Bloom.
- 1L
Root-Level Benefits:
- pH Automation: Maintains pH within the ideal 5.5-6.5 range automatically, reducing lockout risk.
- Balanced Formulation: Provides essential macros and micros without salt buildup.
- Strain-Specific: Works well with various cannabis strains, from indicas to sativas.
Not a Perfect Fit For:
- Organic Purists: Contains synthetic components; not suitable for fully organic grows.
- Cost: Higher initial investment than standard nutrients.
The Final Verdict:
Our Grow-O-Meter Says: Perfect for growers seeking hands-off pH management and consistent results. Check Price on Amazon.
FoxFarm Ocean Forest Potting Soil
An organic potting soil blend with pre-balanced pH and nutrients, ideal for preventing lockout in soil-based grows.
- ALL-IN-ONE POTTING SOIL SOLUTION: FoxFarm ocean forest potting soil is a blend designed to give your plants everything t…
- MOISTURE-LOCKING NUTRIENT BLEND: This organic potting soil for plant is packed with aged forest products, sphagnum peat …
- TOP-NOTCH SOIL FOR EVERY PLANT: From roses and shrubs to seedlings and trees, this garden soil supports vigorous growth …
Bloom & Boost:
- Pre-Amended Mix: Includes worm castings, bat guano, and forest humus for balanced nutrition.
- pH Balanced: Pre-adjusted to 6.3-6.8, reducing the need for frequent pH monitoring.
- Light Texture: Promotes root growth and drainage, preventing overwatering issues.
Things to Consider:
- Limited Reusability: Nutrients deplete after 1-2 grows; requires re-amending or replacement.
- Heat Risk: Fresh batches can run “hot” for seedlings; mix with light warrior for young plants.
Is It Right For Your Garden? Best for soil growers wanting a hassle-free start with minimal lockout risk. See Latest Discount.
NU Aqua Reef Series 4 Stage 75GPD RODI System
A reverse osmosis system that purifies water, removing excess minerals and preventing salt buildup.
- 120-DAY HOME TRIAL & 3 YEAR WARRANTY: If you’re not satisfied with your system in 120 Days send it back. Backed by an in…
- ADVANCED FILTRATION TECHNOLOGY: The NU Aqua Reef Series 4 Stage RODI system employs cutting-edge deionized reverse osmos…
- 4-STAGE FILTER PROCESS: The RO water filter system four stage filtration process addressing various contaminants. Sedime…
Grow Room Win:
- Pure Water Production: Removes 99% of contaminants, including calcium and magnesium, preventing lockout.
- pH Neutral Output: Allows precise pH adjustment without mineral interference.
- High Efficiency: Produces 75 gallons per day, suitable for medium to large operations.
The Trade-Off:
- Installation Complexity: Requires plumbing knowledge for setup.
- Waste Water: Generates wastewater; may not be ideal for arid regions.
The Final Verdict: Essential for growers using hard water or dealing with recurrent lockout issues. Check Price on Amazon.
Sledgehammer Flushing Agent
A specialized flushing solution that breaks up salt buildup and restores nutrient availability.
- FLUSH AWAY FERTILIZER BUILDUP: SledgeHammer nutrients flush clears excess fertilizer from soil & soilless mediums, preve…
- MAXIMIZE MOISTURE UPTAKE: By reducing surface tension, plant flushing solution allows water to penetrate deeply into gro…
- YUCCA SAPONIN-INFUSED ROOT CARE: Derived from Yucca schidigera, this nutrient solution uses natural saponins to break do…
Why Growers Love It:
- Rapid Action: Clears salt residues from grow media and roots within hours.
- Plant-Safe: Gentle formula doesn’t stress plants during flushing.
- Versatile: Works in soil, coco, and hydroponic systems.
Room for Improvement:
- Temporary Solution: Doesn’t address underlying pH or nutrient issues alone.
- Odor: Some users report a mild chemical smell during use.
Bottom Line for Growers: The go-to solution for emergency lockout rescues. Use with pH-balanced water for best results. Check Price on Amazon.
The Final Word: Become the Master of Your Medium
Mastering the best pH for hydroponic cannabis and a proper hydroponic cannabis nutrient schedule isn’t black magic. It’s a dance of chemistry and observation. Your meters give you the data, but your plants give you the truth. Learn to listen to them. Spend time in your garden every single day. Look at the color of the leaves, check the smell of the roots, and be consistent with your checks.
Stop letting your system dictate terms to you. By understanding the ‘why’ behind the numbers, you take control. You stop being a victim of cannabis nutrient deficiencies in hydroponics and become the architect of your own massive, sticky, trouble-free harvest. Now go calibrate your pen.
FAQ’s
What exactly is nutrient lockout, and how does pH cause it?
A: Nutrient lockout is a frustrating problem where your cannabis plants can’t absorb the nutrients they need, even if those nutrients are in the water. Think of pH as the gatekeeper for your plants’ roots. If the pH level in your nutrient solution is too high or too low, this gate closes. For example, if the pH drops below 5.5, crucial macro-nutrients like Nitrogen and Phosphorus become “locked out.” Conversely, if it goes above 6.5, essential micronutrients like Iron become unavailable. Maintaining a balanced pH is the single most important step in keeping that gate open and ensuring your plants get the food they need.
What is the ideal pH “sweet spot” for cannabis, and how should I maintain it?
A: The perfect pH range for hydroponic cannabis is typically between 5.5 and 6.5. Instead of keeping it at a single fixed number, many experienced growers use a technique called pH drifting. This means you set the pH to the lower end (around 5.6) and let it naturally rise over a few days before you adjust it back down. This slight fluctuation helps the plant absorb a wider range of nutrients, as some nutrients are more available at a slightly higher pH while others are better at a lower one.
How do I fix nutrient lockout if it’s already happening?
A: If you suspect nutrient lockout, the fastest and most reliable fix is to perform a full system flush. This means you’ll completely drain your old reservoir, clean it thoroughly, and refill it with fresh, pH-balanced water. Next, prepare a new nutrient solution at about half the recommended strength. This gentler solution allows your plants to recover and reset their nutrient uptake without getting overwhelmed. After a few days, you can gradually increase the nutrient strength back to the normal level.
Do my plants’ nutrient needs change during the different growth stages?
A: Yes, absolutely. Your plants’ nutritional needs change as they mature. During the vegetative stage, they require a higher level of Nitrogen to support robust leaf and stem growth. When they enter the flowering stage, their focus shifts. At this point, they need less Nitrogen and a much higher concentration of Phosphorus and Potassium to develop dense, healthy buds. Using the right nutrient mix for the right stage is key to maximizing your final yield.


