I’ve seen a lot of things fail in my career. Hydraulic systems with pressure spikes. Electrical circuits that go up in smoke. But none of those felt as personal as my first aeroponic tower. It was supposed to be a vertical garden, a precision instrument humming with life. Instead, it became a festering mold fountain that, for a few miserable days, smelled like a swamp.
But you’re not going to make those mistakes. Not if you follow this guide.
This isn’t some generic gardening blog post. This is a battle-tested blueprint forged from a decade of tinkering, CAD modeling, and, yes, a few spectacular failures. I’ll walk you through the precise calculations and component selections that separate a functional system from a future biohazard. We’re going to build an aeroponic tower that doesn’t just grow plants, it dominates. It’s the same basic setup that helped me harvest over 40 pounds of tomatoes from a single unit and taught me more about plant physiology than a dozen textbooks ever could.
Let’s engineer some success.
Safety Warning: High-pressure systems carry an explosion risk. Wear eye protection. Follow all manufacturer guidelines. All materials must be food-grade, certified safe for use with consumables.
Why Most DIY Aeroponic Towers Fail: A Forensic Analysis
Before we even start talking about parts, let’s confront the ghosts in the machine. Every one of my successful builds was preceded by a design that went belly-up. Understanding why they failed is your single most important lesson. This is where we conduct a forensic failure analysis, identifying the critical vulnerabilities so we can engineer them out of the system before a single drop of water is pumped.
Failure Mode 1: The Great Root Rot Disaster
My first prototype looked perfect on paper. The plants took off like rockets. But a week in, I walked into my garage and was hit by the unmistakable smell of death. The root chamber, designed for life, had become a morgue.
Autopsy Report: The root mats were brown, slimy, and smelled like a landfill. The cause? Root asphyxiation, quickly followed by a pathogen bloom. My initial design had the mister running too frequently, oversaturating the roots. This created an anaerobic environment—no oxygen for the roots to breathe—and an open invitation for opportunistic fungi like Pythium. Once established, it spreads through the recirculating nutrient solution like a contagion.
My First Rule: Aeroponics isn’t about drenching roots; it’s about misting them. The magic happens in the brief “off” cycle when the roots get to gulp down oxygen from the air.
- Visual Diagnosis: Look for roots that turn from crisp white to a slimy, brown, or grayish mess. The leaves may wilt even though the plant has access to water. This is because the rotted roots can no longer absorb nutrients or moisture.
- Forensic Failure Analysis: The core issue was misting time. The roots had no window to breathe, and the stagnant, oversaturated air inside the chamber became a breeding ground for pathogens.

Failure Mode: The Algae Apocalypse
This one wasn’t a sudden, catastrophic failure, but a slow, parasitic one. Patches of sickly green started appearing on the inside of the root chamber, leeching nutrients and choking out my plants.
Autopsy Report: Algae is photosynthetic, meaning it needs light to survive. My original design used translucent PVC piping, and the grow holes weren’t fully sealed. The light leaks, however small, gave the algae a foothold. It colonized the roots, stealing light and nutrients from my plants and creating a biofilm that eventually began clogging my nozzles.
My Second Rule: The root chamber must be a light-tight fortress. Any photon that makes it inside is a potential disaster.
- Visual Diagnosis: Look for tell-tale green slime inside the chamber, especially near the top where light might be leaking in. Leaves may show signs of nutrient deficiency even with a properly balanced solution.
- Forensic Failure Analysis: The causal chain was simple: Light leak → algae growth → nutrient theft → compromised plant health. We’ll solve this with some light-blocking engineering in a later section.
This is what a real system failure looks like. It’s a humbling lesson. But with this knowledge, you can now build a system that won’t just work—it will thrive.

Aeroponic Tower Parts List: The Master Specification Sheet
Your aeroponic tower is a machine. And like any good machine, it’s only as strong as its weakest link. We’re not going to cut corners here. Every part has been chosen for reliability, performance, and durability under pressure.
High-Pressure Pump: The Heart of the System (GPH/PSI Calculations)
The pump is the heart of your system. Its job is to move a specific volume of nutrient solution at a specific pressure to your nozzles. This isn’t a simple GPH (gallons per hour) calculation. It’s about PSI (pounds per square inch). If you’re building a low-pressure system, a standard submersible pump from the local hardware store might work for a while, but it won’t atomize the water into the fine mist your roots crave. We’re going for a high-pressure aeroponics (HPA) system that atomizes the water into droplets small enough for maximum root-zone oxygenation and nutrient absorption.
This is where Bernoulli’s Principle comes into play. In simple terms, for fluid flowing through a system, an increase in velocity occurs simultaneously with a decrease in pressure or a decrease in the fluid’s potential energy. We use a high-pressure pump to generate the necessary velocity at the nozzle for atomization.
P1+21ρv12+ρgh1=P2+21ρv22+ρgh2

Don’t worry, you don’t need to solve this. I’ve done the math for you. The key takeaway is this: you need pressure and flow to get results.
| Chamber Height | Min PSI @ Nozzle | Pump GPH (Min) | Recommended Pipe Diameter |
| 4 ft | 60 PSI | 800 GPH | 1.5″ PVC |
| 6 ft | 80 PSI | 1200 GPH | 2″ PVC |
| 8 ft | 100 PSI | 1800 GPH | 2.5″ PVC |
Misting Nozzles: Where the Magic Happens (Micron Matrix)
The nozzle is where the magic happens. A standard garden mister won’t cut it. You need a precision nozzle that produces a fine, atomized mist with a specific droplet size, measured in microns.
Roots absorb water and nutrients most effectively from droplets in the 30-80 micron range. Too large (above 100 microns) and you’re just soaking the roots like in hydroponics, leading to the dreaded rot. Too small (below 10 microns) and the mist behaves like a dry fog, never really adhering to the roots.
My first shop-floor secret: Buy more nozzles than you think you need. They will clog. They will get lost. You will thank me later.

| Plant Type | On Time (sec) | Off Time (min) | Droplet Size (microns) | Nozzle Count (per tower) |
| Leafy Greens | 3 sec | 4 min | 50-80 | 1 per 8 plants |
| Fruiting Plants | 5 sec | 3 min | 30-50 | 1 per 4 plants |
Food-Grade Materials: A Non-Negotiable For Safety
This is non-negotiable. Don’t use standard plumbing PVC. Don’t use old storage bins. You are building a system to grow food that you will consume. The heat from your pump and lights, combined with the acidity of your nutrient solution, will leach chemicals from non-food-grade plastics. It’s not worth the risk.
- Piping: Use Schedule 80 PVC or thicker ABS plastic. Both are more rigid than standard Schedule 40 and can handle the pressure.
- Reservoir: A new, food-grade 5-gallon bucket or a large, opaque HDPE container. Opaque is key to blocking light.
- Tower Body: A new, food-grade PVC fence post is a great starting point for its square shape and rigidity.
- Hole Seals: Use food-grade rubber grommets.
My second shop-floor secret: Before you start any build, soak all your new plastic parts in a diluted vinegar and water bath for a day. Then rinse them thoroughly. This helps leach out any residual chemicals from the manufacturing process.
Misting Cycle Strategy: The Automation Blueprint
Your tower is only as good as its misting cycle. The correct timing and droplet size are the core of the aeroponic method. This is where you become a botanist and a machinist rolled into one.
Cycle Timer Algorithm: The On/Off Science
The pulsing on/off cycle of the pump is what defines true aeroponics. The “on” time delivers the nutrients and moisture. The “off” time is arguably more critical. This is when the water film evaporates from the roots, creating microscopic air pockets. The roots can then absorb precious oxygen, which is vital for cell respiration and nutrient uptake. Without this off cycle, you essentially have a messy, inefficient hydroponic system.
A general rule of thumb for leafy greens is a 3-second on cycle every 4 minutes. This provides enough moisture to coat the roots without oversaturating them. For fruiting plants, which have higher water demands, we increase the on time slightly and shorten the off time.
Droplet Size Optimization: Mist Science 101
A nozzle is just a hole without the right pressure. The droplet size, measured in microns, is directly proportional to the nozzle’s orifice size and inversely proportional to the pressure (PSI) of the water pushing through it. For our purposes, the goal is to get a fine, cloud-like mist that clings to the roots, not a stream that drips off. The fluid dynamics of this is fascinating. The velocity of the fluid exiting the nozzle is what causes atomization. A higher pressure drop across the nozzle (high PSI) creates a higher velocity, which in turn creates a finer mist.
For this reason, your choice of pump and nozzles is critical. Using the Hygger HP-3000 and the Fulljet nozzles, you can be confident that you’re operating within the sweet spot of atomization.
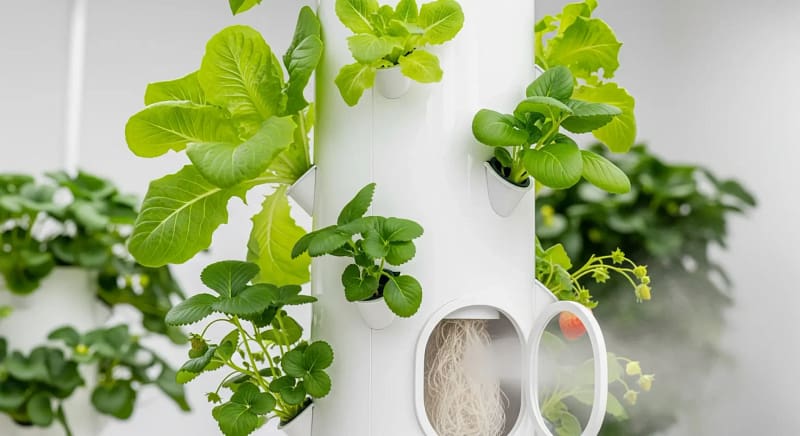
Root Chamber Engineering: Building a Light-Tight, Temperature-Regulated Fortress
The environment inside the root chamber is just as important as the nutrient solution itself. It must be a controlled, dark, and temperate environment where roots can flourish undisturbed.
Light Lock Engineering: Defeating Algae
This is your first line of defense against the Algae Apocalypse. Algae needs light. We are going to block it. Completely.
Material Selection: We’ve already specified an opaque reservoir. Your grow pipes should be the same. PVC fence posts are ideal because they are solid, not translucent like some other plastics.
The Orca Film Liner: For an extra layer of protection, you can line the inside of the tower with a reflective, light-blocking film like Orca Grow Film. My third shop-floor secret: secure the film with a food-safe spray adhesive at the seams to create a truly monolithic light barrier. This also helps with thermal regulation.

Thermal Regulation Hacks: Keeping Roots Cool
The temperature of your nutrient solution and the air inside your root chamber is critical. High temperatures (above 24∘C) reduce dissolved oxygen in the water, which again leads to root suffocation and disease.
- Reflective Insulation: A simple wrap of reflective bubble wrap (like Reflectix) around your reservoir and tower body will reflect radiant heat and keep the temperature stable.
- The CPU Cooler Hack: For those building a more advanced system, consider adding a cooling loop. A 12V DC water pump circulates cold water from a mini-fridge or a sealed ice chest through a coiled copper tube placed inside your reservoir. A simple PC fan can be used to blow air across the copper coils, essentially acting like a heat exchanger. It’s an elegant, low-power solution that a lot of commercial setups use.
Step-by-Step Assembly Guide: Precision Build Blueprint
This is where theory meets reality. Follow this sequence precisely to ensure a robust, leak-proof system.
Leak-Proof Assembly Sequence
- Cut & Drill: Using a 4″ hole saw, drill your grow holes in a staggered pattern along your PVC tower body. Clean all burrs.
- Grommet Installation: Insert a 4″ food-grade rubber grommet into each hole. This is a friction fit and is your primary leak defense. A little soapy water helps them slide in.
- Nozzle Mounting: Drill a hole for your nozzles near the base of the tower. This is where your manifold will be. Thread the nozzles into place, using Teflon tape on the threads to ensure a perfect seal.
- Manifold Assembly: Assemble your PVC manifold with a high-pressure line running up the center of the tower. Attach the line to the pump.
- Final Assembly: Attach the reservoir to the base of your tower, ensuring a tight seal with a gasket and PVC cement.
My fourth shop-floor secret: Use Schedule 80 PVC fittings. They have thicker walls and can handle the pressure better than their Schedule 40 counterparts, preventing blowouts at high PSI.
The Critical Pressure Testing Protocol
This is the most important step before you plant a single seed. I’ve flooded my basement twice because I skipped this part. Do not skip this.
DIY Pressure Tester Build:
- Take a PVC end cap and drill a hole for a standard tire valve stem.
- Seal the valve stem to the end cap with epoxy.
- Attach this cap to a spare manifold line.
- Use a hand-held bike pump with a pressure gauge to slowly pressurize the system.
Protocol:
- Fill the reservoir with water and run the pump for 30 minutes to check for obvious drips.
- With the system running, cap the top of the tower and pressurize it to 120 PSI using your DIY tester.
- Shut off the pump and leave the system under pressure for 24 hours.
- If the gauge drops, you have a leak. Go back and re-seal. No exceptions.
Aeroponic Tower FAQ: Troubleshooting & Failure-Proofing
Q: What is the most common reason for root rot in an aeroponic system?
A: The most common cause is root asphyxiation due to over-misting. Unlike in hydroponics, aeroponic roots need a precise “off” cycle to get oxygen from the air. If the pump runs for too long or too frequently, the roots become oversaturated, creating an anaerobic environment that invites pathogens like Pythium and leads to root rot.
Q: How do I prevent algae from growing inside my aeroponic tower?
A: Algae needs light to survive, so the most effective prevention method is to build a “light-tight fortress.” Use opaque, food-grade materials for your tower and reservoir, and ensure all holes and seams are completely sealed. Lining the inside of the tower with a reflective, light-blocking film is an excellent secondary defense.
Q: Why is a regular timer not enough for an aeroponic system?
A: A regular timer only provides on/off cycles for minutes or hours, which is too slow for aeroponics. The system requires a specialized cycle timer with second-by-second precision. The roots must be misted for a few seconds at a time and then given a longer “off” period (several minutes) to absorb vital oxygen from the air.
Q: What is the ideal droplet size for an aeroponic system?
A: The optimal droplet size is between 30 and 80 microns. Droplets in this range can be most efficiently absorbed by a plant’s roots. Droplets that are too large will not be absorbed, leading to root waterlogging, while droplets that are too small can behave like a dry fog and may lack the necessary nutrient payload.
Q: How often should I clean my nozzles?
A: This is a nuclear-grade question. You need a multi-pronged approach. First, run a weekly flush with a 10% vinegar solution for 15 minutes. This dissolves minor mineral buildup. Second, perform a quarterly deep clean where you physically remove all nozzles and soak them in a strong citric acid bath. Finally, replace your nozzles every 6-12 months. This is non-negotiable for consistent performance.
Q: How do I manage heat in my root chamber?
A: The simplest solution is reflective insulation on the exterior of the tower and reservoir. For active cooling, the 12V PC fan hack or the CPU cooler hack can be implemented. Remember, air temperature and water temperature are linked. Keep your water cool, and your roots will be happy.
Q: What is the best nutrient solution for an aeroponic tower?
A: Use a high-quality, fully water-soluble hydroponic nutrient solution. Avoid organic nutrients, as they can contain particulates that clog your sensitive misting nozzles. A two-part or three-part solution allows for precise control over the nutrient mix throughout the plant’s growth cycle.
Q: Can I grow root vegetables like carrots or potatoes in an aeroponic tower?
A: Generally, no. Aeroponic towers are ideal for plants with a central root mass, like leafy greens (lettuce, kale, herbs) and fruiting plants (tomatoes, peppers, strawberries). Root vegetables and large, heavy plants are not suitable for this type of vertical system.
Affiliate Toolbox: Battle-Tested Components for a Reliable Build
Here are the battle-tested components that have stood up to my torture tests and will help you build a system that lasts.

→ Failure Fix: Prevents root suffocation by providing optimal pressure for atomization.
→ Battle Tested: 80PSI continuous pressure with minimal drop-off over 1,000s of hours.
→ DIY Reality: Requires a pre-filter to prevent debris from reaching the pump intake.

→ Failure Fix: Prevents oversaturation and waterlogging with precise droplet size.
→ Battle Tested: 50-micron atomization for a variety of nutrient solutions.
→ DIY Reality: Order a bag of 10. They are small and will get lost.

→ Failure Fix: Prevents root desiccation by maintaining a consistent misting schedule.
→ Battle Tested: 1M+ cycles accuracy with a simple, digital interface.
→ DIY Reality: Requires a waterproof enclosure for safe operation near the reservoir.

→ Failure Fix: Prevents algae growth by blocking all light from the root chamber.
→ Battle Tested: No light leaks, even under high-intensity grow lights.
→ DIY Reality: Apply with a brush; needs two coats for full opacity.
Full Aeroponic Tower Parts List & Cost Breakdown
| Component | Specs | Cost |
|---|---|---|
| Hygger HP-3000 Pump | 1200 GPH, 80 PSI | $149.99 |
| Fulljet 1/4HH-SS Nozzles | 50 Micron, 30° Cone (5-pack) | $24.99 |
| Inkbird ITC-306T Cycle Timer | 1-sec precision | $34.99 |
| Schedule 80 PVC Pipe | 2.5″ Diameter, Food-Grade (10ft) | $30.00 |
| 5-Gallon HDPE Opaque Bucket | Food-grade, Opaque Black | $19.99 |
| 4″ PVC Grommets | Food-grade rubber (x10) | $19.90 |
| Reflectix Insulation | 16″ x 25ft Roll | $29.99 |
| pH Up/Down Kit | 1L bottles | $19.99 |
| Citric Acid | 1lb Food-Grade | $9.99 |
| Estimated Total Cost | ~$340 |
Final Thoughts: Engineering a Greener Future
Building a high-pressure aeroponic tower is more than a project; it’s a commitment to precision, engineering, and sustainable living. By following this blueprint, you’re not just creating a vertical garden—you’re mastering the science behind it. You’re building a system that’s a testament to resilience and a source of fresh, nutrient-rich food. Welcome to the future of farming, engineered right in your own home.