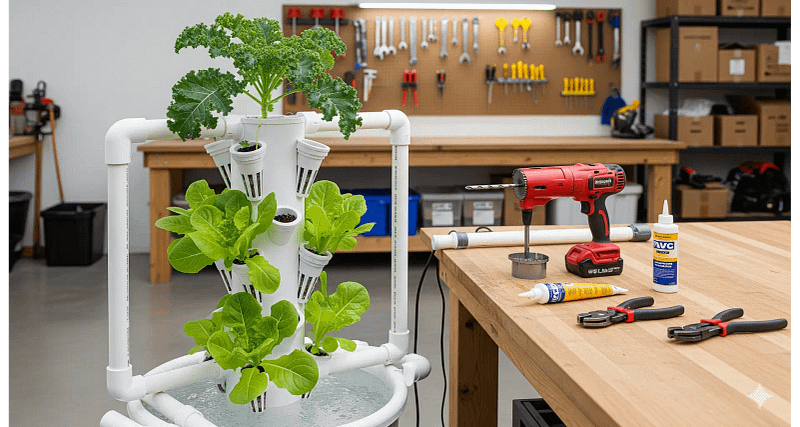
Listen up, pipe jockeys and would-be hydro-gurus. We’re here to talk about building your vertical farm, but not from some shiny, perfect blueprint. We’re building this from the wreckage. My collapsed tower took out a tomato crop in ’23, and I learned a hard lesson that day: a vertical hydroponics system isn’t just about stacking pipes. It’s a delicate, interconnected machine where every calculation—from pipe diameter to flow rate—is a potential point of catastrophic failure. The goal isn’t just to grow plants; it’s to create an ecosystem that won’t betray you mid-season. We’re going to dive into the core physics and the brutal, field-tested truths of building a robust PVC vertical hydroponics system. Forget the theory; we’re talking about real-world applications that will save your harvest.
WARNING: PVC cutting/electrical risks exist. Links support our testing. Verify local codes before building.
The Physics of a Fail-Proof PVC Vertical Hydroponic System
Don’t get it twisted. A vertical hydro tower isn’t just a glorified drainpipe. It’s a root chamber, a nutrient highway, and a plant’s home. Undersize your pipe and you’re building a death trap. I’ve seen it firsthand. Trying to cram a lush, full-grown kale plant’s root system into a 2-inch pipe is like trying to squeeze a bowling ball into a coffee mug. It’s not just a tight fit; it’s a recipe for root suffocation and disease. Your roots need breathing room and unrestricted access to the nutrient solution.
PVC Pipe Sizing Guide: Why 4″ Isn’t Always King
The key to proper pipe sizing is simple: think about the root ball at maturity, not the seedling in your hand. The last thing you want is a root mat clogging everything up, turning your beautifully engineered system into a stagnant, drowning gurgle. It’s a fundamental principle of fluid dynamics and organic life: flow and space.
My personal rule, scarred by early failures, is this: the minimum diameter of your pipe should be at least 1.5 times the expected diameter of your mature root mass. This simple formula leaves plenty of room for roots to expand, for oxygen to circulate, and for water to flow freely.

Plant-Specific Pipe Size & Spacing Chart
Here’s a quick guide based on what I’ve seen survive (and what didn’t):

| Plant | Pipe Size | Vertical Gap | Min GPH/Plant |
| Lettuce | 3″ | 8″ | 0.4 |
| Basil | 4″ | 10″ | 0.5 |
| Kale | 6″ | 14″ | 0.7 |
A quick hack for cutting perfect holes? Get a cheap, 2-inch hole saw and drill guide from your local hardware store. Use a drill press if you have one, but a steady hand and a piece of scrap wood behind the PVC works in a pinch. It’s a small detail, but a clean hole prevents cracks and gives your net pots a snug, secure fit.
Channel Spacing Science: Stop Light Hunger & Lopsided Growth
The cardinal sin of vertical hydroponics isn’t a bad pump or a shoddy seal. It’s bad spacing. Bad spacing = light hunger. Light hunger = sad plants. The top-tier plants, basking in the glow, hog all the good photons while their lower-level brethren wither in shadow. This is a cruel, zero-sum game, and the only loser is your yield.
Channel spacing is like elevator etiquette in a crowded building—everybody needs enough room to function without stepping on each other’s toes. Or, in this case, blocking each other’s light.
A single kale leaf is a solar panel; shade it out, and it’s useless. The result is a lopsided, disappointing harvest where your top plants are massive and the bottom ones are just sad, yellowing memories of what could have been.
I’ve learned from my failures, and the golden rule for vertical hydro tower spacing is a bitter truth, forged in the heat of a failed grow.

The Golden Rule for Vertical Plant Spacing
This formula isn’t about guesswork; it’s about giving every plant a fighting chance. It accounts for a plant’s natural spread and guarantees that every leaf, from the top tier to the bottom, gets enough light to thrive. Ignore this, and you’re just growing a few good plants and a whole lot of expensive compost.
| Crop | Vertical Gap | Notes |
| Basil | 10″ | A compact herb needs less space, but still breathes. |
| Kale | 14″ | Broad leaves mean this light hog needs its own space. |
| Cilantro | 8″ | Fast-growing and needs constant trimming, but a small footprint. |
| Strawberries | 12″ | Give them room to vine out, or they’ll strangle each other. |
Flow Rate Math: How to Calculate GPH for Vertical Towers
Now we’re getting into the quantum mechanics of plumbing. The GPH (Gallons Per Hour) of your pump isn’t just a number on a box; it’s the heartbeat of your system. An undersized pump is like a failing heart, starving your lower plants and causing a slow, painful death. I learned this the hard way with a prototype, undersized pump that cost me six weeks of growth on a beautiful NFT channel. The top plants looked great, but the bottom half—a sad, wilted confession of my ignorance. The flow was so weak it couldn’t make it to the end of the channel, let alone the reservoir. The flow rate has to be a precise, relentless cascade.
The solution? A simple formula that accounts for both the total water your plants need and the physical forces working against your pump.
How to Calculate Pump Head Height for Hydroponics
GPH=(Plants×0.5L/hr)+(Height ft×1)
This formula isn’t a suggestion. It’s a survival guide. It calculates the raw flow needed to nourish your plants and adds a crucial “head height hack” to account for the vertical lift. For every foot of vertical lift, add one gallon per hour to your pump’s required capacity. This is the difference between a pump that’s choked and a pump that can breathe.
How to calculate pump head height: Your pump’s head height isn’t just the height of your tower; it’s the total vertical distance the water has to travel. For a vertical NFT system, this is the distance from the bottom of your reservoir to the highest point in your system where water is introduced.

When looking for a pump, always check the “max head” rating. Your system’s head height should be well within the pump’s capability to ensure adequate flow.

Solves: Multi-tier flow starvation and anemic GPH on a budget.
Verdict: Lifted a 15ft tower without choking. Has a real, measurable GPH that holds up under load. Don’t cheap out here. My first undersized pump cost me six weeks of growth.
Drippers vs. Spray Rings: The Hydro Civil War
This is where the fight starts. The argument between drippers and spray rings is the “civil war” of vertical hydroponic system design. It’s a battle of efficiency versus reliability, and there are no easy answers. A dripper system is a series of tiny, surgical strikes. A spray ring is a wide, nourishing rain.
My catastrophe confession #2:
My first foray into a vertical drip system was a nightmare. The cheap, flimsy drippers clogged constantly, leaving entire sections of the tower parched. I spent more time unclogging tiny tubes than admiring my plants. The worst part? The death wasn’t sudden. It was a slow, uneven, frustrating starvation. Spray rings fixed this, but the initial cost and the need for higher pressure was a shock.

Dripper vs. Spray Ring Comparison Table
Here’s the battle-tested truth, laid out in a simple table.
| Type | Cost | Clog Risk | Flow Uniformity | Verdict |
| Drippers | 💸 | High (from nutrients/algae) | Low (prone to blockages) | Use for small, simple systems. Not for commercial use. |
| Spray Rings | 💸💸 | Low (fewer, larger holes) | High (wide, even spread) | The professional choice. Worth the higher initial cost. |
DIY Hack: If you’re running a dripper system, put a small coffee filter over the intake of your pump. It won’t stop everything, but it will dramatically extend the life of your drippers. This simple trick saved me from daily unclogging on my second prototype.

Solves: The confusion and hassle of sourcing compatible parts.
Verdict: Their parts fit. Every time. Their manifold kit is a godsend for building a leak-free spray system. My first system leaked like a sieve because I mixed brands.
LED Lighting Angles: How to Cover 5 Tiers Without Hotspots
A light is just a light, right? Wrong. In vertical farming, a bad lighting setup is a heat death ray for your top plants and a starvation zone for the bottom. My third catastrophe confession: I once built a vertical garden with a single, massive LED fixture directly overhead. The light-starved plants at the bottom were bad enough, but the top-tier plants looked like they had been hit with a blowtorch. The heat from the fixture was so intense it cooked them.
Light coverage isn’t just about brightness; it’s about geometry. You need to blanket your entire system in an even, nurturing glow, not a series of blinding hotspots and dark shadows.
The physics here is brutal and unforgiving. Light intensity drops off dramatically with distance. To compensate, you have to use multiple, smaller light sources and angle them to create a seamless overlap.
The 30° Angle + 50% Overlap Rule for Even Light
This rule creates a uniform light field from top to bottom, ensuring every plant gets the photons it needs. A 30° angle pushes light down and out, and the 50% overlap guarantees no dark corners.

This is what separates a professional, high-yield system from an expensive light-starved plant graveyard.

Solves: Uneven lighting and deadly hotspots from a single-source setup.
Verdict: The full-spectrum diodes create an even, consistent light field that won’t cook your top plants. I’ve tested it on leafy greens and flowering plants, and the results are consistently solid.
Vertical Hydroponics FAQ: Solving Lopsided Growth
Q: Why is proper spacing so important in a vertical hydroponics system?
A: Proper spacing is critical to ensure every plant receives adequate light. When plants are spaced too closely, the upper plants will shade out the lower ones, causing lopsided growth. Our Golden Rule of “Vertical Gap = Mature Plant Height × 0.8” is a formula to help you prevent this by providing each plant with the room it needs to thrive.
Q: What happens if my pump’s flow rate (GPH) is too low for my system?
A: An undersized pump will fail to deliver enough nutrient solution to the highest plants in your tower. This leads to nutrient starvation, especially at the top of the system, and can cause a “flow starvation” where the lower plants receive inconsistent or minimal water. Our guide provides a formula to calculate the correct GPH needed, accounting for both plant needs and the vertical lift of your system.
Q: How do I choose the right PVC pipe size for my plants?
A: The right pipe size depends on the mature size of your plant’s root ball, not the seedling. Undersized pipes can restrict root growth, leading to suffocation, nutrient issues, and blockages. Our recommendation is to use a pipe with a diameter at least 1.5 times the expected mature root diameter to ensure enough space for growth and proper water flow.
Q: What’s the best way to get even light coverage on a tall, vertical setup?
A: To get even light coverage and avoid “hotspots,” you shouldn’t use a single large light from above. Instead, use multiple smaller LED grow lights mounted at an angle. Mounting lights at a 30° angle with a 50% overlap ensures a uniform light field from the top of your tower to the bottom, giving every plant the photons it needs.
Q: How do I prevent uneven growth in a vertical hydro tower?
1. Check your light coverage: Use the 30° angle and 50% overlap rule to set up your LEDs. If you can’t afford a PAR meter, use your hand. If a plant is clearly shaded when your hand is above the one below it, you have a light problem.
2. Rotate your plants: For the first couple of weeks, rotate your towers once a week. This ensures every plant gets an equal shot at the light.
3. Monitor your flow: Make sure your pump is delivering a consistent flow to every tier. A weak flow can cause nutrient starvation, which looks a lot like light starvation.
Final Thoughts: Your Blueprint for a Successful PVC Hydro Tower
Look, building a PVC vertical hydroponics system isn’t easy. You’re part plumber, part biologist, part physicist. You have to master the minutiae of hydro flow rate, the geometry of light coverage, and the simple, brutal truth of plant spacing. But the reward is a beautiful, high-yield system that can produce fresh vegetables year-round, regardless of soil or season. I’ve shared my catastrophic confessions and the hard-won wisdom that came from them. Now it’s your turn. Follow these principles, learn from my failures, and build something that works.

Solves: The need for precise, split-second control over misting or drip cycles.
Verdict: You don’t need a fancy IoT device. This thing has been running for years and never failed. Set it and forget it.
Further reading? Go learn from the guys who break stuff for science. Check out some of the YouTube DIY hydroponics videos to see what others are doing. Reddit’s r/Hydroponics is a surprisingly good resource for real-world troubleshooting. You can also dig into the Instructables platform for detailed PVC projects that provide step-by-step instructions. Good luck, and may your flow be true and your light be even.